Aspire 1400 Notebook Service Guide
Page 7
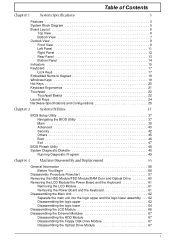
... 9 Front View 9 Left Panel 11 Right Panel 12 Rear Panel 13 Bottom Panel 14 Indicators 15 Keyboard 17 Lock Keys 17 Embedded Numeric Keypad 18 Windows Keys 19 Hot Keys 20 Keyboard Ergonomics 21 Touchpad 22 Touchpad Basics 22 Launch Keys 24 Hardware Specifications and Configurations 25 Chapter 2 System ...Module/FDD Module/RAM Door and Optical Drive 60 Removing the LCD Module/the Power Board and the Keyboard 61 Removing the LCD Module 61 Removing the Power Board and the Keyboard 61 Disassembling the Main Unit 62 Separate the main unit into the logic upper and the logic ...
... 9 Front View 9 Left Panel 11 Right Panel 12 Rear Panel 13 Bottom Panel 14 Indicators 15 Keyboard 17 Lock Keys 17 Embedded Numeric Keypad 18 Windows Keys 19 Hot Keys 20 Keyboard Ergonomics 21 Touchpad 22 Touchpad Basics 22 Launch Keys 24 Hardware Specifications and Configurations 25 Chapter 2 System ...Module/FDD Module/RAM Door and Optical Drive 60 Removing the LCD Module/the Power Board and the Keyboard 61 Removing the LCD Module 61 Removing the Power Board and the Keyboard 61 Disassembling the Main Unit 62 Separate the main unit into the logic upper and the logic ...
Aspire 1400 Notebook Service Guide
Page 8
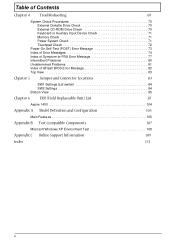
...of Contents Chapter 4 Troubleshooting 69 System Check Procedures 70 External Diskette Drive Check 70 External CD-ROM Drive Check 70 Keyboard or Auxiliary Input Device Check 71 Memory Check 71 Power System Check 71 Touchpad Check 72 Power-On Self-Test (...Jumper and Connector Locations 83 SW1 Settings (Lid switch 84 SW2 Settings 84 Bottom View 85 Chapter 6 FRU (Field Replaceable Unit) List 87 Aspire 1400 104 Appendix A Model Definition and Configuration 105 Main Features 105 Appendix B Test Compatible Components 107 Microsoft Windows XP Environment Test 108 Appendix C ...
...of Contents Chapter 4 Troubleshooting 69 System Check Procedures 70 External Diskette Drive Check 70 External CD-ROM Drive Check 70 Keyboard or Auxiliary Input Device Check 71 Memory Check 71 Power System Check 71 Touchpad Check 72 Power-On Self-Test (...Jumper and Connector Locations 83 SW1 Settings (Lid switch 84 SW2 Settings 84 Bottom View 85 Chapter 6 FRU (Field Replaceable Unit) List 87 Aspire 1400 104 Appendix A Model Definition and Configuration 105 Main Features 105 Appendix B Test Compatible Components 107 Microsoft Windows XP Environment Test 108 Appendix C ...
Aspire 1400 Notebook Service Guide
Page 10
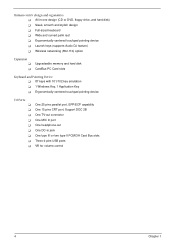
... DVD, floppy drive, and hard disk) ! Ergonomically-centered touchpad pointing device ! Wide and curved palm rest ! Upgradeable memory and hard disk CardBus PC Card slots Keyboard and Pointing Device ! 87 keys with 101/102 key emulation ! 1 Windows Key, 1 Application Key ! All-in jack One type III or two type II PCMCIA...
... DVD, floppy drive, and hard disk) ! Ergonomically-centered touchpad pointing device ! Wide and curved palm rest ! Upgradeable memory and hard disk CardBus PC Card slots Keyboard and Pointing Device ! 87 keys with 101/102 key emulation ! 1 Windows Key, 1 Application Key ! All-in jack One type III or two type II PCMCIA...
Aspire 1400 Notebook Service Guide
Page 16
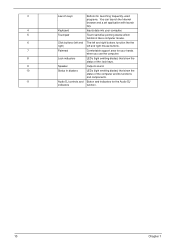
3 Launch keys Buttons for launching frequently-used programs. You can launch the Internet browser and a set application with launch key. 4 Keyboard Inputs data into your computer. 5 Touchpad Touch-sensitive pointing device which functions like a computer mouse. 6 Click buttons (left and The left and right buttons function ...
3 Launch keys Buttons for launching frequently-used programs. You can launch the Internet browser and a set application with launch key. 4 Keyboard Inputs data into your computer. 5 Touchpad Touch-sensitive pointing device which functions like a computer mouse. 6 Click buttons (left and The left and right buttons function ...

Aspire 1400 Notebook Service Guide
Page 21
Icon A. AC power Computer is running on . B. Scroll Lock is activated. Chapter 1 15 Status indicators Power Lights when the computer is activated. The status LCD displays icons that show the status of the computer. Indicators The computer has easy-to-read lock indicators (A) found above the keyboard, and status indicators (B) and Audio DJ mode indicators (C) on the front panel of the ocmpouter and its components.. Num lock Scroll lock Numeric Lock (for embedded keypad) is activated. Lock indicators Function Caps lock Description Caps Lock is on AC power.
Icon A. AC power Computer is running on . B. Scroll Lock is activated. Chapter 1 15 Status indicators Power Lights when the computer is activated. The status LCD displays icons that show the status of the computer. Indicators The computer has easy-to-read lock indicators (A) found above the keyboard, and status indicators (B) and Audio DJ mode indicators (C) on the front panel of the ocmpouter and its components.. Num lock Scroll lock Numeric Lock (for embedded keypad) is activated. Lock indicators Function Caps lock Description Caps Lock is on AC power.
Aspire 1400 Notebook Service Guide
Page 23
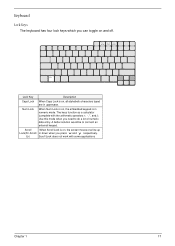
... off. A better solution would be to do a lot of numeric data entry. Lk) Scroll Lock does not work with the arithmetic operators +, -, *, and /). Keyboard Lock Keys The keyboard has four lock keys which you need to connect an external keypad. The keys function as a calculator (complete with some applications Chapter 1 17 Scroll...
... off. A better solution would be to do a lot of numeric data entry. Lk) Scroll Lock does not work with the arithmetic operators +, -, *, and /). Keyboard Lock Keys The keyboard has four lock keys which you need to connect an external keypad. The keys function as a calculator (complete with some applications Chapter 1 17 Scroll...

Aspire 1400 Notebook Service Guide
Page 24
... a normal manner. Embedded Numeric Keypad The embedded numeric keypad functions like a desktop numeric keypad. It is indicated by small characters located on embedded keypad. Main keyboard keys Hold Fn while typing letters on embedded keypad. Use cursor-control keys in numberic mode or cursor-control mode.
... a normal manner. Embedded Numeric Keypad The embedded numeric keypad functions like a desktop numeric keypad. It is indicated by small characters located on embedded keypad. Main keyboard keys Hold Fn while typing letters on embedded keypad. Use cursor-control keys in numberic mode or cursor-control mode.
Aspire 1400 Notebook Service Guide
Page 25
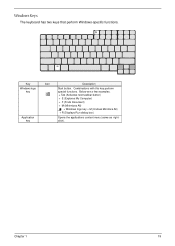
Chapter 1 19 Below are a few examples: + Tab (Activates next taskbar button) + E (Explores My Computer) + F (Finds Document) + M (Minimizes All) j + Windows logo key + M (Undoes Minimize All) + R (Displays Run dialog box) Opens the applications context menu (same as rightclick). Key Windows logo key Application key Icon Description Start button. Combinations with this key perform special functions. Windows Keys The keyboard has two keys that perform Windows-specific functions.
Chapter 1 19 Below are a few examples: + Tab (Activates next taskbar button) + E (Explores My Computer) + F (Finds Document) + M (Minimizes All) j + Windows logo key + M (Undoes Minimize All) + R (Displays Run dialog box) Opens the applications context menu (same as rightclick). Key Windows logo key Application key Icon Description Start button. Combinations with this key perform special functions. Windows Keys The keyboard has two keys that perform Windows-specific functions.

Aspire 1400 Notebook Service Guide
Page 27
Keyboard Ergonomics Located below the keyboard, the wide and curved palm rest is ergonomically desinged to provide you with a very comfortable place to rest your hands while you type. Chapter 1 21
Keyboard Ergonomics Located below the keyboard, the wide and curved palm rest is ergonomically desinged to provide you with a very comfortable place to rest your hands while you type. Chapter 1 21

Aspire 1400 Notebook Service Guide
Page 30
Launch Keys Located above the keyboard are launch keys that can used to launch applications. NOTE: To configure the launch keys and the applications they launch.. # 1 Icon Item WWW 2 Application This computer's all-in-one design Description By default, launches your Internet browser. Launches a set application. 24 Chapter 1
Launch Keys Located above the keyboard are launch keys that can used to launch applications. NOTE: To configure the launch keys and the applications they launch.. # 1 Icon Item WWW 2 Application This computer's all-in-one design Description By default, launches your Internet browser. Launches a set application. 24 Chapter 1
Aspire 1400 Notebook Service Guide
Page 31
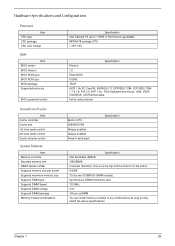
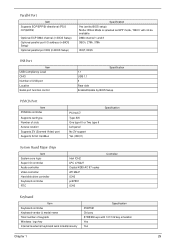
... 1.75V/1.5V Specification Phoenix 1.0 Flash ROM 512KB TSOP ACPI 1.0b,PC Card 95, SM BIOS 2.3, EPP/IEEE 1284, ECP/IEEE 1284 1.7 & 1.9, PCI 2.2, PnP 1.0a, PS/2 keyboard and mouse, USB, VESA VGA BIOS, CD-ROM bootable, Set by two 512MB SO-DIMM module).
... 1.75V/1.5V Specification Phoenix 1.0 Flash ROM 512KB TSOP ACPI 1.0b,PC Card 95, SM BIOS 2.3, EPP/IEEE 1284, ECP/IEEE 1284 1.7 & 1.9, PCI 2.2, PnP 1.0a, PS/2 keyboard and mouse, USB, VESA VGA BIOS, CD-ROM bootable, Set by two 512MB SO-DIMM module).
Aspire 1400 Notebook Service Guide
Page 35
... 3BCh, 278h, 378h IRQ7, IRQ5 USB Port Item USB Compliancy Level OHCI Number of keypads Windows logo key Internal & external keyboard work simultaneously Specification PC87591 Chicony 87/88/89 keys with 101/102 key emulation Yes Yes Chapter 1 29 Parallel Port Item Supports...core logic Super I/O controller Audio controller Video controller Hard disk drive controller Keyboard controller RTC Intel ICH2 LPC 47N227 Crystal 4299 AC 97 codes ATI M6-P ICH2 pc87591 ICH2 Controller Keyboard Item Keyboard controller Keyboard vendor & model name Total number of USB port Location Serial port function...
... 3BCh, 278h, 378h IRQ7, IRQ5 USB Port Item USB Compliancy Level OHCI Number of keypads Windows logo key Internal & external keyboard work simultaneously Specification PC87591 Chicony 87/88/89 keys with 101/102 key emulation Yes Yes Chapter 1 29 Parallel Port Item Supports...core logic Super I/O controller Audio controller Video controller Hard disk drive controller Keyboard controller RTC Intel ICH2 LPC 47N227 Crystal 4299 AC 97 codes ATI M6-P ICH2 pc87591 ICH2 Controller Keyboard Item Keyboard controller Keyboard vendor & model name Total number of USB port Location Serial port function...
Aspire 1400 Notebook Service Guide
Page 39
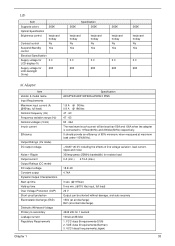
...8kV (at 254Vac 1. VCCI classII requirements(Japan) Chapter 1 33 LCD Item Supports colors 262K Optical Specification Brightness control keyboard hotkey Contrast control No Suspend/Standby Yes control Electrical Specification Supply voltage for 3.3 LCD display (V) Supply voltage for 690 ...LCD backlight (Vrms) 262K Specification 262K keyboard hotkey No Yes keyboard hotkey No Yes 3.3 3.3 690 690 262K keyboard hotkey No Yes 3.3 690 262K keyboard hotkey No Yes 3.3 690 AC Adapter Item Vendor & model name Input Requirements...
...8kV (at 254Vac 1. VCCI classII requirements(Japan) Chapter 1 33 LCD Item Supports colors 262K Optical Specification Brightness control keyboard hotkey Contrast control No Suspend/Standby Yes control Electrical Specification Supply voltage for 3.3 LCD display (V) Supply voltage for 690 ...LCD backlight (Vrms) 262K Specification 262K keyboard hotkey No Yes keyboard hotkey No Yes 3.3 3.3 690 690 262K keyboard hotkey No Yes 3.3 690 262K keyboard hotkey No Yes 3.3 690 AC Adapter Item Vendor & model name Input Requirements...

Aspire 1400 Notebook Service Guide
Page 59
Keyboard Test Run "KEY38N2.exe". Caps/Scroll/Number Lock LED Indicator Test Press keyboard Caps Lock/Num Lk/Fn+Scroll Lk to continue next test. 11. If the test is pass then press b + Break to check LED indicator. 12. Chapter 2 53 Syscard Test (Carbus 32bit) Insert two pieces of Syscard (Card bus) into PCMCIA slots then run "TESTCB.exe" for testing. 10. Press all keys according to this order--from left to right and from up to down to test each key's function.
Keyboard Test Run "KEY38N2.exe". Caps/Scroll/Number Lock LED Indicator Test Press keyboard Caps Lock/Num Lk/Fn+Scroll Lk to continue next test. 11. If the test is pass then press b + Break to check LED indicator. 12. Chapter 2 53 Syscard Test (Carbus 32bit) Insert two pieces of Syscard (Card bus) into PCMCIA slots then run "TESTCB.exe" for testing. 10. Press all keys according to this order--from left to right and from up to down to test each key's function.
Aspire 1400 Notebook Service Guide
Page 63
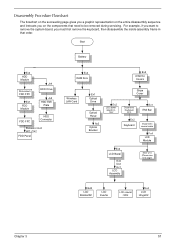
... Antenna Covers Wireless LAN Card Ex1 Optical Drive Optical Panel Ax2 Optical Bracket Ex2 LED power board LS- 1257 Stripe Cover Disconenct Keyboard FFC Ex2 Keyboard Ex1 EMI Bar Disconnect coaxial cable Fx4 LCD Module Ex2 LCD Bezel Ex6 Dx2 Ex1 LCD Assembly Main Unit (Please see next ... Flowchart The flowchart on the succeeding page gives you a graphic representation on the entire disassembly sequence and instructs you must first remove the keyboard, then disassemble the inside assembly frame in that need to remove the system board, you on the components that order. For example, ...
... Antenna Covers Wireless LAN Card Ex1 Optical Drive Optical Panel Ax2 Optical Bracket Ex2 LED power board LS- 1257 Stripe Cover Disconenct Keyboard FFC Ex2 Keyboard Ex1 EMI Bar Disconnect coaxial cable Fx4 LCD Module Ex2 LCD Bezel Ex6 Dx2 Ex1 LCD Assembly Main Unit (Please see next ... Flowchart The flowchart on the succeeding page gives you a graphic representation on the entire disassembly sequence and instructs you must first remove the keyboard, then disassemble the inside assembly frame in that need to remove the system board, you on the components that order. For example, ...
Aspire 1400 Notebook Service Guide
Page 67
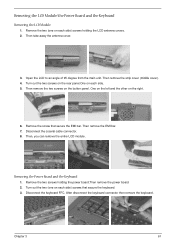
... remove the strip cover (middle cover). 4. Turn out the two screws on the rear panel.One on each side. 5. Remove the screw that secure the keyboard. 3. Then, you can remove the entire LCD module. Turn out the two (one on each side) screws holding the power board.Then remove the power... on the left and the other on the button panel. Then take away the antenna cover. 3. Removing the Power Board and the Keyboard 1. Disconnect the coaxial cable connector. 8. Then remove the EMI bar. 7. Open the LCD to an angle of 95 degree from the main unit. Remove the ...
... remove the strip cover (middle cover). 4. Turn out the two screws on the rear panel.One on each side. 5. Remove the screw that secure the keyboard. 3. Then, you can remove the entire LCD module. Turn out the two (one on each side) screws holding the power board.Then remove the power... on the left and the other on the button panel. Then take away the antenna cover. 3. Removing the Power Board and the Keyboard 1. Disconnect the coaxial cable connector. 8. Then remove the EMI bar. 7. Open the LCD to an angle of 95 degree from the main unit. Remove the ...
Aspire 1400 Notebook Service Guide
Page 77
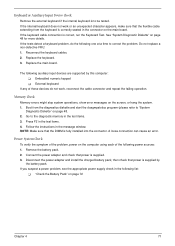
...power problem, see the appropriate power supply check in the connector on page 48. 2. Reconnect the keyboard cables. 2. Boot from the keyboard is correct, run the Keyboard Test. External keyboard If any of the following list: ! Connect the power adapter and check that the flexible cable... loose connection can cause an error. "Check the Battery Pack" on the screen, or hang the system. 1. Replace the keyboard. 3. If the keyboard cable connection is correctly seated in the following power sources: 1. Power System Check To verify the symptom of the problem, power...
...power problem, see the appropriate power supply check in the connector on page 48. 2. Reconnect the keyboard cables. 2. Boot from the keyboard is correct, run the Keyboard Test. External keyboard If any of the following list: ! Connect the power adapter and check that the flexible cable... loose connection can cause an error. "Check the Battery Pack" on the screen, or hang the system. 1. Replace the keyboard. 3. If the keyboard cable connection is correctly seated in the following power sources: 1. Power System Check To verify the symptom of the problem, power...
Aspire 1400 Notebook Service Guide
Page 80
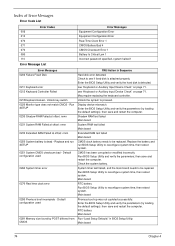
... failed Main board CMOS clock battery needs to be repaired. then save and restart the computer. Check to be replaced. see "Keyboard or Auxiliary Input Device Check" on page 71. then save and restart the computer. Main board RTC battery Run BIOS Setup Utility... Bad 4 CMOS Checksum Error 1 Battery Is Critical Low 1 Incorrect password specified, system halted 1 Error Messages 0200 Failure Fixed Disk 0211 Keyboard error 0212 Keyboard Controller Failed 0213Keyboard locked - Unlock key switch 0220 Monitor type does not match CMOS - Run SETUP 0230 Shadow RAM Failed at offset:...
... failed Main board CMOS clock battery needs to be repaired. then save and restart the computer. Check to be replaced. see "Keyboard or Auxiliary Input Device Check" on page 71. then save and restart the computer. Main board RTC battery Run BIOS Setup Utility... Bad 4 CMOS Checksum Error 1 Battery Is Critical Low 1 Incorrect password specified, system halted 1 Error Messages 0200 Failure Fixed Disk 0211 Keyboard error 0212 Keyboard Controller Failed 0213Keyboard locked - Unlock key switch 0220 Monitor type does not match CMOS - Run SETUP 0230 Shadow RAM Failed at offset:...
Aspire 1400 Notebook Service Guide
Page 83
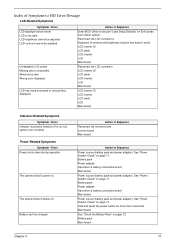
... connection board Main board Power source (battery pack and power adapter). Index of Symptom-to execute "Load Setup Defaults" on Exit screen, then reboot system. Keyboard (if contrast and brightness function key doesn't work LCD is too dark LCD brightness cannot be adjusted LCD contrast cannot be charged Action in Sequence...
... connection board Main board Power source (battery pack and power adapter). Index of Symptom-to execute "Load Setup Defaults" on Exit screen, then reboot system. Keyboard (if contrast and brightness function key doesn't work LCD is too dark LCD brightness cannot be adjusted LCD contrast cannot be charged Action in Sequence...
Aspire 1400 Notebook Service Guide
Page 84
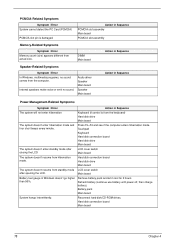
... sound comes from standby mode LCD cover switch after closing the LCD LCD cover switch Main board The system doesn't resume from the keyboard) Hard disk drive Main board The system doesn't enter hibernation mode and four short beeps every minute. Hard disk connection board Hard... board 78 Chapter 4 Press Fn+F4 and see if the computer enters hibernation mode. Battery pack Main board System hangs intermittently. Touchpad Keyboard Hard disk connection board Hard disk drive Main board The system doesn't enter standby mode after opening the LCD. Audio driver Speaker Main...
... sound comes from standby mode LCD cover switch after closing the LCD LCD cover switch Main board The system doesn't resume from the keyboard) Hard disk drive Main board The system doesn't enter hibernation mode and four short beeps every minute. Hard disk connection board Hard... board 78 Chapter 4 Press Fn+F4 and see if the computer enters hibernation mode. Battery pack Main board System hangs intermittently. Touchpad Keyboard Hard disk connection board Hard disk drive Main board The system doesn't enter standby mode after opening the LCD. Audio driver Speaker Main...


