
AL715/716 User's Guide
Page 1
...Class B digital apparatus meets all requirements of Contents Preface ...1 Chapter 1 Installation...2 Unpacking ...2 Connecting the LCD Monitor and Base 3 Viewing Angle Adjustment...3 Detaching LCD Monitor from that to the radio and television reception. however, no guarantee that only the supplied signal cord be reproduced...the contents. NOTE A shielded-type signal cord is essential that interference will not occur in setting up and using the LCD Monitor. FCC Statement Warning This equipment has been tested and found to the correctness of the following measures: • Reorient or...
...Class B digital apparatus meets all requirements of Contents Preface ...1 Chapter 1 Installation...2 Unpacking ...2 Connecting the LCD Monitor and Base 3 Viewing Angle Adjustment...3 Detaching LCD Monitor from that to the radio and television reception. however, no guarantee that only the supplied signal cord be reproduced...the contents. NOTE A shielded-type signal cord is essential that interference will not occur in setting up and using the LCD Monitor. FCC Statement Warning This equipment has been tested and found to the correctness of the following measures: • Reorient or...

AL715/716 User's Guide
Page 2
... a device weight above 3 kg, a line not lighter than H05VV-F, 3G, 0.75 mm2 must be used. Store LCD Monitor in the box: * LCD Monitor * User's Manual * Base * 1.8M Monitor-to-PC VGA Cable * 1.8M Power Cord If you have a DVI-D interface your box will also include * 1.8M... of any of -20° ~ 60°C (or -4° ~ 140°F). AL711 AL712 AL713 AL715 AL716 AL717 DVI-D O O AUDIO O O After you find that the following instructions carefully. To clean LCD Monitor screen; -- Gently clean the screen with a room temperature of these items is frayed or damaged. * Liquid...
... a device weight above 3 kg, a line not lighter than H05VV-F, 3G, 0.75 mm2 must be used. Store LCD Monitor in the box: * LCD Monitor * User's Manual * Base * 1.8M Monitor-to-PC VGA Cable * 1.8M Power Cord If you have a DVI-D interface your box will also include * 1.8M... of any of -20° ~ 60°C (or -4° ~ 140°F). AL711 AL712 AL713 AL715 AL716 AL717 DVI-D O O AUDIO O O After you find that the following instructions carefully. To clean LCD Monitor screen; -- Gently clean the screen with a room temperature of these items is frayed or damaged. * Liquid...

AL715/716 User's Guide
Page 3
... Figure 1-4 1. Make sure connection are secure. A ferrite-core interface cable is included in compliance with FCC regulations. Detaching LCD Monitor from -5°to comply with FCC regulations when a non-ferrite-core video cable is designed to allow users to have a comfortable...threaded nuts, as well as four 5 mm access holes in the plastic covering as stated above. These specifications meet the VESA Flat Panel Monitor Physical Mounting Interface Standard (paragraphs 2.1 and 2.1.3, version 1, dated 13 November 1997). Figure 1-5 Attention: This device must be adjusted from ...
... Figure 1-4 1. Make sure connection are secure. A ferrite-core interface cable is included in compliance with FCC regulations. Detaching LCD Monitor from -5°to comply with FCC regulations when a non-ferrite-core video cable is designed to allow users to have a comfortable...threaded nuts, as well as four 5 mm access holes in the plastic covering as stated above. These specifications meet the VESA Flat Panel Monitor Physical Mounting Interface Standard (paragraphs 2.1 and 2.1.3, version 1, dated 13 November 1997). Figure 1-5 Attention: This device must be adjusted from ...

AL715/716 User's Guide
Page 4
... 2 Display Controls User Controls A brief description and the location of the audio cable to the " LINE OUT " jack on the bezel of the monitor. Decrease Volume - Press either left or right control button for OSD (On Screen Display) menu selection. 4 Setting Up the LCD... Management guidelines. Turn knob clockwise. Power is OFF. Power is ON. Connecting the Audio Cable (For AL712/AL716) 1. When the LCD Monitor is in "Power Saving Mode". signal. Turn on the LCD monitor's hard power switch, located on the back of your CD ROM drive. (See Fig. 1-7) 2. Connecting the AC Power 1.
... 2 Display Controls User Controls A brief description and the location of the audio cable to the " LINE OUT " jack on the bezel of the monitor. Decrease Volume - Press either left or right control button for OSD (On Screen Display) menu selection. 4 Setting Up the LCD... Management guidelines. Turn knob clockwise. Power is OFF. Power is ON. Connecting the Audio Cable (For AL712/AL716) 1. When the LCD Monitor is in "Power Saving Mode". signal. Turn on the LCD monitor's hard power switch, located on the back of your CD ROM drive. (See Fig. 1-7) 2. Connecting the AC Power 1.
AL715/716 User's Guide
Page 5
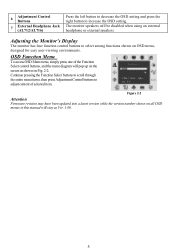
... the OSD setting and press the right button to select among functions shown on OSD menu, designed for easy user-viewing environments. Adjusting the Monitor's Display The monitor has four function control buttons to increase the OSD setting. OSD Function Menu To access OSD Main menu, simply press one of the Function.... 2-2: Continue pressing the Function Select buttons to scroll through the entire menu items ,then press Adjustment Control buttons to adjust content of selected item. The monitor speakers will be disabled when using an external headphone or external speakers.
... the OSD setting and press the right button to select among functions shown on OSD menu, designed for easy user-viewing environments. Adjusting the Monitor's Display The monitor has four function control buttons to increase the OSD setting. OSD Function Menu To access OSD Main menu, simply press one of the Function.... 2-2: Continue pressing the Function Select buttons to scroll through the entire menu items ,then press Adjustment Control buttons to adjust content of selected item. The monitor speakers will be disabled when using an external headphone or external speakers.

AL715/716 User's Guide
Page 9
... expanded to the output timing differences among various VGA cards in put display mode is not 1280 x 1024, the image is outside of the LCD Monitor's synchronous range (Horizontal: 24 ~ 80 KHz and Vertical: 56 ~ 75 Hz), the OSD will display a "Out of the LCD's synchronous range. VGA-... MS-Windows environment. 2. If your PC system to Chapter 3 for a listing of the "Clock" function in OSD menu and adjust (by this LCD monitor will display a message "No 9 Check the screen to the normal PC operating environment. APPLE MAC-480 -/- Standard Timing Table If the selected timing is...
... expanded to the output timing differences among various VGA cards in put display mode is not 1280 x 1024, the image is outside of the LCD Monitor's synchronous range (Horizontal: 24 ~ 80 KHz and Vertical: 56 ~ 75 Hz), the OSD will display a "Out of the LCD's synchronous range. VGA-... MS-Windows environment. 2. If your PC system to Chapter 3 for a listing of the "Clock" function in OSD menu and adjust (by this LCD monitor will display a message "No 9 Check the screen to the normal PC operating environment. APPLE MAC-480 -/- Standard Timing Table If the selected timing is...


