

AL702 User Guide
Page 2
English TABLE OF CONTENTS FCC compliance statement 1 DOC compliance notice 1 Introduction 2 Features ...2 Unpacking 3 Screen position adjustment 4 Connecting the power cord 4 Safety precaution 5 Cleaning your monitor 5 Preset modes 6 Power saving 7 DDC ...7 Installation 8 User controls 9 Front panel controls 9 Basic section of a OSD screen 10 Standard OSD operation 11 OSD function description 11 Troubleshooting 13 Specification 14
English TABLE OF CONTENTS FCC compliance statement 1 DOC compliance notice 1 Introduction 2 Features ...2 Unpacking 3 Screen position adjustment 4 Connecting the power cord 4 Safety precaution 5 Cleaning your monitor 5 Preset modes 6 Power saving 7 DDC ...7 Installation 8 User controls 9 Front panel controls 9 Basic section of a OSD screen 10 Standard OSD operation 11 OSD function description 11 Troubleshooting 13 Specification 14
AL702 User Guide
Page 4
...RGB (Red, Green, Blue) display standards, including PS/V, PS/2, optional for purchasing model AL702, a high performance 17-inch color TFT LCD monitor. FEATURES The AL702 is a 17-inch TFT LCD monitor that is intelligent, microprocessor-based and ergonomically designed display, compatible with most Macintosh compatible color...For horizontal scan frequencies between 31.5 KHz and 80 KHz, and vertical scan frequencies between 56.3 Hz and 75 Hz. The AL702 monitor provides flicker-free and color images at the precision-of a fixed frequency. · The resident memory allows for storing factory...
...RGB (Red, Green, Blue) display standards, including PS/V, PS/2, optional for purchasing model AL702, a high performance 17-inch color TFT LCD monitor. FEATURES The AL702 is a 17-inch TFT LCD monitor that is intelligent, microprocessor-based and ergonomically designed display, compatible with most Macintosh compatible color...For horizontal scan frequencies between 31.5 KHz and 80 KHz, and vertical scan frequencies between 56.3 Hz and 75 Hz. The AL702 monitor provides flicker-free and color images at the precision-of a fixed frequency. · The resident memory allows for storing factory...
AL702 User Guide
Page 5
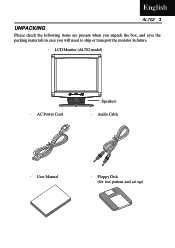
English AL702 3 UNPACKING Please check the following items are present when you unpack the box, and save the packing materials in case you will need to ship or transport the monitor in future. · LCD Monitor (AL702 model) · AC Power Cord Speakers · Audio Cable · User Manual · Floppy Disk (for test pattern and set up)
English AL702 3 UNPACKING Please check the following items are present when you unpack the box, and save the packing materials in case you will need to ship or transport the monitor in future. · LCD Monitor (AL702 model) · AC Power Cord Speakers · Audio Cable · User Manual · Floppy Disk (for test pattern and set up)

AL702 User Guide
Page 6
The cord set should have the appropriate safety approvals for your hands to hold the edges of the monitor as indicated by using at 220/240 V AC (outside of U.S.): Use a Cord Set consisting of H05VV-F cord and plug rated 16 A, 250 V. No user-adjustment ... adjusted to 30 degrees up or 5 degrees down as shown in either 100/120V AC or 220/240 V AC voltage area. The monitor can adjust the tilt of the monitor by arrow below . CONNECTING THE POWER CORD · Check first to make sure that the power cord you can be installed. 4 User...
The cord set should have the appropriate safety approvals for your hands to hold the edges of the monitor as indicated by using at 220/240 V AC (outside of U.S.): Use a Cord Set consisting of H05VV-F cord and plug rated 16 A, 250 V. No user-adjustment ... adjusted to 30 degrees up or 5 degrees down as shown in either 100/120V AC or 220/240 V AC voltage area. The monitor can adjust the tilt of the monitor by arrow below . CONNECTING THE POWER CORD · Check first to make sure that the power cord you can be installed. 4 User...
AL702 User Guide
Page 7
...the screen, as screen is adequate ventilation. · Avoid placing the monitor against a bright background or where sunlight or other heavy object, on the face of the monitor. English AL702 5 SAFETY PRECAUTION · Avoid placing the monitor, or any other light sources may reflect on the power cord to ...prevent it from fire or electrical shock. · Do not expose the monitor to rain, excessive moisture, or dust to...
...the screen, as screen is adequate ventilation. · Avoid placing the monitor against a bright background or where sunlight or other heavy object, on the face of the monitor. English AL702 5 SAFETY PRECAUTION · Avoid placing the monitor, or any other light sources may reflect on the power cord to ...prevent it from fire or electrical shock. · Do not expose the monitor to rain, excessive moisture, or dust to...
AL702 User Guide
Page 8
...capable of storing up to perform the Auto Setup under Windows "Full Screen" pattern or using the pattern in the floppy disk provided. The monitor is matched, the user can store their preferred modes in the user modes. For optimum adjustment, the user is the new display information must... have 1 KHz difference for horizontal frequency or 1 Hz for different modes, the monitor has default setting modes that are different from the default modes. Mode 1 VGA 2 VGA 3 MAC 4 VESA 5 VESA 6 VESA 7 VESA 8 VESA 9 VESA 10 ...
...capable of storing up to perform the Auto Setup under Windows "Full Screen" pattern or using the pattern in the floppy disk provided. The monitor is matched, the user can store their preferred modes in the user modes. For optimum adjustment, the user is the new display information must... have 1 KHz difference for horizontal frequency or 1 Hz for different modes, the monitor has default setting modes that are different from the default modes. Mode 1 VGA 2 VGA 3 MAC 4 VESA 5 VESA 6 VESA 7 VESA 8 VESA 9 VESA 10 ...

AL702 User Guide
Page 9
The DDC (Display Data Channel) is activated. The monitor supports DDC2B standard. English AL702 7 POWER SAVING The monitor will be driven into "Power Saving" mode by the amber-color power LED. State ON OFF Powe r Consumption Normal < 5 W LED Light Green Amber The power ...
The DDC (Display Data Channel) is activated. The monitor supports DDC2B standard. English AL702 7 POWER SAVING The monitor will be driven into "Power Saving" mode by the amber-color power LED. State ON OFF Powe r Consumption Normal < 5 W LED Light Green Amber The power ...

AL702 User Guide
Page 10
...Guide INSTALLATION To install the monitor to a properly grounded AC outlet. 3. Make sure both the monitor and computer are powered-OFF. Power-ON Monitor and Computer Power-ON the monitor first, then power-ON the computer. Connect power cord Connect the power cord to the monitor, then to your host...system, please follow the steps as given below: Steps 1. b. This sequence is very important. 5. Connect the Audio cable. 4. If the monitor still does not function properly, please refer to the troubleshooting section to the computer. 2. Connect the video cable to diagnose the problem. *...
...Guide INSTALLATION To install the monitor to a properly grounded AC outlet. 3. Make sure both the monitor and computer are powered-OFF. Power-ON Monitor and Computer Power-ON the monitor first, then power-ON the computer. Connect power cord Connect the power cord to the monitor, then to your host...system, please follow the steps as given below: Steps 1. b. This sequence is very important. 5. Connect the Audio cable. 4. If the monitor still does not function properly, please refer to the troubleshooting section to the computer. 2. Connect the video cable to diagnose the problem. *...

AL702 User Guide
Page 13
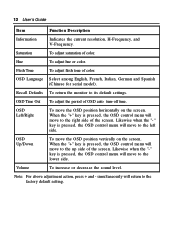
...To increase or decrease the brightness. H.Size To increase or decrease the size of the parameter, or make adjustments to turn on this function. English AL702 11 Standard OSD Operation 1. Use Select key to turn speaker ON/ OFF. Then use + or - If no keys are pressed for Auto- ... make selection between different options. 4. Auto- Position, Clock, and Clock-Phase, the whole process takes about 5 seconds. (Please install the attached LCD monitor utility disk for a time period, the OSD automatically disappears. 5. Up/Down To move the screen toward left or right.
...To increase or decrease the brightness. H.Size To increase or decrease the size of the parameter, or make adjustments to turn on this function. English AL702 11 Standard OSD Operation 1. Use Select key to turn speaker ON/ OFF. Then use + or - If no keys are pressed for Auto- ... make selection between different options. 4. Auto- Position, Clock, and Clock-Phase, the whole process takes about 5 seconds. (Please install the attached LCD monitor utility disk for a time period, the OSD automatically disappears. 5. Up/Down To move the screen toward left or right.
AL702 User Guide
Page 14
OSD Language Select among English, French, Italian, German and Spanish (Chinese for serial model). Recall Defaults To return the monitor to the up side of the screen. OSD Up/Down To move to the factory default setting. Volume To increase or decrease the sound level. ...
OSD Language Select among English, French, Italian, German and Spanish (Chinese for serial model). Recall Defaults To return the monitor to the up side of the screen. OSD Up/Down To move to the factory default setting. Volume To increase or decrease the sound level. ...
AL702 User Guide
Page 15
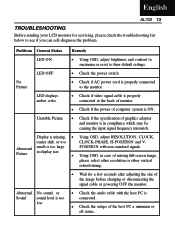
...Picture • Check if the specification of graphics adapter and monitor is connected. • Check the setups of the host PC a minimum or off status. Display is ON. English AL702 13 TROUBLESHOOTING Before sending your LCD monitor for a few seconds after adjusting the size of the image... before changing or disconnecting the signal cable or powering OFF the monitor. Problems Current Status Remedy LED ON • Using ...
...Picture • Check if the specification of graphics adapter and monitor is connected. • Check the setups of the host PC a minimum or off status. Display is ON. English AL702 13 TROUBLESHOOTING Before sending your LCD monitor for a few seconds after adjusting the size of the image... before changing or disconnecting the signal cable or powering OFF the monitor. Problems Current Status Remedy LED ON • Using ...


