User Manual
Page 1
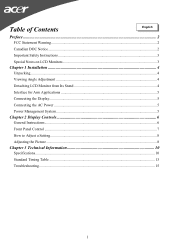
Table of Contents English Preface ...2 FCC Statement Warning ...2 Canadian DOC Notice ...2 Important Safety Instructions...3 Special Notes on LCD Monitors 3 Chapter 1 Installation ...4 Unpacking...4 Viewing Angle Adjustment ...4 Detaching LCD Monitor from Its Stand 4 Interface for Arm Applications ...5 Connecting the Display...5 Connecting the AC Power ...5 Power Management System...5 Chapter 2 Display Controls 6 General Instructions...6 Front Panel Control...
Table of Contents English Preface ...2 FCC Statement Warning ...2 Canadian DOC Notice ...2 Important Safety Instructions...3 Special Notes on LCD Monitors 3 Chapter 1 Installation ...4 Unpacking...4 Viewing Angle Adjustment ...4 Detaching LCD Monitor from Its Stand 4 Interface for Arm Applications ...5 Connecting the Display...5 Connecting the AC Power ...5 Power Management System...5 Chapter 2 Display Controls 6 General Instructions...6 Front Panel Control...

User Manual
Page 2
... part of this equipment does cause harmful interference to radio or television reception, which the receiver is connected. • Consult the dealer or an experienced monitor technician for a Class B digital device, pursuant to change without prior written permission of the FCC Rules. This equipment generates, uses, and can be reproduced by... le matériel brouilleur du Canada. 2 however, no guarantee that to provide reasonable protection against harmful interference in setting up and using the LCD Monitor.
... part of this equipment does cause harmful interference to radio or television reception, which the receiver is connected. • Consult the dealer or an experienced monitor technician for a Class B digital device, pursuant to change without prior written permission of the FCC Rules. This equipment generates, uses, and can be reproduced by... le matériel brouilleur du Canada. 2 however, no guarantee that to provide reasonable protection against harmful interference in setting up and using the LCD Monitor.

User Manual
Page 3
...not remove the cover or attempt to the nature of the previous screen may find slightly uneven brightness on the screen depending on LCD Monitors The following instructions carefully. NOTES • Due to service this range could result in a room with a room temperature of the following... is damaged. 7. Important Safety Instructions Please read the following symptoms are normal with LCD monitor and do not indicate a problem. Do not place the LCD Monitor near a window. To clean LCD Monitor screen; -- Lamp Disposal LAMP(S) INSIDE THIS PRODUCT CONTAIN MERCURY AND MUST BE RECYCLED OR...
...not remove the cover or attempt to the nature of the previous screen may find slightly uneven brightness on the screen depending on LCD Monitors The following instructions carefully. NOTES • Due to service this range could result in a room with a room temperature of the following... is damaged. 7. Important Safety Instructions Please read the following symptoms are normal with LCD monitor and do not indicate a problem. Do not place the LCD Monitor near a window. To clean LCD Monitor screen; -- Lamp Disposal LAMP(S) INSIDE THIS PRODUCT CONTAIN MERCURY AND MUST BE RECYCLED OR...
User Manual
Page 4
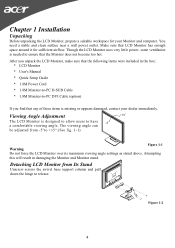
... and pull down the hinge to +15°.(See fig. 1-1) Figure 1-1 Warning Do not force the LCD Monitor over its maximum viewing angle settings as stated above. Though the LCD Monitor uses very little power, some ventilation is needed to have a comfortable viewing angle. After you unpack the LCD... sure that the following items were included in damaging the Monitor and Monitor stand. Attempting this will result in the box: * LCD Monitor * User's Manual * Quick Setup Guide * 1.8M Power Cord * 1.8M Monitor-to-PC D-SUB Cable * 1.8M Monitor-to-PC DVI Cable (option) If you find that any of these ...
... and pull down the hinge to +15°.(See fig. 1-1) Figure 1-1 Warning Do not force the LCD Monitor over its maximum viewing angle settings as stated above. Though the LCD Monitor uses very little power, some ventilation is needed to have a comfortable viewing angle. After you unpack the LCD... sure that the following items were included in damaging the Monitor and Monitor stand. Attempting this will result in the box: * LCD Monitor * User's Manual * Quick Setup Guide * 1.8M Power Cord * 1.8M Monitor-to-PC D-SUB Cable * 1.8M Monitor-to-PC DVI Cable (option) If you find that any of these ...

User Manual
Page 5
... 4 mm, 0.7 pitches threaded nuts, as well as four 5 mm access holes in the plastic covering as illustrated in power saving mode, the monitor screen will be blank and the power LED indicator will light yellow. 5 Connect the power cord to Fig.1-2. When the LCD... Monitor is in Figure 1-3. These specifications meet the VESA Flat Panel Monitor Physical Mounting Interface Standard (paragraphs 2.1 and 2.1.3, version 1, dated 13 November 1997). Power off your PC. 4. Connect the ...
... 4 mm, 0.7 pitches threaded nuts, as well as four 5 mm access holes in the plastic covering as illustrated in power saving mode, the monitor screen will be blank and the power LED indicator will light yellow. 5 Connect the power cord to Fig.1-2. When the LCD... Monitor is in Figure 1-3. These specifications meet the VESA Flat Panel Monitor Physical Mounting Interface Standard (paragraphs 2.1 and 2.1.3, version 1, dated 13 November 1997). Power off your PC. 4. Connect the ...
User Manual
Page 6
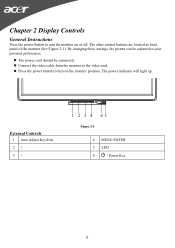
z Press the power button to turn the monitor on the monitor position. External Controls 1 Auto Adjust Key/Exit 2 < 3 > Figure 2-1 4 MENU/ENTER 5 LED 6 / Power Key 6 z The power cord should be adjusted to your personal preferences. By changing these settings, the picture can be connected. The other control buttons are located at front panel of the monitor (See Figure 2-1). The power indicator will light up. z Connect the video cable from the monitor to the video card. Chapter 2 Display Controls General Instructions Press the power button to turn on or off.
z Press the power button to turn the monitor on the monitor position. External Controls 1 Auto Adjust Key/Exit 2 < 3 > Figure 2-1 4 MENU/ENTER 5 LED 6 / Power Key 6 z The power cord should be adjusted to your personal preferences. By changing these settings, the picture can be connected. The other control buttons are located at front panel of the monitor (See Figure 2-1). The power indicator will light up. z Connect the video cable from the monitor to the video card. Chapter 2 Display Controls General Instructions Press the power button to turn on or off.
User Manual
Page 7
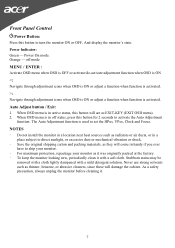
... cleaning it with a mild detergent solution. When OSD menu is in active status, this button to turn the monitor ON or OFF, And display the monitor's state. When OSD menu is in off mode MENU / ENTER : Activate OSD menu when OSD is OFF or activate/de-activate adjustment function ... and Focus. Stubborn stains may be removed with a cloth lightly dampened with a soft cloth. Auto Adjust button / Exit: 1. NOTES ‧ Do not install the monitor in a location near heat sources such as radiators or air ducts, or in a place subject to direct sunlight, or excessive dust or mechanical vibration or...
... cleaning it with a mild detergent solution. When OSD menu is in active status, this button to turn the monitor ON or OFF, And display the monitor's state. When OSD menu is in off mode MENU / ENTER : Activate OSD menu when OSD is OFF or activate/de-activate adjustment function ... and Focus. Stubborn stains may be removed with a cloth lightly dampened with a soft cloth. Auto Adjust button / Exit: 1. NOTES ‧ Do not install the monitor in a location near heat sources such as radiators or air ducts, or in a place subject to direct sunlight, or excessive dust or mechanical vibration or...
User Manual
Page 13
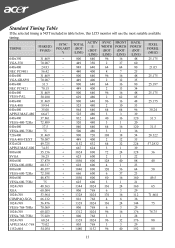
... 1152x864 54.054 + 1480 1152 96 40 192 80 13 Standard Timing Table If the selected timing is NOT included in table below, this LCD monitor will use the most suitable available timing.
... 1152x864 54.054 + 1480 1152 96 40 192 80 13 Standard Timing Table If the selected timing is NOT included in table below, this LCD monitor will use the most suitable available timing.

User Manual
Page 15
...is unclear and unstable, please perform the following steps: 1. PROBLEM Picture is unclear and unstable The picture is supported by your LCD Monitor. In Windows XP open the specific application where the problems appear. 2. Choose a mode that is running on "Shut Down Windows"...or decrement numbers) until those bars disappear. 3. If step 2 doesn't work, connect your PC system Functions properly with a CRT Monitor but it back on LCD Monitor If there's no picture, press the Adjustment Control button several times. 3. PROBLEM There is selected. Due to another external CRT....
...is unclear and unstable, please perform the following steps: 1. PROBLEM Picture is unclear and unstable The picture is supported by your LCD Monitor. In Windows XP open the specific application where the problems appear. 2. Choose a mode that is running on "Shut Down Windows"...or decrement numbers) until those bars disappear. 3. If step 2 doesn't work, connect your PC system Functions properly with a CRT Monitor but it back on LCD Monitor If there's no picture, press the Adjustment Control button several times. 3. PROBLEM There is selected. Due to another external CRT....


