
AL2023W Service Guide
Page 5
These limits are present inside the monitor. This equipment generates, uses and can be used in a residential installation. It is not responsible for any , must be determined by the party responsible for ... device, pursuant to operate the equipment. 2. Increase the separation between the equipment and receiver. 3. WARNING: To prevent fire or chock hazard, do not expose the monitor to qualified personnel only. - 5 - Reorient or relocate the receiving antenna. 2. Connect the equipment into an outlet on , the user is no guarantee that this equipment...
These limits are present inside the monitor. This equipment generates, uses and can be used in a residential installation. It is not responsible for any , must be determined by the party responsible for ... device, pursuant to operate the equipment. 2. Increase the separation between the equipment and receiver. 3. WARNING: To prevent fire or chock hazard, do not expose the monitor to qualified personnel only. - 5 - Reorient or relocate the receiving antenna. 2. Connect the equipment into an outlet on , the user is no guarantee that this equipment...
AL2023W Service Guide
Page 6
...of the grounded plug. Do not defeat the safety purpose of power source indicated on a wall or shelf, use only with the monitor. This will protect the monitor from overheating, be used for ventilation. z Do not attempt to power surges. Please refer all servicing to the appliance. z For...short circuit parts causing a fire or electric shock. z Do not place the monitor on the monitor. Do not place the monitor on the monitor cabinet. Do not place the monitor in the back and bottom of the monitor and to your home, consult your outlet does not accommodate the three-wire plug...
...of the grounded plug. Do not defeat the safety purpose of power source indicated on a wall or shelf, use only with the monitor. This will protect the monitor from overheating, be used for ventilation. z Do not attempt to power surges. Please refer all servicing to the appliance. z For...short circuit parts causing a fire or electric shock. z Do not place the monitor on the monitor. Do not place the monitor on the monitor cabinet. Do not place the monitor in the back and bottom of the monitor and to your home, consult your outlet does not accommodate the three-wire plug...
AL2023W Service Guide
Page 7
... 99.99% or more. z Due to make sure the flicker disappears. Turn off the Power Switch for hours. SPECIAL NOTES ON LCD MONITORS The following symptoms are normal with LCD monitor and do not indicate a problem. z The LCD screen has effective pixels of the time. z You may find slightly uneven brightness in...
... 99.99% or more. z Due to make sure the flicker disappears. Turn off the Power Switch for hours. SPECIAL NOTES ON LCD MONITORS The following symptoms are normal with LCD monitor and do not indicate a problem. z The LCD screen has effective pixels of the time. z You may find slightly uneven brightness in...
AL2023W Service Guide
Page 8
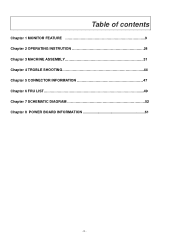
Table of contents Chapter 1 MONITOR FEATURE 9 Chapter 2 OPERATING INSTRUTION 24 Chapter 3 MACHINE ASSEMBLY 31 Chapter 4 TROBLE SHOOTING 44 Chapter 5 CONNECTOR INFORMATION 47 Chapter 6 FRU LIST 49 Chapter 7 SCHEMATIC DIAGRAM 52 Chapter 8 POWER BOARD INFORMATION 61 - 8 -
Table of contents Chapter 1 MONITOR FEATURE 9 Chapter 2 OPERATING INSTRUTION 24 Chapter 3 MACHINE ASSEMBLY 31 Chapter 4 TROBLE SHOOTING 44 Chapter 5 CONNECTOR INFORMATION 47 Chapter 6 FRU LIST 49 Chapter 7 SCHEMATIC DIAGRAM 52 Chapter 8 POWER BOARD INFORMATION 61 - 8 -
AL2023W Service Guide
Page 9
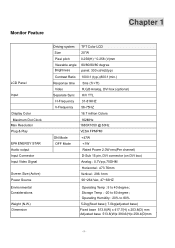
Monitor Feature Chapter 1 LCD Panel Input Display Color Maximum Dot Clock Max Resolution Plug & Play EPA ENERGY STAR Audio output Input Connector Input Video Signal Screen ...
Monitor Feature Chapter 1 LCD Panel Input Display Color Maximum Dot Clock Max Resolution Plug & Play EPA ENERGY STAR Audio output Input Connector Input Video Signal Screen ...
AL2023W Service Guide
Page 24
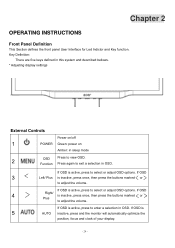
... described bellows. * Adjusting display settings External Controls Power on/off 1 POWER Green: power on Amber: in OSD. If OSD is 5 AUTO inactive, press and the monitor will automatically optimize the position, focus and clock of your display. - 24 - If OSD is active, press to select or adjust OSD options. If OSD...
... described bellows. * Adjusting display settings External Controls Power on/off 1 POWER Green: power on Amber: in OSD. If OSD is 5 AUTO inactive, press and the monitor will automatically optimize the position, focus and clock of your display. - 24 - If OSD is active, press to select or adjust OSD options. If OSD...
AL2023W Service Guide
Page 27
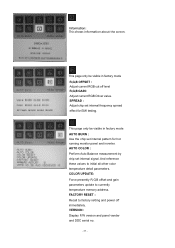
... F/W version and panel vender and DDC serial no. - 27 - AUTO COLOR : Perform Auto Balance measurement by chip set internal frequency spread effect for hot running monitor panel and inverter. And reference these values to currently temperature memory address. COLOR UPDATE: Force presently R,G,B offset and gain parameters update to initial all other...
... F/W version and panel vender and DDC serial no. - 27 - AUTO COLOR : Perform Auto Balance measurement by chip set internal frequency spread effect for hot running monitor panel and inverter. And reference these values to currently temperature memory address. COLOR UPDATE: Force presently R,G,B offset and gain parameters update to initial all other...
AL2023W Service Guide
Page 29
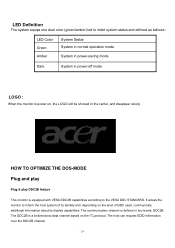
HOW TO OPTIMIZE THE DOS-MODE Plug and play Plug & play DDC2B feature This monitor is defined in two levels, DDC2B. The communication channel is equipped with VESA DDC2B capabilities according to the VESA DDC STANDARD. The host can request ... information over the DDC2B channel. - 29 - The DDC2B is power on, the LOGO will be showed in the center, and disappear slowly. It allows the monitor to inform the host system of its identity and, depending on the level of DDC used, communicate additional information about its display capabilities. LED Definition...
HOW TO OPTIMIZE THE DOS-MODE Plug and play Plug & play DDC2B feature This monitor is defined in two levels, DDC2B. The communication channel is equipped with VESA DDC2B capabilities according to the VESA DDC STANDARD. The host can request ... information over the DDC2B channel. - 29 - The DDC2B is power on, the LOGO will be showed in the center, and disappear slowly. It allows the monitor to inform the host system of its identity and, depending on the level of DDC used, communicate additional information about its display capabilities. LED Definition...

AL2023W Service Guide
Page 30
...and/or the United States Environmental Protection Agency (EPA) and The Swedish Confederation Employees (NUTEK). The display is no video input signal this monitor, following a time-out period, will automatically switch to use a cord set by pressing a key on type connector body, rated 10A,...-22 female configuration. The other end terminates with a grounding type attachment plug, rated 10A, 250V,CEE-22 male configuration. This monitor meets the Green monitor standards as set consisting of personal computer: Please use VDE 0602, 0625, 0821 approval power cord in European counties. - 30 ...
...and/or the United States Environmental Protection Agency (EPA) and The Swedish Confederation Employees (NUTEK). The display is no video input signal this monitor, following a time-out period, will automatically switch to use a cord set by pressing a key on type connector body, rated 10A,...-22 female configuration. The other end terminates with a grounding type attachment plug, rated 10A, 250V,CEE-22 male configuration. This monitor meets the Green monitor standards as set consisting of personal computer: Please use VDE 0602, 0625, 0821 approval power cord in European counties. - 30 ...
AL2023W Service Guide
Page 31
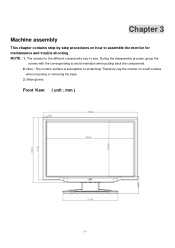
The screws for maintenance and trouble shooting NOTE : 1. Note : The monitor surface is susceptible to avoid mismatch when putting back the components. 2. Wear gloves. Front View: ( unit : mm ) - 31 - Therefore, lay the monitor on how to assemble the monitor for the different components vary in size. During the disassembly process, group the screws with the corresponding to scratching! Chapter 3 Machine assembly This chapter contains step-by-step procedures on a soft surface when mounting or removing the base. 3.
The screws for maintenance and trouble shooting NOTE : 1. Note : The monitor surface is susceptible to avoid mismatch when putting back the components. 2. Wear gloves. Front View: ( unit : mm ) - 31 - Therefore, lay the monitor on how to assemble the monitor for the different components vary in size. During the disassembly process, group the screws with the corresponding to scratching! Chapter 3 Machine assembly This chapter contains step-by-step procedures on a soft surface when mounting or removing the base. 3.


