
AL2023W Service Guide
Page 2
... and product names are trademarks of Acer Incorporated. Acer Incorporated makes no representations or warranties, either expresses or implied, with respect to the contents hereof and specifically disclaims any warranties of all necessary servicing, repair, and any incidental or consequential damages resulting from any defect in any language or computer language, in the software. Pentium and Pentium II/III...
... and product names are trademarks of Acer Incorporated. Acer Incorporated makes no representations or warranties, either expresses or implied, with respect to the contents hereof and specifically disclaims any warranties of all necessary servicing, repair, and any incidental or consequential damages resulting from any defect in any language or computer language, in the software. Pentium and Pentium II/III...
AL2023W Service Guide
Page 4
... you should check the most up-to-date information available on card, modem, or extra memory capability). You MUST use the list provided by your regional office MAY have a DIFFERENT part number code to those given in the FRU list of this printed Service Guide. These LOCALIZED FEATURES will not be covered in this generic service guide. Preface Before using this information...
... you should check the most up-to-date information available on card, modem, or extra memory capability). You MUST use the list provided by your regional office MAY have a DIFFERENT part number code to those given in the FRU list of this printed Service Guide. These LOCALIZED FEATURES will not be covered in this generic service guide. Preface Before using this information...
AL2023W Service Guide
Page 5
... monitor. Do not open the cabinet. WARNING: (FOR FCC CERTIFIED MODELS) NOTE: this equipment has been tested and found to comply with the limits for a Class B digital device, pursuant to radio communications. This equipment generates, uses and can be used in...installation. Connect the equipment into an outlet on , the user is connected. 4. Shielded interface cables and AC power cord, if any radio or TV interference caused by unauthorized modification to correct the interference by turning the equipment off and on a circuit different from that to comply with the instructions...
... monitor. Do not open the cabinet. WARNING: (FOR FCC CERTIFIED MODELS) NOTE: this equipment has been tested and found to comply with the limits for a Class B digital device, pursuant to radio communications. This equipment generates, uses and can be used in...installation. Connect the equipment into an outlet on , the user is connected. 4. Shielded interface cables and AC power cord, if any radio or TV interference caused by unauthorized modification to correct the interference by turning the equipment off and on a circuit different from that to comply with the instructions...
AL2023W Service Guide
Page 6
... or covered. This plug will fit only into the slot on the monitor. It could short circuit parts causing a fire or electric shock. opening or removing covers can injure a person and cause serious damage to the appliance. near or over a radiator or heat register. Do not defeat the safety purpose of power source indicated on a wall or shelf, use an adapter to...
... or covered. This plug will fit only into the slot on the monitor. It could short circuit parts causing a fire or electric shock. opening or removing covers can injure a person and cause serious damage to the appliance. near or over a radiator or heat register. Do not defeat the safety purpose of power source indicated on a wall or shelf, use an adapter to...
AL2023W Service Guide
Page 7
z The LCD screen has effective pixels of the previous screen may remain after switching the image, when the same image is recovered slowly by changing the image or turning off the Power Switch and then turn it on the desktop pattern you use . In this case, the screen is displayed for hours. - 7 - Turn off the Power Switch for hours. z Due to the nature of the LCD screen, an afterimage of 99.99...
z The LCD screen has effective pixels of the previous screen may remain after switching the image, when the same image is recovered slowly by changing the image or turning off the Power Switch and then turn it on the desktop pattern you use . In this case, the screen is displayed for hours. - 7 - Turn off the Power Switch for hours. z Due to the nature of the LCD screen, an afterimage of 99.99...
AL2023W Service Guide
Page 9
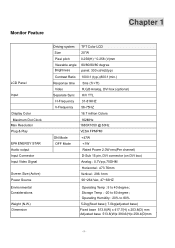
Monitor Feature Chapter 1 LCD Panel Input Display Color Maximum Dot Clock Max Resolution Plug & Play EPA ENERGY STAR Audio output Input Connector Input Video Signal Screen Size (Active) Power Source Environmental Considerations Weight (N.W.) Dimension Driving system TFT Color LCD Size 20"W Pixel pitch 0.258(H) * 0.258 (V)mm Viewable angle 80/80/80/80 degree Brightness panel: 300 cd/m2(typ) Contrast Ratio 1000:1 (typ.);800:1(min.) Response time 5ms (Tr+Tf) Video R,G,B Analog, DVI box (optional) Separate Sync H/V TTL H-Frequency 31-81KHZ V-Frequency 56...
Monitor Feature Chapter 1 LCD Panel Input Display Color Maximum Dot Clock Max Resolution Plug & Play EPA ENERGY STAR Audio output Input Connector Input Video Signal Screen Size (Active) Power Source Environmental Considerations Weight (N.W.) Dimension Driving system TFT Color LCD Size 20"W Pixel pitch 0.258(H) * 0.258 (V)mm Viewable angle 80/80/80/80 degree Brightness panel: 300 cd/m2(typ) Contrast Ratio 1000:1 (typ.);800:1(min.) Response time 5ms (Tr+Tf) Video R,G,B Analog, DVI box (optional) Separate Sync H/V TTL H-Frequency 31-81KHZ V-Frequency 56...
AL2023W Service Guide
Page 24
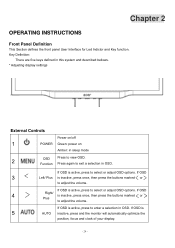
... bellows. * Adjusting display settings External Controls Power on/off 1 POWER Green: power on Amber: in sleep mode 2 OSD Press to exit a selection in OSD. If OSD is active, press to adjust the volume. Chapter 2 OPERATING INSTRUCTIONS Front Panel Definition This Section defines the front panel User Interface for Led Indictor and Key function. If OSD is 5 AUTO inactive, press and the monitor will automatically optimize the position, focus and clock of your display. - 24 - If OSD is...
... bellows. * Adjusting display settings External Controls Power on/off 1 POWER Green: power on Amber: in sleep mode 2 OSD Press to exit a selection in OSD. If OSD is active, press to adjust the volume. Chapter 2 OPERATING INSTRUCTIONS Front Panel Definition This Section defines the front panel User Interface for Led Indictor and Key function. If OSD is 5 AUTO inactive, press and the monitor will automatically optimize the position, focus and clock of your display. - 24 - If OSD is...
AL2023W Service Guide
Page 25
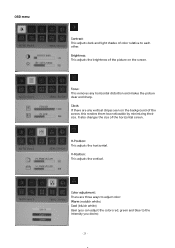
... makes the picture clear and sharp. OSD menu Contrast: This adjusts dark and light shades of the horizontal screen. It also changes the size of color relative to the intensity you desire) - 25 - V-Position: This adjusts the vertical. Clock: If there are three ways to adjust color: Warm (reddish white) Cool (bluish white) User (you can adjust the colors red, green and blue to each other. Focus: This removes any vertical stripes seen on the screen. Brightness: This adjusts the brightness...
... makes the picture clear and sharp. OSD menu Contrast: This adjusts dark and light shades of the horizontal screen. It also changes the size of color relative to the intensity you desire) - 25 - V-Position: This adjusts the vertical. Clock: If there are three ways to adjust color: Warm (reddish white) Cool (bluish white) User (you can adjust the colors red, green and blue to each other. Focus: This removes any vertical stripes seen on the screen. Brightness: This adjusts the brightness...
AL2023W Service Guide
Page 26
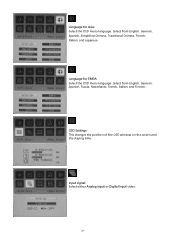
Language for EMEA: Select the OSD menu language. OSD Settings: This changes the position of the OSD window on the screen and the staying time. Select from English, German, Spanish, Russia, Nederlands, French, Italian, and Finnish. Select from English, German, Spanish, Simplified Chinese, Traditional Chinese, French, Italian, and Japanese. Input signal: Select either Analog Input or Digital Input video. - 26 - Language for Asia: Select the OSD menu language.
Language for EMEA: Select the OSD menu language. OSD Settings: This changes the position of the OSD window on the screen and the staying time. Select from English, German, Spanish, Russia, Nederlands, French, Italian, and Finnish. Select from English, German, Spanish, Simplified Chinese, Traditional Chinese, French, Italian, and Japanese. Input signal: Select either Analog Input or Digital Input video. - 26 - Language for Asia: Select the OSD menu language.
AL2023W Service Guide
Page 27
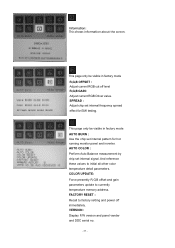
... parameters. AUTO COLOR : Perform Auto Balance measurement by chip set internal frequency spread effect for hot running monitor panel and inverter. Information: This shows information about the screen. VERSION : Display F/W version and panel vender and DDC serial no. - 27 - This page only be visible in factory mode AUTO BURN : Use the chip set internal pattern for EMI testing. FACTORY RESET : Recall to factory setting and power off level R,G,B GAIN : Adjust current RGB Driver value.
... parameters. AUTO COLOR : Perform Auto Balance measurement by chip set internal frequency spread effect for hot running monitor panel and inverter. Information: This shows information about the screen. VERSION : Display F/W version and panel vender and DDC serial no. - 27 - This page only be visible in factory mode AUTO BURN : Use the chip set internal pattern for EMI testing. FACTORY RESET : Recall to factory setting and power off level R,G,B GAIN : Adjust current RGB Driver value.
AL2023W Service Guide
Page 29
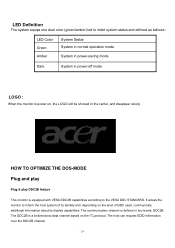
... based on the level of DDC used, communicate additional information about its identity and, depending on the I2C protocol. HOW TO OPTIMIZE THE DOS-MODE Plug and play Plug & play DDC2B feature This monitor is equipped with VESA DDC2B capabilities according to indict system status and defined as bellows : LED Color Green Amber System Status System in normal operation mode System in power-saving mode...
... based on the level of DDC used, communicate additional information about its identity and, depending on the I2C protocol. HOW TO OPTIMIZE THE DOS-MODE Plug and play Plug & play DDC2B feature This monitor is equipped with VESA DDC2B capabilities according to indict system status and defined as bellows : LED Color Green Amber System Status System in normal operation mode System in power-saving mode...

AL2023W Service Guide
Page 30
After the video input signal is restored, full power is restored and the display is completely off. The display is restored by pressing a key on type connector body, rated 10A, 250V, having standard CEE-22 female configuration. Please note that power supply card needs to use a cord set by reducing power consumption when there is the wallet plug with units intended for connection to a "Screen Saver" feature except the display is...
After the video input signal is restored, full power is restored and the display is completely off. The display is restored by pressing a key on type connector body, rated 10A, 250V, having standard CEE-22 female configuration. Please note that power supply card needs to use a cord set by reducing power consumption when there is the wallet plug with units intended for connection to a "Screen Saver" feature except the display is...
AL2023W Service Guide
Page 31
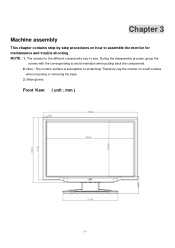
Note : The monitor surface is susceptible to avoid mismatch when putting back the components. 2. Wear gloves. During the disassembly process, group the screws with the corresponding to scratching! Therefore, lay the monitor on how to assemble the monitor for the different components vary in size. The screws for maintenance and trouble shooting NOTE : 1. Chapter 3 Machine assembly This chapter contains step-by-step procedures on a soft surface when mounting or removing the base. 3. Front View: ( unit : mm ) - 31 -
Note : The monitor surface is susceptible to avoid mismatch when putting back the components. 2. Wear gloves. During the disassembly process, group the screws with the corresponding to scratching! Therefore, lay the monitor on how to assemble the monitor for the different components vary in size. The screws for maintenance and trouble shooting NOTE : 1. Chapter 3 Machine assembly This chapter contains step-by-step procedures on a soft surface when mounting or removing the base. 3. Front View: ( unit : mm ) - 31 -

AL2023W Service Guide
Page 35
CHANGE THE JUMPER NUMBER OF P/B ACCORDING PANEL CONNECT THE P/B AND JUMPER CABLE WITH COLLOID MARK THE LOCATION AS LEFT SHOW WITH COLOR PEN PUT THE P/B TO THE PRODUCTION LINE GET THE SPEAKER AND CHECKING INSERT THE SPEAKER TO THE SINK OF MAIN BOARD CONNECT THE MIAN BOARD AND POWER BOARD PUT 1*PCS SPRING TO THE DVI SINK OF MIAN BOARD, AND PUT THE M/B AND P/B TO THE SHIELDING SETTLED SPEAKER AND PUT IT TO THE SHIELDING CHECKING THE POWER BOARD AND SCAN THE S/N AND P/B OF FLOW CODE.
CHANGE THE JUMPER NUMBER OF P/B ACCORDING PANEL CONNECT THE P/B AND JUMPER CABLE WITH COLLOID MARK THE LOCATION AS LEFT SHOW WITH COLOR PEN PUT THE P/B TO THE PRODUCTION LINE GET THE SPEAKER AND CHECKING INSERT THE SPEAKER TO THE SINK OF MAIN BOARD CONNECT THE MIAN BOARD AND POWER BOARD PUT 1*PCS SPRING TO THE DVI SINK OF MIAN BOARD, AND PUT THE M/B AND P/B TO THE SHIELDING SETTLED SPEAKER AND PUT IT TO THE SHIELDING CHECKING THE POWER BOARD AND SCAN THE S/N AND P/B OF FLOW CODE.
AL2023W Service Guide
Page 37
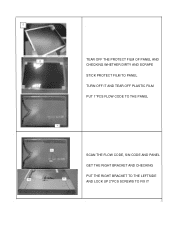
TEAR OFF THE PROTECT FILM OF PANEL AND CHECKING WHETHER DIRTY AND SCRAPE STICK PROTECT FILM TO PANEL TURN OFF IT AND TEAR OFF PLASTIC FILM PUT 1*PCS FLOW CODE TO THE PANEL SCAN THE FLOW CODE, S/N CODE AND PANEL GET THE RIGHT BRACKET AND CHECKING PUT THE RIGHT BRACKET TO THE LEFTSIDE AND LOCK UP 2*PCS SCREWS TO FIX IT
TEAR OFF THE PROTECT FILM OF PANEL AND CHECKING WHETHER DIRTY AND SCRAPE STICK PROTECT FILM TO PANEL TURN OFF IT AND TEAR OFF PLASTIC FILM PUT 1*PCS FLOW CODE TO THE PANEL SCAN THE FLOW CODE, S/N CODE AND PANEL GET THE RIGHT BRACKET AND CHECKING PUT THE RIGHT BRACKET TO THE LEFTSIDE AND LOCK UP 2*PCS SCREWS TO FIX IT
AL2023W Service Guide
Page 38
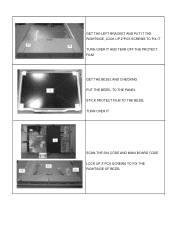
GET THE LEFT BRACKET AND PUT IT THE RIGHTSIDE, LOCK UP 2*PCS SCREWS TO FIX IT TURN OVER IT AND TEAR OFF THE PROTECT FILM GET THE BEZEL AND CHECKING PUT THE BEZEL TO THE PANEL STICK PROTECT FILM TO THE BEZEL TURN OVER IT SCAN THE S/N CODE AND MAIN BOARD CODE LOCK UP 3*PCS SCREWS TO FIX THE RIGHTSIDE OF BEZEL
GET THE LEFT BRACKET AND PUT IT THE RIGHTSIDE, LOCK UP 2*PCS SCREWS TO FIX IT TURN OVER IT AND TEAR OFF THE PROTECT FILM GET THE BEZEL AND CHECKING PUT THE BEZEL TO THE PANEL STICK PROTECT FILM TO THE BEZEL TURN OVER IT SCAN THE S/N CODE AND MAIN BOARD CODE LOCK UP 3*PCS SCREWS TO FIX THE RIGHTSIDE OF BEZEL

AL2023W Service Guide
Page 40
PUT THE LEFT AND RIGHT SPEAKERS TO THE LOCATION OF BEZEL INSERT THE BUTTON BOARD CABLE TO THE JACK OF B/B GET THE CARD OF B/B AND STICK 1*PCS ADHESIVE TAPE CHECKING THE SPEAKER LOCK UP 2*PCS SCREWS TO FIX THE RIGHT SPEAKER LOCK UP 2*PCS SCREWS TO FIX THE LEFT SPEAKER CHECKING THE SPEAKER AND STICK 2*PCS ADHESIVE TAPE ON THE CABLE LOCK UP 2*PCS IO NUT ON THE VGA JACK OF MAIN BOARD LOCK UP 2*PCS IO NUT ON THE DVI JACK OF MAIN BOARD
PUT THE LEFT AND RIGHT SPEAKERS TO THE LOCATION OF BEZEL INSERT THE BUTTON BOARD CABLE TO THE JACK OF B/B GET THE CARD OF B/B AND STICK 1*PCS ADHESIVE TAPE CHECKING THE SPEAKER LOCK UP 2*PCS SCREWS TO FIX THE RIGHT SPEAKER LOCK UP 2*PCS SCREWS TO FIX THE LEFT SPEAKER CHECKING THE SPEAKER AND STICK 2*PCS ADHESIVE TAPE ON THE CABLE LOCK UP 2*PCS IO NUT ON THE VGA JACK OF MAIN BOARD LOCK UP 2*PCS IO NUT ON THE DVI JACK OF MAIN BOARD
AL2023W Service Guide
Page 43
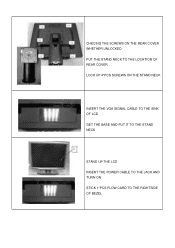
CHECING THE SCREWS ON THE REAR COVER WHETHER UNLOCKED PUT THE STAND NECK TO THE LOCATION OF REAR COVER LOCK UP 4*PCS SCREWS ON THE STAND NECK INSERT THE VGA SIGNAL CABLE TO THE SINK OF LCD GET THE BASE AND PUT IT TO THE STAND NECK STAND UP THE LCD INSERT THE POWER CABLE TO THE JACK AND TURN ON STICK 1*PCS FLOW CARD TO THE RIGHTSIDE OF BEZEL
CHECING THE SCREWS ON THE REAR COVER WHETHER UNLOCKED PUT THE STAND NECK TO THE LOCATION OF REAR COVER LOCK UP 4*PCS SCREWS ON THE STAND NECK INSERT THE VGA SIGNAL CABLE TO THE SINK OF LCD GET THE BASE AND PUT IT TO THE STAND NECK STAND UP THE LCD INSERT THE POWER CABLE TO THE JACK AND TURN ON STICK 1*PCS FLOW CARD TO THE RIGHTSIDE OF BEZEL
AL2023W Service Guide
Page 49
... or regulations on how best to dispose it, or follow the rules set by your regional Acer office to order FRU parts repair and service of customer machines. For ACER-AUTHORIZED CERVICE PROVIDERS, your regional web or channel(http://aicsl.acer.com.tw/spl/). FRU (Field Replaceable Unit) list Chapter 6 This chapter gives you should check the most up-to...
... or regulations on how best to dispose it, or follow the rules set by your regional Acer office to order FRU parts repair and service of customer machines. For ACER-AUTHORIZED CERVICE PROVIDERS, your regional web or channel(http://aicsl.acer.com.tw/spl/). FRU (Field Replaceable Unit) list Chapter 6 This chapter gives you should check the most up-to...

AL2023W Service Guide
Page 51
Part Number of Exploded View Item Part Number Part Description 1 EAW0TB01011 LCD BEZEL W0TB-S W0TB 2 MM30030IBJ4 SCREW M3*3-I-NI 3 AAM201EW121 LCD (TFT)20*M201EW02 V8 4 FAW0TB02018 LCD BKT-R W0TB 5 FCL7TA01018 SHIELDING MYLAR L7TA 6 FCL9TB01017 SCALAR BOARD MYLAR L9TB 7 FAL9TB01016 POWER SHIELDING L9TB 8 EAW0TB02018 LCD COVER W0TB 9 FAL9TB04015 HINGE ASSY L9TB 10 EBL9TB02013 HINGE COVER L9TB 11 MM40100B244 SCREW M4.0*10-B BLACK (NYL0K) 12 MF25080PJB8 SCREW F2.5*8.0-P GP 13 DN006316046 SPK...
Part Number of Exploded View Item Part Number Part Description 1 EAW0TB01011 LCD BEZEL W0TB-S W0TB 2 MM30030IBJ4 SCREW M3*3-I-NI 3 AAM201EW121 LCD (TFT)20*M201EW02 V8 4 FAW0TB02018 LCD BKT-R W0TB 5 FCL7TA01018 SHIELDING MYLAR L7TA 6 FCL9TB01017 SCALAR BOARD MYLAR L9TB 7 FAL9TB01016 POWER SHIELDING L9TB 8 EAW0TB02018 LCD COVER W0TB 9 FAL9TB04015 HINGE ASSY L9TB 10 EBL9TB02013 HINGE COVER L9TB 11 MM40100B244 SCREW M4.0*10-B BLACK (NYL0K) 12 MF25080PJB8 SCREW F2.5*8.0-P GP 13 DN006316046 SPK...

