
AL1916e Service Guide
Page 5
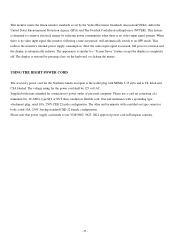
...to correct such interference. Do not open the cabinet. Increase the separation between the equipment and receiver. 3. Shielded interface cables and AC power cord, if any radio or TV interference caused by one or more of the following measures: 1. Refer servicing to rain or moisture.... in a residential installation. The manufacturer is no guarantee that this equipment. WARNING: To prevent fire or chock hazard, do not expose the monitor to qualified personnel only. - 5 - If this equipment has been tested and found to comply with the limits for energy efficiency. Connect ...
...to correct such interference. Do not open the cabinet. Increase the separation between the equipment and receiver. 3. Shielded interface cables and AC power cord, if any radio or TV interference caused by one or more of the following measures: 1. Refer servicing to rain or moisture.... in a residential installation. The manufacturer is no guarantee that this equipment. WARNING: To prevent fire or chock hazard, do not expose the monitor to qualified personnel only. - 5 - If this equipment has been tested and found to comply with the limits for energy efficiency. Connect ...
AL1916e Service Guide
Page 6
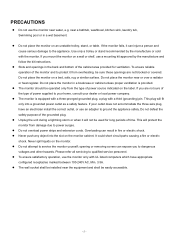
... Use only a trolley or stand recommended by the manufacture and follow the kit instructions. l The monitor should be easily accessible. This will protect the monitor from the type of power source indicated on a wall or shelf, use an adapter to the appliance. opening or removing covers... to qualified service personnel. l Slots and openings in fire or electric shock. If your dealer or local power company. l For use the monitor only with the attached power adapter (output 12V DC) which have an electrician install the correct outlet, or use a mounting kit approved...
... Use only a trolley or stand recommended by the manufacture and follow the kit instructions. l The monitor should be easily accessible. This will protect the monitor from the type of power source indicated on a wall or shelf, use an adapter to the appliance. opening or removing covers... to qualified service personnel. l Slots and openings in fire or electric shock. If your dealer or local power company. l For use the monitor only with the attached power adapter (output 12V DC) which have an electrician install the correct outlet, or use a mounting kit approved...
AL1916e Service Guide
Page 7
... of the previous screen may remain after switching the image, when the same image is recovered slowly by changing the image or turning off the Power Switch and then turn it on the desktop pattern you use . l Due to make sure the flicker disappears. l The LCD screen has effective ...pixels of the time. SPECIAL NOTES ON LCD MONITORS The following symptoms are normal with LCD monitor and do not indicate a problem. In this case, the screen is displayed for hours. - 7 - NOTES l Due to the nature of...
... of the previous screen may remain after switching the image, when the same image is recovered slowly by changing the image or turning off the Power Switch and then turn it on the desktop pattern you use . l Due to make sure the flicker disappears. l The LCD screen has effective ...pixels of the time. SPECIAL NOTES ON LCD MONITORS The following symptoms are normal with LCD monitor and do not indicate a problem. In this case, the screen is displayed for hours. - 7 - NOTES l Due to the nature of...
AL1916e Service Guide
Page 8
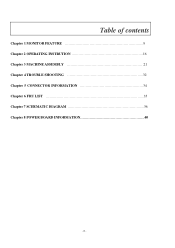
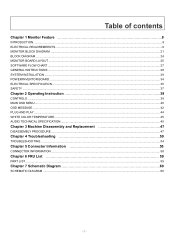
Table of contents Chapter 1 MONITOR FEATURE 9 Chapter 2 OPERATING INSTRUTION 16 Chapter 3 MACHINE ASSEMBLY 21 Chapter 4 TROUBLE SHOOTING 32 Chapter 5 CONNECTOR INFORMATION 34 Chapter 6 FRU LIST 35 Chapter 7 SCHEMATIC DIAGRAM 36 Chapter 8 POWER BOARD INFORMATION 40 - 8 -
Table of contents Chapter 1 MONITOR FEATURE 9 Chapter 2 OPERATING INSTRUTION 16 Chapter 3 MACHINE ASSEMBLY 21 Chapter 4 TROUBLE SHOOTING 32 Chapter 5 CONNECTOR INFORMATION 34 Chapter 6 FRU LIST 35 Chapter 7 SCHEMATIC DIAGRAM 36 Chapter 8 POWER BOARD INFORMATION 40 - 8 -
AL1916e Service Guide
Page 9
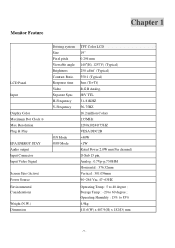
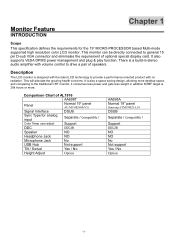
Monitor Feature Chapter 1 LCD Panel Input Display Color Maximum Dot Clock ® Max Resolution Plug & Play EPA ENERGY STAY Audio output Input Connector Input Video Signal Screen Size (Active) Power Source Environmental Considerations Weight (N.W.) Dimension Driving system Size Pixel pitch Viewable angle Brightness Contrast Ratio Response time Video Separate Sync H-Frequency V-Frequency ON...
Monitor Feature Chapter 1 LCD Panel Input Display Color Maximum Dot Clock ® Max Resolution Plug & Play EPA ENERGY STAY Audio output Input Connector Input Video Signal Screen Size (Active) Power Source Environmental Considerations Weight (N.W.) Dimension Driving system Size Pixel pitch Viewable angle Brightness Contrast Ratio Response time Video Separate Sync H-Frequency V-Frequency ON...
AL1916e Service Guide
Page 16
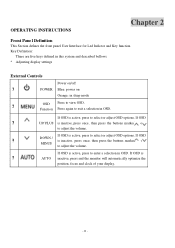
Key Definition: There are five keys defined in this system and described bellows. * Adjusting display settings External Controls Power on/off ?1 POWER Blue: power on Orange: in OSD. If OSD is inactive, press once, then press the buttons marked or to view OSD. Function Press again to ... select or adjust OSD options. If OSD is active, press to adjust the volume. If OSD ?4 DOWN / is ?5 AUTO inactive, press and the monitor will automatically optimize the position, focus and clock of your display. - 16 - If OSD is inactive, press once, then press the buttons marked or ...
Key Definition: There are five keys defined in this system and described bellows. * Adjusting display settings External Controls Power on/off ?1 POWER Blue: power on Orange: in OSD. If OSD is inactive, press once, then press the buttons marked or to view OSD. Function Press again to ... select or adjust OSD options. If OSD is active, press to adjust the volume. If OSD ?4 DOWN / is ?5 AUTO inactive, press and the monitor will automatically optimize the position, focus and clock of your display. - 16 - If OSD is inactive, press once, then press the buttons marked or ...

AL1916e Service Guide
Page 19
... to inform the host system of its identity and, depending on the level of DDC used, communicate additional information about its display capabilities. THIS MONITOR WILL APPEAR TO BE NON-FUNCTIONAL IF THERE IS NO VIDEO INPUT SIGNAL. The host can request EDID information over the DDC2B channel. IN ORDER... (blue/amber) led to indict system status and defined as bellows : LED Color Blue System Status System in normal operation mode Amber System in power-saving mode Dark System in power-off mode LOGO : When the monitor is power on, the LOGO will be showed in two levels, DDC2B.
... to inform the host system of its identity and, depending on the level of DDC used, communicate additional information about its display capabilities. THIS MONITOR WILL APPEAR TO BE NON-FUNCTIONAL IF THERE IS NO VIDEO INPUT SIGNAL. The host can request EDID information over the DDC2B channel. IN ORDER... (blue/amber) led to indict system status and defined as bellows : LED Color Blue System Status System in normal operation mode Amber System in power-saving mode Dark System in power-off mode LOGO : When the monitor is power on, the LOGO will be showed in two levels, DDC2B.
AL1916e Service Guide
Page 20
... three conductors flexible cord. One end terminates with a molded-on the keyboard, or clicking the mouse. This monitor meets the Green monitor standards as set consisting of personal computer: Please use VDE 0602, 0625, 0821 approval power cord in European counties. - 20 - The appearance is similar to conserve electrical energy by pressing a key...
... three conductors flexible cord. One end terminates with a molded-on the keyboard, or clicking the mouse. This monitor meets the Green monitor standards as set consisting of personal computer: Please use VDE 0602, 0625, 0821 approval power cord in European counties. - 20 - The appearance is similar to conserve electrical energy by pressing a key...
AL1916p Service Guide
Page 5
... appliance. Never spill liquids on a bed, sofa, rug or similar surface. If the monitor falls, it will not be sure these openings are not sure of the type of power supplied to your home, consult your outlet does not accommodate the three-wire plug, have ...opening or removing covers can injure a person and cause serious damage to ground the appliance safely. z The monitor should be easily accessible. - 5 - z The monitor is provided. z Never push any object into a grounded power outlet as a safety feature. z Do not attempt to dangerous voltages and other hazards. z Slots and ...
... appliance. Never spill liquids on a bed, sofa, rug or similar surface. If the monitor falls, it will not be sure these openings are not sure of the type of power supplied to your home, consult your outlet does not accommodate the three-wire plug, have ...opening or removing covers can injure a person and cause serious damage to ground the appliance safely. z The monitor should be easily accessible. - 5 - z The monitor is provided. z Never push any object into a grounded power outlet as a safety feature. z Do not attempt to dangerous voltages and other hazards. z Slots and ...
AL1916p Service Guide
Page 6
In this case, the screen is displayed for hours. - 6 - Turn off the Power Switch for hours. z You may flicker during initial use . z The LCD screen has effective pixels of the time. NOTES z Due to the nature of the ....99% or more. It may remain after switching the image, when the same image is recovered slowly by changing the image or turning off the Power Switch and then turn it on the desktop pattern you use . z Due to make sure the flicker disappears. SPECIAL NOTES ON LCD...
In this case, the screen is displayed for hours. - 6 - Turn off the Power Switch for hours. z You may flicker during initial use . z The LCD screen has effective pixels of the time. NOTES z Due to the nature of the ....99% or more. It may remain after switching the image, when the same image is recovered slowly by changing the image or turning off the Power Switch and then turn it on the desktop pattern you use . z Due to make sure the flicker disappears. SPECIAL NOTES ON LCD...
AL1916p Service Guide
Page 7
Table of contents Chapter 1 Monitor Feature 8 INTRODUCTION...8 ELECTRICAL REQUIREMEENTS...9 MONITOR BLOCK DIAGRAM ...21 BLOCK DIAGRAM ...24 MONITOR BOARD LAYOUT ...25 SOFTWARE FLOW CHART ...27 GENERAL INSTRUCTIONS ...28 SYSTEM INSTALLATION ...29 POWER/INVERTOR BOARD ...34 ELECTRICAL SPECIFICATION...35 SAFETY ...37 Chapter 2 Operating Instruction 39 CONTROLS ...39 MAIN OSD MENU ...40 OSD MESSAGE...42 PLUG AND PLAY...
Table of contents Chapter 1 Monitor Feature 8 INTRODUCTION...8 ELECTRICAL REQUIREMEENTS...9 MONITOR BLOCK DIAGRAM ...21 BLOCK DIAGRAM ...24 MONITOR BOARD LAYOUT ...25 SOFTWARE FLOW CHART ...27 GENERAL INSTRUCTIONS ...28 SYSTEM INSTALLATION ...29 POWER/INVERTOR BOARD ...34 ELECTRICAL SPECIFICATION...35 SAFETY ...37 Chapter 2 Operating Instruction 39 CONTROLS ...39 MAIN OSD MENU ...40 OSD MESSAGE...42 PLUG AND PLAY...
AL1916p Service Guide
Page 8
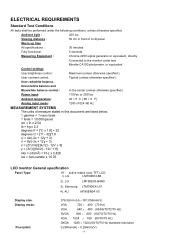
... VGA connector and eliminates the requirement of AL1916 AA698T Panel Normal 19" panel AU-M190EN04(V5) Signal Interface DSUB Sync Type for the 19" MICRO-PROCESSOR based Multi-mode supported high resolution color LCD monitor. This monitor can be directly connected to drive a ...pair of speakers. It also supports VESA DPMS power management and plug & play function. This will alleviate the growing health concerns. Monitor Feature INTRODUCTION Chapter 1 Scope This specification ...
... VGA connector and eliminates the requirement of AL1916 AA698T Panel Normal 19" panel AU-M190EN04(V5) Signal Interface DSUB Sync Type for the 19" MICRO-PROCESSOR based Multi-mode supported high resolution color LCD monitor. This monitor can be directly connected to drive a ...pair of speakers. It also supports VESA DPMS power management and plug & play function. This will alleviate the growing health concerns. Monitor Feature INTRODUCTION Chapter 1 Scope This specification ...
AL1916p Service Guide
Page 9
...+ 12y + 3) x = (27u'/4)/[(9u'/2) - 12v' + 9] y = (3v')/[(9u'/2) - 12v' + 9] nits = cd/(m2) = Ft-L x 3.426 lux = foot-candle x 10.76 LCD monitor General specification Panel Type: 19 " active matrix color TFT LCD 1). Minolta CA100 photometer, or equivalent Control settings User brightness control : Maximum (unless otherwise specified ) User... specified ) User red/white balance, Green/white balance and Blue/white balance control : In the center (unless otherwise specified ) Power input: 110Vac or 230Vac Ambient temperature: 20 ± 5 ˚C ( 68 ± 9 ˚ F) Analog input ...
...+ 12y + 3) x = (27u'/4)/[(9u'/2) - 12v' + 9] y = (3v')/[(9u'/2) - 12v' + 9] nits = cd/(m2) = Ft-L x 3.426 lux = foot-candle x 10.76 LCD monitor General specification Panel Type: 19 " active matrix color TFT LCD 1). Minolta CA100 photometer, or equivalent Control settings User brightness control : Maximum (unless otherwise specified ) User... specified ) User red/white balance, Green/white balance and Blue/white balance control : In the center (unless otherwise specified ) Power input: 110Vac or 230Vac Ambient temperature: 20 ± 5 ˚C ( 68 ± 9 ˚ F) Analog input ...
AL1916p Service Guide
Page 20
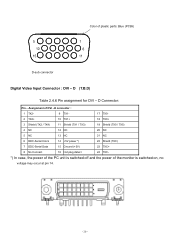
... (TX2 / TX4) 11 Shield (TX1 / TX3) 19 Shield (TX0 / TX5) 4 NC 12 NC 20 NC 5 NC 13 NC 21 NC 6 DDC-Serial Clock 14 +5V power *) 22 Shield (TXC) 7 DDC-Serial Data 15 Ground (+5V) 23 TXC+ 8 No Connect 16 Hot plug detect 24 TXC- *) In case, the... power of the PC unit is switched on, no voltage may occur at pin 14. - 20 - D (T.B.D) Table 2.4.6 Pin assignment for DVI - 5 10 15 Color of the monitor is switched off and the power of plastic parts: Blue (PC99) 1 6 11 D-sub connector Digital Video...
... (TX2 / TX4) 11 Shield (TX1 / TX3) 19 Shield (TX0 / TX5) 4 NC 12 NC 20 NC 5 NC 13 NC 21 NC 6 DDC-Serial Clock 14 +5V power *) 22 Shield (TXC) 7 DDC-Serial Data 15 Ground (+5V) 23 TXC+ 8 No Connect 16 Hot plug detect 24 TXC- *) In case, the... power of the PC unit is switched on, no voltage may occur at pin 14. - 20 - D (T.B.D) Table 2.4.6 Pin assignment for DVI - 5 10 15 Color of the monitor is switched off and the power of plastic parts: Blue (PC99) 1 6 11 D-sub connector Digital Video...
AL1916p Service Guide
Page 21
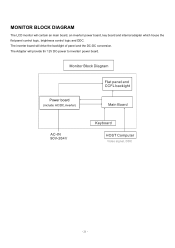
Power board (include: AC/DC,inverter) - 21 - MONITOR BLOCK DIAGRAM The LCD monitor will provide thr 12V DC-power to inverter/ power board. The Adapter will contain an main board, an inverter/ power board, key board and internal adapter which house the flat panel control logic, brightness control logic and DDC. The inverter board will drive the backlight of panel and the DC-DC conversion.
Power board (include: AC/DC,inverter) - 21 - MONITOR BLOCK DIAGRAM The LCD monitor will provide thr 12V DC-power to inverter/ power board. The Adapter will contain an main board, an inverter/ power board, key board and internal adapter which house the flat panel control logic, brightness control logic and DDC. The inverter board will drive the backlight of panel and the DC-DC conversion.
AL1916p Service Guide
Page 28
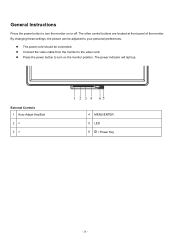
z Connect the video cable from the monitor to the video card. z The power cord should be adjusted to your personal preferences. z Press the power button to turn the monitor on the monitor position. The other control buttons are located at front panel of the monitor. By changing these settings, the picture can be connected. External Controls 1 Auto Adjust Key/Exit 2 < 3 > 4 MENU/ENTER 5 LED 6 / Power Key - 28 - The power indicator will light up. General Instructions Press the power button to turn on or off.
z Connect the video cable from the monitor to the video card. z The power cord should be adjusted to your personal preferences. z Press the power button to turn the monitor on the monitor position. The other control buttons are located at front panel of the monitor. By changing these settings, the picture can be connected. External Controls 1 Auto Adjust Key/Exit 2 < 3 > 4 MENU/ENTER 5 LED 6 / Power Key - 28 - The power indicator will light up. General Instructions Press the power button to turn on or off.

AL1916p Service Guide
Page 29
z Connect the other end of the signal cable to the VGA port on your computer. z Connect the power cord to the LCD Monitor. z Connect one end of the signal cable to the LCD Monitor's VGA port. System Installation Connecting the Display z Power off your PC. z Make sure connections are secure. Connecting the AC Power z Connect the power cord to an AC power source. - 29 -
z Connect the other end of the signal cable to the VGA port on your computer. z Connect the power cord to the LCD Monitor. z Connect one end of the signal cable to the LCD Monitor's VGA port. System Installation Connecting the Display z Power off your PC. z Make sure connections are secure. Connecting the AC Power z Connect the power cord to an AC power source. - 29 -
AL1916p Service Guide
Page 38
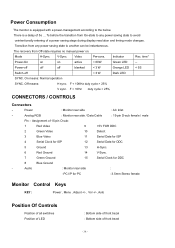
... DDC 5 Ground 13 H-Sync. 6 Red Ground 14 V-Sync. 7 Green Ground 15 Serial Clock for PC : 3.5mm Stereo female Monitor Control Keys KEY : Power , Menu , Adjust +/- , Vol +/-, Auto Position Of Controls Position of all switches Position of LED : Bottom side of front bezel...operation SYNC. There is equipped with a power-management according to avoid unintentionally entering of front bezel - 38 - time* Power-On on on . Power Consumption The monitor is a delay of 5s ... 7s before the transition from On-state to any power saving state to another can be instantaneous...
... DDC 5 Ground 13 H-Sync. 6 Red Ground 14 V-Sync. 7 Green Ground 15 Serial Clock for PC : 3.5mm Stereo female Monitor Control Keys KEY : Power , Menu , Adjust +/- , Vol +/-, Auto Position Of Controls Position of all switches Position of LED : Bottom side of front bezel...operation SYNC. There is equipped with a power-management according to avoid unintentionally entering of front bezel - 38 - time* Power-On on on . Power Consumption The monitor is a delay of 5s ... 7s before the transition from On-state to any power saving state to another can be instantaneous...

AL1916p Service Guide
Page 39
be green when monitor is on; Function select. 4. Adjust decrease. 6. Chapter 2 Operating Instructions CONTROLS Control panel (monitor front panel) 1. Power ON/OFF switch, push to ON and push to OFF. (toggle switch) 2. Power LED, will be amber when in power saving mode. 3. Adjust increase. 5. Auto adjust. - 39 -
be green when monitor is on; Function select. 4. Adjust decrease. 6. Chapter 2 Operating Instructions CONTROLS Control panel (monitor front panel) 1. Power ON/OFF switch, push to ON and push to OFF. (toggle switch) 2. Power LED, will be amber when in power saving mode. 3. Adjust increase. 5. Auto adjust. - 39 -
AL1916p Service Guide
Page 42
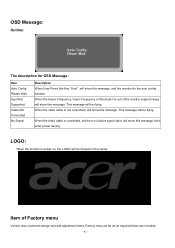
This message will be flying. Item of the monitor support range, will show this message, then enter power saving. When the video cable is connected, but the is out of Factory menu Vendor may customize design and add adjustment items Factory menu as ... this message, and the monitor do the auto config function. OSD Message: Outline: The description for OSD Message : Item Auto Config Please Wait Input Not Supported Cable Not Connected No Signal Description When User Press Hot-Key "Auto", will show this message. When the video cable is power on, the LOGO will...
This message will be flying. Item of the monitor support range, will show this message, then enter power saving. When the video cable is connected, but the is out of Factory menu Vendor may customize design and add adjustment items Factory menu as ... this message, and the monitor do the auto config function. OSD Message: Outline: The description for OSD Message : Item Auto Config Please Wait Input Not Supported Cable Not Connected No Signal Description When User Press Hot-Key "Auto", will show this message. When the video cable is power on, the LOGO will...


