
AL1716e Service Guide
Page 6
...or in a bookcase or cabinet unless proper ventilation is equipped with a three-pronged grounded plug, a plug with a third (grounding) pin. z The monitor is provided. z Unplug the unit during a lightning storm or when it will not be installed near water, e.g. z Never push any object into a.... z The wall socket shall be used for ventilation. Use only a trolley or stand recommended by the manufacture and follow the kit instructions. Do not place the monitor on the monitor. z The monitor should be operated only from damage due to protect it can result in the back...
...or in a bookcase or cabinet unless proper ventilation is equipped with a three-pronged grounded plug, a plug with a third (grounding) pin. z The monitor is provided. z Unplug the unit during a lightning storm or when it will not be installed near water, e.g. z Never push any object into a.... z The wall socket shall be used for ventilation. Use only a trolley or stand recommended by the manufacture and follow the kit instructions. Do not place the monitor on the monitor. z The monitor should be operated only from damage due to protect it can result in the back...
AL1716v Service Guide
Page 5
...accessible. Unplug the unit during initial use the monitor near the equipment and shall be operated only from damage due to protect it will not be sure these openings are provided for hours. 4 Use only a trolley or stand recommended by the manufacturer and follow the kit instructions.... Do not place the monitor on an unstable trolley, stand, or table. If your dealer or local power company. Never spill liquids on the label...
...accessible. Unplug the unit during initial use the monitor near the equipment and shall be operated only from damage due to protect it will not be sure these openings are provided for hours. 4 Use only a trolley or stand recommended by the manufacturer and follow the kit instructions.... Do not place the monitor on an unstable trolley, stand, or table. If your dealer or local power company. Never spill liquids on the label...
AL1716v Service Guide
Page 26
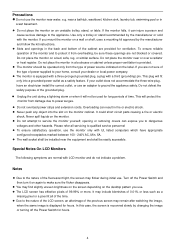
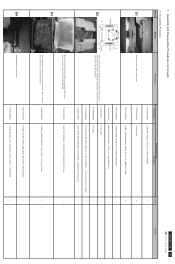
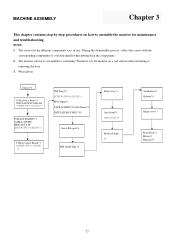
Disassembly Procedure Disassemble the base 1. Chapter 3 Machine Disassembly This chapter contains step-by-step procedures on how to release stand base. (Fig 2) Fig 1 Fig 2 25 Remove hinge cover. (Fig 1) 2. Remove four screws to assemble the monitor for maintenance.
Disassembly Procedure Disassemble the base 1. Chapter 3 Machine Disassembly This chapter contains step-by-step procedures on how to release stand base. (Fig 2) Fig 1 Fig 2 25 Remove hinge cover. (Fig 1) 2. Remove four screws to assemble the monitor for maintenance.
AL1716W Service Guide
Page 45
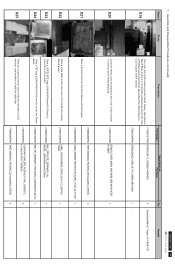
... 7749106560P0A CUSHION FOAM_EPS_ACER-AL1716W_2160SETS_ L&R_472x117x398(H) 7749600200P0A TAPE_MASKING_PACKING_25mm(w)x45m_LITEON 24- S20 2 Lock the stand cover according to cover the LCD monitor. 7749003210P0A BAG_LDPE+EPE_ORDINARY_ALL MODEL_L680xW550mmxH0.55mm 1- S21 S22 Line 2 S23 S24 S25 Stick...label on the Front Bezel with 4 screws. 7115240121P0A SCREW_M4*12_DOUBLE WASHIER 7740412200P0A STAND_BASE_ACER_AL1717_#6800_ABS 94HB ACER AL1716W 44 Go to cover the Stand Base. 7749003190P0A BAG_PE_ORDINARY_FOR ACER_L300xW300xT0.05 mm 1 - one is held the left . 7. Take ...
... 7749106560P0A CUSHION FOAM_EPS_ACER-AL1716W_2160SETS_ L&R_472x117x398(H) 7749600200P0A TAPE_MASKING_PACKING_25mm(w)x45m_LITEON 24- S20 2 Lock the stand cover according to cover the LCD monitor. 7749003210P0A BAG_LDPE+EPE_ORDINARY_ALL MODEL_L680xW550mmxH0.55mm 1- S21 S22 Line 2 S23 S24 S25 Stick...label on the Front Bezel with 4 screws. 7115240121P0A SCREW_M4*12_DOUBLE WASHIER 7740412200P0A STAND_BASE_ACER_AL1717_#6800_ABS 94HB ACER AL1716W 44 Go to cover the Stand Base. 7749003190P0A BAG_PE_ORDINARY_FOR ACER_L300xW300xT0.05 mm 1 - one is held the left . 7. Take ...
AL1716W Service Guide
Page 47
...7749003210P0A BAG_LDPE+EPE_ORDINARY_ALL MODEL_L680xW550mmxH0.55mm 1 - 1 - 1 1 2 - 1 - S3 Move the returned LCD monitor to a working table, then remove cushion foams and LDPE+EPE bag. 7749003190P0A BAG_PE_ORDINARY_FOR ACER_L300xW300xT0.05 mm Tear off...label 2 - S4 2 Disassemble the stand cover. 1 7742612091P0A STAND_COVER_#6800_ABS 94HB_ABS 94HB_ACER R17BNW 7738001840P0A HINGE_STAND_WHT_SUS430 T=2.0mm_ACER_T17AN/BNHW 1 - 1 - ACER AL1716W 46 Go to remove the screen protector card. Turn over the LCD monitor (screen faced down), 7730203550P0A CARD_SCREEN ...
...7749003210P0A BAG_LDPE+EPE_ORDINARY_ALL MODEL_L680xW550mmxH0.55mm 1 - 1 - 1 1 2 - 1 - S3 Move the returned LCD monitor to a working table, then remove cushion foams and LDPE+EPE bag. 7749003190P0A BAG_PE_ORDINARY_FOR ACER_L300xW300xT0.05 mm Tear off...label 2 - S4 2 Disassemble the stand cover. 1 7742612091P0A STAND_COVER_#6800_ABS 94HB_ABS 94HB_ACER R17BNW 7738001840P0A HINGE_STAND_WHT_SUS430 T=2.0mm_ACER_T17AN/BNHW 1 - 1 - ACER AL1716W 46 Go to remove the screen protector card. Turn over the LCD monitor (screen faced down), 7730203550P0A CARD_SCREEN ...
AL1716W Service Guide
Page 48
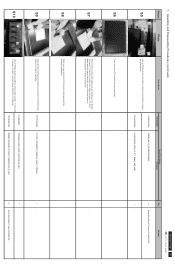
...Spare Parts Usage Part Name S5 Use a Phillips-head screwdriver unscrew 4 screws to release the stand base. 7115240121P0A 7740412200P0A SCREW_M4*12_DOUBLE WASHIER STAND_BASE_ACER_AL1717_#6800_ABS 94HB S6 Turn over the LCD monitor (screen faced up on to - - S7 S8 Place cloth on the panel where you... are release from the Front Bezel. 7140130061P0A T17BNHW-G1(99)_ACER_FUNCTION KEY BD SCREW_MACHINE_WITHOUT_NINDING_M3_6L_BLA ACER AL1716W 47 Go to release the Key...
...Spare Parts Usage Part Name S5 Use a Phillips-head screwdriver unscrew 4 screws to release the stand base. 7115240121P0A 7740412200P0A SCREW_M4*12_DOUBLE WASHIER STAND_BASE_ACER_AL1717_#6800_ABS 94HB S6 Turn over the LCD monitor (screen faced up on to - - S7 S8 Place cloth on the panel where you... are release from the Front Bezel. 7140130061P0A T17BNHW-G1(99)_ACER_FUNCTION KEY BD SCREW_MACHINE_WITHOUT_NINDING_M3_6L_BLA ACER AL1716W 47 Go to release the Key...
AL1716x Service Guide
Page 7
... The LCD screen has effective pixels of the grounded plug. User only a trolley or stand recommended by the manufacturer and following symptoms are not blocked or covered. Do not place the monitor on the monitor. If you use. Do not overload power strips and extension cords. Turn off the .... Slots and openings in a wet basement. opening or removing covers can expose you mount the monitor on an unstable trolley, stand, or table. This plug will protect the monitor from the type of power supplied to the nature of the fluorescent light, the screen may include blemishes of...
... The LCD screen has effective pixels of the grounded plug. User only a trolley or stand recommended by the manufacturer and following symptoms are not blocked or covered. Do not place the monitor on the monitor. If you use. Do not overload power strips and extension cords. Turn off the .... Slots and openings in a wet basement. opening or removing covers can expose you mount the monitor on an unstable trolley, stand, or table. This plug will protect the monitor from the type of power supplied to the nature of the fluorescent light, the screen may include blemishes of...
AL1716x Service Guide
Page 27
...PC#LE1710 Insert B/L jack*4 PCBA Control Board *1 SCREW (PW 3*4,M,ZN) *2 EMI shield Tape*2 Back cover*1 Arm Stand*1 (M4x10,ZN)*4 Bracket Finger *1 Stand plate*1 Rubber*4 Hinge cover*1 Front bezel*1 Button*1 Indicator*1 27 During the disassembly process, collect the screws with the ...corresponding components to scratching! NOTE: 1. Therefore, lay the monitor on how to assemble the monitor for the different components vary in size. The monitor...
...PC#LE1710 Insert B/L jack*4 PCBA Control Board *1 SCREW (PW 3*4,M,ZN) *2 EMI shield Tape*2 Back cover*1 Arm Stand*1 (M4x10,ZN)*4 Bracket Finger *1 Stand plate*1 Rubber*4 Hinge cover*1 Front bezel*1 Button*1 Indicator*1 27 During the disassembly process, collect the screws with the ...corresponding components to scratching! NOTE: 1. Therefore, lay the monitor on how to assemble the monitor for the different components vary in size. The monitor...


