
AL1712 Service Guide
Page 5
... more of the following measures: 1. The manufacturer is connected. 4. WARNING: To prevent fire or chock hazard, do not expose the monitor to this equipment. These limits are present inside the monitor. However, there is the responsibility of the FCC Rules. NOTICE: 1. It is no guarantee that this product meets the ENERGY STAR...
... more of the following measures: 1. The manufacturer is connected. 4. WARNING: To prevent fire or chock hazard, do not expose the monitor to this equipment. These limits are present inside the monitor. However, there is the responsibility of the FCC Rules. NOTICE: 1. It is no guarantee that this product meets the ENERGY STAR...
AL1712 Service Guide
Page 6
... tub, Swimming pool or in a bookcase or cabinet unless proper ventilation is equipped with a three-pronged grounded plug, a plug with the monitor. The monitor is provided. This plug will not be operated only from overheating, be easily accessible. Overloading can expose you are not blocked or covered. ...Please refer all servicing to qualified service personnel. To ensure reliable operation of the monitor and to protect it from the type of time. The wall socket shall be installed near the equipment and shall be sure these...
... tub, Swimming pool or in a bookcase or cabinet unless proper ventilation is equipped with a three-pronged grounded plug, a plug with the monitor. The monitor is provided. This plug will not be operated only from overheating, be easily accessible. Overloading can expose you are not blocked or covered. ...Please refer all servicing to qualified service personnel. To ensure reliable operation of the monitor and to protect it from the type of time. The wall socket shall be installed near the equipment and shall be sure these...
AL1712 Service Guide
Page 7
... the desktop pattern you use . In this case, the screen is displayed for hours. - 7 - Turn off the Power Switch for hours. SPECIAL NOTES ON LCD MONITORS The following symptoms are normal with LCD...
... the desktop pattern you use . In this case, the screen is displayed for hours. - 7 - Turn off the Power Switch for hours. SPECIAL NOTES ON LCD MONITORS The following symptoms are normal with LCD...
AL1712 Service Guide
Page 8
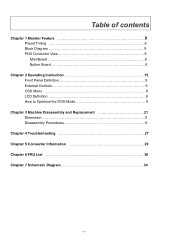
Table of contents Chapter 1 Monitor Feature 9 Preset Timing 9 Block Diagram 9 PCB Conductor View 9 MainBoard 9 Button Board 9 Chapter 2 Operating Instruction 15 Front Panel Definition 9 External Controls 9 OSD Menu 9 LCD Definition 9 How to Optimize the DOS-Mode 9 Chapter 3 Machine Disassembly and Replacement 21 Dimension 9 Disassembly Procedures 9 Chapter 4 Troubleshooting 27 Chapter 5 Connector Information 29 Chapter 6 FRU List 30 Chapter 7 Schematic Diagram 34 - 8 -
Table of contents Chapter 1 Monitor Feature 9 Preset Timing 9 Block Diagram 9 PCB Conductor View 9 MainBoard 9 Button Board 9 Chapter 2 Operating Instruction 15 Front Panel Definition 9 External Controls 9 OSD Menu 9 LCD Definition 9 How to Optimize the DOS-Mode 9 Chapter 3 Machine Disassembly and Replacement 21 Dimension 9 Disassembly Procedures 9 Chapter 4 Troubleshooting 27 Chapter 5 Connector Information 29 Chapter 6 FRU List 30 Chapter 7 Schematic Diagram 34 - 8 -
AL1712 Service Guide
Page 9
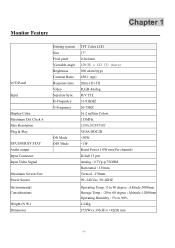
Monitor Feature Chapter 1 LCD Panel Input Display Color Maximum Dot Clock ® Max Resolution Plug & Play EPA ENERGY STAY Audio output Input Connector Input Video Signal Maximum Screen Size Power Source Environmental Considerations Weight (N.W.) Dimension Driving system Size Pixel pitch Viewable angle Brightness Contrast Ratio Response time Video Separate Sync H-Frequency V-Frequency ON Mode OFF Mode TFT Color LCD 17" 0.264 mm 150(H) x 125 (V) degree 300 cd/m2(typ) 450:1 (typ) 20ms (Tr+Tf) R,G,B Analog H/V TTL 31-81KHZ 56-75HZ 16.2 million Colors 135MHz 1280x1024@75HZ VESA DDC2B
Monitor Feature Chapter 1 LCD Panel Input Display Color Maximum Dot Clock ® Max Resolution Plug & Play EPA ENERGY STAY Audio output Input Connector Input Video Signal Maximum Screen Size Power Source Environmental Considerations Weight (N.W.) Dimension Driving system Size Pixel pitch Viewable angle Brightness Contrast Ratio Response time Video Separate Sync H-Frequency V-Frequency ON Mode OFF Mode TFT Color LCD 17" 0.264 mm 150(H) x 125 (V) degree 300 cd/m2(typ) 450:1 (typ) 20ms (Tr+Tf) R,G,B Analog H/V TTL 31-81KHZ 56-75HZ 16.2 million Colors 135MHz 1280x1024@75HZ VESA DDC2B
AL1712 Service Guide
Page 15
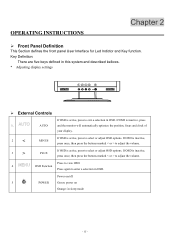
... in OSD. OPERATING INSTRUCTIONS Chapter 2 Front Panel Definition This Section defines the front panel User Interface for Led Indictor and Key function. AUTO and the monitor will automatically optimize the position, focus and clock of your display. 2 < MINUS If OSD is active, press to enter a selection in sleep mode - 15 - If...
... in OSD. OPERATING INSTRUCTIONS Chapter 2 Front Panel Definition This Section defines the front panel User Interface for Led Indictor and Key function. AUTO and the monitor will automatically optimize the position, focus and clock of your display. 2 < MINUS If OSD is active, press to enter a selection in sleep mode - 15 - If...

AL1712 Service Guide
Page 19
... APPEAR TO BE NON-FUNCTIONAL IF THERE IS NO VIDEO INPUT SIGNAL. The host can request EDID information over the DDC2B channel. This monitor meets the Green monitor standards as set by pressing a key on the keyboard, or clicking the mouse. - 19 - After the video input signal is restored, ...full power is restored and the display is no video input signal this monitor, following a time-out period, will be showed in two levels, DDC2B. This feature is designed to conserve electrical energy by reducing power consumption when ...
... APPEAR TO BE NON-FUNCTIONAL IF THERE IS NO VIDEO INPUT SIGNAL. The host can request EDID information over the DDC2B channel. This monitor meets the Green monitor standards as set by pressing a key on the keyboard, or clicking the mouse. - 19 - After the video input signal is restored, ...full power is restored and the display is no video input signal this monitor, following a time-out period, will be showed in two levels, DDC2B. This feature is designed to conserve electrical energy by reducing power consumption when ...
AL1712 Service Guide
Page 21
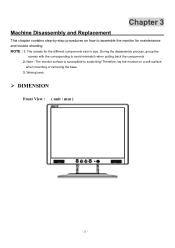
Chapter 3 Machine Disassembly and Replacement This chapter contains step-by-step procedures on a soft surface when mounting or removing the base. 3. The screws for maintenance and trouble shooting NOTE : 1. Wear gloves. Note : The monitor surface is susceptible to assemble the monitor for the different components vary in size. DIMENSION Front View : ( unit : mm ) - 21 - During the disassembly process, group the screws with the corresponding to avoid mismatch when putting back the components. 2. Therefore, lay the monitor on how to scratching!
Chapter 3 Machine Disassembly and Replacement This chapter contains step-by-step procedures on a soft surface when mounting or removing the base. 3. The screws for maintenance and trouble shooting NOTE : 1. Wear gloves. Note : The monitor surface is susceptible to assemble the monitor for the different components vary in size. DIMENSION Front View : ( unit : mm ) - 21 - During the disassembly process, group the screws with the corresponding to avoid mismatch when putting back the components. 2. Therefore, lay the monitor on how to scratching!


