User Guide
Page 2
... a particular purpose, and noninfringement. Disclaimer While every precaution has been taken in connection with the furnishing, performance, or use of ATI hardware, software or other products and documentation described herein, for any act or omission of ATI concerning such products or this manual, or parts thereof, in any interruption of service, loss or interruption of business, loss of anticipatory profits, or for...
... a particular purpose, and noninfringement. Disclaimer While every precaution has been taken in connection with the furnishing, performance, or use of ATI hardware, software or other products and documentation described herein, for any act or omission of ATI concerning such products or this manual, or parts thereof, in any interruption of service, loss or interruption of business, loss of anticipatory profits, or for...
User Guide
Page 5
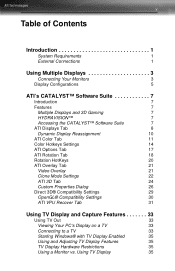
... ATI Overlay Tab 21 Video Overlay 21 Clone Mode Settings 22 ATI 3D Tab 24 Custom Properties Dialog 26 Direct 3D® Compatibility Settings 29 OpenGL® Compatibility Settings 30 ATI VPU Recover Tab 31 Using TV Display and Capture Features 33 Using TV Out 33 Viewing Your PC's Display on a TV 33 Connecting to a TV 33 Starting Windows® with TV Display Enabled 35 Using and Adjusting TV Display Features 35 TV Display Hardware Restrictions 35 Using a Monitor...
... ATI Overlay Tab 21 Video Overlay 21 Clone Mode Settings 22 ATI 3D Tab 24 Custom Properties Dialog 26 Direct 3D® Compatibility Settings 29 OpenGL® Compatibility Settings 30 ATI VPU Recover Tab 31 Using TV Display and Capture Features 33 Using TV Out 33 Viewing Your PC's Display on a TV 33 Connecting to a TV 33 Starting Windows® with TV Display Enabled 35 Using and Adjusting TV Display Features 35 TV Display Hardware Restrictions 35 Using a Monitor...
User Guide
Page 6
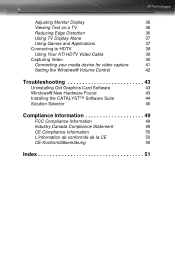
vi Adjusting Monitor Display 36 Viewing Text on a TV 36 Reducing Edge Distortion 36 Using TV Display Alone 37 Using Games and Applications 37 Connecting to HDTV 38 Using Your ATI HDTV Video Cable 39 Capturing Video 40 Connecting your media device for video capture 41 Setting the Windows® Volume Control 42 Troubleshooting 43 Uninstalling Old Graphics Card Software 43 Windows® New Hardware Found 43 Installing the CATALYST™ Software Suite 44 Solution Selector 45 Compliance Information 49 FCC Compliance Information...
vi Adjusting Monitor Display 36 Viewing Text on a TV 36 Reducing Edge Distortion 36 Using TV Display Alone 37 Using Games and Applications 37 Connecting to HDTV 38 Using Your ATI HDTV Video Cable 39 Capturing Video 40 Connecting your media device for video capture 41 Setting the Windows® Volume Control 42 Troubleshooting 43 Uninstalling Old Graphics Card Software 43 Windows® New Hardware Found 43 Installing the CATALYST™ Software Suite 44 Solution Selector 45 Compliance Information 49 FCC Compliance Information...
User Guide
Page 7
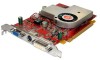
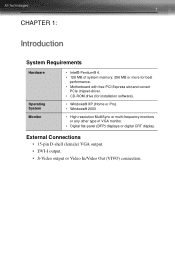
... memory; 256 MB or more for best performance. • Motherboard with free PCI Express slot and correct PCIe chipset-driver. • CD-ROM drive (for installation software). • Windows® XP (Home or Pro). • Windows® 2000 • High-resolution MultiSync or multi-frequency monitors or any other type of VGA monitor. • Digital flat-panel (DFP) displays or digital CRT display. External Connections • 15-pin D-shell (female) VGA output. • DVI-I output. • S-Video output or Video In/Video Out (VIVO) connection...
... memory; 256 MB or more for best performance. • Motherboard with free PCI Express slot and correct PCIe chipset-driver. • CD-ROM drive (for installation software). • Windows® XP (Home or Pro). • Windows® 2000 • High-resolution MultiSync or multi-frequency monitors or any other type of VGA monitor. • Digital flat-panel (DFP) displays or digital CRT display. External Connections • 15-pin D-shell (female) VGA output. • DVI-I output. • S-Video output or Video In/Video Out (VIVO) connection...
User Guide
Page 9
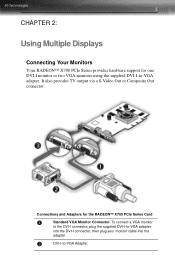
To connect a VGA monitor to the DVI-I connector, plug the supplied DVI-I-to-VGA adapter into the adapter. 3 CHAPTER 2: Using Multiple Displays Connecting Your Monitors Your RADEON™ X700 PCIe Series provides hardware support for the RADEON™ X700 PCIe Series Card X Standard VGA Monitor Connector. Y DVI-I-to -VGA adapter. It also provides TV output via a S-Video Out or Composite Out connector. Connections and Adapters for one DVI-I monitor or two VGA monitors using the supplied DVI-I connector, then plug your monitor cable into the DVI-I -to -VGA Adapter.
To connect a VGA monitor to the DVI-I connector, plug the supplied DVI-I-to-VGA adapter into the adapter. 3 CHAPTER 2: Using Multiple Displays Connecting Your Monitors Your RADEON™ X700 PCIe Series provides hardware support for the RADEON™ X700 PCIe Series Card X Standard VGA Monitor Connector. Y DVI-I-to -VGA adapter. It also provides TV output via a S-Video Out or Composite Out connector. Connections and Adapters for one DVI-I monitor or two VGA monitors using the supplied DVI-I connector, then plug your monitor cable into the DVI-I -to -VGA Adapter.
User Guide
Page 10
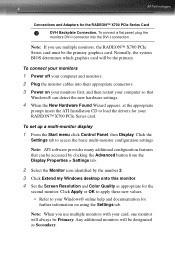
... system BIOS determines which graphics card will be the primary. To connect your monitors 1 Power off your computer and monitors. 2 Plug the monitor cables into the DVI-I Backplate Connection. Note: If you use multiple monitors, the RADEON™ X700 PCIe Series card must be the primary graphics card. To set up a multi-monitor display 1 From the Start menu click Control Panel, then Display. Click Apply or OK to apply these new values. • Refer to your Windows® online help and documentation for...
... system BIOS determines which graphics card will be the primary. To connect your monitors 1 Power off your computer and monitors. 2 Plug the monitor cables into the DVI-I Backplate Connection. Note: If you use multiple monitors, the RADEON™ X700 PCIe Series card must be the primary graphics card. To set up a multi-monitor display 1 From the Start menu click Control Panel, then Display. Click Apply or OK to apply these new values. • Refer to your Windows® online help and documentation for...
User Guide
Page 11
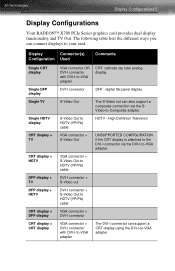
... display + CRT display VGA connector OR DVI-I connector with DVI-I-to-VGA adapter The S-Video out can support a CRT display using the DVI-I -to -VGA adapter CRT- S-Video Out S-Video Out to HDTV (YPrPb) cable VGA connector + S-Video Out VGA connector + S-Video Out to HDTV (YPrPb) cable DVI-I connector + S-Video out DVI-I connector + S-Video Out to HDTV (YPrPb) cable VGA connector + DVI-I connector VGA connector + DVI-I connector with DVI-I connector DFP - Display Configurations 5 Display Configurations Your RADEON™ X700 PCIe Series graphics card provides dual display...
... display + CRT display VGA connector OR DVI-I connector with DVI-I-to-VGA adapter The S-Video out can support a CRT display using the DVI-I -to -VGA adapter CRT- S-Video Out S-Video Out to HDTV (YPrPb) cable VGA connector + S-Video Out VGA connector + S-Video Out to HDTV (YPrPb) cable DVI-I connector + S-Video out DVI-I connector + S-Video Out to HDTV (YPrPb) cable VGA connector + DVI-I connector VGA connector + DVI-I connector with DVI-I connector DFP - Display Configurations 5 Display Configurations Your RADEON™ X700 PCIe Series graphics card provides dual display...

User Guide
Page 13
... advanced multi-monitor management. HYDRAVISION™ In addition to life through Windows® Control Panel, which is located in the Start menu. CHAPTER 3: Introduction 7 ATI's CATALYST™ Software Suite Introduction This chapter describes using the advanced multiple-monitor and 3D graphics features in 3D image quality or 3D gaming performance. Accessing the CATALYST™ Software Suite The CATALYST™ Software Suite installs the ATI display tabs into the Windows® Display Properties...
... advanced multi-monitor management. HYDRAVISION™ In addition to life through Windows® Control Panel, which is located in the Start menu. CHAPTER 3: Introduction 7 ATI's CATALYST™ Software Suite Introduction This chapter describes using the advanced multiple-monitor and 3D graphics features in 3D image quality or 3D gaming performance. Accessing the CATALYST™ Software Suite The CATALYST™ Software Suite installs the ATI display tabs into the Windows® Display Properties...
User Guide
Page 23
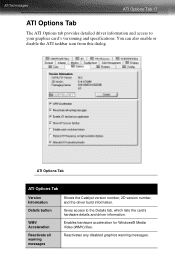
Gives access to your graphics card's versioning and specifications. ATI Options Tab ATI Options Tab Version Information Details button WMV Acceleration Reactivate all warning messages Shows the Catalyst version number, 2D version number, and the driver build information. Enables hardware acceleration for Windows® Media Video (WMV) files. Reactivates any disabled graphics warning messages. ATI Options Tab 17 ATI Options Tab The ATI Options tab provides detailed driver information and access to the Details tab, which...
Gives access to your graphics card's versioning and specifications. ATI Options Tab ATI Options Tab Version Information Details button WMV Acceleration Reactivate all warning messages Shows the Catalyst version number, 2D version number, and the driver build information. Enables hardware acceleration for Windows® Media Video (WMV) files. Reactivates any disabled graphics warning messages. ATI Options Tab 17 ATI Options Tab The ATI Options tab provides detailed driver information and access to the Details tab, which...
User Guide
Page 28
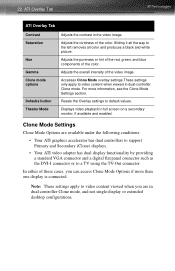
...; Your ATI graphics accelerator has dual controllers to support Primary and Secondary (Clone) displays. • Your ATI video adapter has dual display functionality by providing a standard VGA connector and a digital flat panel connector such as the DVI-I connector or to video content when viewed in dual-controller Clone mode, and not single-display or extended desktop configurations. 22 ATI Overlay Tab ATI Overlay Tab Contrast Saturation Hue Gamma Clone mode options Defaults button Theater Mode Adjusts the contrast in full screen on a secondary monitor, if available and enabled.
...; Your ATI graphics accelerator has dual controllers to support Primary and Secondary (Clone) displays. • Your ATI video adapter has dual display functionality by providing a standard VGA connector and a digital flat panel connector such as the DVI-I connector or to video content when viewed in dual-controller Clone mode, and not single-display or extended desktop configurations. 22 ATI Overlay Tab ATI Overlay Tab Contrast Saturation Hue Gamma Clone mode options Defaults button Theater Mode Adjusts the contrast in full screen on a secondary monitor, if available and enabled.
User Guide
Page 39
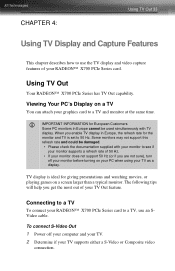
... RADEON™ X700 PCIe Series card to use an SVideo cable. CHAPTER 4: Using TV Out 33 Using TV Display and Capture Features This chapter describes how to a TV, use the TV display and video capture features of your TV Out feature. Using TV Out Your RADEON™ X700 PCIe Series has TV Out capability. To connect S-Video Out 1 Power off your monitor before turning on your PC when using your RADEON™ X700 PCIe Series card. Some monitors may not support this refresh rate...
... RADEON™ X700 PCIe Series card to use an SVideo cable. CHAPTER 4: Using TV Out 33 Using TV Display and Capture Features This chapter describes how to a TV, use the TV display and video capture features of your TV Out feature. Using TV Out Your RADEON™ X700 PCIe Series has TV Out capability. To connect S-Video Out 1 Power off your monitor before turning on your PC when using your RADEON™ X700 PCIe Series card. Some monitors may not support this refresh rate...
User Guide
Page 41
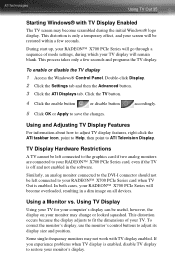
... monitor's control buttons to fit the dimensions of mode settings, during the initial Windows® logo display. To enable or disable the TV display 1 Access the Windows® Control Panel. In both cases, your monitor may become overloaded, resulting in the software. If you experience problems when TV display is only a temporary effect, and your screen will be left connected to the graphics card if two analog monitors are connected to your RADEON™ X700 PCIe Series card...
... monitor's control buttons to fit the dimensions of mode settings, during the initial Windows® logo display. To enable or disable the TV display 1 Access the Windows® Control Panel. In both cases, your monitor may become overloaded, resulting in the software. If you experience problems when TV display is only a temporary effect, and your screen will be left connected to the graphics card if two analog monitors are connected to your RADEON™ X700 PCIe Series card...
User Guide
Page 43
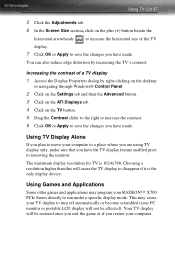
... to a place where you are using TV display only, make sure that you have the TV display feature enabled prior to run under a specific display mode. You can also reduce edge distortion by right-clicking on the desktop or navigating through Windows® Control Panel. 2 Click on the Settings tab and then the Advanced button. 3 Click on the ATI Displays tab. 4 Click on the plus...
... to a place where you are using TV display only, make sure that you have the TV display feature enabled prior to run under a specific display mode. You can also reduce edge distortion by right-clicking on the desktop or navigating through Windows® Control Panel. 2 Click on the Settings tab and then the Advanced button. 3 Click on the ATI Displays tab. 4 Click on the plus...
User Guide
Page 47
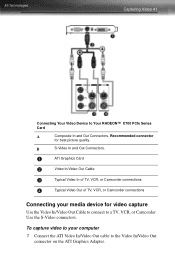
Capturing Video 41 Connecting Your Video Device to a TV, VCR, or Camcorder. Recommended connector for video capture Use the Video In/Video Out Cable to connect to Your RADEON™ X700 PCIe Series Card A Composite In and Out Connectors. X ATI Graphics Card Y Video In/Video Out Cable Z Typical Video In of TV, VCR, or Camcorder connections [ Typical Video Out of TV, VCR, or Camcorder connections Connecting your computer 1 Connect the ATI Video In/Video Out cable to the Video In/Video Out connector on the ATI Graphics Adapter. Use the S-Video connectors. To capture ...
Capturing Video 41 Connecting Your Video Device to a TV, VCR, or Camcorder. Recommended connector for video capture Use the Video In/Video Out Cable to connect to Your RADEON™ X700 PCIe Series Card A Composite In and Out Connectors. X ATI Graphics Card Y Video In/Video Out Cable Z Typical Video In of TV, VCR, or Camcorder connections [ Typical Video Out of TV, VCR, or Camcorder connections Connecting your computer 1 Connect the ATI Video In/Video Out cable to the Video In/Video Out connector on the ATI Graphics Adapter. Use the S-Video connectors. To capture ...
User Guide
Page 49
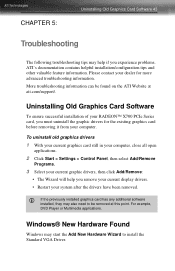
... additional software installed, they may also need to install the Standard VGA Driver. Uninstalling Old Graphics Card Software To ensure successful installation of your RADEON™ X700 PCIe Series card, you remove your current display drivers. • Restart your system after the drivers have been removed. For example, DVD Player or Multimedia applications. To uninstall old graphics drivers 1 With your current graphics card still in your computer, close all open applications. 2 Click Start > Settings > Control Panel...
... additional software installed, they may also need to install the Standard VGA Driver. Uninstalling Old Graphics Card Software To ensure successful installation of your RADEON™ X700 PCIe Series card, you remove your current display drivers. • Restart your system after the drivers have been removed. For example, DVD Player or Multimedia applications. To uninstall old graphics drivers 1 With your current graphics card still in your computer, close all open applications. 2 Click Start > Settings > Control Panel...
User Guide
Page 51
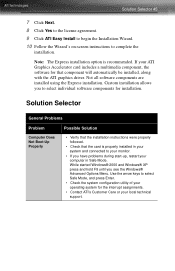
... Express installation option is properly installed in your system and connected to select individual software components for that the card is recommended. Use the arrow keys to complete the installation. Solution Selector General Problems Problem Computer Does Not Boot-Up Properly Possible Solution • Verify that the installation instructions were properly followed. • Check that component will automatically be installed, along with the ATI graphics driver...
... Express installation option is properly installed in your system and connected to select individual software components for that the card is recommended. Use the arrow keys to complete the installation. Solution Selector General Problems Problem Computer Does Not Boot-Up Properly Possible Solution • Verify that the installation instructions were properly followed. • Check that component will automatically be installed, along with the ATI graphics driver...
User Guide
Page 52
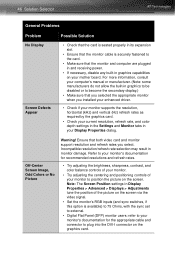
Incompatible resolution/refresh rate selection may result in graphics capabilities on your Display Properties dialog. Note: The Screen Position settings in Display Properties > Advanced > Displays > Adjustments tune the position of your monitor to position the picture on the screen. Off-Center Screen Image, Odd Colors or No Picture Warning! Refer to your monitor's documentation for the appropriate cable and connector to plug into the DVI-I connector on the graphics card. 46 Solution Selector General Problems Problem No Display Screen Defects...
Incompatible resolution/refresh rate selection may result in graphics capabilities on your Display Properties dialog. Note: The Screen Position settings in Display Properties > Advanced > Displays > Adjustments tune the position of your monitor to position the picture on the screen. Off-Center Screen Image, Odd Colors or No Picture Warning! Refer to your monitor's documentation for the appropriate cable and connector to plug into the DVI-I connector on the graphics card. 46 Solution Selector General Problems Problem No Display Screen Defects...
User Guide
Page 53
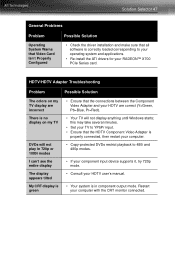
... entire display The display appears tilted My CRT display is green • Ensure that the connections between the Component Video Adapter and your HDTV are incorrect There is properly connected, then restart your computer. • Copy-protected DVDs restrict playback to your operating system and applications. • Re-install the ATI drivers for your RADEON™ X700 PCIe Series card. HDTV/HDTV Adapter Troubleshooting Problem Possible Solution The colors on my TV display are...
... entire display The display appears tilted My CRT display is green • Ensure that the connections between the Component Video Adapter and your HDTV are incorrect There is properly connected, then restart your computer. • Copy-protected DVDs restrict playback to your operating system and applications. • Re-install the ATI drivers for your RADEON™ X700 PCIe Series card. HDTV/HDTV Adapter Troubleshooting Problem Possible Solution The colors on my TV display are...

User Guide
Page 59
... troubleshooting 47 HDTV adapter troubleshooting 47 HDTV Component Video Adapter 38 High Definition Television 38 horizontal size TV display 36 hue video overlay 21 I Input and output adapters displaying PC output on TV and recording on videotape 40 installing CATALYST Software 44 M multiple displays rotate 20 O old graphics drivers uninstall 43 Options tab 17 overlay adjustments 21 overlay settings Clone Mode 22 P performance 3D 25 primary display 8 clone mode 22 profiles 3D 25 color 13 color settings 13 Q quality 3D 25 R Recording PC output...
... troubleshooting 47 HDTV adapter troubleshooting 47 HDTV Component Video Adapter 38 High Definition Television 38 horizontal size TV display 36 hue video overlay 21 I Input and output adapters displaying PC output on TV and recording on videotape 40 installing CATALYST Software 44 M multiple displays rotate 20 O old graphics drivers uninstall 43 Options tab 17 overlay adjustments 21 overlay settings Clone Mode 22 P performance 3D 25 primary display 8 clone mode 22 profiles 3D 25 color 13 color settings 13 Q quality 3D 25 R Recording PC output...
User Guide
Page 60
... display 8 secondary displays clone mode 22 settings 3D applications 14 Clone Mode 22 single display rotate 20 system requirements 1 T tab Overlay 21 Theater Mode 22 Triple Buffering 30 troubleshooting general problems 45 HDTV 47 HDTV adapter 47 TV displaying PC output on 40 TV display 33, 36, 37 contrast 36 games 37 hardware restrictions 35 horizontal size 36 TV Out 33, 35 U uninstall old graphics drivers 43 Uninstalling old graphics card software 43 V VGA 22 video capture...
... display 8 secondary displays clone mode 22 settings 3D applications 14 Clone Mode 22 single display rotate 20 system requirements 1 T tab Overlay 21 Theater Mode 22 Triple Buffering 30 troubleshooting general problems 45 HDTV 47 HDTV adapter 47 TV displaying PC output on 40 TV display 33, 36, 37 contrast 36 games 37 hardware restrictions 35 horizontal size 36 TV Out 33, 35 U uninstall old graphics drivers 43 Uninstalling old graphics card software 43 V VGA 22 video capture...


