
User Guide
Page 2
... other products and documentation provided herein. and 6,516,132. Trademarks AMD, the AMD Arrow logo, AMD Athlon, AMD Opteron and combinations therof, AMD-XXXX, ATI and ATI product and product-feature names are not designed, intended, authorized or warranted for use of this publication are for limited viewing uses only. With respect...
... other products and documentation provided herein. and 6,516,132. Trademarks AMD, the AMD Arrow logo, AMD Athlon, AMD Opteron and combinations therof, AMD-XXXX, ATI and ATI product and product-feature names are not designed, intended, authorized or warranted for use of this publication are for limited viewing uses only. With respect...

User Guide
Page 5
... Old Graphics Drivers 4 Install the Graphics Card 5 Installing and Configuring Displays 7 Connections 7 Adapters 7 Supported Display Connections 8 Connecting and Configuring Displays 9 Installing Software and Drivers 11 ATI Catalyst™ Control Center 13 Help 14 Using TV Display and Capture Features 15 Viewing the PC's Display on TV or HDTV 15 Connecting to...
... Old Graphics Drivers 4 Install the Graphics Card 5 Installing and Configuring Displays 7 Connections 7 Adapters 7 Supported Display Connections 8 Connecting and Configuring Displays 9 Installing Software and Drivers 11 ATI Catalyst™ Control Center 13 Help 14 Using TV Display and Capture Features 15 Viewing the PC's Display on TV or HDTV 15 Connecting to...

User Guide
Page 7
... power supply is designed to accommodate a high-end graphics card with two (2) PCI Express® x16 slots and correct PCIe™ chipset driver. • A second ATI Radeon™ HD 2600 Series graphics card. • Two ATI CrossFire™ internal bridge interconnects. • A specialized PCI Express® 550 watt or greater power supply. For an...
... power supply is designed to accommodate a high-end graphics card with two (2) PCI Express® x16 slots and correct PCIe™ chipset driver. • A second ATI Radeon™ HD 2600 Series graphics card. • Two ATI CrossFire™ internal bridge interconnects. • A specialized PCI Express® 550 watt or greater power supply. For an...

User Guide
Page 13
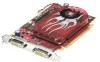
... In/Video Out) 3 SVGA connection Adapters The following illustrate the typical connections on the ATI Radeon™ HD 2600 Series graphics card. ATI DVI-to other display devices. The connections available may vary between models of this series graphics card. ATI Radeon™ HD 2600 Series Connections Legend 1 DVI-I Dual Link connection (Provides audio and...
... In/Video Out) 3 SVGA connection Adapters The following illustrate the typical connections on the ATI Radeon™ HD 2600 Series graphics card. ATI DVI-to other display devices. The connections available may vary between models of this series graphics card. ATI Radeon™ HD 2600 Series Connections Legend 1 DVI-I Dual Link connection (Provides audio and...
User Guide
Page 14
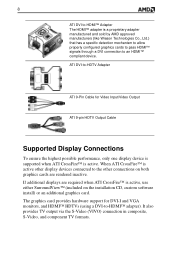
... HDTV Output Cable Supported Display Connections To ensure the highest possible performance, only one display device is supported when ATI CrossFire™ is active. ATI DVI-to -HDMI™ adapter). If additional displays are rendered inactive. It also provides TV output via the S-Video (VIVO) connection in...cards to pass HDMI™ signals through a DVI connection to the other connections on both graphics cards are required when ATI CrossFire™ is active, use either SurroundView™ (included on the installation CD, custom software install) or an additional graphics card.
... HDTV Output Cable Supported Display Connections To ensure the highest possible performance, only one display device is supported when ATI CrossFire™ is active. ATI DVI-to -HDMI™ adapter). If additional displays are rendered inactive. It also provides TV output via the S-Video (VIVO) connection in...cards to pass HDMI™ signals through a DVI connection to the other connections on both graphics cards are required when ATI CrossFire™ is active, use either SurroundView™ (included on the installation CD, custom software install) or an additional graphics card.
User Guide
Page 15
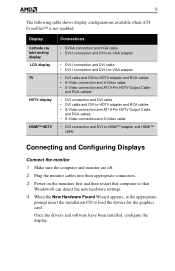
...-I-to-VGA adapter • DVI cable and DVI-to-HDTV adapter and RCA cables • S-Video connection and S-Video cable • S-Video connection and ATI 9-Pin HDTV Output Cable and RCA cablest • DVI connection and DVI cable • DVI cable and DVI-to-HDTV adapter and RCA cables •...; S-Video connection and ATI 9-Pin HDTV Output Cable and RCA cables • S-Video connection and S-Video cable • DVI connection and DVI-to-HDMI™ adapter and HDMI™...
...-I-to-VGA adapter • DVI cable and DVI-to-HDTV adapter and RCA cables • S-Video connection and S-Video cable • S-Video connection and ATI 9-Pin HDTV Output Cable and RCA cablest • DVI connection and DVI cable • DVI cable and DVI-to-HDTV adapter and RCA cables •...; S-Video connection and ATI 9-Pin HDTV Output Cable and RCA cables • S-Video connection and S-Video cable • DVI connection and DVI-to-HDMI™ adapter and HDMI™...

User Guide
Page 16
... Start menu click Control Panel, and then click Display. b) To access the basic multi-monitor configuration settings, click the Settings tab . Note: When using the ATI Catalyst™ Control Center.
... Start menu click Control Panel, and then click Display. b) To access the basic multi-monitor configuration settings, click the Settings tab . Note: When using the ATI Catalyst™ Control Center.
User Guide
Page 17
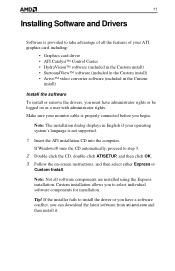
... select either Express or Custom Install. Make sure your monitor cable is properly connected before you can download the latest software from ati.amd.com and then install it. Note: The installation dialog displays in the Custom install) Install the software To install or... have a software conflict, you begin. 11 Installing Software and Drivers Software is provided to take advantage of your ATI graphics card, including: • Graphics card driver • ATI Catalyst™ Control Center • HydraVision™ software (included in the Custom install) • SurroundView™...
... select either Express or Custom Install. Make sure your monitor cable is properly connected before you can download the latest software from ati.amd.com and then install it. Note: The installation dialog displays in the Custom install) Install the software To install or... have a software conflict, you begin. 11 Installing Software and Drivers Software is provided to take advantage of your ATI graphics card, including: • Graphics card driver • ATI Catalyst™ Control Center • HydraVision™ software (included in the Custom install) • SurroundView™...
User Guide
Page 19
... to fine-tune your graphics settings, enable or disable connected display devices, and change the orientation of the desktop. 13 ATI Catalyst™ Control Center The ATI Catalyst™ Control Center is a simplified view that provides access to the display features of the changes before they are applied.... The ATI Catalyst™ Control Center offers two views: • Basic View is software that includes wizards to get the inexperienced user up and ...
... to fine-tune your graphics settings, enable or disable connected display devices, and change the orientation of the desktop. 13 ATI Catalyst™ Control Center The ATI Catalyst™ Control Center is a simplified view that provides access to the display features of the changes before they are applied.... The ATI Catalyst™ Control Center offers two views: • Basic View is software that includes wizards to get the inexperienced user up and ...

User Guide
Page 20
..., choose Advanced, and then do either of the following : • Press F1 at any time to launch ATI Catalyst® Control Center, or you can • Double-click the ATI Catalyst® Control Center desktop shortcut. Windows® Start Menu From the Windows® task bar, click Start...™ Control Center from one of the following access points: Access Point Instructions Windows® Desktop 1. Fom the short menu, select ATI Catalyst® Control Center. Press the predefined combination of placing a shortcut on how to access usage information, generate a problem report, ...
..., choose Advanced, and then do either of the following : • Press F1 at any time to launch ATI Catalyst® Control Center, or you can • Double-click the ATI Catalyst® Control Center desktop shortcut. Windows® Start Menu From the Windows® task bar, click Start...™ Control Center from one of the following access points: Access Point Instructions Windows® Desktop 1. Fom the short menu, select ATI Catalyst® Control Center. Press the predefined combination of placing a shortcut on how to access usage information, generate a problem report, ...

User Guide
Page 23
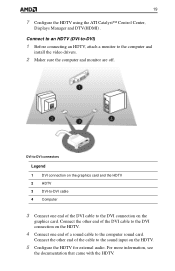
... HDMI™ HDTV, attach a monitor to the computer and install the video drivers. 2 Make sure the computer and monitor are off. Component Video using ATI 9-Pin HDTV Output Cable) on page 22. • Connect to a composite video device (S-Video-to-S-Video or Composite Video) on page 24. •...; Connect to a European video device (S-Video to SCART using ATI DVI-to - This topic includes the following procedures: • Connect to an HDMI™ HDTV (DVI-to-HDMI™) on page 17. • Connect...
... HDMI™ HDTV, attach a monitor to the computer and install the video drivers. 2 Make sure the computer and monitor are off. Component Video using ATI 9-Pin HDTV Output Cable) on page 22. • Connect to a composite video device (S-Video-to-S-Video or Composite Video) on page 24. •...; Connect to a European video device (S-Video to SCART using ATI DVI-to - This topic includes the following procedures: • Connect to an HDMI™ HDTV (DVI-to-HDMI™) on page 17. • Connect...
User Guide
Page 25
... HDTV for external audio. Connect the other end of a sound cable to the sound input on the graphics card. 19 7 Configure the HDTV using the ATI Catalyst™ Control Center, Displays Manager and DTV(HDMI) .
... HDTV for external audio. Connect the other end of a sound cable to the sound input on the graphics card. 19 7 Configure the HDTV using the ATI Catalyst™ Control Center, Displays Manager and DTV(HDMI) .

User Guide
Page 26
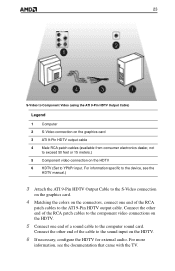
... or 15 meters. 5 Component video connection on the computer. DVI to component video connectors Legend 1 Computer 2 DVI connection on the graphics card 3 ATI DVI-to-HDTV adapter (standard dip-switch settings) . 4 RCA patch cables (available from consumer electronics dealer, not to -Component Video using the...™ Control Center, Displays Manager and DTV(DVI). The HDTV will not display anything until Windows® starts. 7 Configure the HDTV using ATI DVI-to-HDTV adapter) 1 Before connecting an HDTV, attach a monitor to the device, see the HDTV manual.) For information specific to the...
... or 15 meters. 5 Component video connection on the computer. DVI to component video connectors Legend 1 Computer 2 DVI connection on the graphics card 3 ATI DVI-to-HDTV adapter (standard dip-switch settings) . 4 RCA patch cables (available from consumer electronics dealer, not to -Component Video using the...™ Control Center, Displays Manager and DTV(DVI). The HDTV will not display anything until Windows® starts. 7 Configure the HDTV using ATI DVI-to-HDTV adapter) 1 Before connecting an HDTV, attach a monitor to the device, see the HDTV manual.) For information specific to the...

User Guide
Page 27
... up position is not supported). Aspect Ratio Switch Settings In the previous examples, the component input display supports 480i, 480p, 1080i, and 16:9. 4 Attach the ATI DVI-to-HDTV component video adapter to set the appropriate display mode and aspect ratio. Configure the DIP switches to the DVI connection on and... the down position if off (540p is on the graphics card. Set the switches on the ATI HDTV Component Video Adapter enable four, standard HDTV video modes: 480i, 480p, 720p,and 1080i. The default setting is 4:3.
... up position is not supported). Aspect Ratio Switch Settings In the previous examples, the component input display supports 480i, 480p, 1080i, and 16:9. 4 Attach the ATI DVI-to-HDTV component video adapter to set the appropriate display mode and aspect ratio. Configure the DIP switches to the DVI connection on and... the down position if off (540p is on the graphics card. Set the switches on the ATI HDTV Component Video Adapter enable four, standard HDTV video modes: 480i, 480p, 720p,and 1080i. The default setting is 4:3.
User Guide
Page 28
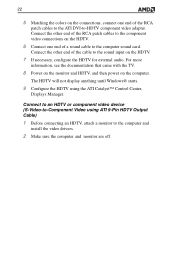
...end of the RCA patch cables to the component video connections on the HDTV. 6 Connect one end of the RCA patch cables to the ATI DVI-to-HDTV component video adapter. The HDTV will not display anything until Windows® starts. 9 Configure the HDTV using... ATI 9-Pin HDTV Output Cable) 1 Before connecting an HDTV, attach a monitor to -Component Video using the ATI Catalyst™ Control Center, Displays Manager. For more information, see the documentation that came with the TV...
...end of the RCA patch cables to the component video connections on the HDTV. 6 Connect one end of the RCA patch cables to the ATI DVI-to-HDTV component video adapter. The HDTV will not display anything until Windows® starts. 9 Configure the HDTV using... ATI 9-Pin HDTV Output Cable) 1 Before connecting an HDTV, attach a monitor to -Component Video using the ATI Catalyst™ Control Center, Displays Manager. For more information, see the documentation that came with the TV...
User Guide
Page 29
Connect the other end of the cable to the sound input on the HDTV. 5 Connect one end of the RCA patch cables to the ATI 9-Pin HDTV output cable. Connect the other end of the RCA patch cables to the component video connections on the HDTV. 6 If necessary, configure the ... external audio. For information specific to the device, see the documentation that came with the TV. For more information, see the HDTV manual.) 3 Attach the ATI 9-Pin HDTV Output Cable to the S-Video connection on the graphics card. 4 Matching the colors on the HDTV 6 HDTV (Set to YPbPr input. 23 S-Video...
Connect the other end of the cable to the sound input on the HDTV. 5 Connect one end of the RCA patch cables to the ATI 9-Pin HDTV output cable. Connect the other end of the RCA patch cables to the component video connections on the HDTV. 6 If necessary, configure the ... external audio. For information specific to the device, see the documentation that came with the TV. For more information, see the HDTV manual.) 3 Attach the ATI 9-Pin HDTV Output Cable to the S-Video connection on the graphics card. 4 Matching the colors on the HDTV 6 HDTV (Set to YPbPr input. 23 S-Video...
User Guide
Page 30
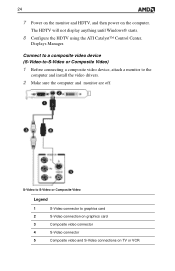
... video drivers. 2 Make sure the computer and monitor are off. The HDTV will not display anything until Windows® starts. 8 Configure the HDTV using the ATI Catalyst™ Control Center, Displays Manager. 24 7 Power on the monitor and HDTV, and then power on TV or VCR Connect to a composite video device...
... video drivers. 2 Make sure the computer and monitor are off. The HDTV will not display anything until Windows® starts. 8 Configure the HDTV using the ATI Catalyst™ Control Center, Displays Manager. 24 7 Power on the monitor and HDTV, and then power on TV or VCR Connect to a composite video device...

User Guide
Page 31
Connect the other end of the composite video cable to the S-Video connection on the computer. The composite video device will not display anything until Windows® starts. 5 Configure the composite video device using the ATI Catalyst™ Control Center, Displays Manager. 25 3 Connect the S-Video connector on the composite video cable to either the S-Video or composite video connection on the composite video device. 4 Power on the monitor and composite video device, and then power on the graphics card.
Connect the other end of the composite video cable to the S-Video connection on the computer. The composite video device will not display anything until Windows® starts. 5 Configure the composite video device using the ATI Catalyst™ Control Center, Displays Manager. 25 3 Connect the S-Video connector on the composite video cable to either the S-Video or composite video connection on the composite video device. 4 Power on the monitor and composite video device, and then power on the graphics card.

User Guide
Page 33
... Africa, Asia, Japan, South Korea, and the Philipines. The TV will not display anything until Windows starts. 10 Configure the TV using the ATI Displays control panel. For more information, see the Help for NTSC and PAL d) Use a sharp pencil to PAL. a) Disconnect the monitor cable... from the computer. Switch Positions for ATI Displays. PAL is the TV standard used in the preceding illustration. c) Locate the orange switch on the TV. 8 If necessary, configure the TV...
... Africa, Asia, Japan, South Korea, and the Philipines. The TV will not display anything until Windows starts. 10 Configure the TV using the ATI Displays control panel. For more information, see the Help for NTSC and PAL d) Use a sharp pencil to PAL. a) Disconnect the monitor cable... from the computer. Switch Positions for ATI Displays. PAL is the TV standard used in the preceding illustration. c) Locate the orange switch on the TV. 8 If necessary, configure the TV...
User Guide
Page 37
Click OK. Avivo™ Video Converter The wizard-based ATI Avivo™ Video Converter changes a video file from one format to an Apple® iPod® Video, Sony® PSP, or Windows® Mobile-based ...
Click OK. Avivo™ Video Converter The wizard-based ATI Avivo™ Video Converter changes a video file from one format to an Apple® iPod® Video, Sony® PSP, or Windows® Mobile-based ...


