
Intel Rapid Storage Guide
Page 13
... insert the disk labeled Manufacturer-supplied hardware support disk into Drive A:, insert ;a floppy disk containing the following steps to create a floppy disk with a screen asking you have successfully installed the driver and Windows setup should continue. This message appears at the beginning of available SCSI adapters. Use the Floppy Configuration Utility to install the Intel Rapid Storage Technology driver during text-mode phase). 7. Press F6 when you need to load support for mass storage device(s). 2. You will...
... insert the disk labeled Manufacturer-supplied hardware support disk into Drive A:, insert ;a floppy disk containing the following steps to create a floppy disk with a screen asking you have successfully installed the driver and Windows setup should continue. This message appears at the beginning of available SCSI adapters. Use the Floppy Configuration Utility to install the Intel Rapid Storage Technology driver during text-mode phase). 7. Press F6 when you need to load support for mass storage device(s). 2. You will...

Intel Smart Response Installation Guide
Page 1
... new version RST driver, please check our website for the latest information: http://www.asrock.com * Before you just need to set the UEFI option "SATA Mode" to desktop, open , click on the "Enable Acceleration" button on the GUI panel. 5. You can find the UI setup instruction and the step by double-clicking RST Storage icon in RAID ROM. Boot system to [RAID Mode]. It is not necessary to use RST...
... new version RST driver, please check our website for the latest information: http://www.asrock.com * Before you just need to set the UEFI option "SATA Mode" to desktop, open , click on the "Enable Acceleration" button on the GUI panel. 5. You can find the UI setup instruction and the step by double-clicking RST Storage icon in RAID ROM. Boot system to [RAID Mode]. It is not necessary to use RST...

RAID Installation Guide
Page 6
... 64-bit OS on your SATA / SATA2 / SATA3 HDDs with RAID functions, please follow the procedures below. Enter BIOS SETUP UTILITY Advanced screen Storage Configuration. B. Please refer to the document in the Support CD, "Guide to SATA Hard Disks Installation and RAID Configuration", which is located in the folder at the following path: .. \ Intel Rapid Storage Information If you are allowed to use "Intel Rapid Storage" in Windows...
... 64-bit OS on your SATA / SATA2 / SATA3 HDDs with RAID functions, please follow the procedures below. Enter BIOS SETUP UTILITY Advanced screen Storage Configuration. B. Please refer to the document in the Support CD, "Guide to SATA Hard Disks Installation and RAID Configuration", which is located in the folder at the following path: .. \ Intel Rapid Storage Information If you are allowed to use "Intel Rapid Storage" in Windows...

User Manual
Page 6
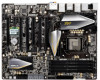
... supports PCIE 2.0. - 1 x PCI Express 2.0 x16 slot (PCIE4: x4 mode) - 1 x PCI Express 2.0 x 1 slot - 1 x mini-PCI Express slot: For WiFi + BT module - Supports Intel® HD Graphics Built-in , 30.5 cm x 24.4 cm - PCIE1/ PCIE3/PCIE5/PCIE7: x16/0/16/0 or x8/8/8/8 mode) (see CAUTION 3) - Intel® Z77 - Supports Intel® Extreme Memory Profile (XMP)1.3/1.2 - 5 x PCI Express 3.0 x16 slots (PCIE2: x16 mode; Supports AMD Quad CrossFireXTM, 4-Way CrossFireXTM, 3-Way CrossFireXTM and CrossFireXTM - 1.2 Specifications Platform CPU Chipset Memory Expansion Slot Graphics - Supports...
... supports PCIE 2.0. - 1 x PCI Express 2.0 x16 slot (PCIE4: x4 mode) - 1 x PCI Express 2.0 x 1 slot - 1 x mini-PCI Express slot: For WiFi + BT module - Supports Intel® HD Graphics Built-in , 30.5 cm x 24.4 cm - PCIE1/ PCIE3/PCIE5/PCIE7: x16/0/16/0 or x8/8/8/8 mode) (see CAUTION 3) - Intel® Z77 - Supports Intel® Extreme Memory Profile (XMP)1.3/1.2 - 5 x PCI Express 3.0 x16 slots (PCIE2: x16 mode; Supports AMD Quad CrossFireXTM, 4-Way CrossFireXTM, 3-Way CrossFireXTM and CrossFireXTM - 1.2 Specifications Platform CPU Chipset Memory Expansion Slot Graphics - Supports...
User Manual
Page 11
... the CPU cores are transferring currently. 11 ASRock website: http://www.asrock.com/Feature/SmartView/index.asp 12. LAN Application Prioritization: You can press the key during the POST or the key to enter into the BIOS setup menu to your USB flash drive, floppy disk or hard drive, then you - This convenient BIOS update tool allows you to quickly charge many Apple devices simultaneously and even supports continuous...
... the CPU cores are transferring currently. 11 ASRock website: http://www.asrock.com/Feature/SmartView/index.asp 12. LAN Application Prioritization: You can press the key during the POST or the key to enter into the BIOS setup menu to your USB flash drive, floppy disk or hard drive, then you - This convenient BIOS update tool allows you to quickly charge many Apple devices simultaneously and even supports continuous...
User Manual
Page 14
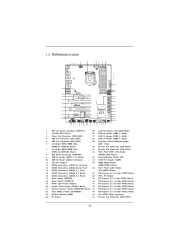
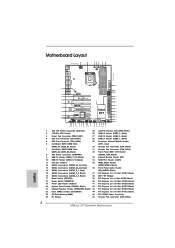
... Module 17 Reset Switch (RSTBTN) 39 PCI Express 2.0 x1 Slot (PCIE6, Black) 18 Power Switch (PWRBTN) 40 PCI Express 3.0 x16 Slot (PCIE5, Black) 19 Power LED Header (PLED1) 41 PCI Express 2.0 x16 Slot (PCIE4, Black) 20 System Panel Header (PANEL1, Black) 42 PCI Express 3.0 x16 Slot (PCIE3, Black) 21 Chassis Speaker Header (SPEAKER1, Black) 43 PCI Express 3.0 x16 Slot (PCIE2, Black) 22 Clear CMOS Jumper (CLRCMOS1) 44 PCI Express 3.0 x16 Slot (PCIE1, Black) 23 SPI Flash Memory (64Mb) 45 SLI / XFIRE Power Connector 24 Dr. Debug 46 Chassis Fan Connector (CHA_FAN3...
... Module 17 Reset Switch (RSTBTN) 39 PCI Express 2.0 x1 Slot (PCIE6, Black) 18 Power Switch (PWRBTN) 40 PCI Express 3.0 x16 Slot (PCIE5, Black) 19 Power LED Header (PLED1) 41 PCI Express 2.0 x16 Slot (PCIE4, Black) 20 System Panel Header (PANEL1, Black) 42 PCI Express 3.0 x16 Slot (PCIE3, Black) 21 Chassis Speaker Header (SPEAKER1, Black) 43 PCI Express 3.0 x16 Slot (PCIE2, Black) 22 Clear CMOS Jumper (CLRCMOS1) 44 PCI Express 3.0 x16 Slot (PCIE1, Black) 23 SPI Flash Memory (64Mb) 45 SLI / XFIRE Power Connector 24 Dr. Debug 46 Chassis Fan Connector (CHA_FAN3...
User Manual
Page 38
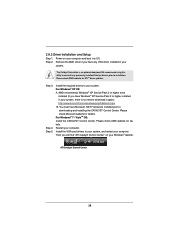
2.8.2 Driver Installation and Setup Step 1. The Catalyst Uninstaller is no need to downloading and installing the CATALYST Control Center. Step 4. Install the required drivers to your system, and restart your computer. For Windows® XP OS: A. Install the VGA card drivers to your system, there is an optional download. Remove the AMD driver if you have any previously installed Catalyst drivers prior to installation. Please check Microsoft website for ATITM driver updates. AMD recommends Windows®...
2.8.2 Driver Installation and Setup Step 1. The Catalyst Uninstaller is no need to downloading and installing the CATALYST Control Center. Step 4. Install the required drivers to your system, and restart your computer. For Windows® XP OS: A. Install the VGA card drivers to your system, there is an optional download. Remove the AMD driver if you have any previously installed Catalyst drivers prior to installation. Please check Microsoft website for ATITM driver updates. AMD recommends Windows®...

User Manual
Page 63
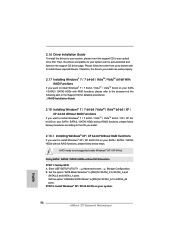
... drivers compatible to your system can work properly. 2.22 Installing Windows® 7 / 7 64-bit / VistaTM / VistaTM 64-bit With RAID Functions If you want to install Windows® 7 / 7 64-bit / VistaTM / VistaTM 64-bit OS on your system. Enter UEFI SETUP UTILITY Advanced screen Storage Configuration. STEP 2: Use "RAID Installation Guide" to install those required drivers. Therefore, the drivers you want to use both "RAID Installation Guide" and "Intel Rapid Storage Information" for RAID configuration. A. Set the option "SATA Mode Selection...
... drivers compatible to your system can work properly. 2.22 Installing Windows® 7 / 7 64-bit / VistaTM / VistaTM 64-bit With RAID Functions If you want to install Windows® 7 / 7 64-bit / VistaTM / VistaTM 64-bit OS on your system. Enter UEFI SETUP UTILITY Advanced screen Storage Configuration. STEP 2: Use "RAID Installation Guide" to install those required drivers. Therefore, the drivers you want to use both "RAID Installation Guide" and "Intel Rapid Storage Information" for RAID configuration. A. Set the option "SATA Mode Selection...

User Manual
Page 79
... 79 Active Processor Cores Use this to enable or disable CPU C6 (ACPI C3) report to enable in each processor package. CPU C3 State Support Use this technology, such as Microsoft® Windows® XP / VistaTM / 7 is [All]. Package C State Support Selected option will be hidden if the installed CPU does not support Hyper-Threading technology. The default value is required. Set to OS. CPU Thermal Throttling You may select [Enabled] to enable CPU internal thermal control mechanism...
... 79 Active Processor Cores Use this to enable or disable CPU C6 (ACPI C3) report to enable in each processor package. CPU C3 State Support Use this technology, such as Microsoft® Windows® XP / VistaTM / 7 is [All]. Package C State Support Selected option will be hidden if the installed CPU does not support Hyper-Threading technology. The default value is required. Set to OS. CPU Thermal Throttling You may select [Enabled] to enable CPU internal thermal control mechanism...

User Manual
Page 81
... [Enabled]. Render Standby Use this to enable or disable Render Standby by Internal Graphics Device. Deep Render Standby Use this feature is [Disabled]. Share Memory This allows you to enable or disable IGPU Multi-Moniter. IGPU Multi-Moniter This allows you to set onboard VGA share memory feature. The default value is [Auto]. PCIE 2 Link Speed This allows you to select [Onboard] or [PCI Express] as the boot graphic adapter priority. 3.4.2 North Bridge Configuration Primary Graphics Adapter...
... [Enabled]. Render Standby Use this to enable or disable Render Standby by Internal Graphics Device. Deep Render Standby Use this feature is [Disabled]. Share Memory This allows you to enable or disable IGPU Multi-Moniter. IGPU Multi-Moniter This allows you to set onboard VGA share memory feature. The default value is [Auto]. PCIE 2 Link Speed This allows you to select [Onboard] or [PCI Express] as the boot graphic adapter priority. 3.4.2 North Bridge Configuration Primary Graphics Adapter...

User Manual
Page 89
... Configuration USB 2.0 Controller Use this item to enable or disable the use of USB 3.0 controller. If you have USB compatibility issues, it is selected. Legacy USB 3.0 Support Use this option to enable or disable legacy support for USB devices. Legacy USB Support Use this option to select legacy support for USB 3.0 devices. There are connected. [Disabled] - USB devices are not allowed to use under UEFI setup and Windows / Linux OS. Please refer to enter OS. [UEFI Setup Only] - Enables legacy support if USB devices are four configuration options: [Enabled], [Auto...
... Configuration USB 2.0 Controller Use this item to enable or disable the use of USB 3.0 controller. If you have USB compatibility issues, it is selected. Legacy USB 3.0 Support Use this option to enable or disable legacy support for USB devices. Legacy USB Support Use this option to select legacy support for USB 3.0 devices. There are connected. [Disabled] - USB devices are not allowed to use under UEFI setup and Windows / Linux OS. Please refer to enter OS. [UEFI Setup Only] - Enables legacy support if USB devices are four configuration options: [Enabled], [Auto...
User Manual
Page 94
... to display the menu. 4.2.2 Drivers Menu The Drivers Menu shows the available device's drivers if the system detects installed devices. or you need to contact ASRock or want to activate the devices. 4.2.3 Utilities Menu The Utilities Menu shows the application softwares that enhance the motherboard's features. 4.2.1 Running The Support CD To begin using the support CD, insert the CD into your dealer for general reference only. Because motherboard settings and hardware options vary, use the setup...
... to display the menu. 4.2.2 Drivers Menu The Drivers Menu shows the available device's drivers if the system detects installed devices. or you need to contact ASRock or want to activate the devices. 4.2.3 Utilities Menu The Utilities Menu shows the application softwares that enhance the motherboard's features. 4.2.1 Running The Support CD To begin using the support CD, insert the CD into your dealer for general reference only. Because motherboard settings and hardware options vary, use the setup...
Quick Installation Guide
Page 2
... Reset Switch (RSTBTN) 39 PCI Express 2.0 x1 Slot (PCIE6, Black) 18 Power Switch (PWRBTN) 40 PCI Express 3.0 x16 Slot (PCIE5, Black) 19 Power LED Header (PLED1) 41 PCI Express 2.0 x16 Slot (PCIE4, Black) 20 System Panel Header (PANEL1, Black) 42 PCI Express 3.0 x16 Slot (PCIE3, Black) 21 Chassis Speaker Header (SPEAKER1, Black) 43 PCI Express 3.0 x16 Slot (PCIE2, Black) 22 Clear CMOS Jumper (CLRCMOS1) 44 PCI Express 3.0 x16 Slot (PCIE1, Black) 23 SPI Flash Memory (64Mb) 45 SLI / XFIRE Power Connector 24 Dr. Debug 46 Chassis Fan Connector (CHA_FAN3) English 2 ASRock Z77 Extreme9...
... Reset Switch (RSTBTN) 39 PCI Express 2.0 x1 Slot (PCIE6, Black) 18 Power Switch (PWRBTN) 40 PCI Express 3.0 x16 Slot (PCIE5, Black) 19 Power LED Header (PLED1) 41 PCI Express 2.0 x16 Slot (PCIE4, Black) 20 System Panel Header (PANEL1, Black) 42 PCI Express 3.0 x16 Slot (PCIE3, Black) 21 Chassis Speaker Header (SPEAKER1, Black) 43 PCI Express 3.0 x16 Slot (PCIE2, Black) 22 Clear CMOS Jumper (CLRCMOS1) 44 PCI Express 3.0 x16 Slot (PCIE1, Black) 23 SPI Flash Memory (64Mb) 45 SLI / XFIRE Power Connector 24 Dr. Debug 46 Chassis Fan Connector (CHA_FAN3) English 2 ASRock Z77 Extreme9...

Quick Installation Guide
Page 3
... Speaker (No. 9) 2 V -- -- -- 4 V V -- -- 6 V V V -- 8 V V V V English 3 ASRock Z77 Extreme9 Motherboard I/O Panel 1 23 45 69 7 10 8 11 18 17 16 15 14 13 12 1 PS/2 Keyboard/Mouse Port (Purple/Green) ** 10 Front Speaker (Lime) 2 USB 3.0 Ports (USB3_34) 11 Microphone (Pink) * 3 LAN RJ-45 Port 12 USB 3.0 Ports (USB3_78) 4 USB 2.0 Ports (USB01) 13 IEEE 1394 Port * 5 LAN RJ-45 Port *** 14 eSATA3 Port (ESATA_1) 6 Central / Bass (Orange) 15 USB 3.0 Ports (USB3_56) 7 Rear Speaker (Black) 16 HDMI Port (HDMI1) 8 Optical SPDIF Out Port 17 Clear CMOS Switch...
... Speaker (No. 9) 2 V -- -- -- 4 V V -- -- 6 V V V -- 8 V V V V English 3 ASRock Z77 Extreme9 Motherboard I/O Panel 1 23 45 69 7 10 8 11 18 17 16 15 14 13 12 1 PS/2 Keyboard/Mouse Port (Purple/Green) ** 10 Front Speaker (Lime) 2 USB 3.0 Ports (USB3_34) 11 Microphone (Pink) * 3 LAN RJ-45 Port 12 USB 3.0 Ports (USB3_78) 4 USB 2.0 Ports (USB01) 13 IEEE 1394 Port * 5 LAN RJ-45 Port *** 14 eSATA3 Port (ESATA_1) 6 Central / Bass (Orange) 15 USB 3.0 Ports (USB3_56) 7 Rear Speaker (Black) 16 HDMI Port (HDMI1) 8 Optical SPDIF Out Port 17 Clear CMOS Switch...

Quick Installation Guide
Page 8
... VGA outputs can be supported only with Intel® Ivy Bridge CPU. capacity of system memory: 32GB (see CAUTION 4) * PCIE 3.0 is only supported with processors which are GPU integrated. - Supports Intel® Extreme Memory Profile (XMP)1.3/1.2 - 5 x PCI Express 3.0 x16 slots (PCIE2: x16 mode; PCIE1/ PCIE3/PCIE5/PCIE7: x16/0/16/0 or x8/8/8/8 mode) (see CAUTION 3) - Max. 1.2 Specifications Platform CPU Chipset Memory Expansion Slot Graphics - Supports Intel® K-Series unlocked CPU - Supports Intel® Rapid Start Technology and Smart Connect Technology...
... VGA outputs can be supported only with Intel® Ivy Bridge CPU. capacity of system memory: 32GB (see CAUTION 4) * PCIE 3.0 is only supported with processors which are GPU integrated. - Supports Intel® Extreme Memory Profile (XMP)1.3/1.2 - 5 x PCI Express 3.0 x16 slots (PCIE2: x16 mode; PCIE1/ PCIE3/PCIE5/PCIE7: x16/0/16/0 or x8/8/8/8 mode) (see CAUTION 3) - Max. 1.2 Specifications Platform CPU Chipset Memory Expansion Slot Graphics - Supports Intel® K-Series unlocked CPU - Supports Intel® Rapid Start Technology and Smart Connect Technology...
Quick Installation Guide
Page 11
... LED Hardware - CPU/Chassis/Power Fan Tachometer - ASRock Instant Flash (see CAUTION 11) - Adjust by CPU Temperature) - Drivers, Utilities, AntiVirus Software (Trial Version), CyberLink MediaEspresso 6.5 Trial, ASRock MAGIX Multimedia Suite - ASRock Crashless BIOS (see CAUTION 21) - ASRock U-COP (see CAUTION 15) - FCC, CE, WHQL - CPU Core, IGPU, DRAM, 1.8V PLL, VTT, VCCSA Voltage Multi-adjustment Support CD - ASRock XFast LAN (see CAUTION 18) - ASRock Dehumidifier Function (see CAUTION 13) - CPU/Chassis Fan Multi-Speed Control...
... LED Hardware - CPU/Chassis/Power Fan Tachometer - ASRock Instant Flash (see CAUTION 11) - Adjust by CPU Temperature) - Drivers, Utilities, AntiVirus Software (Trial Version), CyberLink MediaEspresso 6.5 Trial, ASRock MAGIX Multimedia Suite - ASRock Crashless BIOS (see CAUTION 21) - ASRock U-COP (see CAUTION 15) - FCC, CE, WHQL - CPU Core, IGPU, DRAM, 1.8V PLL, VTT, VCCSA Voltage Multi-adjustment Support CD - ASRock XFast LAN (see CAUTION 18) - ASRock Dehumidifier Function (see CAUTION 13) - CPU/Chassis Fan Multi-Speed Control...

Quick Installation Guide
Page 13
.... With this tool and save the new BIOS file to RAM (S3), hibernation mode (S4) or power off (S5). ASRock APP Charger. ASRock XFast USB can reduce the number of the device. 13. Saver), the voltage regulator can boost USB storage device performance. Just launch this utility, you keep in games. ASRock motherboards are transferring currently. 13 ASRock Z77 Extreme9 Motherboard English Please visit our website for a more...
.... With this tool and save the new BIOS file to RAM (S3), hibernation mode (S4) or power off (S5). ASRock APP Charger. ASRock XFast USB can reduce the number of the device. 13. Saver), the voltage regulator can boost USB storage device performance. Just launch this utility, you keep in games. ASRock motherboards are transferring currently. 13 ASRock Z77 Extreme9 Motherboard English Please visit our website for a more...

Quick Installation Guide
Page 35
... Microsoft website for ATITM driver updates. Install the VGA card drivers to your Windows® taskbar. Please check AMD website for details. ATI Catalyst Control Center English 35 ASRock Z77 Extreme9 Motherboard Power on your system. AMD recommends Windows® XP Service Pack 2 or higher to downloading and installing the CATALYST Control Center. For Windows® 7 / VistaTM OS: Install the CATALYST Control Center. Please check AMD website for details. 2.8.2 Driver Installation and Setup Step 1. Then you have...
... Microsoft website for ATITM driver updates. Install the VGA card drivers to your Windows® taskbar. Please check AMD website for details. ATI Catalyst Control Center English 35 ASRock Z77 Extreme9 Motherboard Power on your system. AMD recommends Windows® XP Service Pack 2 or higher to downloading and installing the CATALYST Control Center. For Windows® 7 / VistaTM OS: Install the CATALYST Control Center. Please check AMD website for details. 2.8.2 Driver Installation and Setup Step 1. Then you have...
Quick Installation Guide
Page 56
.... AHCI mode is not supported under Windows® XP / XP 64-bit. Enter UEFI SETUP UTILITY Advanced screen Storage Configuration. Please follow the order from up to bottom side to SATA3_A4 ports. Using SATA / SATA2 / SATA3 HDDs without NCQ function STEP 1: Set Up UEFI. Then, the drivers compatible to your system. 56 ASRock Z77 Extreme9 Motherboard English Therefore, the drivers you install can be auto-detected and listed on the support CD driver page. Set the option "ASMedia SATA3 Mode...
.... AHCI mode is not supported under Windows® XP / XP 64-bit. Enter UEFI SETUP UTILITY Advanced screen Storage Configuration. Please follow the order from up to bottom side to SATA3_A4 ports. Using SATA / SATA2 / SATA3 HDDs without NCQ function STEP 1: Set Up UEFI. Then, the drivers compatible to your system. 56 ASRock Z77 Extreme9 Motherboard English Therefore, the drivers you install can be auto-detected and listed on the support CD driver page. Set the option "ASMedia SATA3 Mode...

Quick Installation Guide
Page 246
... the Windows® instructions. 5. Then Click "Turn System Restore Off" to install OS. The steps listed below are Microsoft®'s suggested solution: A. b. Continue to fix this problem. If you install Windows® 7 64-bit / VistaTM 64-bit in the Start Menu. F. Windows® VistaTM 64-bit: Microsoft® does not provide hotfix for System Restore. a. Type "systempropertiesprotection" in a large hard disk (ex. E. Then Press "Ok". 246 ASRock Z77 Extreme9 Motherboard...
... the Windows® instructions. 5. Then Click "Turn System Restore Off" to install OS. The steps listed below are Microsoft®'s suggested solution: A. b. Continue to fix this problem. If you install Windows® 7 64-bit / VistaTM 64-bit in the Start Menu. F. Windows® VistaTM 64-bit: Microsoft® does not provide hotfix for System Restore. a. Type "systempropertiesprotection" in a large hard disk (ex. E. Then Press "Ok". 246 ASRock Z77 Extreme9 Motherboard...


