
User Manual
Page 2
...not cause harmful interference, and (2) this motherboard contains Perchlorate, a toxic substance controlled in advance. Version 1.0 Published June 2016 Copyright©2016 ASRock INC. With respect to infringe. Copyright Notice: No part of this documentation, ASRock does not provide warranty of any interference ...any kind, either expressed or implied, including but not limited to the owners' benefit, without written consent of ASRock Inc. ASRock assumes no event shall ASRock, its directors, officers, employees, or agents be constructed as a commitment by the purchaser for loss of ...
...not cause harmful interference, and (2) this motherboard contains Perchlorate, a toxic substance controlled in advance. Version 1.0 Published June 2016 Copyright©2016 ASRock INC. With respect to infringe. Copyright Notice: No part of this documentation, ASRock does not provide warranty of any interference ...any kind, either expressed or implied, including but not limited to the owners' benefit, without written consent of ASRock Inc. ASRock assumes no event shall ASRock, its directors, officers, employees, or agents be constructed as a commitment by the purchaser for loss of ...

User Manual
Page 4
Contents Chapter 1 Introduction 1 1.1 Package Contents 1 1.2 Specifications 2 1.3 Motherboard Layout 7 1.4 I/O Panel 9 1.5 WiFi-802.11ac Module and ASRock WiFi 2.4/5 GHz Antenna 11 Chapter 2 Installation 13 2.1 Installing the CPU 14 2.2 Installing the CPU Fan and Heatsink 17 2.3 Installation of Memory Modules (DIMM) 18 2.4 Expansion ...
Contents Chapter 1 Introduction 1 1.1 Package Contents 1 1.2 Specifications 2 1.3 Motherboard Layout 7 1.4 I/O Panel 9 1.5 WiFi-802.11ac Module and ASRock WiFi 2.4/5 GHz Antenna 11 Chapter 2 Installation 13 2.1 Installing the CPU 14 2.2 Installing the CPU Fan and Heatsink 17 2.3 Installation of Memory Modules (DIMM) 18 2.4 Expansion ...
User Manual
Page 7
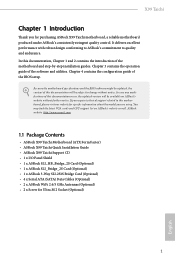
... • ASRock X99 Taichi Motherboard (ATX Form Factor) • ASRock X99 Taichi Quick Installation Guide • ASRock X99 Taichi Support CD • 1 x I/O Panel Shield • 1 x ASRock SLI_HB_Bridge_2S Card (Optional) • 1 x ASRock SLI_Bridge_2S Card (Optional) • 1 x ASRock 3-Way SLI-2S1S Bridge Card (Optional) • 4 x Serial ATA (SATA) Data Cables (Optional) • 2 x ASRock WiFi 2.4/5 GHz Antennas (Optional) • 2 x Screw for purchasing ASRock X99 Taichi motherboard, a reliable motherboard produced under ASRock's consistently stringent...
... • ASRock X99 Taichi Motherboard (ATX Form Factor) • ASRock X99 Taichi Quick Installation Guide • ASRock X99 Taichi Support CD • 1 x I/O Panel Shield • 1 x ASRock SLI_HB_Bridge_2S Card (Optional) • 1 x ASRock SLI_Bridge_2S Card (Optional) • 1 x ASRock 3-Way SLI-2S1S Bridge Card (Optional) • 4 x Serial ATA (SATA) Data Cables (Optional) • 2 x ASRock WiFi 2.4/5 GHz Antennas (Optional) • 2 x Screw for purchasing ASRock X99 Taichi motherboard, a reliable motherboard produced under ASRock's consistently stringent...

User Manual
Page 13
X99 Taichi 1.3 Motherboard Layout 12 3 45 6 7 USB 2.0 T: USB1 B: USB2 PS2 Keyboard /Mouse M2_WIFI CLRC BTN1 USB 3.1 T: USB31_TA_1 B: USB31_TC_1 USB 2.0 T: USB7 USB 3.0 B: USB5 Top: RJ-45 USB 3.0 T: USB3 B: USB4 ... Bottom: MIC IN 10 28 PCIE1 CHA_FAN1 NUT1_3 NUT1_2 NUT1_1 NUT1_0 M2 CHA_FAN3 SSATA3_3 SSATA3_2 CHA_FAN2 11 12 13 SSATA3_0_1 14 PCIE2 SATA3_0_3 X99 15 LAN Ta i c h i Intel SATA3_1_4 X99 16 LAN CMOS PCIE3 Battery 17 SATA3_2_5 SATAE_1 Purity SoundTM 3 PCIE4 18 Ultra M.2 PCIe Gen3 x4 M2 CT5 NUT2_3 NUT2_2 NUT2_1 NUT2_0...
X99 Taichi 1.3 Motherboard Layout 12 3 45 6 7 USB 2.0 T: USB1 B: USB2 PS2 Keyboard /Mouse M2_WIFI CLRC BTN1 USB 3.1 T: USB31_TA_1 B: USB31_TC_1 USB 2.0 T: USB7 USB 3.0 B: USB5 Top: RJ-45 USB 3.0 T: USB3 B: USB4 ... Bottom: MIC IN 10 28 PCIE1 CHA_FAN1 NUT1_3 NUT1_2 NUT1_1 NUT1_0 M2 CHA_FAN3 SSATA3_3 SSATA3_2 CHA_FAN2 11 12 13 SSATA3_0_1 14 PCIE2 SATA3_0_3 X99 15 LAN Ta i c h i Intel SATA3_1_4 X99 16 LAN CMOS PCIE3 Battery 17 SATA3_2_5 SATAE_1 Purity SoundTM 3 PCIE4 18 Ultra M.2 PCIe Gen3 x4 M2 CT5 NUT2_3 NUT2_2 NUT2_1 NUT2_0...
User Manual
Page 17
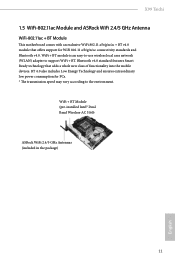
... that offers support for PCs. * The transmission speed may vary according to support WiFi + BT. X99 Taichi 1.5 WiFi-802.11ac Module and ASRock WiFi 2.4/5 GHz Antenna WiFi-802.11ac + BT Module This motherboard comes with an exclusive WiFi 802.11 a/b/g/n/ac + BT v4.0 module that adds a whole new... class of functionality into the mobile devices. WiFi + BT Module (pre-installed Intel® Dual Band Wireless-AC 3160) ASRock WiFi 2.4/5 GHz Antennas (included in ...
... that offers support for PCs. * The transmission speed may vary according to support WiFi + BT. X99 Taichi 1.5 WiFi-802.11ac Module and ASRock WiFi 2.4/5 GHz Antenna WiFi-802.11ac + BT Module This motherboard comes with an exclusive WiFi 802.11 a/b/g/n/ac + BT v4.0 module that adds a whole new... class of functionality into the mobile devices. WiFi + BT Module (pre-installed Intel® Dual Band Wireless-AC 3160) ASRock WiFi 2.4/5 GHz Antennas (included in ...

User Manual
Page 19
.... • Hold components by the edges and do not touch the ICs. • Whenever you install motherboard components or change any components, place them on a carpet. X99 Taichi Chapter 2 Installation This is an ATX form factor motherboard. Also remember to use a grounded wrist strap or touch a safety grounded object before installing or removing the...
.... • Hold components by the edges and do not touch the ICs. • Whenever you install motherboard components or change any components, place them on a carpet. X99 Taichi Chapter 2 Installation This is an ATX form factor motherboard. Also remember to use a grounded wrist strap or touch a safety grounded object before installing or removing the...

User Manual
Page 22
6 A B 7 A B 8 Please save and replace the cover if the processor is removed. The cover must be placed if you wish to return the motherboard for after service. 16 English
6 A B 7 A B 8 Please save and replace the cover if the processor is removed. The cover must be placed if you wish to return the motherboard for after service. 16 English

User Manual
Page 24
...install identical (the same brand, speed, size and chip-type) DDR4 DIMM pairs. 2. It will cause permanent damage to the motherboard and the DIMM if you always need to install a DDR, DDR2 or DDR3 memory module into the slot at incorrect orientation. otherwise, ... spec definition, please install the memory modules on DDR4_A1, DDR4_B1, DDR4_C1 and DDR4_D1 for first priority. 2.3 Installation of Memory Modules (DIMM) This motherboard provides eight 288-pin DDR4 (Double Data Rate 4) DIMM slots, and supports Quad Channel Memory Technology. 1. For quad channel configuration, you force ...
...install identical (the same brand, speed, size and chip-type) DDR4 DIMM pairs. 2. It will cause permanent damage to the motherboard and the DIMM if you always need to install a DDR, DDR2 or DDR3 memory module into the slot at incorrect orientation. otherwise, ... spec definition, please install the memory modules on DDR4_A1, DDR4_B1, DDR4_C1 and DDR4_D1 for first priority. 2.3 Installation of Memory Modules (DIMM) This motherboard provides eight 288-pin DDR4 (Double Data Rate 4) DIMM slots, and supports Quad Channel Memory Technology. 1. For quad channel configuration, you force ...

User Manual
Page 26
... is used for the card before installing a PCIe card into the PCIE1 slot. 2.4 Expansion Slots (PCI Express Slots) There are 5 PCI Express slots on the motherboard. PCIE2 (PCIe 3.0 x16 slot) is unplugged. Before installing an expansion card, please make necessary hardware settings for PCI Express x16 lane width graphics cards.
... is used for the card before installing a PCIe card into the PCIE1 slot. 2.4 Expansion Slots (PCI Express Slots) There are 5 PCI Express slots on the motherboard. PCIE2 (PCIe 3.0 x16 slot) is unplugged. Before installing an expansion card, please make necessary hardware settings for PCI Express x16 lane width graphics cards.

User Manual
Page 27
English 21 X99 Taichi PCIe Slot Configurations (For CPU with 28 PCIe lanes) PCIE1 PCIE2 PCIE3 Single Graphics Card N/A x16 N/A PCIE4 N/A PCIE5 N/A Two Graphics Cards in CrossFireXTM or SLITM N/A x16 N/A N/A x8 Mode Three Graphics Cards in 3-Way CrossFireXTM Mode N/A x8 N/A x8 x8 or 3-Way SLITM Mode For a better thermal environment, please connect a chassis fan to the motherboard's chassis fan connector (CHA_FAN1, CHA_FAN2 or CHA_FAN3) when using multiple graphics cards.
English 21 X99 Taichi PCIe Slot Configurations (For CPU with 28 PCIe lanes) PCIE1 PCIE2 PCIE3 Single Graphics Card N/A x16 N/A PCIE4 N/A PCIE5 N/A Two Graphics Cards in CrossFireXTM or SLITM N/A x16 N/A N/A x8 Mode Three Graphics Cards in 3-Way CrossFireXTM Mode N/A x8 N/A x8 x8 or 3-Way SLITM Mode For a better thermal environment, please connect a chassis fan to the motherboard's chassis fan connector (CHA_FAN1, CHA_FAN2 or CHA_FAN3) when using multiple graphics cards.

User Manual
Page 29
... +5V 1 Please connect the chassis power LED and the chassis speaker to the motherboard. Note the positive and negative pins before connecting the cables. HDLED (Hard Drive Activity LED): Connect to the reset switch on the chassis front panel. X99 Taichi 2.6 Onboard Headers and Connectors Onboard headers and connectors are matched correctly. RESET...
... +5V 1 Please connect the chassis power LED and the chassis speaker to the motherboard. Note the positive and negative pins before connecting the cables. HDLED (Hard Drive Activity LED): Connect to the reset switch on the chassis front panel. X99 Taichi 2.6 Onboard Headers and Connectors Onboard headers and connectors are matched correctly. RESET...

User Manual
Page 30
...) (9-pin USB5_6) (see p.7, No. 17) SATA3_0 SSATA3_0 SATA3_3 SSATA3_1 These ten SATA3 connectors support SATA data cables for internal storage devices with up to this motherboard. USB_PWR Besides three USB 2.0 ports PP+ on the I/O panel, there GND DUMMY are two headers and one 1 GND P+ PUSB_PWR port on SATA3_0 ~ SATA3_5 ports only...
...) (9-pin USB5_6) (see p.7, No. 17) SATA3_0 SSATA3_0 SATA3_3 SSATA3_1 These ten SATA3 connectors support SATA data cables for internal storage devices with up to this motherboard. USB_PWR Besides three USB 2.0 ports PP+ on the I/O panel, there GND DUMMY are two headers and one 1 GND P+ PUSB_PWR port on SATA3_0 ~ SATA3_5 ports only...

User Manual
Page 31
X99 Taichi USB 3.0 Header (19-pin USB3_1_2) (see p.7, No. 9) GND FAN_VOLTAGE CHA_FAN_SPEED FAN_SPEED_CONTROL FAN_SPEED_CONTROL CHA_FAN_SPEED FAN_VOLTAGE GND GND FAN_VOLTAGE CHA_FAN_SPEED FAN_SPEED_CONTROL Please connect fan cables to the ... support HDA to MIC2_L. B. To activate the front mic, go to Ground (GND). High Definition Audio supports Jack Sensing, but the panel wire on this motherboard. D. Connect Mic_IN (MIC) to function correctly. CHA_ FAN fan speed can support two ports. Please follow the instructions in the Realtek Control panel and adjust...
X99 Taichi USB 3.0 Header (19-pin USB3_1_2) (see p.7, No. 9) GND FAN_VOLTAGE CHA_FAN_SPEED FAN_SPEED_CONTROL FAN_SPEED_CONTROL CHA_FAN_SPEED FAN_VOLTAGE GND GND FAN_VOLTAGE CHA_FAN_SPEED FAN_SPEED_CONTROL Please connect fan cables to the ... support HDA to MIC2_L. B. To activate the front mic, go to Ground (GND). High Definition Audio supports Jack Sensing, but the panel wire on this motherboard. D. Connect Mic_IN (MIC) to function correctly. CHA_ FAN fan speed can support two ports. Please follow the instructions in the Realtek Control panel and adjust...

User Manual
Page 32
... GND 1 2 34 FAN_SPEED_CONTROL CPU_FAN_SPEED FAN_VOLTAGE GND 1 2 34 12 24 1 13 8 5 4 1 RRXD1 DDTR#1 DDSR#1 CCTS#1 1 RRI#1 RRTS#1 GND TTXD1 DDCD#1 This motherboard provides a 4-Pin CPU fan (Quiet Fan) connector. To use a 20-pin ATX power supply, please plug it to Pin 1-3. This... motherboard provides a 4-Pin water cooling CPU fan connector. This motherboard provides an 8-pin ATX 12V power connector. If you plan to connect a 3-Pin CPU water cooler fan, please connect it...
... GND 1 2 34 FAN_SPEED_CONTROL CPU_FAN_SPEED FAN_VOLTAGE GND 1 2 34 12 24 1 13 8 5 4 1 RRXD1 DDTR#1 DDSR#1 CCTS#1 1 RRI#1 RRTS#1 GND TTXD1 DDCD#1 This motherboard provides a 4-Pin CPU fan (Quiet Fan) connector. To use a 20-pin ATX power supply, please plug it to Pin 1-3. This... motherboard provides a 4-Pin water cooling CPU fan connector. This motherboard provides an 8-pin ATX 12V power connector. If you plan to connect a 3-Pin CPU water cooler fan, please connect it...

User Manual
Page 34
... LEDs (BIOS_A_LED or BIOS_B_LED) to quickly clear the CMOS values or boot from either BIOS A or BIOS B. 2.7 Smart Switches The motherboard has two smart switches: Clear CMOS Switch and one BIOS Selection Switch, allowing users to identify which enhances the safety and stability of ...the BIOS files to the primary BIOS to quickly clear the CMOS values. This motherboard has two BIOS chips, a primary BIOS (BIOS_A) and a backup BIOS (BIOS_ B), which BIOS is currently activated. Clear CMOS Switch (CLRCBTN1) (see...
... LEDs (BIOS_A_LED or BIOS_B_LED) to quickly clear the CMOS values or boot from either BIOS A or BIOS B. 2.7 Smart Switches The motherboard has two smart switches: Clear CMOS Switch and one BIOS Selection Switch, allowing users to identify which enhances the safety and stability of ...the BIOS files to the primary BIOS to quickly clear the CMOS values. This motherboard has two BIOS chips, a primary BIOS (BIOS_A) and a backup BIOS (BIOS_ B), which BIOS is currently activated. Clear CMOS Switch (CLRCBTN1) (see...
User Manual
Page 37
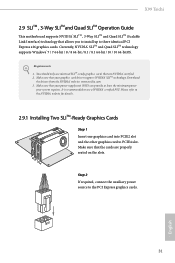
... Step 1 Insert one graphics card into PCIE2 slot and the other graphics card to three identical PCI Express x16 graphics cards. X99 Taichi 2.9 SLITM , 3-Way SLITMand Quad SLITM Operation Guide This motherboard supports NVIDIA® SLITM , 3-Way SLITM and Quad SLITM (Scalable Link Interface) technology that allows you to install up to PCIE4...
... Step 1 Insert one graphics card into PCIE2 slot and the other graphics card to three identical PCI Express x16 graphics cards. X99 Taichi 2.9 SLITM , 3-Way SLITMand Quad SLITM Operation Guide This motherboard supports NVIDIA® SLITM , 3-Way SLITM and Quad SLITM (Scalable Link Interface) technology that allows you to install up to PCIE4...

User Manual
Page 42
2.10 CrossFireXTM, 3-Way CrossFireXTM and Quad CrossFireXTM Operation Guide This motherboard supports CrossFireXTM, 3-way CrossFireXTM and Quad CrossFireXTM that allows you to install up to enable CrossFireXTM. Currently CrossFireXTM, 3-way CrossFireXTM and Quad ... minimum power your graphics card vendor for details. 4. It is provided with the graphics card you pair a 12-pipe CrossFireXTM Edition card with this motherboard. CrossFire Bridge Step 2 Connect two graphics cards by installing a CrossFire Bridge on the CrossFire Bridge Interconnects on the slots. If you purchase, not ...
2.10 CrossFireXTM, 3-Way CrossFireXTM and Quad CrossFireXTM Operation Guide This motherboard supports CrossFireXTM, 3-way CrossFireXTM and Quad CrossFireXTM that allows you to install up to enable CrossFireXTM. Currently CrossFireXTM, 3-way CrossFireXTM and Quad ... minimum power your graphics card vendor for details. 4. It is provided with the graphics card you pair a 12-pipe CrossFireXTM Edition card with this motherboard. CrossFire Bridge Step 2 Connect two graphics cards by installing a CrossFire Bridge on the CrossFire Bridge Interconnects on the slots. If you purchase, not ...

User Manual
Page 44
Make sure that is provided with the graphics card you purchase, not bundled with this motherboard. CrossFire Bridge Step 2 Use one graphics card into PCIE2 slot, another graphics card to PCIE4 slot, and the other CrossFire Bridge to connect the graphics ...
Make sure that is provided with the graphics card you purchase, not bundled with this motherboard. CrossFire Bridge Step 2 Use one graphics card into PCIE2 slot, another graphics card to PCIE4 slot, and the other CrossFire Bridge to connect the graphics ...

User Manual
Page 47
E D C B A E D C B A C B A E D C B A E D NUT2 NUT1 X99 Taichi Step 3 Move the standoff based on the motherboard. Step 6 Tighten the screw with a screwdriver to use the default nut. Step 4 Peel off the yellow protective film on the nut to be aware that ...
E D C B A E D C B A C B A E D C B A E D NUT2 NUT1 X99 Taichi Step 3 Move the standoff based on the motherboard. Step 6 Tighten the screw with a screwdriver to use the default nut. Step 4 Peel off the yellow protective film on the nut to be aware that ...
User Manual
Page 49
... on a specific item then follow the order from top to bottom to install it. X99 Taichi Chapter 3 Software and Utilities Operation 3.1 Installing Drivers The Support CD that comes with the motherboard contains necessary drivers and useful utilities that the motherboard supports. Please click Install All or follow the installation wizard to install those required...
... on a specific item then follow the order from top to bottom to install it. X99 Taichi Chapter 3 Software and Utilities Operation 3.1 Installing Drivers The Support CD that comes with the motherboard contains necessary drivers and useful utilities that the motherboard supports. Please click Install All or follow the installation wizard to install those required...


