
User Manual
Page 3
... Guide ... 21 2.8 CrossFireXTM, 3-Way CrossFireXTM and Quad CrossFireXTM Operation Guide 27 2.9 Surround Display Features 31 2.10 ASRock Smart Remote Installation Guide 32 2.11 ASRock XFast Charger Operation Guide 33 2.12 Jumpers Setup 34 2.13 Onboard Headers and Connectors 35 2.14 Smart Switches 41 ...2.19 Hot Plug and Hot Swap Functions for SATA3 HDDs .... 47 2.20 SATA / SATA2 / SATA3 HDD Hot Plug Feature and Operation Guide 48 2.21 Driver Installation Guide 50 2.22 Installing Windows® 7 / 7 64-bit / VistaTM / VistaTM 64-bit With RAID Functions 50 2.23 Installing Windows® ...
... Guide ... 21 2.8 CrossFireXTM, 3-Way CrossFireXTM and Quad CrossFireXTM Operation Guide 27 2.9 Surround Display Features 31 2.10 ASRock Smart Remote Installation Guide 32 2.11 ASRock XFast Charger Operation Guide 33 2.12 Jumpers Setup 34 2.13 Onboard Headers and Connectors 35 2.14 Smart Switches 41 ...2.19 Hot Plug and Hot Swap Functions for SATA3 HDDs .... 47 2.20 SATA / SATA2 / SATA3 HDD Hot Plug Feature and Operation Guide 48 2.21 Driver Installation Guide 50 2.22 Installing Windows® 7 / 7 64-bit / VistaTM / VistaTM 64-bit With RAID Functions 50 2.23 Installing Windows® ...

User Manual
Page 4
... 70 3.6 Boot Screen 71 3.7 Security Screen 72 3.8 Exit Screen 73 4 Software Support 74 4.1 Install Operating System 74 4.2 Support CD Information 74 4.2.1 Running Support CD 74 4.2.2 Drivers Menu 74 4.2.3 Utilities Menu 74 4.2.4 Contact Information 74 4
... 70 3.6 Boot Screen 71 3.7 Security Screen 72 3.8 Exit Screen 73 4 Software Support 74 4.1 Install Operating System 74 4.2 Support CD Information 74 4.2.1 Running Support CD 74 4.2.2 Drivers Menu 74 4.2.3 Utilities Menu 74 4.2.4 Contact Information 74 4

User Manual
Page 10
... Facebook friends and your PC enters into the BIOS setup menu to access ASRock Instant Flash. Traffic Shaping: You can boost USB storage device performance. With APP Charger driver installed, you - ASRock XFast RAM is also capable of previously visited websites, making web surfi... or other complicated flash utility. Simply install the APP Charger driver, it reduces the 10 And it can easily enjoy the marvelous charging experience. The performance may depend on -the-go. ASRock XFast LAN provides a faster internet access, which data streams you to...
... Facebook friends and your PC enters into the BIOS setup menu to access ASRock Instant Flash. Traffic Shaping: You can boost USB storage device performance. With APP Charger driver installed, you - ASRock XFast RAM is also capable of previously visited websites, making web surfi... or other complicated flash utility. Simply install the APP Charger driver, it reduces the 10 And it can easily enjoy the marvelous charging experience. The performance may depend on -the-go. ASRock XFast LAN provides a faster internet access, which data streams you to...

User Manual
Page 18
... fan to improve heat dissipation. Apply thermal interface material onto center of IHS on the motherboard (CPU_ FAN1, see page 12, No. 6). Step 2. Use a screw driver to install the screws. Step 6.
... fan to improve heat dissipation. Apply thermal interface material onto center of IHS on the motherboard (CPU_ FAN1, see page 12, No. 6). Step 2. Use a screw driver to install the screws. Step 6.

User Manual
Page 21
... PCI Express x16 graphics cards. Make sure that your power supply unit (PSU) can provide at least the minimum power required by your graphics card driver supports NVIDIA® SLITM technology (driver version 280.41 and later). Make sure that the cards are NVIDIA® certified. Download the... driver from NVIDIA website (www.nvidia.com). 3. Install the identical SLITM-ready graphics cards that are NVIDIA® certified because different types of graphics ...
... PCI Express x16 graphics cards. Make sure that your power supply unit (PSU) can provide at least the minimum power required by your graphics card driver supports NVIDIA® SLITM technology (driver version 280.41 and later). Make sure that the cards are NVIDIA® certified. Download the... driver from NVIDIA website (www.nvidia.com). 3. Install the identical SLITM-ready graphics cards that are NVIDIA® certified because different types of graphics ...

User Manual
Page 24
...® nView system tray utility. Please follow the below procedures to your system. For Windows® XP / XP 64-bit OS: (For SLITM mode only) A. B. 2.7.2 Driver Installation and Setup Install the graphics card drivers to enable the multi-GPU feature.
...® nView system tray utility. Please follow the below procedures to your system. For Windows® XP / XP 64-bit OS: (For SLITM mode only) A. B. 2.7.2 Driver Installation and Setup Install the graphics card drivers to enable the multi-GPU feature.

User Manual
Page 27
... mode. 2.8.1 Graphics Card Setup 2.8.1.1 Installing Two CrossFireXTM-Ready Graphics Cards Different CrossFireXTM cards may require different methods to AMD graphics card manuals for ATITM CrossFireXTM driver updates. 1. Make sure that AMD has released or will not see the performance benefits of different operating modes with Windows® VistaTM / 7 OS...
... mode. 2.8.1 Graphics Card Setup 2.8.1.1 Installing Two CrossFireXTM-Ready Graphics Cards Different CrossFireXTM cards may require different methods to AMD graphics card manuals for ATITM CrossFireXTM driver updates. 1. Make sure that AMD has released or will not see the performance benefits of different operating modes with Windows® VistaTM / 7 OS...
User Manual
Page 30
... Center. Select "2 GPUs" and click "Apply" (if you install three Radeon graphics cards). 30 Remove the AMD driver if you have any previously installed Catalyst drivers prior to your computer. Step 3. AMD recommends Windows® XP Service Pack 2 or higher to be installed (If... you will find "ATI Catalyst Control Center" on your Windows® taskbar. Please check AMD website for ATITM driver updates. Please check AMD website for details. Restart your system. Double-click "ATI Catalyst Control Center". For Windows® XP OS: A....
... Center. Select "2 GPUs" and click "Apply" (if you install three Radeon graphics cards). 30 Remove the AMD driver if you have any previously installed Catalyst drivers prior to your computer. Step 3. AMD recommends Windows® XP Service Pack 2 or higher to be installed (If... you will find "ATI Catalyst Control Center" on your Windows® taskbar. Please check AMD website for ATITM driver updates. Please check AMD website for details. Restart your system. Double-click "ATI Catalyst Control Center". For Windows® XP OS: A....

User Manual
Page 44
... module specific) ACPI module initialization CSM initialization Reserved for future AMI DXE codes OEM DXE initialization codes Boot Device Selection (BDS) phase is started Driver connecting is started PCI Bus initialization is started PCI Bus Hot Plug Controller Initialization PCI Bus Enumeration PCI Bus Request Resources PCI Bus Assign Resources...
... module specific) ACPI module initialization CSM initialization Reserved for future AMI DXE codes OEM DXE initialization codes Boot Device Selection (BDS) phase is started Driver connecting is started PCI Bus initialization is started PCI Bus Hot Plug Controller Initialization PCI Bus Enumeration PCI Bus Request Resources PCI Bus Assign Resources...

User Manual
Page 48
...Plug cannot be damaged under the Hot Plug operation. 3. Points of Hot Plug feature carefully. Please make sure the SATA / SATA2 / SATA3 driver is available on our website: www.asrock.com 2. 2.20 SATA / SATA2 / SATA3 HDD Hot Plug Feature and Operation Guide This motherboard supports Hot Plug feature for our motherboard, ...48 SATA data cable (Red) B. Below operation procedure is designed only for SATA / SATA2 / SATA3 HDD in the product spec on our support website: www.asrock.com 4. A. 7-pin SATA data cable B. The latest SATA / SATA2 / SATA3 driver is installed into system properly.
...Plug cannot be damaged under the Hot Plug operation. 3. Points of Hot Plug feature carefully. Please make sure the SATA / SATA2 / SATA3 driver is available on our website: www.asrock.com 2. 2.20 SATA / SATA2 / SATA3 HDD Hot Plug Feature and Operation Guide This motherboard supports Hot Plug feature for our motherboard, ...48 SATA data cable (Red) B. Below operation procedure is designed only for SATA / SATA2 / SATA3 HDD in the product spec on our support website: www.asrock.com 4. A. 7-pin SATA data cable B. The latest SATA / SATA2 / SATA3 driver is installed into system properly.
User Manual
Page 50
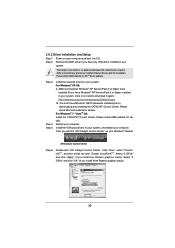
... in the Support CD, "Guide to SATA Hard Disks Installation and RAID Configuration", which is located in Windows® environment, install "SATA2 driver" from up UEFI. Set the option "SATA Mode" to [RAID]. (For SATA2_0 to SATA2_3, SATA3_0 and SATA3_1 ports.) STEP 2: Use "RAID ...Installation Guide" to install those required drivers. Before you start to configure the RAID function, you want to manage RAID functions, you install can be installed to Intel Rapid Storage...
... in the Support CD, "Guide to SATA Hard Disks Installation and RAID Configuration", which is located in Windows® environment, install "SATA2 driver" from up UEFI. Set the option "SATA Mode" to [RAID]. (For SATA2_0 to SATA2_3, SATA3_0 and SATA3_1 ports.) STEP 2: Use "RAID ...Installation Guide" to install those required drivers. Before you start to configure the RAID function, you want to manage RAID functions, you install can be installed to Intel Rapid Storage...

User Manual
Page 74
... procedures in this chapter for further information. 74 or you need to contact ASRock or want to know more information. 4.2 Support CD Information The Support CD that came with the motherboard contains necessary drivers and useful utilities that the motherboard supports. Refer to activate the devices. ...CD To begin using the support CD, insert the CD into your OS documentation for more about ASRock, welcome to display the menus. 4.2.2 Drivers Menu The Drivers Menu shows the available devices drivers if the system detects installed devices. Click on the file "ASSETUP.EXE" from the...
... procedures in this chapter for further information. 74 or you need to contact ASRock or want to know more information. 4.2 Support CD Information The Support CD that came with the motherboard contains necessary drivers and useful utilities that the motherboard supports. Refer to activate the devices. ...CD To begin using the support CD, insert the CD into your OS documentation for more about ASRock, welcome to display the menus. 4.2.2 Drivers Menu The Drivers Menu shows the available devices drivers if the system detects installed devices. Click on the file "ASSETUP.EXE" from the...

User Manual
Page 76
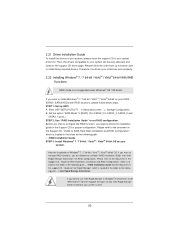
...system. OR Please copy the file from ASRock website. (http://download.asrock. Please refer to install the operating system. 1. Install Windows® VistaTM 64-bit / 7 64-bit: A. B. Please make sure to find the RAID driver. Insert your USB port; select "Browse" to...or Windows® 7 64-bit. 2. D. You can download the driver from ASRock motherboard support CD. (please copy the files under following directory: D:\ AMD64\Win7-64_Vista64_Intel_v10.6.0.100) 3. page, please click "Load Driver". When you see "Where do you have copied in RAID Mode This...
...system. OR Please copy the file from ASRock website. (http://download.asrock. Please refer to install the operating system. 1. Install Windows® VistaTM 64-bit / 7 64-bit: A. B. Please make sure to find the RAID driver. Insert your USB port; select "Browse" to...or Windows® 7 64-bit. 2. D. You can download the driver from ASRock motherboard support CD. (please copy the files under following directory: D:\ AMD64\Win7-64_Vista64_Intel_v10.6.0.100) 3. page, please click "Load Driver". When you see "Where do you have copied in RAID Mode This...
User Manual
Page 77
... following instructions to install OS. Continue to confirm. Disk volume > 2TB), it may take more time to boot into Windows® or install driver/ utilities. Disable System Restore.
... following instructions to install OS. Continue to confirm. Disk volume > 2TB), it may take more time to boot into Windows® or install driver/ utilities. Disable System Restore.

User Manual
Page 79
Set "Startup type" to reboot.) D. After reboot, please start to install motherboard drivers and utilities. Windows® 7 64-bit: A. Reboot your system. (It may take about 5 minutes to "Disable" then Click "OK". After installing Windows® 7 64-bit, ... time; >30 mins.) C. Please request the hotfix KB2505454 through this hotfix then reboot by itself. Reboot your system. E. c. Please start to install motherboard drivers and utilities. 6. C. Finish. 79 D. Windows® will install this link: http://support.microsoft.com/kb/2505454/ B.
Set "Startup type" to reboot.) D. After reboot, please start to install motherboard drivers and utilities. Windows® 7 64-bit: A. Reboot your system. (It may take about 5 minutes to "Disable" then Click "OK". After installing Windows® 7 64-bit, ... time; >30 mins.) C. Please request the hotfix KB2505454 through this hotfix then reboot by itself. Reboot your system. E. c. Please start to install motherboard drivers and utilities. 6. C. Finish. 79 D. Windows® will install this link: http://support.microsoft.com/kb/2505454/ B.

Quick Installation Guide
Page 10
... devices via PC. ASRock website: http://www.asrock.com/Feature/AppCharger/index.asp 9. ASRock website: http://www.asrock.com/Feature/SmartView/index.asp 10. ASRock XFast Charger is included into the BIOS setup menu to access ASRock Instant Flash. ASRock APP Charger. With APP Charger driver installed, you can...includes the benefits listed below. If you desire a faster, less restricted way of previously visited websites, making web surfing faster 10 ASRock X79 Extreme4 Motherboard English In addition to RAM (S3), hibernation mode (S4) or power off (S5). this tool and save the new ...
... devices via PC. ASRock website: http://www.asrock.com/Feature/AppCharger/index.asp 9. ASRock website: http://www.asrock.com/Feature/SmartView/index.asp 10. ASRock XFast Charger is included into the BIOS setup menu to access ASRock Instant Flash. ASRock APP Charger. With APP Charger driver installed, you can...includes the benefits listed below. If you desire a faster, less restricted way of previously visited websites, making web surfing faster 10 ASRock X79 Extreme4 Motherboard English In addition to RAM (S3), hibernation mode (S4) or power off (S5). this tool and save the new ...

Quick Installation Guide
Page 15
...socket that the CPU and the heatsink are oriented on side closest to the CPU fan connector on the motherboard. Use a screw driver to improve heat dissipation. 2.2 Installation of CPU Fan and Heatsink This motherboard is an example to illustrate the installation of the ..., see page 2, No. 6). For proper installation, please kindly refer to dissipate heat. Place the heatsink onto the socket. English 15 ASRock X79 Extreme4 Motherboard Step 2. If you need to spray thermal interface material between the CPU and the heatsink to install the screws. Below is equipped with...
...socket that the CPU and the heatsink are oriented on side closest to the CPU fan connector on the motherboard. Use a screw driver to improve heat dissipation. 2.2 Installation of CPU Fan and Heatsink This motherboard is an example to illustrate the installation of the ..., see page 2, No. 6). For proper installation, please kindly refer to dissipate heat. Place the heatsink onto the socket. English 15 ASRock X79 Extreme4 Motherboard Step 2. If you need to spray thermal interface material between the CPU and the heatsink to install the screws. Below is equipped with...

Quick Installation Guide
Page 18
...Express graphics cards. 18 ASRock X79 Extreme4 Motherboard English Please follow the installation procedures in this section. For 3-Way SLITM technology, you should have two identical SLITM-ready graphics cards that are properly seated on the slots. Download the driver from NVIDIA website (www..... Make sure that your power supply unit (PSU) can provide at least the minimum power required by your graphics card driver supports NVIDIA® SLITM technology (driver version 280.41 and later). Currently, NVIDIA® SLITM technology supports Windows® XP / XP 64-bit / VistaTM...
...Express graphics cards. 18 ASRock X79 Extreme4 Motherboard English Please follow the installation procedures in this section. For 3-Way SLITM technology, you should have two identical SLITM-ready graphics cards that are properly seated on the slots. Download the driver from NVIDIA website (www..... Make sure that your power supply unit (PSU) can provide at least the minimum power required by your graphics card driver supports NVIDIA® SLITM technology (driver version 280.41 and later). Currently, NVIDIA® SLITM technology supports Windows® XP / XP 64-bit / VistaTM...

Quick Installation Guide
Page 21
... select Enable SLI. In Set PhysX GPU acceleration item, please select Enabled. 2.5.2 Driver Installation and Setup Install the graphics card drivers to enable the multi-GPU feature. After that, you can freely enjoy the benefit of SLITM feature. 21 ASRock X79 Extreme4 Motherboard English B. From the pop-up menu, select Set SLI and PhysX configuration...
... select Enable SLI. In Set PhysX GPU acceleration item, please select Enabled. 2.5.2 Driver Installation and Setup Install the graphics card drivers to enable the multi-GPU feature. After that, you can freely enjoy the benefit of SLITM feature. 21 ASRock X79 Extreme4 Motherboard English B. From the pop-up menu, select Set SLI and PhysX configuration...

Quick Installation Guide
Page 24
... installation guide. In below procedures, we use Radeon HD 5770 as 12-pipe cards while in any 3D application. English 24 ASRock X79 Extreme4 Motherboard Currently CrossFireXTM feature is supported with Windows® XP with Service Pack 2 / VistaTM / 7 OS. 3-way CrossFireXTM ... motherboard and a CrossFireXTM Edition co-processor graphics card, must be installed correctly to AMD graphics card manuals for ATITM CrossFireXTM driver updates. 1. Make sure that AMD has released or will not see the performance benefits of combining multiple high performance Graphics Processing...
... installation guide. In below procedures, we use Radeon HD 5770 as 12-pipe cards while in any 3D application. English 24 ASRock X79 Extreme4 Motherboard Currently CrossFireXTM feature is supported with Windows® XP with Service Pack 2 / VistaTM / 7 OS. 3-way CrossFireXTM ... motherboard and a CrossFireXTM Edition co-processor graphics card, must be installed correctly to AMD graphics card manuals for ATITM CrossFireXTM driver updates. 1. Make sure that AMD has released or will not see the performance benefits of combining multiple high performance Graphics Processing...


