
User Manual
Page 3
...5 1.2 Specifications 6 1.3 Motherboard Layout 11 1.4 I/O Panel 12 2 . BIOS SETUP UTILITY 3 5 3.1 Introduction 35 3.1.1 BIOS Menu Bar 35 3.1.2 Navigation Keys 36 3.2 Main Screen 36 3 Contents 1 . Installation 14 Pre-installation Precautions 14 2.1 CPU Installation 15 2.2 Installation of CPU Fan and Heatsink 15 2.3 Installation of Memory Modules (DIMM 16 2.4 Expansion Slots (PCI and PCI Express slots 18 2.5 Jumpers Setup 19 2.6 Onboard Headers and Connectors 20 2.7 HDMI_SPDIF Header Connection Guide 25 2.8 SATAII Hard Disk Setup Guide 26 2.9 Serial ATA (SATA) / Serial ATAII...
...5 1.2 Specifications 6 1.3 Motherboard Layout 11 1.4 I/O Panel 12 2 . BIOS SETUP UTILITY 3 5 3.1 Introduction 35 3.1.1 BIOS Menu Bar 35 3.1.2 Navigation Keys 36 3.2 Main Screen 36 3 Contents 1 . Installation 14 Pre-installation Precautions 14 2.1 CPU Installation 15 2.2 Installation of CPU Fan and Heatsink 15 2.3 Installation of Memory Modules (DIMM 16 2.4 Expansion Slots (PCI and PCI Express slots 18 2.5 Jumpers Setup 19 2.6 Onboard Headers and Connectors 20 2.7 HDMI_SPDIF Header Connection Guide 25 2.8 SATAII Hard Disk Setup Guide 26 2.9 Serial ATA (SATA) / Serial ATAII...

User Manual
Page 9
... same OC settings as yours! Please be noticed that the USB flash drive or hard drive must use Intelligent Energy Saver function, please enable Cool 'n' Quiet option in the BIOS setup in Flash ROM. ASRock Instant Flash is capable of ASRock OC Tuner. With OC DNA, you to save your BIOS only in a few clicks without entering operating systems first like MS-DOS or Windows®. The software name itself...
... same OC settings as yours! Please be noticed that the USB flash drive or hard drive must use Intelligent Energy Saver function, please enable Cool 'n' Quiet option in the BIOS setup in Flash ROM. ASRock Instant Flash is capable of ASRock OC Tuner. With OC DNA, you to save your BIOS only in a few clicks without entering operating systems first like MS-DOS or Windows®. The software name itself...
User Manual
Page 25
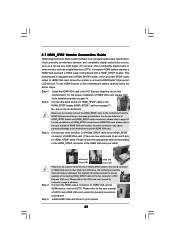
... a HDMI VGA card and a HDMI ready motherboard with a HDMI_SPDIF header, which provides an interface between any compatible digital audio/video source, such as a set-top box, DVD player, A/V receiver and a compatible digital audio or video monitor, such as HDTV. Make sure to correctly connect the HDMI_SPDIF cable to the motherboard and the HDMI VGA card according to the PCI Express Graphics slot on this picture shows the wrong example of connecting HDMI_SPDIF cable to the wrong connector of HDMI VGA card...
... a HDMI VGA card and a HDMI ready motherboard with a HDMI_SPDIF header, which provides an interface between any compatible digital audio/video source, such as a set-top box, DVD player, A/V receiver and a compatible digital audio or video monitor, such as HDTV. Make sure to correctly connect the HDMI_SPDIF cable to the motherboard and the HDMI VGA card according to the PCI Express Graphics slot on this picture shows the wrong example of connecting HDMI_SPDIF cable to the wrong connector of HDMI VGA card...

User Manual
Page 30
... HDDs without RAID functions, please follow the order from up , press key, and then a window for boot devices selection appears. Please follow below procedures according to install Windows® XP / Windows® XP 64-bit on the support CD driver page. Using SATA / SATAII HDDs with NCQ and Hot Plug functions STEP 1: Set Up BIOS. A. Then you see these messages, Please choose: 1. Generate AHCI Driver diskette for WindowsXP 2. Set the "SATA Operation Mode" option...
... HDDs without RAID functions, please follow the order from up , press key, and then a window for boot devices selection appears. Please follow below procedures according to install Windows® XP / Windows® XP 64-bit on the support CD driver page. Using SATA / SATAII HDDs with NCQ and Hot Plug functions STEP 1: Set Up BIOS. A. Then you see these messages, Please choose: 1. Generate AHCI Driver diskette for WindowsXP 2. Set the "SATA Operation Mode" option...
User Manual
Page 33
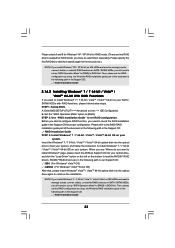
...configuration. STEP 2: Use "RAID Installation Guide" to [RAID] in the Support CD: .. \ RAID Installation Guide 2.14.2 Installing Windows® 7 / 7 64-bit / VistaTM / VistaTM 64-bit With RAID Functions If you want to install Windows® 7 / 7 64-bit / VistaTM / VistaTM 64-bit on your SATA / SATAII HDDs with RAID functions, please follow the instruction to install Windows® 7 / 7 64-bit / VistaTM / VistaTM 64-bit OS on the bottom to install Windows?" STEP 1: Set Up BIOS. Enter BIOS SETUP UTILITY Advanced screen IDE Configuration. Set the "SATA Operation Mode" option to boot...
...configuration. STEP 2: Use "RAID Installation Guide" to [RAID] in the Support CD: .. \ RAID Installation Guide 2.14.2 Installing Windows® 7 / 7 64-bit / VistaTM / VistaTM 64-bit With RAID Functions If you want to install Windows® 7 / 7 64-bit / VistaTM / VistaTM 64-bit on your SATA / SATAII HDDs with RAID functions, please follow the instruction to install Windows® 7 / 7 64-bit / VistaTM / VistaTM 64-bit OS on the bottom to install Windows?" STEP 1: Set Up BIOS. Enter BIOS SETUP UTILITY Advanced screen IDE Configuration. Set the "SATA Operation Mode" option to boot...
User Manual
Page 37
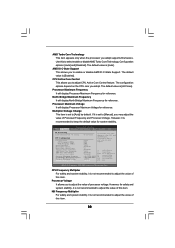
... option to load the optiomized CPU overclocking setting. BIOS SETUP UTILITY Main OC Tweaker Advanced H/W Monitor Boot Security Exit EZ Overclocking Load Optimized CPU OC Setting CPU Configuration Overclock Mode CPU Frequency (MHz) PCIE Frequency (MHz) Spread Spectrum Boot Failure Guard Boot Failure Guard Count Advanced Clock Calibration AMD Turbo Core Technology AMD IO C-State Support CPU Active Core Control Processor Maximum Frequency North Bridge Maximum Frequency Processor Maximum Voltage Multiplier/Voltage Change [Press Enter] [Auto] [200] [100] [Auto] [Enabled] [3] [Disabled] [Auto...
... option to load the optiomized CPU overclocking setting. BIOS SETUP UTILITY Main OC Tweaker Advanced H/W Monitor Boot Security Exit EZ Overclocking Load Optimized CPU OC Setting CPU Configuration Overclock Mode CPU Frequency (MHz) PCIE Frequency (MHz) Spread Spectrum Boot Failure Guard Boot Failure Guard Count Advanced Clock Calibration AMD Turbo Core Technology AMD IO C-State Support CPU Active Core Control Processor Maximum Frequency North Bridge Maximum Frequency Processor Maximum Voltage Multiplier/Voltage Change [Press Enter] [Auto] [200] [100] [Auto] [Enabled] [3] [Disabled] [Auto...
User Manual
Page 38
.... The default value is [Auto]. BIOS SETUP UTILITY Main OC Tweaker Advanced H/W Monitor Boot Security Exit EZ Overclocking Load Optimized CPU OC Setting CPU Configuration Overclock Mode CPU Frequency (MHz) PCIE Frequency (MHz) Spread Spectrum Boot Failure Guard Boot Failure Guard Count Advanced Clock Calibration AMD Turbo Core Technology AMD IO C-State Support CPU Active Core Control Processor Maximum Frequency North Bridge Maximum Frequency Processor Maximum Voltage Multiplier/Voltage Change [Press Enter] [Auto] [200] [100] [Auto] [Enabled] [3] [Disabled] [Auto] [Enabled] [Disabled] x13...
.... The default value is [Auto]. BIOS SETUP UTILITY Main OC Tweaker Advanced H/W Monitor Boot Security Exit EZ Overclocking Load Optimized CPU OC Setting CPU Configuration Overclock Mode CPU Frequency (MHz) PCIE Frequency (MHz) Spread Spectrum Boot Failure Guard Boot Failure Guard Count Advanced Clock Calibration AMD Turbo Core Technology AMD IO C-State Support CPU Active Core Control Processor Maximum Frequency North Bridge Maximum Frequency Processor Maximum Voltage Multiplier/Voltage Change [Press Enter] [Auto] [200] [100] [Auto] [Enabled] [3] [Disabled] [Auto] [Enabled] [Disabled] x13...
User Manual
Page 39
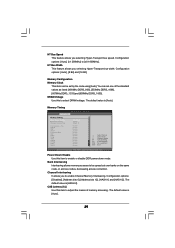
.... DRAM Voltage Use this to enable or disable DDR power down mode. The default value is [HASH 2]. Configuration options: [Disabled], [Address bits 6], [Address bits 12], [HASH 1] and [HASH 2]. Memory Timing BIOS SETUP UTILITY OC Tweaker Memory Timing Power Down Enable Bank Interleaving Channel Interleaving CAS Latency (CL) TRCD TRP TRAS Command Rate TRC TRTP TWR TRFC TRRD TWTR TRTP TFAW [Disabled] [Auto] [Hash 2] [Auto] [Auto] [Auto] [Auto] [Auto] [Auto] [Auto] [Auto] [Auto] [Auto] [Auto] [Auto] [Auto] +F1 F9 F10 ESC Select Screen Select Item Change Option General Help Load...
.... DRAM Voltage Use this to enable or disable DDR power down mode. The default value is [HASH 2]. Configuration options: [Disabled], [Address bits 6], [Address bits 12], [HASH 1] and [HASH 2]. Memory Timing BIOS SETUP UTILITY OC Tweaker Memory Timing Power Down Enable Bank Interleaving Channel Interleaving CAS Latency (CL) TRCD TRP TRAS Command Rate TRC TRTP TWR TRFC TRRD TWTR TRTP TFAW [Disabled] [Auto] [Hash 2] [Auto] [Auto] [Auto] [Auto] [Auto] [Auto] [Auto] [Auto] [Auto] [Auto] [Auto] [Auto] [Auto] +F1 F9 F10 ESC Select Screen Select Item Change Option General Help Load...
User Manual
Page 45
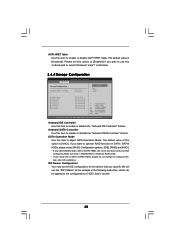
... to enable or disable ACPI HPET Table. The default value of this option is [Disabled]. Onboard IDE Controller Use this item to operate RAID function on SATA / SATAII HDDs, please do not change the setting of this item after OS installation. We will use this motherboard to submit Windows® VistaTM certification. 3.4.4 Storage Configuration BIOS SETUP UTILITY Advanced Storage Configuration Onboard IDE Controller Onboard SATA Controller SATA Operation Mode IDE1 Master IDE1 Slave SATAII_1 SATAII_2 SATAII_3 SATAII_4 eSATA5 eSATA6 [Enabled] [Enabled] [AHCI] [Hard Disk] [Not...
... to enable or disable ACPI HPET Table. The default value of this option is [Disabled]. Onboard IDE Controller Use this item to operate RAID function on SATA / SATAII HDDs, please do not change the setting of this item after OS installation. We will use this motherboard to submit Windows® VistaTM certification. 3.4.4 Storage Configuration BIOS SETUP UTILITY Advanced Storage Configuration Onboard IDE Controller Onboard SATA Controller SATA Operation Mode IDE1 Master IDE1 Slave SATAII_1 SATAII_2 SATAII_3 SATAII_4 eSATA5 eSATA6 [Enabled] [Enabled] [AHCI] [Hard Disk] [Not...

User Manual
Page 49
... USB Mouse Power On Use this item to enable or disable USB Keyboard/Remote Power On on the system. 49 3.4.8 USB Configuration BIOS SETUP UTILITY Advanced USB Configuration USB Controller USB 2.0 Support Legacy USB Support [Enabled] [Enabled] [Enabled] USB Keyboard/Remote Power On [Disabled] USB Mouse Power On [Disabled] To enable or disable the onboard USB controllers. +F1 F9 F10 ESC Select Screen Select Item Change Option General Help Load Defaults Save and Exit Exit v02.54 (C) Copyright 1985-2003, American Megatrends, Inc. USB devices are not allowed to enter OS. [BIOS Setup...
... USB Mouse Power On Use this item to enable or disable USB Keyboard/Remote Power On on the system. 49 3.4.8 USB Configuration BIOS SETUP UTILITY Advanced USB Configuration USB Controller USB 2.0 Support Legacy USB Support [Enabled] [Enabled] [Enabled] USB Keyboard/Remote Power On [Disabled] USB Mouse Power On [Disabled] To enable or disable the onboard USB controllers. +F1 F9 F10 ESC Select Screen Select Item Change Option General Help Load Defaults Save and Exit Exit v02.54 (C) Copyright 1985-2003, American Megatrends, Inc. USB devices are not allowed to enter OS. [BIOS Setup...
User Manual
Page 52
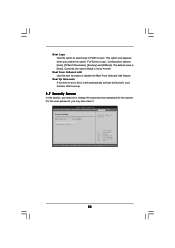
... is set or change the supervisor/user password for the system. Configuration options: [Auto], [PCIE2.0 Revolution], [Scenery] and [ASRock]. The default value is [Auto]. For the user password, you enable the option "Full Screen Logo". This option only appears when you may set to Aircraft. Boot Logo Use this item to enable or disable the Boot From Onboard LAN feature. Boot From Onboard LAN Use this option to select logo in POST screen. Select Screen Select Item Enter Change F1 General Help F9 Load Defaults F10...
... is set or change the supervisor/user password for the system. Configuration options: [Auto], [PCIE2.0 Revolution], [Scenery] and [ASRock]. The default value is [Auto]. For the user password, you enable the option "Full Screen Logo". This option only appears when you may set to Aircraft. Boot Logo Use this item to enable or disable the Boot From Onboard LAN feature. Boot From Onboard LAN Use this option to select logo in POST screen. Select Screen Select Item Enter Change F1 General Help F9 Load Defaults F10...

User Manual
Page 54
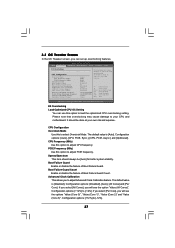
... Main Menu did not appear automatically, locate and double click on a specific item then follow the installation wizard to your CD-ROM drive. Please install the necessary drivers to display the menus. 4.2.2 Drivers Menu The Drivers Menu shows the available devices drivers if the system detects the installed devices. Click on the file "ASSETUP.EXE" from the BIN folder in the Support CD to activate the devices. 4.2.3 Utilities Menu The Utilities Menu shows the applications software...
... Main Menu did not appear automatically, locate and double click on a specific item then follow the installation wizard to your CD-ROM drive. Please install the necessary drivers to display the menus. 4.2.2 Drivers Menu The Drivers Menu shows the available devices drivers if the system detects the installed devices. Click on the file "ASSETUP.EXE" from the BIN folder in the Support CD to activate the devices. 4.2.3 Utilities Menu The Utilities Menu shows the applications software...
Quick Installation Guide
Page 3
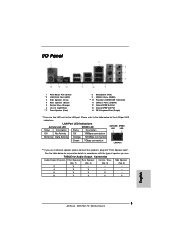
...V V V V 3 ASRock M3N78D FX Motherboard English Please refer to the LAN port. LAN Port LED Indications Activity/Link LED SPEED LED Status Description Status Description ACT/LINK SPEED LED LED Off No Activity Off 10Mbps connection Blinking Data Activity Orange 100Mbps connection Green 1Gbps connection LAN Port ** If you use 2-channel speaker, please connect the speaker's plug into "Front Speaker Jack". See the table below for the LAN port LED indications. I/O Panel 1 PS/2 Mouse Port (Green) * 2 LAN RJ-45 Port (LAN1) 3 Side Speaker (Gray) 4 Rear Speaker (Black...
...V V V V 3 ASRock M3N78D FX Motherboard English Please refer to the LAN port. LAN Port LED Indications Activity/Link LED SPEED LED Status Description Status Description ACT/LINK SPEED LED LED Off No Activity Off 10Mbps connection Blinking Data Activity Orange 100Mbps connection Green 1Gbps connection LAN Port ** If you use 2-channel speaker, please connect the speaker's plug into "Front Speaker Jack". See the table below for the LAN port LED indications. I/O Panel 1 PS/2 Mouse Port (Green) * 2 LAN RJ-45 Port (LAN1) 3 Side Speaker (Gray) 4 Rear Speaker (Black...

Quick Installation Guide
Page 4
...-bit / VistaTM in RAID / AHCI mode, please install the OS directly, and you can work in RAID / AHCI mode only. If you want to our user manual in RAID / AHCI mode, please make a SATA driver diskette first. Click "Jack" and then click "Configuration". You may refer to install Windows® XP / XP 64-bit in the support CD or the quick installation guide for the detail steps of powered eSATA2 function. 4 ASRock M3N78D FX Motherboard English Click "Advanced Options...
...-bit / VistaTM in RAID / AHCI mode, please install the OS directly, and you can work in RAID / AHCI mode only. If you want to our user manual in RAID / AHCI mode, please make a SATA driver diskette first. Click "Jack" and then click "Configuration". You may refer to install Windows® XP / XP 64-bit in the support CD or the quick installation guide for the detail steps of powered eSATA2 function. 4 ASRock M3N78D FX Motherboard English Click "Advanced Options...

Quick Installation Guide
Page 8
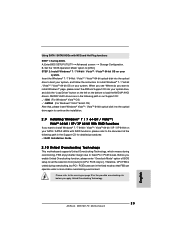
...This motherboard supports Dual Channel Memory Technology. Before you implement Dual Channel Memory Technology, make sure to read the installation guide of memory modules on page 13 for system usage under Windows® 7 / VistaTM / XP. Hardware - CPU Temperature Sensing Monitor - Chassis Temperature Sensing - CPU/Chassis/Power Fan Tachometer - CASE OPEN detection - FCC, CE, WHQL - Due to the components and devices of "User Manual" in the BIOS, applying Untied Overclocking Technology, or using the third-party overclocking tools. Before installing SATAII hard disk to...
...This motherboard supports Dual Channel Memory Technology. Before you implement Dual Channel Memory Technology, make sure to read the installation guide of memory modules on page 13 for system usage under Windows® 7 / VistaTM / XP. Hardware - CPU Temperature Sensing Monitor - Chassis Temperature Sensing - CPU/Chassis/Power Fan Tachometer - CASE OPEN detection - FCC, CE, WHQL - Due to the components and devices of "User Manual" in the BIOS, applying Untied Overclocking Technology, or using the third-party overclocking tools. Before installing SATAII hard disk to...

Quick Installation Guide
Page 9
... technology that the USB flash drive or hard drive must use Intelligent Energy Saver function, please enable Cool 'n' Quiet option in the BIOS setup in advance. The voltage regulator can press key during the POST or press key to BIOS setup menu to improve efficiency when the CPU cores are idle. Please visit our website for the operation procedures of Intelligent Energy Saver. With this tool and save your USB flash drive, floppy disk or hard drive...
... technology that the USB flash drive or hard drive must use Intelligent Energy Saver function, please enable Cool 'n' Quiet option in the BIOS setup in advance. The voltage regulator can press key during the POST or press key to BIOS setup menu to improve efficiency when the CPU cores are idle. Please visit our website for the operation procedures of Intelligent Energy Saver. With this tool and save your USB flash drive, floppy disk or hard drive...
Quick Installation Guide
Page 23
... PCI / PCIE buses. When you see "Where do you enable Untied Overclocking function, please enter "Overclock Mode" option of BIOS setup to set the selection from [Auto] to [CPU, PCIE, Async.]. page, please insert the ASRock Support CD into the optical drive to boot your system, and follow the instruction to install Windows® 7 / 7 64-bit / VistaTM / VistaTM 64-bit OS on page 8 for detailed procedures: ..\ RAID Installation Guide 2 . 1 0 Untied Overclocking Technology This motherboard supports Untied Overclocking Technology, which means during overclocking, but PCI / PCIE...
... PCI / PCIE buses. When you see "Where do you enable Untied Overclocking function, please enter "Overclock Mode" option of BIOS setup to set the selection from [Auto] to [CPU, PCIE, Async.]. page, please insert the ASRock Support CD into the optical drive to boot your system, and follow the instruction to install Windows® 7 / 7 64-bit / VistaTM / VistaTM 64-bit OS on page 8 for detailed procedures: ..\ RAID Installation Guide 2 . 1 0 Untied Overclocking Technology This motherboard supports Untied Overclocking Technology, which means during overclocking, but PCI / PCIE...

Quick Installation Guide
Page 24
... CD-ROM drive. The Support CD that will display the Main Menu automatically if "AUTORUN" is designed to enter BIOS Setup utility; otherwise, POST continues with the motherboard contains necessary drivers and useful utilities that came with its various sub-menus and to display the menus. 24 ASRock M3N78D FX Motherboard English For the detailed information about BIOS Setup, please refer to enter BIOS Setup after POST, please restart the system by pressing + + , or pressing the reset button...
... CD-ROM drive. The Support CD that will display the Main Menu automatically if "AUTORUN" is designed to enter BIOS Setup utility; otherwise, POST continues with the motherboard contains necessary drivers and useful utilities that came with its various sub-menus and to display the menus. 24 ASRock M3N78D FX Motherboard English For the detailed information about BIOS Setup, please refer to enter BIOS Setup after POST, please restart the system by pressing + + , or pressing the reset button...

RAID Installation Guide
Page 7
... following path in the Support CD: .. \ RAID Installation Guide STEP 3: Install Windows® 7 / 7 64-bit / VistaTM / VistaTM 64-bit OS on your system. Enter BIOS SETUP UTILITY Advanced screen Storge Configuration. Set the "SATA Operation Mode" option to set RAID configuration. Insert the Windows® 7 / 7 64-bit / VistaTM / VistaTM 64-bit optical disk into the optical drive to boot your system, and follow below steps. If you install Windows® 7 / 7 64-bit / VistaTM / VistaTM 64-bit on IDE HDDs and want to manage...
... following path in the Support CD: .. \ RAID Installation Guide STEP 3: Install Windows® 7 / 7 64-bit / VistaTM / VistaTM 64-bit OS on your system. Enter BIOS SETUP UTILITY Advanced screen Storge Configuration. Set the "SATA Operation Mode" option to set RAID configuration. Insert the Windows® 7 / 7 64-bit / VistaTM / VistaTM 64-bit optical disk into the optical drive to boot your system, and follow below steps. If you install Windows® 7 / 7 64-bit / VistaTM / VistaTM 64-bit on IDE HDDs and want to manage...
RAID Installation Guide
Page 11
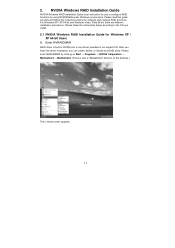
... desktop.) Then, below according to the OS you install. 2.1 NVIDIA Windows RAID Installation Guide for you can create, delete, or rebuild any RAID array. Enter NVRAIDMAN RAID driver is an instruction for Windows XP / XP 64-bit Users A. Please enter NVRAIDMAN by using NVIDIAMAN under Windows environment. Please read this guide carefully and follow the instructions below screen appears. 11 After you finish the driver installation, you to configure and manage RAID functions. 2. For Windows...
... desktop.) Then, below according to the OS you install. 2.1 NVIDIA Windows RAID Installation Guide for you can create, delete, or rebuild any RAID array. Enter NVRAIDMAN RAID driver is an instruction for Windows XP / XP 64-bit Users A. Please enter NVRAIDMAN by using NVIDIAMAN under Windows environment. Please read this guide carefully and follow the instructions below screen appears. 11 After you finish the driver installation, you to configure and manage RAID functions. 2. For Windows...


