User Manual
Page 6
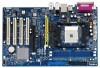
1.2 Specifications Platform: ATX Form Factor: 12.0-in x 7.5-in, 30.5 cm x 19.1 cm CPU: 754-Pin Socket Supporting advanced 64-bit AMD AthlonTM 64 and 32-bit / 64-bit Sempron Processors Supports AMD's Cool 'n' QuietTM Technology (see CAUTION 1) Chipsets: ... Speed: 802.3u (10/100 Ethernet), Supports Wake-On-LAN Hardware Monitor: CPU Temperature Sensing Motherboard Temperature Sensing CPU Overheat Shutdown to Protect CPU Life (ASRock U-COP)(see CAUTION 3) CPU Fan Tachometer Chassis Fan Tachometer Voltage Monitoring: +12V, +5V, +3.3V, Vcore Future CPU Port: Supports CPU upgrade from ...
1.2 Specifications Platform: ATX Form Factor: 12.0-in x 7.5-in, 30.5 cm x 19.1 cm CPU: 754-Pin Socket Supporting advanced 64-bit AMD AthlonTM 64 and 32-bit / 64-bit Sempron Processors Supports AMD's Cool 'n' QuietTM Technology (see CAUTION 1) Chipsets: ... Speed: 802.3u (10/100 Ethernet), Supports Wake-On-LAN Hardware Monitor: CPU Temperature Sensing Motherboard Temperature Sensing CPU Overheat Shutdown to Protect CPU Life (ASRock U-COP)(see CAUTION 3) CPU Fan Tachometer Chassis Fan Tachometer Voltage Monitoring: +12V, +5V, +3.3V, Vcore Future CPU Port: Supports CPU upgrade from ...
User Manual
Page 10
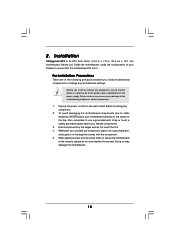
... your chassis to the motherboard, peripherals, and/or components. 1. Doing so may cause severe damage to ensure that comes with the component. 5. Installation K8Upgrade-NF3 is detached from the wall socket before you handle components. 3. Pre-installation Precautions Take note of your motherboard directly on a grounded antistatic pad or in , 30.5 cm x 19...
... your chassis to the motherboard, peripherals, and/or components. 1. Doing so may cause severe damage to ensure that comes with the component. 5. Installation K8Upgrade-NF3 is detached from the wall socket before you handle components. 3. Pre-installation Precautions Take note of your motherboard directly on a grounded antistatic pad or in , 30.5 cm x 19...

User Manual
Page 11
.... Then connect the CPU fan to improve heat dissipation. Step 3. DO NOT force the CPU into the socket until it is locked. Lever 90° Up Socket Corner CPU Golden Triangle STEP 1: Lift Up The Socket Lever STEP 2 / STEP 3: STEP 4: Match The CPU Golden Triangle Push Down And Lock To The...and in one correct orientation. For proper installation, please kindly refer to the instruction manuals of CPU Fan and Heatsink After you push down the socket lever to a 90o angle. You also need to spray thermal grease between the CPU and the heatsink to the CPU FAN connector (CPU_FAN1, ...
.... Then connect the CPU fan to improve heat dissipation. Step 3. DO NOT force the CPU into the socket until it is locked. Lever 90° Up Socket Corner CPU Golden Triangle STEP 1: Lift Up The Socket Lever STEP 2 / STEP 3: STEP 4: Match The CPU Golden Triangle Push Down And Lock To The...and in one correct orientation. For proper installation, please kindly refer to the instruction manuals of CPU Fan and Heatsink After you push down the socket lever to a 90o angle. You also need to spray thermal grease between the CPU and the heatsink to the CPU FAN connector (CPU_FAN1, ...
Quick Installation Guide
Page 2
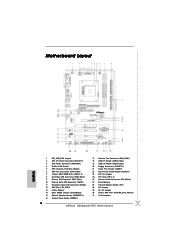
Motherboard Layout English 1 PS2_USB_PW1 Jumper 2 ATX 12V Power Connector (ATX12V1) 3 ATX Power Connector (ATXPWR1) 4 754-Pin CPU Socket 5 CPU Heatsink Retention Module 6 CPU Fan Connector (CPU_FAN1) 7 184-pin DDR DIMM Slots (DDR1- 2) 8 Secondary IDE Connector (IDE2, Black) 9 Primary IDE Connector (IDE1, Blue) 10 ... (Black) 26 Flash Memory 27 Infrared Module Header (IR1) 28 J15 Jumper 29 J9 / J10 Jumper 30 Future CPU Port (FUTURE_CPU_PORT1) 31 J1-J8 Jumpers 2 ASRock K8Upgrade-NF3 Motherboard
Motherboard Layout English 1 PS2_USB_PW1 Jumper 2 ATX 12V Power Connector (ATX12V1) 3 ATX Power Connector (ATXPWR1) 4 754-Pin CPU Socket 5 CPU Heatsink Retention Module 6 CPU Fan Connector (CPU_FAN1) 7 184-pin DDR DIMM Slots (DDR1- 2) 8 Secondary IDE Connector (IDE2, Black) 9 Primary IDE Connector (IDE1, Blue) 10 ... (Black) 26 Flash Memory 27 Infrared Module Header (IR1) 28 J15 Jumper 29 J9 / J10 Jumper 30 Future CPU Port (FUTURE_CPU_PORT1) 31 J1-J8 Jumpers 2 ASRock K8Upgrade-NF3 Motherboard

Quick Installation Guide
Page 5
...ATX Form Factor: 12.0-in x 7.5-in, 30.5 cm x 19.1 cm CPU: 754-Pin Socket Supporting advanced 64-bit AMD AthlonTM 64 and 32-bit / 64-bit Sempron Processors Supports AMD's ...Ethernet), Supports Wake-On-LAN Hardware Monitor: CPU Temperature Sensing Motherboard Temperature Sensing CPU Overheat Shutdown to Protect CPU Life (ASRock U-COP)(see CAUTION 3) CPU Fan Tachometer Chassis Fan Tachometer Voltage Monitoring: +12V, +5V, +3.3V, Vcore Future ... 2.0 Ports on the I/O Panel Plus 2 On-Board Headers Supporting 4 Extra USB 2.0 Ports (see CAUTION 5) English 5 ASRock K8Upgrade-NF3 Motherboard
...ATX Form Factor: 12.0-in x 7.5-in, 30.5 cm x 19.1 cm CPU: 754-Pin Socket Supporting advanced 64-bit AMD AthlonTM 64 and 32-bit / 64-bit Sempron Processors Supports AMD's ...Ethernet), Supports Wake-On-LAN Hardware Monitor: CPU Temperature Sensing Motherboard Temperature Sensing CPU Overheat Shutdown to Protect CPU Life (ASRock U-COP)(see CAUTION 3) CPU Fan Tachometer Chassis Fan Tachometer Voltage Monitoring: +12V, +5V, +3.3V, Vcore Future ... 2.0 Ports on the I/O Panel Plus 2 On-Board Headers Supporting 4 Extra USB 2.0 Ports (see CAUTION 5) English 5 ASRock K8Upgrade-NF3 Motherboard

Quick Installation Guide
Page 7
...a 90° angle. Doing so may cause severe damage to secure the CPU. Step 2. Position the CPU directly above the socket such that comes with a small triangle. Installation Pre-installation Precautions Take note of the following precautions before touching any motherboard settings. 1.... component. Install CPU fan and heatsink. When placing screws into the socket to the chassis, please do not touch the ICs. 4. English 7 ASRock K8Upgrade-NF3 Motherboard Step 5. Unplug the power cord from the wall socket before you handle components. 3. Also remember to indicate that it is...
...a 90° angle. Doing so may cause severe damage to secure the CPU. Step 2. Position the CPU directly above the socket such that comes with a small triangle. Installation Pre-installation Precautions Take note of the following precautions before touching any motherboard settings. 1.... component. Install CPU fan and heatsink. When placing screws into the socket to the chassis, please do not touch the ICs. 4. English 7 ASRock K8Upgrade-NF3 Motherboard Step 5. Unplug the power cord from the wall socket before you handle components. 3. Also remember to indicate that it is...