RAID Installation Guide
Page 2
... Disks", which is called data mirroring that optimizes two identical hard disk drives to configure RAID functions by following the detailed instruction of the "User Manual" in parallel, interleaved stacks. Hot-Plug any fault tolerance. WARNING!! AMD BIOS RAID Installation Guide AMD BIOS RAID Installation Guide is called data striping that...
... Disks", which is called data mirroring that optimizes two identical hard disk drives to configure RAID functions by following the detailed instruction of the "User Manual" in parallel, interleaved stacks. Hot-Plug any fault tolerance. WARNING!! AMD BIOS RAID Installation Guide AMD BIOS RAID Installation Guide is called data striping that...
RAID Installation Guide
Page 11
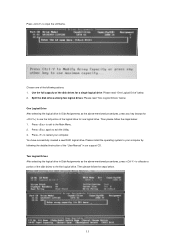
... computer by following actions: 1. Press to exit to allocate a portion of the disk drives for one of the following the detailed instruction of the "User Manual" in Disk Assignments as the above -mentioned procedures, press to the Main Menu. 2. You have successfully created a new RAID logical drive. Split the disk drives...
... computer by following actions: 1. Press to exit to allocate a portion of the disk drives for one of the following the detailed instruction of the "User Manual" in Disk Assignments as the above -mentioned procedures, press to the Main Menu. 2. You have successfully created a new RAID logical drive. Split the disk drives...

RAID Installation Guide
Page 12
... desired capacity for the first logical drive and press . Please install the operating system to your computer by following the detailed instruction of the "User Manual" in our support CD. 1.4.2 Configuring Legacy RAID ROM For AMD A88X Chipset When the appropriate prompt appears during POST, press to restart the computer. Press...
... desired capacity for the first logical drive and press . Please install the operating system to your computer by following the detailed instruction of the "User Manual" in our support CD. 1.4.2 Configuring Legacy RAID ROM For AMD A88X Chipset When the appropriate prompt appears during POST, press to restart the computer. Press...
RAID Installation Guide
Page 18
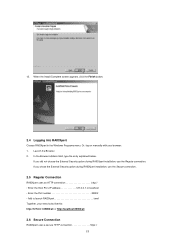
Or, log on manually with your entry looks like this: http://127.0.0.1:25902/ati or http://localhost:25902/ati 2.6 Secure Connection RAIDXpert uses a secure HTTP connection https:// 18 In ...
Or, log on manually with your entry looks like this: http://127.0.0.1:25902/ati or http://localhost:25902/ati 2.6 Secure Connection RAIDXpert uses a secure HTTP connection https:// 18 In ...

Quick Installation Guide
Page 6
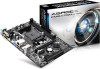
... to change without further notice. www.asrock.com/support/index.asp 1.1 Package Contents ASRock FM2A75M-HD+ Motherboard (Micro ATX Form Factor) ASRock FM2A75M-HD+ Quick Installation Guide ASRock FM2A75M-HD+ Support CD 2 x Serial ATA (SATA) Data Cables (Optional) 1 x I/O Panel Shield ASRock Reminds You... ASRock website http://www.asrock.com If you require technical support related to this manual will be subject to AHCI mode...
... to change without further notice. www.asrock.com/support/index.asp 1.1 Package Contents ASRock FM2A75M-HD+ Motherboard (Micro ATX Form Factor) ASRock FM2A75M-HD+ Quick Installation Guide ASRock FM2A75M-HD+ Support CD 2 x Serial ATA (SATA) Data Cables (Optional) 1 x I/O Panel Shield ASRock Reminds You... ASRock website http://www.asrock.com If you require technical support related to this manual will be subject to AHCI mode...

Quick Installation Guide
Page 17
You also need to spray thermal grease between the CPU and the heatsink to the CPU FAN connector (CPU_FAN1, see Page 1, No. 3). Make sure that the CPU and the heatsink are securely fastened and in good contact with each other. For proper installation, please kindly refer to the instruction manuals of CPU Fan and Heatsink After you install the CPU into this motherboard, it is necessary to install a larger heatsink and cooling fan to dissipate heat. Then connect the CPU fan to improve heat dissipation. 2.2 Installation of the CPU fan and the heatsink. 16 English
You also need to spray thermal grease between the CPU and the heatsink to the CPU FAN connector (CPU_FAN1, see Page 1, No. 3). Make sure that the CPU and the heatsink are securely fastened and in good contact with each other. For proper installation, please kindly refer to the instruction manuals of CPU Fan and Heatsink After you install the CPU into this motherboard, it is necessary to install a larger heatsink and cooling fan to dissipate heat. Then connect the CPU fan to improve heat dissipation. 2.2 Installation of the CPU fan and the heatsink. 16 English

Quick Installation Guide
Page 23
... system. 2. C. Connect Ground (GND) to the reset switch on the chassis must support HDA to the "FrontMic" Tab in our manual and chassis manual to connect them for AC'97 audio panel. Adjust "Recording Volume". RESET (Reset Switch): Connect to Ground (GND). E. System Panel ...Header (9-pin PANEL1) (see p.1 No. 21) GND PRESENCE# MIC_RET OUT_RET 1 OUT2_L J_SENSE OUT2_R MIC2_R MIC2_L This is an interface for HD audio panel only....
... system. 2. C. Connect Ground (GND) to the reset switch on the chassis must support HDA to the "FrontMic" Tab in our manual and chassis manual to connect them for AC'97 audio panel. Adjust "Recording Volume". RESET (Reset Switch): Connect to Ground (GND). E. System Panel ...Header (9-pin PANEL1) (see p.1 No. 21) GND PRESENCE# MIC_RET OUT_RET 1 OUT2_L J_SENSE OUT2_R MIC2_R MIC2_L This is an interface for HD audio panel only....
Quick Installation Guide
Page 27
... is a menu-driven program, which allows you to display the menus. 26 English For the detailed information about BIOS Setup, please refer to the User Manual (PDF file) contained in the Support CD to scroll through its test routines. The Support CD that will display the Main Menu automatically if "AUTORUN...
... is a menu-driven program, which allows you to display the menus. 26 English For the detailed information about BIOS Setup, please refer to the User Manual (PDF file) contained in the Support CD to scroll through its test routines. The Support CD that will display the Main Menu automatically if "AUTORUN...
