
RAID Installation Guide
Page 1
AMD Windows RAID Installation Guide 16 1 AMD RAID Installation Guide 1. AMD BIOS RAID Installation Guide ...2 1.1 Introduction to RAID...2 1.2 RAID Configurations Precautions 4 1.3 Legacy RAID ROM Configuration (for AMD X470, B450, X370, B350, and A320 Chipsets) ... 5 1.4 UEFI RAID Configuration (for AMD X399, X470, B450, X370, B350, and A320 Chipsets)....11 2.
AMD Windows RAID Installation Guide 16 1 AMD RAID Installation Guide 1. AMD BIOS RAID Installation Guide ...2 1.1 Introduction to RAID...2 1.2 RAID Configurations Precautions 4 1.3 Legacy RAID ROM Configuration (for AMD X470, B450, X370, B350, and A320 Chipsets) ... 5 1.4 UEFI RAID Configuration (for AMD X399, X470, B450, X370, B350, and A320 Chipsets)....11 2.

RAID Installation Guide
Page 2
... Installation Guide AMD BIOS RAID Installation Guide is called data mirroring that optimizes two identical hard disk drives to read and write data in our support CD, then you ... onboard RAID Option ROM Utility to configure RAID. 1.1 Introduction to RAID The term "RAID" stands for you make a SATA driver diskette, press or to enter BIOS setup to RAID mode by using the onboard FastBuild BIOS utility under BIOS environment. 1. It provides data protection and increases fault tolerance to a second drive.
... Installation Guide AMD BIOS RAID Installation Guide is called data mirroring that optimizes two identical hard disk drives to read and write data in our support CD, then you ... onboard RAID Option ROM Utility to configure RAID. 1.1 Introduction to RAID The term "RAID" stands for you make a SATA driver diskette, press or to enter BIOS setup to RAID mode by using the onboard FastBuild BIOS utility under BIOS environment. 1. It provides data protection and increases fault tolerance to a second drive.

RAID Installation Guide
Page 5
Go to enter the RAID BIOS setup utility. When the appropriate prompt appears during POST, press to Advanced Storage Configuration. C. D. B. STEP 2: Create and configure the RAID disk A. During system boot, ... to enter legacy RAID ROM utility. Set the "SATA Mode" option to create and configure the RAID disk. 1.3 Legacy RAID ROM Configuration (for AMD X470, B450, X370, B350, and A320 Chipsets) Use legacy RAID ROM to . Click to save to delete the existing disk arrays before creating a new array. 5 To create...
Go to enter the RAID BIOS setup utility. When the appropriate prompt appears during POST, press to Advanced Storage Configuration. C. D. B. STEP 2: Create and configure the RAID disk A. During system boot, ... to enter legacy RAID ROM utility. Set the "SATA Mode" option to create and configure the RAID disk. 1.3 Legacy RAID ROM Configuration (for AMD X470, B450, X370, B350, and A320 Chipsets) Use legacy RAID ROM to . Click to save to delete the existing disk arrays before creating a new array. 5 To create...

RAID Installation Guide
Page 7
Press to confirm and then press to return to exit the RAID BIOS utility. 7 Press to the previous screen. When completed, you will see the new array on the main screen. Select a caching mode and press to proceed.
Press to confirm and then press to return to exit the RAID BIOS utility. 7 Press to the previous screen. When completed, you will see the new array on the main screen. Select a caching mode and press to proceed.

User Manual
Page 4
... 2.7 M.2_SSD (NGFF) Module Installation Guide (M2_1) 33 2.8 M.2_SSD (NGFF) Module Installation Guide (M2_2) 36 Chapter 3 Software and Utilities Operation 39 3.1 Installing Drivers 39 3.2 A-Tuning 40 3.3 ASRock Live Update & APP Shop 43 3.3.1 UI Overview 43 3.3.2 Apps 44...
... 2.7 M.2_SSD (NGFF) Module Installation Guide (M2_1) 33 2.8 M.2_SSD (NGFF) Module Installation Guide (M2_2) 36 Chapter 3 Software and Utilities Operation 39 3.1 Installing Drivers 39 3.2 A-Tuning 40 3.3 ASRock Live Update & APP Shop 43 3.3.1 UI Overview 43 3.3.2 Apps 44...
User Manual
Page 6
Because the motherboard specifications and the BIOS software might be updated, the content of the motherboard and step-by-step installation guides. Chapter 4 contains the configuration guide of the software and utilities. ASRock website http://www.asrock.com. 1.1 Package Contents • ASRock B450 Pro4 Motherboard (ATX Form Factor) • ASRock B450 Pro4 Quick Installation Guide • ASRock B450 Pro4 Support CD • 1 x I/O Panel...
Because the motherboard specifications and the BIOS software might be updated, the content of the motherboard and step-by-step installation guides. Chapter 4 contains the configuration guide of the software and utilities. ASRock website http://www.asrock.com. 1.1 Package Contents • ASRock B450 Pro4 Motherboard (ATX Form Factor) • ASRock B450 Pro4 Quick Installation Guide • ASRock B450 Pro4 Support CD • 1 x I/O Panel...

User Manual
Page 11
...• 1 x USB 3.1 Gen1 Header (Supports 2 USB 3.1 Gen1 ports) (Supports ESD Protection) BIOS Feature • AMI UEFI Legal BIOS with overclocking, including adjusting the setting in the BIOS, applying Untied Overclocking Technology, or using thirdparty overclocking tools. We are not responsible for possible damage caused ... ErP/EuP ready (ErP/EuP ready power supply is required) * For detailed product information, please visit our website: http://www.asrock.com Please realize that there is a certain risk involved with multilingual GUI support • Supports "Plug and Play" • ACPI...
...• 1 x USB 3.1 Gen1 Header (Supports 2 USB 3.1 Gen1 ports) (Supports ESD Protection) BIOS Feature • AMI UEFI Legal BIOS with overclocking, including adjusting the setting in the BIOS, applying Untied Overclocking Technology, or using thirdparty overclocking tools. We are not responsible for possible damage caused ... ErP/EuP ready (ErP/EuP ready power supply is required) * For detailed product information, please visit our website: http://www.asrock.com Please realize that there is a certain risk involved with multilingual GUI support • Supports "Plug and Play" • ACPI...

User Manual
Page 12
USB 2.0 T: USB5 B: USB6 PS2 Keyboard /Mouse 1.3 Motherboard Layout 1 ATX12V1 B450 Pro4 23 45 1 AMD_FAN_LED1 CPU_FAN2/WP CPU_FAN1 VGA1 DDR4_A1 (64 bit, 288-pin module) DDR4_A2 (64 bit, 288-pin module) DDR4_B1 (64... B: USB31_TC_1 USB 3.1 Gen1 T: USB1 B: USB2 USB 3.1 Gen1 T: USB3 B: USB4 CHA_FAN1/WP RJ-45 LAN BIOS ROM PCIE1 PCIE2 M2_1 1 Ultra M.2 PCIe Gen3 x4 USB3_5_6 Super I/O PCIE3 PCIE5 CMOS Battery PCIE4 B450 Pro4 AMD Promontory B450 M2_2 HD_AUDIO1 1 PCIE6 TPMS1 1 RGB_LED1 1 COM1 1 RoHS USB_1_2 1 SPK_PLED1 USB_3_4 ADDR_LED1 CHA_FAN2/WP CHA_FAN3/WP CLRCMOS2 ...
USB 2.0 T: USB5 B: USB6 PS2 Keyboard /Mouse 1.3 Motherboard Layout 1 ATX12V1 B450 Pro4 23 45 1 AMD_FAN_LED1 CPU_FAN2/WP CPU_FAN1 VGA1 DDR4_A1 (64 bit, 288-pin module) DDR4_A2 (64 bit, 288-pin module) DDR4_B1 (64... B: USB31_TC_1 USB 3.1 Gen1 T: USB1 B: USB2 USB 3.1 Gen1 T: USB3 B: USB4 CHA_FAN1/WP RJ-45 LAN BIOS ROM PCIE1 PCIE2 M2_1 1 Ultra M.2 PCIe Gen3 x4 USB3_5_6 Super I/O PCIE3 PCIE5 CMOS Battery PCIE4 B450 Pro4 AMD Promontory B450 M2_2 HD_AUDIO1 1 PCIE6 TPMS1 1 RGB_LED1 1 COM1 1 RoHS USB_1_2 1 SPK_PLED1 USB_3_4 ADDR_LED1 CHA_FAN2/WP CHA_FAN3/WP CLRCMOS2 ...

User Manual
Page 32
Please remember toremove the jumper cap after you to clear the CMOS when you just finish updating the BIOS, you must boot up the system first, and then shut it down before you do not clear the CMOS right after clearing the CMOS. English ...) 2-pin Jumper CLRCMOS2 allows you update the BIOS. However, please do the clear-CMOS action. If no jumper cap is placed on CLRCMOS2 for 5 seconds. To clear and reset the system parameters to short the pins on the pins, the jumper is "Open". B450 Pro4 2.5 Jumpers Setup The illustration shows how jumpers are...
Please remember toremove the jumper cap after you to clear the CMOS when you just finish updating the BIOS, you must boot up the system first, and then shut it down before you do not clear the CMOS right after clearing the CMOS. English ...) 2-pin Jumper CLRCMOS2 allows you update the BIOS. However, please do the clear-CMOS action. If no jumper cap is placed on CLRCMOS2 for 5 seconds. To clear and reset the system parameters to short the pins on the pins, the jumper is "Open". B450 Pro4 2.5 Jumpers Setup The illustration shows how jumpers are...

User Manual
Page 52
Click to select one or more details. Step 3 Click Update to start the update process. 47 English Step 1 Please check the item information before update. Please update them all soon. Click on Step 2 to see more items you will see a list of recommended or critical updates for the BIOS or drivers. B450 Pro4 3.3.3 BIOS & Drivers Installing BIOS or Drivers When the "BIOS & Drivers" tab is selected, you want to update.
Click to select one or more details. Step 3 Click Update to start the update process. 47 English Step 1 Please check the item information before update. Please update them all soon. Click on Step 2 to see more items you will see a list of recommended or critical updates for the BIOS or drivers. B450 Pro4 3.3.3 BIOS & Drivers Installing BIOS or Drivers When the "BIOS & Drivers" tab is selected, you want to update.
User Manual
Page 71
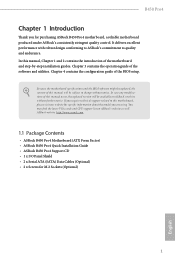
..., then you to adjust the RGB LED color to plug in your USB storage device. Please setup network configuration before using Internet Flash. *For BIOS backup and recovery purpose, it is a handy tool in the UEFI that don't have an optical disk drive to install the drivers from our ... you to update your system via an USB storage device, then downloads and installs the other required drivers automatically. Internet Flash - 4.5 Tool RGB LED ASRock RGB LED allows you can start installing the operating system in RAID mode. Instant Flash Save UEFI files in your USB storage device and run...
..., then you to adjust the RGB LED color to plug in your USB storage device. Please setup network configuration before using Internet Flash. *For BIOS backup and recovery purpose, it is a handy tool in the UEFI that don't have an optical disk drive to install the drivers from our ... you to update your system via an USB storage device, then downloads and installs the other required drivers automatically. Internet Flash - 4.5 Tool RGB LED ASRock RGB LED allows you can start installing the operating system in RAID mode. Instant Flash Save UEFI files in your USB storage device and run...

Quick Installation Guide
Page 3
USB 2.0 T: USB5 B: USB6 PS2 Keyboard /Mouse Motherboard Layout 1 ATX12V1 B450 Pro4 23 45 1 AMD_FAN_LED1 CPU_FAN2/WP CPU_FAN1 VGA1 DDR4_A1 (64 bit, 288-pin module) DDR4_A2 (64 bit, 288-pin module) DDR4_B1 (64 ...USB31_TA_1 B: USB31_TC_1 USB 3.1 Gen1 T: USB1 B: USB2 USB 3.1 Gen1 T: USB3 B: USB4 CHA_FAN1/WP RJ-45 LAN BIOS ROM PCIE1 PCIE2 M2_1 1 Ultra M.2 PCIe Gen3 x4 USB3_5_6 Super I/O PCIE3 PCIE5 CMOS Battery PCIE4 B450 Pro4 AMD Promontory B450 M2_2 HD_AUDIO1 1 PCIE6 TPMS1 1 RGB_LED1 1 COM1 1 RoHS USB_1_2 1 SPK_PLED1 USB_3_4 ADDR_LED1 CHA_FAN2/WP CHA_FAN3/WP CLRCMOS2 1...
USB 2.0 T: USB5 B: USB6 PS2 Keyboard /Mouse Motherboard Layout 1 ATX12V1 B450 Pro4 23 45 1 AMD_FAN_LED1 CPU_FAN2/WP CPU_FAN1 VGA1 DDR4_A1 (64 bit, 288-pin module) DDR4_A2 (64 bit, 288-pin module) DDR4_B1 (64 ...USB31_TA_1 B: USB31_TC_1 USB 3.1 Gen1 T: USB1 B: USB2 USB 3.1 Gen1 T: USB3 B: USB4 CHA_FAN1/WP RJ-45 LAN BIOS ROM PCIE1 PCIE2 M2_1 1 Ultra M.2 PCIe Gen3 x4 USB3_5_6 Super I/O PCIE3 PCIE5 CMOS Battery PCIE4 B450 Pro4 AMD Promontory B450 M2_2 HD_AUDIO1 1 PCIE6 TPMS1 1 RGB_LED1 1 COM1 1 RoHS USB_1_2 1 SPK_PLED1 USB_3_4 ADDR_LED1 CHA_FAN2/WP CHA_FAN3/WP CLRCMOS2 1...
Quick Installation Guide
Page 7
...) Data Cables (Optional) • 2 x Screws for specific information about the model you for purchasing ASRock B450 Pro4 motherboard, a reliable motherboard produced under ASRock's consistently stringent quality control. B450 Pro4 Chapter 1 Introduction Thank you are using. Because the motherboard specifications and the BIOS software might be subject to quality and endurance. It delivers excellent performance with robust design...
...) Data Cables (Optional) • 2 x Screws for specific information about the model you for purchasing ASRock B450 Pro4 motherboard, a reliable motherboard produced under ASRock's consistently stringent quality control. B450 Pro4 Chapter 1 Introduction Thank you are using. Because the motherboard specifications and the BIOS software might be subject to quality and endurance. It delivers excellent performance with robust design...

Quick Installation Guide
Page 12
...) • 1 x USB 3.1 Gen1 Header (Supports 2 USB 3.1 Gen1 ports) (Supports ESD Protection) BIOS Feature • AMI UEFI Legal BIOS with overclocking, including adjusting the setting in the BIOS, applying Untied Overclocking Technology, or using thirdparty overclocking tools. It should be done at your system. ture): ...; ErP/EuP ready (ErP/EuP ready power supply is required) * For detailed product information, please visit our website: http://www.asrock.com Please realize that there is a certain risk involved with multilingual GUI support • Supports "Plug and Play" • ACPI...
...) • 1 x USB 3.1 Gen1 Header (Supports 2 USB 3.1 Gen1 ports) (Supports ESD Protection) BIOS Feature • AMI UEFI Legal BIOS with overclocking, including adjusting the setting in the BIOS, applying Untied Overclocking Technology, or using thirdparty overclocking tools. It should be done at your system. ture): ...; ErP/EuP ready (ErP/EuP ready power supply is required) * For detailed product information, please visit our website: http://www.asrock.com Please realize that there is a certain risk involved with multilingual GUI support • Supports "Plug and Play" • ACPI...

Quick Installation Guide
Page 29
... reset the system parameters to short the pins on CLRMOS2 for 5 seconds. If you need to clear the CMOS when you just finish updating the BIOS, you must boot up the system first, and then shut it down before you to clear the data in CMOS. Clear CMOS Jumper (CLRCMOS2) (...the computer and unplug the power cord from the power supply. Please remember toremove the jumper cap after you update the BIOS. When the jumper cap is placed on the pins, the jumper is removed. However, please do the clear-CMOS action. B450 Pro4 2.5 Jumpers Setup The illustration shows how jumpers are setup.
... reset the system parameters to short the pins on CLRMOS2 for 5 seconds. If you need to clear the CMOS when you just finish updating the BIOS, you must boot up the system first, and then shut it down before you to clear the data in CMOS. Clear CMOS Jumper (CLRCMOS2) (...the computer and unplug the power cord from the power supply. Please remember toremove the jumper cap after you update the BIOS. When the jumper cap is placed on the pins, the jumper is removed. However, please do the clear-CMOS action. B450 Pro4 2.5 Jumpers Setup The illustration shows how jumpers are setup.

Quick Installation Guide
Page 133
B450 Pro4 CPU CPU, CPU CPU CPU, CPU CPU, CPU 팬 12V, +5V, +3.3V, Vcore OS • Microsoft® Windows® 10 64- 비트 인증 • FCC, CE • ErP/EuP ErP/EuP http://www.asrock.com BIOS Untied Overclocking Technology 한국어 131
B450 Pro4 CPU CPU, CPU CPU CPU, CPU CPU, CPU 팬 12V, +5V, +3.3V, Vcore OS • Microsoft® Windows® 10 64- 비트 인증 • FCC, CE • ErP/EuP ErP/EuP http://www.asrock.com BIOS Untied Overclocking Technology 한국어 131

Quick Installation Guide
Page 170
繁體中文 CPU CPU、CPU 扇 CPU CPU、 CPU CPU、CPU 12V、+5V、+3.3V、Vcore 作業系統 • Microsoft® Windows® 10 64-bit 認證 • FCC、CE • ErP/EuP ready ErP/EuP ready http://www.asrock.com BIOS 168
繁體中文 CPU CPU、CPU 扇 CPU CPU、 CPU CPU、CPU 12V、+5V、+3.3V、Vcore 作業系統 • Microsoft® Windows® 10 64-bit 認證 • FCC、CE • ErP/EuP ready ErP/EuP ready http://www.asrock.com BIOS 168


