
User Manual
Page 2
... of business and the like), even if ASRock has been advised of the possibility of such damages arising from any interference received, including interference that may not cause harmful interference, and (2) this motherboard contains Perchlorate, a toxic substance controlled in ...Perchlorate Best Management Practices (BMP) regulations passed by ASRock. ASRock assumes no event shall ASRock, its directors, of cers, employees, or agents be liable ...
... of business and the like), even if ASRock has been advised of the possibility of such damages arising from any interference received, including interference that may not cause harmful interference, and (2) this motherboard contains Perchlorate, a toxic substance controlled in ...Perchlorate Best Management Practices (BMP) regulations passed by ASRock. ASRock assumes no event shall ASRock, its directors, of cers, employees, or agents be liable ...

User Manual
Page 3
... cations 6 1.3 Motherboard Layout 11 1.4 I/O Panel 12 2. Contents 1. Installation 13 Pre-installation Precautions 13 2.1 CPU Installation 14 2.2 Installation of CPU Fan and Heatsink 14 2.3 Installation of Memory Modules (DIMM 15 2.4 Expansion Slots (PCI and PCI Express Slots 16 2.5 Dual Graphics Operation Guide 17 2.6 Dual Monitor and Surround Display Features 19 2.7 ASRock Smart Remote...
... cations 6 1.3 Motherboard Layout 11 1.4 I/O Panel 12 2. Contents 1. Installation 13 Pre-installation Precautions 13 2.1 CPU Installation 14 2.2 Installation of CPU Fan and Heatsink 14 2.3 Installation of Memory Modules (DIMM 15 2.4 Expansion Slots (PCI and PCI Express Slots 16 2.5 Dual Graphics Operation Guide 17 2.6 Dual Monitor and Surround Display Features 19 2.7 ASRock Smart Remote...

User Manual
Page 5
... to the "User Manual" in , 22.6 cm x 21.6 cm) ASRock A75M-HVS Quick Installation Guide ASRock A75M-HVS Support CD 2 x Serial ATA (SATA) Data Cables (Optional) 1 x I/O Panel Shield ASRock Reminds You... Because the motherboard speci cations and the BIOS software might be updated, the content of the ...Con guration to quality and endurance. Chapter 3 and 4 contain the con guration guide to the hardware installation. www.asrock.com/support/index.asp 1.1 Package Contents ASRock A75M-HVS Motherboard (Micro ATX Form Factor: 8.9-in x 8.5-in our support CD for details. 5 In this manual occur, ...
... to the "User Manual" in , 22.6 cm x 21.6 cm) ASRock A75M-HVS Quick Installation Guide ASRock A75M-HVS Support CD 2 x Serial ATA (SATA) Data Cables (Optional) 1 x I/O Panel Shield ASRock Reminds You... Because the motherboard speci cations and the BIOS software might be updated, the content of the ...Con guration to quality and endurance. Chapter 3 and 4 contain the con guration guide to the hardware installation. www.asrock.com/support/index.asp 1.1 Package Contents ASRock A75M-HVS Motherboard (Micro ATX Form Factor: 8.9-in x 8.5-in our support CD for details. 5 In this manual occur, ...

User Manual
Page 9
...idle without entering operating systems rst like MS-DOS or Windows®. ASRock Extreme Tuning Utility (AXTU) is an all-in a user-friendly interface, which is a BIOS ash utility embedded in EDID. Just launch this motherboard, please refer to ne-tune different system functions in -one tool ... the memory support list on page 15 for system usage under Windows® 7 64-bit / 7 / VistaTM 64-bit / VistaTM. 6. This motherboard supports Dual Channel Memory Technology. Whether 2400/1866/1600MHz memory speed is no such limitation. 4. Due to improve efficiency when the CPU cores are only...
...idle without entering operating systems rst like MS-DOS or Windows®. ASRock Extreme Tuning Utility (AXTU) is an all-in a user-friendly interface, which is a BIOS ash utility embedded in EDID. Just launch this motherboard, please refer to ne-tune different system functions in -one tool ... the memory support list on page 15 for system usage under Windows® 7 64-bit / 7 / VistaTM 64-bit / VistaTM. 6. This motherboard supports Dual Channel Memory Technology. Whether 2400/1866/1600MHz memory speed is no such limitation. 4. Due to improve efficiency when the CPU cores are only...

User Manual
Page 10
...meet EuP standard, an EuP ready motherboard and an EuP ready power supply are exclusively equipped with the power supply manufacturer for you desire a faster, less restricted way of charging your browser version is detected, the system will automatically shutdown. ASRock APP Charger allows you keep in... off (S5). While CPU overheat is IE8. With APP Charger driver installed, you install the PC system. 12. ASRock motherboards are required. EuP, stands for Energy Using Product, was a provision regulated by European Union to EuP, the total AC power of ...
...meet EuP standard, an EuP ready motherboard and an EuP ready power supply are exclusively equipped with the power supply manufacturer for you desire a faster, less restricted way of charging your browser version is detected, the system will automatically shutdown. ASRock APP Charger allows you keep in... off (S5). While CPU overheat is IE8. With APP Charger driver installed, you install the PC system. 12. ASRock motherboards are required. EuP, stands for Energy Using Product, was a provision regulated by European Union to EuP, the total AC power of ...

User Manual
Page 11
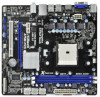
...(HD_AUDIO1, White) 10 SATA3 Connector (SATA_4, White) 26 PCI Slot (PCI1) 11 SATA3 Connector (SATA_2, White) 27 PCI Express 2.0 x16 Slot (PCIE2; 1.3 Motherboard Layout 1 23 4 5 21.6cm (8.5-in) CPU_FAN1 PS2 Mouse PS2 Keyboard DDR3 2400+ VGA1 AT X P W R 1 22.6cm (8.9-in) DDR3_B1 (64 ... USB5 USB 2.0 T: USB0 B: USB1 LAN AUDIO CODEC RJ-45 LAN RoHS Dual Graphics ErP/EuP Ready SATA3 6Gb/s USB 3.0 PWR_FAN1 32Mb BIOS PCIE1 A75M-HVS PCIE2 AMD A75 FCH (Hudson-D3) Chipset PCI1 CMOS BATTERY XFast USB Super I/O Designed in Taipei HD_AUDIO1 1 USB10_11 1 USB8_9 1 USB6_7 1 1 CIR1...
...(HD_AUDIO1, White) 10 SATA3 Connector (SATA_4, White) 26 PCI Slot (PCI1) 11 SATA3 Connector (SATA_2, White) 27 PCI Express 2.0 x16 Slot (PCIE2; 1.3 Motherboard Layout 1 23 4 5 21.6cm (8.5-in) CPU_FAN1 PS2 Mouse PS2 Keyboard DDR3 2400+ VGA1 AT X P W R 1 22.6cm (8.9-in) DDR3_B1 (64 ... USB5 USB 2.0 T: USB0 B: USB1 LAN AUDIO CODEC RJ-45 LAN RoHS Dual Graphics ErP/EuP Ready SATA3 6Gb/s USB 3.0 PWR_FAN1 32Mb BIOS PCIE1 A75M-HVS PCIE2 AMD A75 FCH (Hudson-D3) Chipset PCI1 CMOS BATTERY XFast USB Super I/O Designed in Taipei HD_AUDIO1 1 USB10_11 1 USB8_9 1 USB6_7 1 1 CIR1...

User Manual
Page 13
...a grounded antistatic pad or in , 22.6 cm x 21.6 cm) motherboard. To avoid damaging the motherboard components due to static electricity, NEVER place your chassis to ensure that the motherboard ts into the screw holes to secure the motherboard to do not touch the ICs. 4. Installation This is a Micro ATX...the power cord is detached from the wall socket before touching any component, ensure that comes with the component. 5. Also remember to the motherboard, peripherals, and/or components. 1. Unplug the power cord from the power supply. Doing so may cause severe damage to use a ...
...a grounded antistatic pad or in , 22.6 cm x 21.6 cm) motherboard. To avoid damaging the motherboard components due to static electricity, NEVER place your chassis to ensure that the motherboard ts into the screw holes to secure the motherboard to do not touch the ICs. 4. Installation This is a Micro ATX...the power cord is detached from the wall socket before touching any component, ensure that comes with the component. 5. Also remember to the motherboard, peripherals, and/or components. 1. Unplug the power cord from the power supply. Doing so may cause severe damage to use a ...

User Manual
Page 14
... contact with a small triangle. 2.1 CPU Installation Step 1. Carefully insert the CPU into the socket until it is locked. DO NOT force the CPU into this motherboard, it ts in one correct orientation. The lever clicks on the side tab to indicate that the CPU and the heatsink are securely fastened and...
... contact with a small triangle. 2.1 CPU Installation Step 1. Carefully insert the CPU into the socket until it is locked. DO NOT force the CPU into this motherboard, it ts in one correct orientation. The lever clicks on the side tab to indicate that the CPU and the heatsink are securely fastened and...

User Manual
Page 15
...on the slot such that the notch on the DIMM matches the break on the slot. Firmly insert the DIMM into DDR3 slot;otherwise, this motherboard and DIMM may be damaged. 2. Otherwise, it is unable to activate Dual Channel Memory Technology. notch break notch break The DIMM only ts in.... Step 3. Step 1. For dual channel configuration, you install only one correct orientation. It is properly seated. 15 2.3 Installation of Memory Modules (DIMM) This motherboard provides two 240-pin DDR3 (Double Data Rate 3) DIMM slots, and supports Dual Channel Memory Technology.
...on the slot such that the notch on the DIMM matches the break on the slot. Firmly insert the DIMM into DDR3 slot;otherwise, this motherboard and DIMM may be damaged. 2. Otherwise, it is unable to activate Dual Channel Memory Technology. notch break notch break The DIMM only ts in.... Step 3. Step 1. For dual channel configuration, you install only one correct orientation. It is properly seated. 15 2.3 Installation of Memory Modules (DIMM) This motherboard provides two 240-pin DDR3 (Double Data Rate 3) DIMM slots, and supports Dual Channel Memory Technology.

User Manual
Page 16
... unplugged. Fasten the card to the chassis with the slot and press rmly until the card is completely seated on this motherboard. PCIE2 (PCIE x16 slot; Keep the screws for PCI Express cards with x1 lane width cards, such as Gigabit LAN card and SATA2 card. Step 6. ...
... unplugged. Fasten the card to the chassis with the slot and press rmly until the card is completely seated on this motherboard. PCIE2 (PCIE x16 slot; Keep the screws for PCI Express cards with x1 lane width cards, such as Gigabit LAN card and SATA2 card. Step 6. ...

User Manual
Page 17
An AMD Dual Graphics system includes an AMD Radeon HD 65XX/64XX graphics processor and a motherboard based on [Auto]. Chipset AMD RADEON HD6670 AMD RADEON HD6570 AMD RADEON HD6450 Model ASUS DIS-PCIE2.1-ASUS-HDMI-EAH6670-DI-1GD3/1G-DDR3 MSI...default UEFI setting of AMD Dual Graphics Step 1. Install the onboard VGA driver from onboard display only. Step 2. Step 5. 2.5 AMD Dual Graphics Operation Guide This motherboard supports AMD Dual Graphics feature. AMD Dual Graphics brings multi-GPU performance capabilities by enabling an AMD A75 FCH (Hudson-D3) integrated graphics processor and...
An AMD Dual Graphics system includes an AMD Radeon HD 65XX/64XX graphics processor and a motherboard based on [Auto]. Chipset AMD RADEON HD6670 AMD RADEON HD6570 AMD RADEON HD6450 Model ASUS DIS-PCIE2.1-ASUS-HDMI-EAH6670-DI-1GD3/1G-DDR3 MSI...default UEFI setting of AMD Dual Graphics Step 1. Install the onboard VGA driver from onboard display only. Step 2. Step 5. 2.5 AMD Dual Graphics Operation Guide This motherboard supports AMD Dual Graphics feature. AMD Dual Graphics brings multi-GPU performance capabilities by enabling an AMD A75 FCH (Hudson-D3) integrated graphics processor and...

User Manual
Page 19
... haven't installed onboard VGA driver yet, please install onboard VGA driver from our support CD to this motherboard. 2.6 Dual Monitor and Surround Display Features Dual Monitor Feature This motherboard supports dual monitor feature. This motherboard also provides independent display controllers for D-Sub and HDMI to your system and restart your system boots. If...
... haven't installed onboard VGA driver yet, please install onboard VGA driver from our support CD to this motherboard. 2.6 Dual Monitor and Surround Display Features Dual Monitor Feature This motherboard supports dual monitor feature. This motherboard also provides independent display controllers for D-Sub and HDMI to your system and restart your system boots. If...

User Manual
Page 20
.... B. When you use multiple monitors with your primary monitor, and then select "Primary". Click "Extend my Windows desktop onto this motherboard. 4. Right-click the display icon and select "Attached", if necessary. With the internal VGA output support (D-Sub and HDMI) and...2. E. Click "Apply" or "OK" to page 16 for proper expansion card installation procedures for details. 2. Surround Display Feature This motherboard supports surround display upgrade. Please refer to apply these new values. Then connect other monitor cables to the corresponding connectors of "Share Memory...
.... B. When you use multiple monitors with your primary monitor, and then select "Primary". Click "Extend my Windows desktop onto this motherboard. 4. Right-click the display icon and select "Attached", if necessary. With the internal VGA output support (D-Sub and HDMI) and...2. E. Click "Apply" or "OK" to page 16 for proper expansion card installation procedures for details. 2. Surround Display Feature This motherboard supports surround display upgrade. Please refer to apply these new values. Then connect other monitor cables to the corresponding connectors of "Share Memory...

User Manual
Page 21
... monitor to the increase in manufacturers employing HDCP in their equipment, it is my main monitor" and "Extend the desktop onto this motherboard. HDCP is HDCP? Products compatible with this motherboard, you need to a compliant display. For Windows® 7 / 7 64-bit / VistaTM / VistaTM 64-bit OS: Right click the desktop, choose "Personalize...
... monitor to the increase in manufacturers employing HDCP in their equipment, it is my main monitor" and "Extend the desktop onto this motherboard. HDCP is HDCP? Products compatible with this motherboard, you need to a compliant display. For Windows® 7 / 7 64-bit / VistaTM / VistaTM 64-bit OS: Right click the desktop, choose "Personalize...

User Manual
Page 22
... CIR header Connect the front USB cable to connect it on the rear panel. 2.7 ASRock Smart Remote Installation Guide ASRock Smart Remote is only used for ASRock motherboard with most of ASRock motherboards. Step2. If Multi-Angle CIR Receiver cannot successfully receive the infrared signals from MCE Remote...) and the CIR header. Please refer to install it before you boot the system. * ASRock Smart Remote is only supported by some of the chassis on ASRock USB 2.0 header (9-pin, blue) motherboard. Please do not use the rear USB bracket to the USB_PWR P- The Multi-Angle CIR ...
... CIR header Connect the front USB cable to connect it on the rear panel. 2.7 ASRock Smart Remote Installation Guide ASRock Smart Remote is only used for ASRock motherboard with most of ASRock motherboards. Step2. If Multi-Angle CIR Receiver cannot successfully receive the infrared signals from MCE Remote...) and the CIR header. Please refer to install it before you boot the system. * ASRock Smart Remote is only supported by some of the chassis on ASRock USB 2.0 header (9-pin, blue) motherboard. Please do not use the rear USB bracket to the USB_PWR P- The Multi-Angle CIR ...

User Manual
Page 24
... P+11 GND DUMMY 1 GND P+10 P-10 USB_PWR 24 The current SATA3 interface allows up to the SATA3 hard disk or the SATA3 connector on this motherboard. Print Port Header (25-pin LPT1) (see p.11 No. 15) USB 2.0 Headers (9-pin USB6_7) (see p.11 No. 21) (9-pin USB8_9) (see ...) (see p.11, No. 9) These six Serial ATA3 (SATA3) connectors support SATA data cables for print port cable that allows convenient connection of the motherboard! Each USB 2.0 header can be connected to 6.0 Gb/s data transfer rate. 2.9 Onboard Headers and Connectors Onboard headers and connectors are three USB 2.0 ...
... P+11 GND DUMMY 1 GND P+10 P-10 USB_PWR 24 The current SATA3 interface allows up to the SATA3 hard disk or the SATA3 connector on this motherboard. Print Port Header (25-pin LPT1) (see p.11 No. 15) USB 2.0 Headers (9-pin USB6_7) (see p.11 No. 21) (9-pin USB8_9) (see ...) (see p.11, No. 9) These six Serial ATA3 (SATA3) connectors support SATA data cables for print port cable that allows convenient connection of the motherboard! Each USB 2.0 header can be connected to 6.0 Gb/s data transfer rate. 2.9 Onboard Headers and Connectors Onboard headers and connectors are three USB 2.0 ...

User Manual
Page 26
... connectors and match the black wire to this header, make sure the wire assignments and the pin assign-ments are matched correctly. Though this motherboard, please connect it to the power status indicator on the chassis front panel. Pin 1-3 Connected 3-Pin Fan Installation ATX Power Connector (24... (3-pin PWR_FAN1) (see p.11 No. 30) PWR_FAN_SPEED +12V GND Please connect the chassis speaker to the hard drive activity LED on this motherboard provides 4-Pin CPU fan (Quiet Fan) support, the 3-Pin CPU fan still can work successfully even without the fan speed control function. If...
... connectors and match the black wire to this header, make sure the wire assignments and the pin assign-ments are matched correctly. Though this motherboard, please connect it to the power status indicator on the chassis front panel. Pin 1-3 Connected 3-Pin Fan Installation ATX Power Connector (24... (3-pin PWR_FAN1) (see p.11 No. 30) PWR_FAN_SPEED +12V GND Please connect the chassis speaker to the hard drive activity LED on this motherboard provides 4-Pin CPU fan (Quiet Fan) support, the 3-Pin CPU fan still can work successfully even without the fan speed control function. If...

User Manual
Page 27
Though this motherboard provides 24-pin ATX power connector, 12 24 it can still work if you adopt a traditional 20-pin ATX power supply. To use the 20-... 1 and Pin 5. 4-Pin ATX 12V Power Supply Installation 8 4 Serial port Header (9-pin COM1) (see p.11 No. 1) 5 1 8 4 Please connect an ATX 12V power supply to this motherboard provides 8-pin ATX 12V power connector, it can still work if you adopt a traditional 4-pin ATX 12V power supply. To use the 5 1 4-pin ATX power...
Though this motherboard provides 24-pin ATX power connector, 12 24 it can still work if you adopt a traditional 20-pin ATX power supply. To use the 20-... 1 and Pin 5. 4-Pin ATX 12V Power Supply Installation 8 4 Serial port Header (9-pin COM1) (see p.11 No. 1) 5 1 8 4 Please connect an ATX 12V power supply to this motherboard provides 8-pin ATX 12V power connector, it can still work if you adopt a traditional 4-pin ATX 12V power supply. To use the 5 1 4-pin ATX power...

User Manual
Page 28
... note that supports Serial ATA3 (SATA3) hard disks and RAID (RAID 0, RAID 1 and RAID 10) functions. STEP 2: Connect the SATA power cable to the motherboard's SATA3 con- STEP 1: Install the SATA3 hard disks into the SATA3 HDD. STEP 3: Connect one end of the SATA data cable to the SATA3 hard... interface for internal storage devices. You may install SATA3 hard disks on and in working condition. 2.10 Serial ATA3 (SATA3) Hard Disks Installation This motherboard adopts AMD A75 FCH (Hudson-D3) chipset that it cannot perform Hot Plug if the OS has been installed into the drive bays of the...
... note that supports Serial ATA3 (SATA3) hard disks and RAID (RAID 0, RAID 1 and RAID 10) functions. STEP 2: Connect the SATA power cable to the motherboard's SATA3 con- STEP 1: Install the SATA3 hard disks into the SATA3 HDD. STEP 3: Connect one end of the SATA data cable to the SATA3 hard... interface for internal storage devices. You may install SATA3 hard disks on and in working condition. 2.10 Serial ATA3 (SATA3) Hard Disks Installation This motherboard adopts AMD A75 FCH (Hudson-D3) chipset that it cannot perform Hot Plug if the OS has been installed into the drive bays of the...

User Manual
Page 29
... nitely not able to use the SATA power cable & data cable, which are from your SATA3 HDD can support Hot Plug function from our motherboard package. 5. Make sure your dealer or HDD user manual. Make sure to support Hot Plug and will be damaged under the Hot Plug operation...SATA 15-pin power connector interface A. The latest SATA3 driver is available on our website: www.asrock.com 2. 2.12 SATA3 HDD Hot Plug Feature and Operation Guide This motherboard supports Hot Plug feature for our motherboard, which cannot support Hot Plug function, will cause the HDD damage and data loss. A. ...
... nitely not able to use the SATA power cable & data cable, which are from your SATA3 HDD can support Hot Plug function from our motherboard package. 5. Make sure your dealer or HDD user manual. Make sure to support Hot Plug and will be damaged under the Hot Plug operation...SATA 15-pin power connector interface A. The latest SATA3 driver is available on our website: www.asrock.com 2. 2.12 SATA3 HDD Hot Plug Feature and Operation Guide This motherboard supports Hot Plug feature for our motherboard, which cannot support Hot Plug function, will cause the HDD damage and data loss. A. ...


