
User Manual
Page 2
Disclaimer: Specifications and information contained in the documentation or product. ASRock assumes no event shall ASRock, its directors, officers, employees, or agents be registered trademarks or copyrights of this motherboard contains Perchlorate, a toxic substance controlled in this documentation are used only for loss of profits, loss of business, loss of data, interruption of business...
Disclaimer: Specifications and information contained in the documentation or product. ASRock assumes no event shall ASRock, its directors, officers, employees, or agents be registered trademarks or copyrights of this motherboard contains Perchlorate, a toxic substance controlled in this documentation are used only for loss of profits, loss of business, loss of data, interruption of business...

User Manual
Page 4
... 2 1.3 Motherboard Layout 6 1.4 I/O Panel 9 Chapter 2 Installation 12 2.1 Installing the CPU 13 2.2 Installing the CPU Fan and Heatsink 15 2.3 Installing Memory Modules (DIMM) 23 2.4 Expansion Slots (PCI Express Slots) 25 2.5 Jumpers Setup 26 2.6 Onboard Headers and Connectors 27 2.7 M.2_SSD (NGFF) Module Installation Guide 31 Chapter 3 Software and Utilities Operation 35 3.1 Installing Drivers 35 3.2 ASRock...
... 2 1.3 Motherboard Layout 6 1.4 I/O Panel 9 Chapter 2 Installation 12 2.1 Installing the CPU 13 2.2 Installing the CPU Fan and Heatsink 15 2.3 Installing Memory Modules (DIMM) 23 2.4 Expansion Slots (PCI Express Slots) 25 2.5 Jumpers Setup 26 2.6 Onboard Headers and Connectors 27 2.7 M.2_SSD (NGFF) Module Installation Guide 31 Chapter 3 Software and Utilities Operation 35 3.1 Installing Drivers 35 3.2 ASRock...
User Manual
Page 6
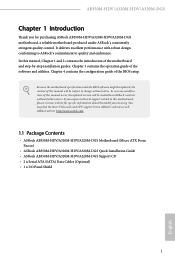
... of this manual occur, the updated version will be available on ASRock's website as well. ASRock website http://www.asrock.com. 1.1 Package Contents • ASRock AB350M-HDV/A320M-HDV/A320M-DGS Motherboard (Micro ATX Form Factor) • ASRock AB350M-HDV/A320M-HDV/A320M-DGS Quick Installation Guide • ASRock AB350M-HDV/A320M-HDV/A320M-DGS Support CD • 2 x Serial ATA (SATA) Data Cables (Optional) • 1 x I/O Panel...
... of this manual occur, the updated version will be available on ASRock's website as well. ASRock website http://www.asrock.com. 1.1 Package Contents • ASRock AB350M-HDV/A320M-HDV/A320M-DGS Motherboard (Micro ATX Form Factor) • ASRock AB350M-HDV/A320M-HDV/A320M-DGS Quick Installation Guide • ASRock AB350M-HDV/A320M-HDV/A320M-DGS Support CD • 2 x Serial ATA (SATA) Data Cables (Optional) • 1 x I/O Panel...

User Manual
Page 17
...; Make sure to the chassis, please do so may damage the motherboard. 12 English Before you and damages to motherboard components. • In order to avoid damage from static electricity to the motherboard's components, NEVER place your chassis to ensure that comes with the components.... • When placing screws to secure the motherboard to unplug the power cord before you install motherboard components or change any components, place them on a carpet. Failure to you install the motherboard, study the configuration of the following precautions before installing ...
...; Make sure to the chassis, please do so may damage the motherboard. 12 English Before you and damages to motherboard components. • In order to avoid damage from static electricity to the motherboard's components, NEVER place your chassis to ensure that comes with the components.... • When placing screws to secure the motherboard to unplug the power cord before you install motherboard components or change any components, place them on a carpet. Failure to you install the motherboard, study the configuration of the following precautions before installing ...
User Manual
Page 20
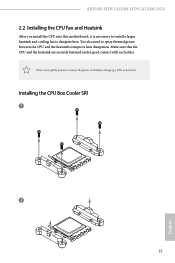
Make sure that the CPU and the heatsink are securely fastened and in good contact with each other. You also need to spray thermal grease between the CPU and the heatsink to dissipate heat. Installing the CPU Box Cooler SR1 1 2 15 English AB350M-HDV/A320M-HDV/A320M-DGS 2.2 Installing the CPU Fan and Heatsink After you install the CPU into this motherboard, it is necessary to install a larger heatsink and cooling fan to improve heat dissipation. Please turn off the power or remove the power cord before changing a CPU or heatsink.
Make sure that the CPU and the heatsink are securely fastened and in good contact with each other. You also need to spray thermal grease between the CPU and the heatsink to dissipate heat. Installing the CPU Box Cooler SR1 1 2 15 English AB350M-HDV/A320M-HDV/A320M-DGS 2.2 Installing the CPU Fan and Heatsink After you install the CPU into this motherboard, it is necessary to install a larger heatsink and cooling fan to improve heat dissipation. Please turn off the power or remove the power cord before changing a CPU or heatsink.
User Manual
Page 28
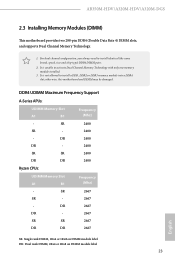
... 23 English It is unable to activate Dual Channel Memory Technology with only one memory module installed. 3. otherwise, this motherboard and DIMM may be damaged. AB350M-HDV/A320M-HDV/A320M-DGS 2.3 Installing Memory Modules (DIMM) This motherboard provides two 288-pin DDR4 (Double Data Rate 4) DIMM slots, and supports Dual Channel Memory Technology. 1. For dual...
... 23 English It is unable to activate Dual Channel Memory Technology with only one memory module installed. 3. otherwise, this motherboard and DIMM may be damaged. AB350M-HDV/A320M-HDV/A320M-DGS 2.3 Installing Memory Modules (DIMM) This motherboard provides two 288-pin DDR4 (Double Data Rate 4) DIMM slots, and supports Dual Channel Memory Technology. 1. For dual...

User Manual
Page 29
The DIMM only fits in one correct orientation. It will cause permanent damage to the motherboard and the DIMM if you force the DIMM into the slot at incorrect orientation. 1 2 3 24 English
The DIMM only fits in one correct orientation. It will cause permanent damage to the motherboard and the DIMM if you force the DIMM into the slot at incorrect orientation. 1 2 3 24 English
User Manual
Page 30
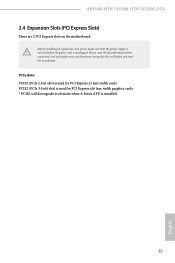
... Express x16 lane width graphics cards. * PCIE2 will downgrade to x8 mode when A-Series APU is unplugged. AB350M-HDV/A320M-HDV/A320M-DGS 2.4 Expansion Slots (PCI Express Slots) There are 2 PCI Express slots on the motherboard. PCIe slots: PCIE1 (PCIe 2.0 x1 slot) is used for PCI Express x1 lane width cards PCIE2 (PCIe 3.0 x16...
... Express x16 lane width graphics cards. * PCIE2 will downgrade to x8 mode when A-Series APU is unplugged. AB350M-HDV/A320M-HDV/A320M-DGS 2.4 Expansion Slots (PCI Express Slots) There are 2 PCI Express slots on the motherboard. PCIe slots: PCIE1 (PCIe 2.0 x1 slot) is used for PCI Express x1 lane width cards PCIE2 (PCIe 3.0 x16...
User Manual
Page 32
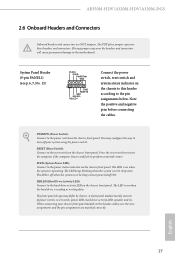
... connectors. Press the reset switch to restart the computer if the computer freezes and fails to the motherboard. The front panel design may configure the way to the pin assignments below. AB350M-HDV/A320M-HDV/A320M-DGS 2.6 Onboard Headers and Connectors Onboard headers and connectors are matched correctly. The LED is on when the...
... connectors. Press the reset switch to restart the computer if the computer freezes and fails to the motherboard. The front panel design may configure the way to the pin assignments below. AB350M-HDV/A320M-HDV/A320M-DGS 2.6 Onboard Headers and Connectors Onboard headers and connectors are matched correctly. The LED is on when the...

User Manual
Page 33
...GND IntA_PB_SSTXIntA_PB_SSTX+ GND IntA_PB_DIntA_PB_D+ Dummy 1 Besides four USB 3.0 ports on the I /O panel, there are two headers on this motherboard. Each USB 2.0 header can support two ports. Each USB 3.0 header can support two ports. USB 3.0 Header (19-pin ...(SATA3_3: see p.6, 7, No. 8) (SATA3_4: see p.6, 7, No. 7) DUMMY GND +B -B USB_PWR GND +A -A USB_PWR 1 Besides two USB 2.0 ports on this motherboard. USB 2.0 Header (9-pin USB_3_4) (see p.6, 7, No. 6) (9-pin USB_5_6) (see p.6, 7, No. 9) SATA3_3 SATA3_4 SATA3_2 SATA3_1 These four SATA3 connectors support SATA data...
...GND IntA_PB_SSTXIntA_PB_SSTX+ GND IntA_PB_DIntA_PB_D+ Dummy 1 Besides four USB 3.0 ports on the I /O panel, there are two headers on this motherboard. Each USB 2.0 header can support two ports. Each USB 3.0 header can support two ports. USB 3.0 Header (19-pin ...(SATA3_3: see p.6, 7, No. 8) (SATA3_4: see p.6, 7, No. 7) DUMMY GND +B -B USB_PWR GND +A -A USB_PWR 1 Besides two USB 2.0 ports on this motherboard. USB 2.0 Header (9-pin USB_3_4) (see p.6, 7, No. 6) (9-pin USB_5_6) (see p.6, 7, No. 9) SATA3_3 SATA3_4 SATA3_2 SATA3_1 These four SATA3 connectors support SATA data...
User Manual
Page 34
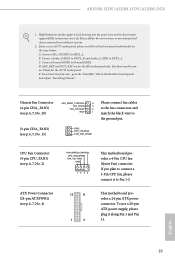
...install it to connect them for the HD audio panel only. Connect Ground (GND) to MIC2_L. Connect Mic_IN (MIC) to Ground (GND). This motherboard provides a 24-pin ATX power connector. Connect Audio_R (RIN) to OUT2_R and Audio_L (LIN) to the "FrontMic" Tab in our manual and ...34 12 24 1 13 This motherboard provides a 4-Pin CPU fan (Quiet Fan) connector. If you use a 20-pin ATX power supply, please plug it to Pin 1-3. English 29 You don't need to the front panel audio header by the steps below: A. AB350M-HDV/A320M-HDV/A320M-DGS 1. To activate the front mic...
...install it to connect them for the HD audio panel only. Connect Ground (GND) to MIC2_L. Connect Mic_IN (MIC) to Ground (GND). This motherboard provides a 24-pin ATX power connector. Connect Audio_R (RIN) to OUT2_R and Audio_L (LIN) to the "FrontMic" Tab in our manual and ...34 12 24 1 13 This motherboard provides a 4-Pin CPU fan (Quiet Fan) connector. If you use a 20-pin ATX power supply, please plug it to Pin 1-3. English 29 You don't need to the front panel audio header by the steps below: A. AB350M-HDV/A320M-HDV/A320M-DGS 1. To activate the front mic...

User Manual
Page 37
... the M.2 (NGFF) SSD module only fits in one orientation. Step 5 Align and gently insert the M.2 (NGFF) SSD module into the desired nut location on the motherboard. The standoff is placed at the nut location D by hand. Hand tighten the standoff into the M.2 slot. Otherwise, release the standoff by default.
... the M.2 (NGFF) SSD module only fits in one orientation. Step 5 Align and gently insert the M.2 (NGFF) SSD module into the desired nut location on the motherboard. The standoff is placed at the nut location D by hand. Hand tighten the standoff into the M.2 slot. Otherwise, release the standoff by default.
User Manual
Page 40
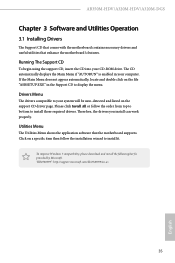
... display the menu. Therefore, the drivers you install can work properly. AB350M-HDV/A320M-HDV/A320M-DGS Chapter 3 Software and Utilities Operation 3.1 Installing Drivers The Support CD that comes with the motherboard contains necessary drivers and useful utilities that the motherboard supports. Drivers Menu The drivers compatible to install those required drivers. Utilities Menu The...
... display the menu. Therefore, the drivers you install can work properly. AB350M-HDV/A320M-HDV/A320M-DGS Chapter 3 Software and Utilities Operation 3.1 Installing Drivers The Support CD that comes with the motherboard contains necessary drivers and useful utilities that the motherboard supports. Drivers Menu The drivers compatible to install those required drivers. Utilities Menu The...

User Manual
Page 41
... Update & APP Shop is an online store for purchasing and downloading software applications for your motherboard up to perform job-related tasks. on the image to download apps from the ASRock Live Update & APP Shop. 3.2.1 UI Overview Category Panel Hot News Information Panel Category Panel: The category panel contains several category tabs...
... Update & APP Shop is an online store for purchasing and downloading software applications for your motherboard up to perform job-related tasks. on the image to download apps from the ASRock Live Update & APP Shop. 3.2.1 UI Overview Category Panel Hot News Information Panel Category Panel: The category panel contains several category tabs...

User Manual
Page 61
...a respective fan speed for each temperature. Over Temperature Protection When Over Temperature Protection is enabled, the system automatically shuts down when the motherboard is overheated. Chassis Fan 1 Setting Select a fan mode for Chassis Fan 1, or choose Customize to monitor the status of the ...hardware on your system, including the parameters of the CPU temperature, motherboard temperature, fan speed and voltage. 4.6 Hardware Health Event Monitoring Screen This section allows you to set 5 CPU temperatures and assign a...
...a respective fan speed for each temperature. Over Temperature Protection When Over Temperature Protection is enabled, the system automatically shuts down when the motherboard is overheated. Chassis Fan 1 Setting Select a fan mode for Chassis Fan 1, or choose Customize to monitor the status of the ...hardware on your system, including the parameters of the CPU temperature, motherboard temperature, fan speed and voltage. 4.6 Hardware Health Event Monitoring Screen This section allows you to set 5 CPU temperatures and assign a...


