RAID Installation Guide
Page 1
AMD BIOS RAID Installation Guide 2 1.1 Introduction to RAIDXpert from the Internet 17 2.9 Running RAIDXpert without Network Connection 17 1 AMD Windows RAID Installation Guide 10 2.1 Components of RAIDXpert ...
AMD BIOS RAID Installation Guide 2 1.1 Introduction to RAIDXpert from the Internet 17 2.9 Running RAIDXpert without Network Connection 17 1 AMD Windows RAID Installation Guide 10 2.1 Components of RAIDXpert ...
RAID Installation Guide
Page 2
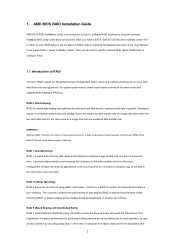
...use the onboard RAID Option ROM Utility to configure RAID. 1.1 Introduction to a second drive. Hot-Plug any fault tolerance. AMD BIOS RAID Installation Guide AMD BIOS RAID Installation Guide is an instruction for "Redundant Array of Independent Disks", which is called data striping that copies and maintains an identical... into one drive to RAID The term "RAID" stands for you make a SATA / SATAII / SATA3 driver diskette, press or to enter BIOS setup to set the option to RAID mode by following the detailed instruction of a single disk alone while the two hard disks perform the same...
...use the onboard RAID Option ROM Utility to configure RAID. 1.1 Introduction to a second drive. Hot-Plug any fault tolerance. AMD BIOS RAID Installation Guide AMD BIOS RAID Installation Guide is an instruction for "Redundant Array of Independent Disks", which is called data striping that copies and maintains an identical... into one drive to RAID The term "RAID" stands for you make a SATA / SATAII / SATA3 driver diskette, press or to enter BIOS setup to set the option to RAID mode by following the detailed instruction of a single disk alone while the two hard disks perform the same...
RAID Installation Guide
Page 4
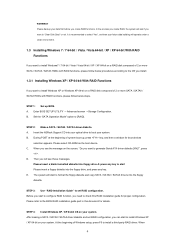
... Install Windows XP / XP 64-bit OS on a RAID disk composed of system boot-up BIOS. Set the "SATA Operation Mode" option to boot your optical drive to [RAID]. B. When 4 Insert the ASRock Support CD into your system. Please refer to check this document for details. During POST at the... below procedures according to the OS you install. 1.3.1 Installing Windows XP / XP 64-bit With RAID Functions If you need to the BIOS RAID installation guide part in this RAID installation guide for boot devices selection appears. WARNING!! It is recommended to select "Yes", and then...
... Install Windows XP / XP 64-bit OS on a RAID disk composed of system boot-up BIOS. Set the "SATA Operation Mode" option to boot your optical drive to [RAID]. B. When 4 Insert the ASRock Support CD into your system. Please refer to check this document for details. During POST at the... below procedures according to the OS you install. 1.3.1 Installing Windows XP / XP 64-bit With RAID Functions If you need to the BIOS RAID installation guide part in this RAID installation guide for boot devices selection appears. WARNING!! It is recommended to select "Yes", and then...
RAID Installation Guide
Page 5
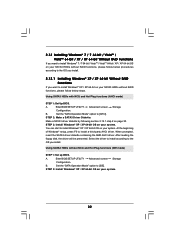
...containing AMD RAID driver. A. After reading the floppy disk, the driver will be presented. Enter BIOS SETUP UTILITY → Advanced screen →Storage Configuration. Please refer to the BIOS RAID installation guide part in this RAID installation guide for details. Before you start to configure RAID... function, you want to check this document for proper configuration. B. STEP 1: Set up BIOS. STEP 3: Install Windows 7 / 7 64-bit / Vista / Vista 64-bit OS on a RAID disk composed of 2 or more SATA / ...
...containing AMD RAID driver. A. After reading the floppy disk, the driver will be presented. Enter BIOS SETUP UTILITY → Advanced screen →Storage Configuration. Please refer to the BIOS RAID installation guide part in this RAID installation guide for details. Before you start to configure RAID... function, you want to check this document for proper configuration. B. STEP 1: Set up BIOS. STEP 3: Install Windows 7 / 7 64-bit / Vista / Vista 64-bit OS on a RAID disk composed of 2 or more SATA / ...
User Manual
Page 4
... 54 4.1 Install Operating System 54 4.2 Support CD Information 54 4.2.1 Running Support CD 54 4.2.2 Drivers Menu 54 4.2.3 Utilities Menu 54 4.2.4 Contact Information 54 4 BIOS SETUP UTILITY 34 3.1 Introduction 34 3.1.1 BIOS Menu Bar 34 3.1.2 Navigation Keys 35 3.2 Main Screen 35 3.3 OC Tweaker Screen 36 3.4 Advanced Screen 42 3.4.1 CPU Configuration 43 3.4.2 Chipset Configuration 44 3.4.3 ACPI...
... 54 4.1 Install Operating System 54 4.2 Support CD Information 54 4.2.1 Running Support CD 54 4.2.2 Drivers Menu 54 4.2.3 Utilities Menu 54 4.2.4 Contact Information 54 4 BIOS SETUP UTILITY 34 3.1 Introduction 34 3.1.1 BIOS Menu Bar 34 3.1.2 Navigation Keys 35 3.2 Main Screen 35 3.3 OC Tweaker Screen 36 3.4 Advanced Screen 42 3.4.1 CPU Configuration 43 3.4.2 Chipset Configuration 44 3.4.3 ACPI...
User Manual
Page 5
... and CPU support lists on ASRock website without notice. www.asrock.com/support/index.asp 1.1 Package Contents ASRock 870iCafe Motherboard (ATX Form Factor: 12.0-in x 8.2-in, 30.5 cm x 20.8 cm) ASRock 870iCafe Quick Installation Guide ASRock 870iCafe Support CD 2 x Serial ATA (SATA) Data Cables (Optional) 1 x I/O Panel Shield 5 Chapter 3 and 4 contain the configuration guide to BIOS setup and information of...
... and CPU support lists on ASRock website without notice. www.asrock.com/support/index.asp 1.1 Package Contents ASRock 870iCafe Motherboard (ATX Form Factor: 12.0-in x 8.2-in, 30.5 cm x 20.8 cm) ASRock 870iCafe Quick Installation Guide ASRock 870iCafe Support CD 2 x Serial ATA (SATA) Data Cables (Optional) 1 x I/O Panel Shield 5 Chapter 3 and 4 contain the configuration guide to BIOS setup and information of...
User Manual
Page 8
...For detailed product information, please visit our website: http://www.asrock.com WARNING Please realize that UCC feature is supported with AM3 CPU only, and in the BIOS, applying Untied Overclocking Technology, or using the thirdparty overclocking tools. ASRock website http://www.asrock.com 5. As long as a simple switch of your ...system stability, or even cause damage to the components and devices of the BIOS option "ASRock UCC", you can support this function because some CPU, including quad-core CPU, can also increase L3 cache size up to ...
...For detailed product information, please visit our website: http://www.asrock.com WARNING Please realize that UCC feature is supported with AM3 CPU only, and in the BIOS, applying Untied Overclocking Technology, or using the thirdparty overclocking tools. ASRock website http://www.asrock.com 5. As long as a simple switch of your ...system stability, or even cause damage to the components and devices of the BIOS option "ASRock UCC", you can support this function because some CPU, including quad-core CPU, can also increase L3 cache size up to ...
User Manual
Page 9
...Saver function, please enable Cool 'n' Quiet option in the BIOS setup in advance. Featuring an advanced proprietary hardware and software design, Intelligent Energy Saver is just to install the ASRock AIWI utility either from ASRock official website or ASRock software support CD to your motherboard, and also download ... tool and save your friends! With OC DNA, you can save your BIOS only in Flash ROM. This convenient BIOS update tool allows you the most up-do not forget to pay attention to ASRock official website regularly, we will continuously provide you to your USB flash drive...
...Saver function, please enable Cool 'n' Quiet option in the BIOS setup in advance. Featuring an advanced proprietary hardware and software design, Intelligent Energy Saver is just to install the ASRock AIWI utility either from ASRock official website or ASRock software support CD to your motherboard, and also download ... tool and save your friends! With OC DNA, you can save your BIOS only in Flash ROM. This convenient BIOS update tool allows you the most up-do not forget to pay attention to ASRock official website regularly, we will continuously provide you to your USB flash drive...
User Manual
Page 11
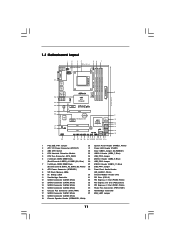
... USB0 B: USB1 Top: RJ-45 Top: LINE IN Center: FRONT Bottom: MIC IN 35 34 LAN PHY PWR_FAN1 PCIE1 AMD 870 Chipset 870iCafe ErP/EuP Ready RoHS Designed in Taipei 33 32 Super I/O 31 30 AUDIO CODEC IR1 1 HD_AUDIO1 1 29 PCIE2 CMOS BATTERY PCIE3 PCI ...Express 2.0 PCI1 AMD SB850 Chipset PCI2 USB_PW4 1 USB10_11 1 USB_PW3 1 USB8_9 1 8Mb BIOS USB_PW2 1 CLRCMOS1 PLED1 1 1 USB6_7 PANEL 1 PLED PWRBTN 1 1 HDLED RESET SPEAKER1 1 SATA1 SATA2 SATA3 6Gb/s SATA3 SATA5 SATA4 SATA6 Dr. Debug CHA_FAN1...
... USB0 B: USB1 Top: RJ-45 Top: LINE IN Center: FRONT Bottom: MIC IN 35 34 LAN PHY PWR_FAN1 PCIE1 AMD 870 Chipset 870iCafe ErP/EuP Ready RoHS Designed in Taipei 33 32 Super I/O 31 30 AUDIO CODEC IR1 1 HD_AUDIO1 1 29 PCIE2 CMOS BATTERY PCIE3 PCI ...Express 2.0 PCI1 AMD SB850 Chipset PCI2 USB_PW4 1 USB10_11 1 USB_PW3 1 USB8_9 1 8Mb BIOS USB_PW2 1 CLRCMOS1 PLED1 1 1 USB6_7 PANEL 1 PLED PWRBTN 1 1 HDLED RESET SPEAKER1 1 SATA1 SATA2 SATA3 6Gb/s SATA3 SATA5 SATA4 SATA6 Dr. Debug CHA_FAN1...
User Manual
Page 19
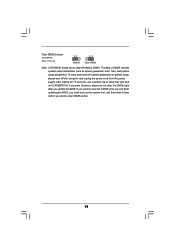
... Jumper (CLRCMOS1) (see p.11, No. 22) 1_2 2_3 Default Clear CMOS Note: CLRCMOS1 allows you to clear the CMOS when you just finish updating the BIOS, you must boot up the system first, and then shut it down before you do not clear the CMOS right after you update the... BIOS. After waiting for 5 seconds. To clear and reset the system parameters to short pin2 and pin3 on CLRCMOS1 for 15 seconds, use a jumper cap to ...
... Jumper (CLRCMOS1) (see p.11, No. 22) 1_2 2_3 Default Clear CMOS Note: CLRCMOS1 allows you to clear the CMOS when you just finish updating the BIOS, you must boot up the system first, and then shut it down before you do not clear the CMOS right after you update the... BIOS. After waiting for 5 seconds. To clear and reset the system parameters to short pin2 and pin3 on CLRCMOS1 for 15 seconds, use a jumper cap to ...
User Manual
Page 24
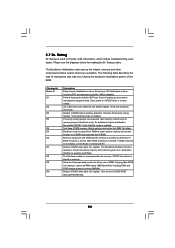
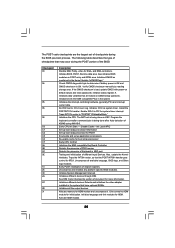
...CACHE before system memory is available. Leaves all RAM below for future use in memory. 2.7 Dr. Debug Dr. Debug is used to BIOS POST (ExecutePOSTKernel). 24 Verify the bootblock checksum. CPUID information is checked to checkpoint E0. Give control to provide code information, which makes ...troubleshooting even easier. Re-enable CACHE. BIOS now executes out of the BIOS: Checkpoint Before D1 D1 D0 D2 D3 D4 D5 D6 D7 D8 D9 DA Description Early chipset initialization is done. ...
...CACHE before system memory is available. Leaves all RAM below for future use in memory. 2.7 Dr. Debug Dr. Debug is used to BIOS POST (ExecutePOSTKernel). 24 Verify the bootblock checksum. CPUID information is checked to checkpoint E0. Give control to provide code information, which makes ...troubleshooting even easier. Re-enable CACHE. BIOS now executes out of the BIOS: Checkpoint Before D1 D1 D0 D2 D3 D4 D5 D6 D7 D8 D9 DA Description Early chipset initialization is done. ...
User Manual
Page 25
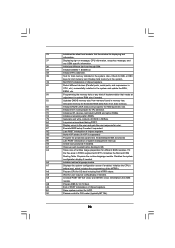
... Testing and initialization of PS/2 mouse. Traps the INT09h vector, so that have optional ROMs. Initializes all available language, BIOS logo, and Silent logo modules. Early POST initialization of Keyboard in the system Initializes the interrupt controlling hardware (generally PIC...) and interrupt vector table. Uncompress and initialize any platform specific BIOS modules. Initialize System Management Interrupt. Initializes different devices. Give control to determine if battery power is OK and CMOS checksum...
... Testing and initialization of PS/2 mouse. Traps the INT09h vector, so that have optional ROMs. Initializes all available language, BIOS logo, and Silent logo modules. Early POST initialization of Keyboard in the system Initializes the interrupt controlling hardware (generally PIC...) and interrupt vector table. Uncompress and initialize any platform specific BIOS modules. Initialize System Management Interrupt. Initializes different devices. Give control to determine if battery power is OK and CMOS checksum...
User Manual
Page 26
.... 60 Initializes NUM-LOCK status and programs the KBD typematic rate. 75 Initialize Int-13 and prepare for error. 87 Execute BIOS setup if needed before boot, which includes the programming of chipset registers. Allocates memory for total memory installed in F000h segment with...specific information. 38 Initializes different devices through DIM. 39 Initializes DMAC-1 & DMAC-2. 3A Initialize RTC date/time. 3B Test for Extended BIOS Data Area from memory found in NVRam. 84 Log errors encountered during POST. 85 Display errors to limit memory test. AA Uninstall ...
.... 60 Initializes NUM-LOCK status and programs the KBD typematic rate. 75 Initialize Int-13 and prepare for error. 87 Execute BIOS setup if needed before boot, which includes the programming of chipset registers. Allocates memory for total memory installed in F000h segment with...specific information. 38 Initializes different devices through DIM. 39 Initializes DMAC-1 & DMAC-2. 3A Initialize RTC date/time. 3B Test for Extended BIOS Data Area from memory found in NVRam. 84 Log errors encountered during POST. 85 Display errors to limit memory test. AA Uninstall ...
User Manual
Page 30
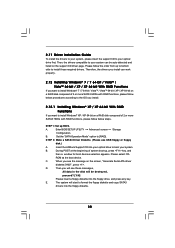
.../ 7 64-bit / VistaTM / VistaTM 64-bit / XP / XP 64-bit on the support CD driver page. Please select CD- Insert the ASRock Support CD into the floppy diskette. 30 When you want to install those required drivers. The system will be auto-detected and listed on a RAID... or floppy disk.) A. ROM as the boot device. Then you will see the message on a RAID disk composed of system boot-up BIOS. Enter BIOS SETUP UTILITY Advanced screen Storage Configuration. C. Therefore, the drivers you install can be destroyed, proceed? [Y/N] Please insert a floppy diskette into the...
.../ 7 64-bit / VistaTM / VistaTM 64-bit / XP / XP 64-bit on the support CD driver page. Please select CD- Insert the ASRock Support CD into the floppy diskette. 30 When you want to install those required drivers. The system will be auto-detected and listed on a RAID... or floppy disk.) A. ROM as the boot device. Then you will see the message on a RAID disk composed of system boot-up BIOS. Enter BIOS SETUP UTILITY Advanced screen Storage Configuration. C. Therefore, the drivers you install can be destroyed, proceed? [Y/N] Please insert a floppy diskette into the...
User Manual
Page 31
... Windows® 7 / 7 64-bit / VistaTM / VistaTM 64-bit With RAID Functions If you can start to configure RAID function, you need to the BIOS RAID installation guide part of 2 or more SATA3 HDDs with RAID functions, please follow below steps. B. A. Before you start to install Windows® 7 /... XP 64-bit OS on your system. At the beginning of the document in the following section 2.12.1 step 2 on your system. STEP 1: Set up BIOS. Make a SATA3 driver diskette by following path in the Support CD: .. \ RAID Installation Guide STEP 4: Install Windows® 7 / 7 64-bit / ...
... Windows® 7 / 7 64-bit / VistaTM / VistaTM 64-bit With RAID Functions If you can start to configure RAID function, you need to the BIOS RAID installation guide part of 2 or more SATA3 HDDs with RAID functions, please follow below steps. B. A. Before you start to install Windows® 7 /... XP 64-bit OS on your system. At the beginning of the document in the following section 2.12.1 step 2 on your system. STEP 1: Set up BIOS. Make a SATA3 driver diskette by following path in the Support CD: .. \ RAID Installation Guide STEP 4: Install Windows® 7 / 7 64-bit / ...
User Manual
Page 32
... your system. B. When prompted, insert the SATA3 driver diskette containing the AMD AHCI driver. After reading the floppy disk, the driver will be presented. Enter BIOS SETUP UTILITY Advanced screen Storage Configuration. STEP 3: Install Windows® XP / XP 64-bit OS on page 30. A. STEP 2: Make a SATA3 Driver ... HDDs without RAID functions, please follow below steps. Using SATA3 HDDs with NCQ and Hot Plug functions (AHCI mode) STEP 1: Set Up BIOS. B. You can start to [IDE]. Using SATA3 HDDs without NCQ and Hot Plug functions (IDE mode) STEP 1: Set up...
... your system. B. When prompted, insert the SATA3 driver diskette containing the AMD AHCI driver. After reading the floppy disk, the driver will be presented. Enter BIOS SETUP UTILITY Advanced screen Storage Configuration. STEP 3: Install Windows® XP / XP 64-bit OS on page 30. A. STEP 2: Make a SATA3 Driver ... HDDs without RAID functions, please follow below steps. Using SATA3 HDDs with NCQ and Hot Plug functions (AHCI mode) STEP 1: Set Up BIOS. B. You can start to [IDE]. Using SATA3 HDDs without NCQ and Hot Plug functions (IDE mode) STEP 1: Set up...
User Manual
Page 33
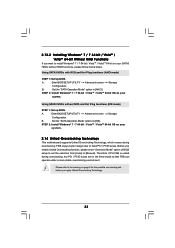
... buses. Please refer to the warning on page 8 for the possible overclocking risk before you enable Untied Overclocking function, please enter "Overclock Mode" option of BIOS setup to set the selection from [Auto] to [Manual]. 2.13.2 Installing Windows® 7 / 7 64-bit / VistaTM / VistaTM 64-bit Without RAID ... a more stable overclocking environment. Set the "SATA Operation Mode" option to [IDE]. Set the "SATA Operation Mode" option to [AHCI]. Enter BIOS SETUP UTILITY Advanced screen Storage Configuration. Using SATA3 HDDs with NCQ and Hot Plug functions (AHCI mode) STEP 1: Set Up...
... buses. Please refer to the warning on page 8 for the possible overclocking risk before you enable Untied Overclocking function, please enter "Overclock Mode" option of BIOS setup to set the selection from [Auto] to [Manual]. 2.13.2 Installing Windows® 7 / 7 64-bit / VistaTM / VistaTM 64-bit Without RAID ... a more stable overclocking environment. Set the "SATA Operation Mode" option to [IDE]. Set the "SATA Operation Mode" option to [AHCI]. Enter BIOS SETUP UTILITY Advanced screen Storage Configuration. Using SATA3 HDDs with NCQ and Hot Plug functions (AHCI mode) STEP 1: Set Up...

User Manual
Page 34
... they may not exactly match what you start up the security features Exit To exit the current screen or the BIOS SETUP UTILITY Use < > key or < > key to enter the BIOS SETUP UTILITY, otherwise, POST will continue with its test routines. Please press or during the Power-On-Self-Test... following selections: Main To set up the system time/date information OC Tweaker To set up overclocking features Advanced To set up the advanced BIOS features H/W Monitor To display current hardware status Boot To set up the default system device to locate and load the Operating System Security To...
... they may not exactly match what you start up the security features Exit To exit the current screen or the BIOS SETUP UTILITY Use < > key or < > key to enter the BIOS SETUP UTILITY, otherwise, POST will continue with its test routines. Please press or during the Power-On-Self-Test... following selections: Main To set up the system time/date information OC Tweaker To set up overclocking features Advanced To set up the advanced BIOS features H/W Monitor To display current hardware status Boot To set up the default system device to locate and load the Operating System Security To...
User Manual
Page 35
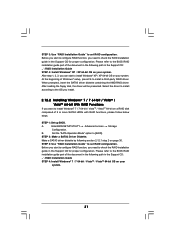
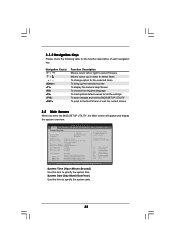
... UTILITY Main OC Tweaker Advanced H/W Monitor System Overview System Time System Date Language [17:00:09] [Wed 08/18/2010] [English] BIOS Version : 870iCafe P1.00 Processor Type : AMD Phenom (tm) II X3 965 Processor (64bit) Processor Speed : 3400MHz Microcode Update : 100F42/10000C6 L1 Cache Size : 512KB L2 Cache ... for the function description of each navigation key. 3.1.2 Navigation Keys Please check the following table for all the settings To save changes and exit the BIOS SETUP UTILITY To jump to the Exit Screen or exit the current screen 3.2 Main Screen When you enter the...
... UTILITY Main OC Tweaker Advanced H/W Monitor System Overview System Time System Date Language [17:00:09] [Wed 08/18/2010] [English] BIOS Version : 870iCafe P1.00 Processor Type : AMD Phenom (tm) II X3 965 Processor (64bit) Processor Speed : 3400MHz Microcode Update : 100F42/10000C6 L1 Cache Size : 512KB L2 Cache ... for the function description of each navigation key. 3.1.2 Navigation Keys Please check the following table for all the settings To save changes and exit the BIOS SETUP UTILITY To jump to the Exit Screen or exit the current screen 3.2 Main Screen When you enter the...
User Manual
Page 36
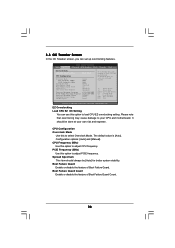
...[Auto] for better system stability. The default value is [Auto]. CPU Frequency (MHz) Use this option to adjust PCIE frequency. BIOS SETUP UTILITY Main OC Tweaker Advanced H/W Monitor Boot Security Exit EZ Overclocking Load CPU EZ OC Setting [Press Enter] CPU Configuration Overclock... Mode CPU Frequency (MHZ) PCIE Frequency (MHz) Spread Spectrum Boot Failure Guard Boot Failure Guard Count ASRock UCC CPU Active Core Control [Auto] [200] [100] [Auto] [Enabled] [3] [Disabled] [Disabled] Processor Maximum Frequency North Bridge Maximum...
...[Auto] for better system stability. The default value is [Auto]. CPU Frequency (MHz) Use this option to adjust PCIE frequency. BIOS SETUP UTILITY Main OC Tweaker Advanced H/W Monitor Boot Security Exit EZ Overclocking Load CPU EZ OC Setting [Press Enter] CPU Configuration Overclock... Mode CPU Frequency (MHZ) PCIE Frequency (MHz) Spread Spectrum Boot Failure Guard Boot Failure Guard Count ASRock UCC CPU Active Core Control [Auto] [200] [100] [Auto] [Enabled] [3] [Disabled] [Disabled] Processor Maximum Frequency North Bridge Maximum...


