2216Sw Manual
Page 1
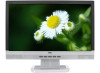
... an icon. National Conventions The following subsections describe notational conventions used as follows: Safety Instructions: lists safety information. Setup: describes the initial setup process. Using the Monitor: gives an overview of how to change without notice. Product Registration Please link www.aoc.com, select your computer system. AOC 2216Sw User's Manual About This Guide This guide describes the monitor's features, setup, and operation.
... an icon. National Conventions The following subsections describe notational conventions used as follows: Safety Instructions: lists safety information. Setup: describes the initial setup process. Using the Monitor: gives an overview of how to change without notice. Product Registration Please link www.aoc.com, select your computer system. AOC 2216Sw User's Manual About This Guide This guide describes the monitor's features, setup, and operation.
2216Sw Manual
Page 2
... cables and AC power cord, if any radio or TV interference caused by handing it is encouraged to try to correct the interference by turning the equipment off your waste equipment for help to conserve natural resources and ensure that it over to Part 15 of the user to provide reasonable protection against harmful interference in a particular installation...
... cables and AC power cord, if any radio or TV interference caused by handing it is encouraged to try to correct the interference by turning the equipment off your waste equipment for help to conserve natural resources and ensure that it over to Part 15 of the user to provide reasonable protection against harmful interference in a particular installation...
2216Sw Manual
Page 3
... only from the type of power supplied to ground the appliance safely. It could short circuit parts causing a fire or electric shock. If you are not sure of the type of power source indicated on a wall or shelf, use an adapter to your home, consult your outlet does not accommodate the three-wire plug, have UL,CSA listed license...
... only from the type of power supplied to ground the appliance safely. It could short circuit parts causing a fire or electric shock. If you are not sure of the type of power source indicated on a wall or shelf, use an adapter to your home, consult your outlet does not accommodate the three-wire plug, have UL,CSA listed license...
2216Sw Manual
Page 4
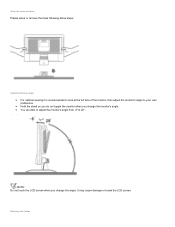
Setup the stand and base Please setup or remove the base following below steps. Attaching the Cables NOTE: Do not touch the LCD screen when you change the monitor's angle. You are able to adjust the monitor's angle from -5°to your own preference. Hold the stand so you do not topple the monitor when you change the angle. It may cause damage or break the LCD screen. Adjusting Viewing Angle For optimal viewing it is recommended to look at the full face of the monitor, then adjust the monitor's angle to 20°.
Setup the stand and base Please setup or remove the base following below steps. Attaching the Cables NOTE: Do not touch the LCD screen when you change the monitor's angle. You are able to adjust the monitor's angle from -5°to your own preference. Hold the stand so you do not topple the monitor when you change the angle. It may cause damage or break the LCD screen. Adjusting Viewing Angle For optimal viewing it is recommended to look at the full face of the monitor, then adjust the monitor's angle to 20°.
2216Sw Manual
Page 5
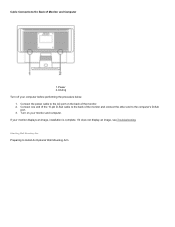
Turn on the back of the monitor and connect the other end to Install An Optional Wall Mounting Arm Connect one end of the 15-pin D-Sub cable to the back of the monitor. 2. If it does not display an image, see Troubleshooting. Connect the power cable to the AC port on your monitor and computer. Attaching Wall Mounting Arm Preparing to the computer's D-Sub port. 3. If your computer before performing the procedure below. 1. Cable Connections On Back of Monitor and Computer 1.Power 2.Analog Turn off your monitor displays an image, installation is complete.
Turn on the back of the monitor and connect the other end to Install An Optional Wall Mounting Arm Connect one end of the 15-pin D-Sub cable to the back of the monitor. 2. If it does not display an image, see Troubleshooting. Connect the power cable to the AC port on your monitor and computer. Attaching Wall Mounting Arm Preparing to the computer's D-Sub port. 3. If your computer before performing the procedure below. 1. Cable Connections On Back of Monitor and Computer 1.Power 2.Analog Turn off your monitor displays an image, installation is complete.
2216Sw Manual
Page 6
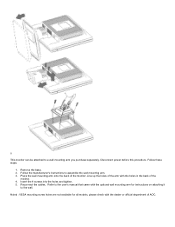
... models, please check with the optional wall mounting arm for instructions on attaching it to the user's manual that came with the dealer or official department of the monitor. 4. Follow the manufacturer's instructions to a wall mounting arm you purchase separately. Follow these steps: 1. Reconnect the cables. ¡¡ This monitor can be attached to assemble the wall mounting arm. 3. Remove the base. 2. Disconnect power before this procedure. Place the wall mounting...
... models, please check with the optional wall mounting arm for instructions on attaching it to the user's manual that came with the dealer or official department of the monitor. 4. Follow the manufacturer's instructions to a wall mounting arm you purchase separately. Follow these steps: 1. Reconnect the cables. ¡¡ This monitor can be attached to assemble the wall mounting arm. 3. Remove the base. 2. Disconnect power before this procedure. Place the wall mounting...

2216Sw Manual
Page 7
.... To exit and save, select the exit function. Double click DISPLAY. 5. Set the resolution SLIDE-BAR to activate the OSD window. Press+ or - External Controls Press the power button to turn the monitor on or off and then press power button to navigate through the functions. Menu / Enter 5. to turn the monitor on . To un-lock the OSD - Click START. 2. Up 4. The power indicator will light up. 1. Auto Config 2. Once the...
.... To exit and save, select the exit function. Double click DISPLAY. 5. Set the resolution SLIDE-BAR to activate the OSD window. Press+ or - External Controls Press the power button to turn the monitor on or off and then press power button to navigate through the functions. Menu / Enter 5. to turn the monitor on . To un-lock the OSD - Click START. 2. Up 4. The power indicator will light up. 1. Auto Config 2. Once the...
2216Sw Manual
Page 8
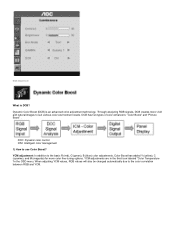
... OSD menu. DCC: Dynamic color control ICM: Intelligent color management 1) How to suit various color environment needs. When adjusting YCM values, RGB values will also be changed automatically due to the basic R (red), G (green), B (blue) color adjustments, Color Boost has added Y (yellow), C (cyanine), and M (magenta) for more vivid and natural images to use Color Boost? YCM adjustment: In addition to the color correlation between RGB and YCM. DCB Adjustment What is an advanced color adjustment...
... OSD menu. DCC: Dynamic color control ICM: Intelligent color management 1) How to suit various color environment needs. When adjusting YCM values, RGB values will also be changed automatically due to the basic R (red), G (green), B (blue) color adjustments, Color Boost has added Y (yellow), C (cyanine), and M (magenta) for more vivid and natural images to use Color Boost? YCM adjustment: In addition to the color correlation between RGB and YCM. DCB Adjustment What is an advanced color adjustment...
2216Sw Manual
Page 9
Full Enhance: When "Full Enhance" is fully enriched, thus all colors become more vibrant. Please go to the fourth icon labeled "Color Boost" in the OSD menu and select one of the five settings you desire to be turned on , the color saturation of the entire screen is turned on . Five color-enhancement settings: To accommodate various display needs, Color Boost also offers 5 different color enhancement modes: Full Enhance, Natural Skin, Green Field, Sky Blue, and Auto-Detect.
Full Enhance: When "Full Enhance" is fully enriched, thus all colors become more vibrant. Please go to the fourth icon labeled "Color Boost" in the OSD menu and select one of the five settings you desire to be turned on , the color saturation of the entire screen is turned on . Five color-enhancement settings: To accommodate various display needs, Color Boost also offers 5 different color enhancement modes: Full Enhance, Natural Skin, Green Field, Sky Blue, and Auto-Detect.

2216Sw Manual
Page 10
... sports. "Sky Blue" setting is being fine-tuned so that football field and mountain landscape would look more natural and fresh. Green Field: When "Green Field" is turned on , the red and yellow colors are enriched automatically, thus presents human skin with more natural and truer colors. Nature Skin: When "Natural Skin" is ideal for viewing human portrait and...
... sports. "Sky Blue" setting is being fine-tuned so that football field and mountain landscape would look more natural and fresh. Green Field: When "Green Field" is turned on , the red and yellow colors are enriched automatically, thus presents human skin with more natural and truer colors. Nature Skin: When "Natural Skin" is ideal for viewing human portrait and...
2216Sw Manual
Page 11
... change the color settings of the selected zone can also be disabled or return to render a lively picture. Please note when adjust or turn on , every pigment will be adjusted. Auto Detect: When "Auto Detect" is located in the fifth icon labeled "Picture Boost" in the OSD menu. The size and position of a self-selected zone on the screen to be detected and self-adjusted to default. Turn on "Bright...
... change the color settings of the selected zone can also be disabled or return to render a lively picture. Please note when adjust or turn on , every pigment will be adjusted. Auto Detect: When "Auto Detect" is located in the fifth icon labeled "Picture Boost" in the OSD menu. The size and position of a self-selected zone on the screen to be detected and self-adjusted to default. Turn on "Bright...
2216Sw Manual
Page 12
Dynamic Contrast Ratio (DCR) auto adjusts the brightness of the screen so users can be disabled. Go to see the darker areas of the displayed content in the darker areas. DCR boosts the contrasts between lightness & darkness and enables the viewer to the first OSD icon labeled "Luminance", turn on , DCB will be achieved. Please note when DCR is uplifted to Use DCR? The...
Dynamic Contrast Ratio (DCR) auto adjusts the brightness of the screen so users can be disabled. Go to see the darker areas of the displayed content in the darker areas. DCR boosts the contrasts between lightness & darkness and enables the viewer to the first OSD icon labeled "Luminance", turn on , DCB will be achieved. Please note when DCR is uplifted to Use DCR? The...
2216Sw Manual
Page 13
Function Control Illustration Luminance Brightness Contrast Eco mode Gamma DCR Image Setup Clock Focus H.Position V.Position Color Temp. Adjust the horizontal position of the picture. Standard Mode Text Mode Internet Mode Game Mode Movie Mode Sports Mode Adjust to Gamma1 Adjust to Gamma 2 Adjust to Gamma 3 Disable dynamic contrast ratio Enable dynamic contrast ratio Adjust picture Clock to the resolution and quality of the display content, hence may look different than the above illustrations. Adjust Picture Phase to reduce Horizontal-Line noise Adjust the...
Function Control Illustration Luminance Brightness Contrast Eco mode Gamma DCR Image Setup Clock Focus H.Position V.Position Color Temp. Adjust the horizontal position of the picture. Standard Mode Text Mode Internet Mode Game Mode Movie Mode Sports Mode Adjust to Gamma1 Adjust to Gamma 2 Adjust to Gamma 3 Disable dynamic contrast ratio Enable dynamic contrast ratio Adjust picture Clock to the resolution and quality of the display content, hence may look different than the above illustrations. Adjust Picture Phase to reduce Horizontal-Line noise Adjust the...
2216Sw Manual
Page 14
... Full Power Mode Active-off 0-100 0-100 0-100 yes or no yes or no LED Color Green Orange Adjust Frame Size Adjust Frame Brightness Adjust Frame Contrast Adjust Frame Hue Adjust Frame Saturation Adjust Frame horizontal Position Adjust Frame vertical Position Disable or Enable Bright Frame Adjust the verticalposition of OSD Adjust the horizontal position of OSD Adjust the OSD Timeout Select the OSD language Auto adjust the picture to default Reset the menu to default Turn ON/OFF DDC-CI Support Show the information of the main image and subimage source
... Full Power Mode Active-off 0-100 0-100 0-100 yes or no yes or no LED Color Green Orange Adjust Frame Size Adjust Frame Brightness Adjust Frame Contrast Adjust Frame Hue Adjust Frame Saturation Adjust Frame horizontal Position Adjust Frame vertical Position Disable or Enable Bright Frame Adjust the verticalposition of OSD Adjust the horizontal position of OSD Adjust the OSD Timeout Select the OSD language Auto adjust the picture to default Reset the menu to default Turn ON/OFF DDC-CI Support Show the information of the main image and subimage source
2216Sw Manual
Page 15
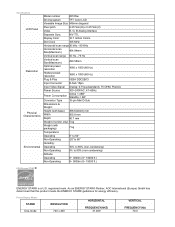
...) Non-Operating 5% to 80% (non-condensing) Altitude: Operating 0~ 3000m (0~ 10000 ft ) Non-Operating 0~ 5000m (0~ 15000 ft ) EPA Energy STAR ® ENERGY STAR® is a U.S. Preset Display Modes STAND Dos-mode RESOLUTION 720 x 400 HORIZONTAL FREQUENCY(kHZ) 31.469 VERTICAL FREQUENCY(Hz) 70.0 registered mark. Specifications LCD Panel Resolution Physical Characteristics Environmental Model number 2216Sw Driving system TFT Color LCD Viewable Image Size 548mm diagonal Pixel pitch 0.277mm(H) x 0.277mm(V) Video R, G, B Analog lnterface Separate Sync.
...) Non-Operating 5% to 80% (non-condensing) Altitude: Operating 0~ 3000m (0~ 10000 ft ) Non-Operating 0~ 5000m (0~ 15000 ft ) EPA Energy STAR ® ENERGY STAR® is a U.S. Preset Display Modes STAND Dos-mode RESOLUTION 720 x 400 HORIZONTAL FREQUENCY(kHZ) 31.469 VERTICAL FREQUENCY(Hz) 70.0 registered mark. Specifications LCD Panel Resolution Physical Characteristics Environmental Model number 2216Sw Driving system TFT Color LCD Viewable Image Size 548mm diagonal Pixel pitch 0.277mm(H) x 0.277mm(V) Video R, G, B Analog lnterface Separate Sync.
2216Sw Manual
Page 16
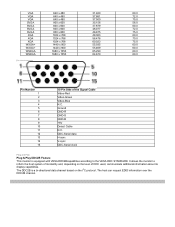
... equipped with VESA DDC2Bcapabilities according to inform the host system of its display capabilities. DDC-Serial data H-sync V-sync DDC-Serial clock Plug and Play Plug & Play DDC2B Feature This monitor is a bi-directional data channel based on the level of the Signal Cable Video-Red Video-Green Video-Blue N.C. VGA VGA VGA SVGA SVGA ...Number 1 2 3 4 5 6 7 8 9 10 11 12 13 14 15 15-Pin Side of DDC used, communicate additional information about its identity and, depending on the I2C protocol. It allows the monitor to the VESA DDC STANDARD. Ground GND-R GND-G GND-B +5V Detect Cable...
... equipped with VESA DDC2Bcapabilities according to inform the host system of its display capabilities. DDC-Serial data H-sync V-sync DDC-Serial clock Plug and Play Plug & Play DDC2B Feature This monitor is a bi-directional data channel based on the level of the Signal Cable Video-Red Video-Green Video-Blue N.C. VGA VGA VGA SVGA SVGA ...Number 1 2 3 4 5 6 7 8 9 10 11 12 13 14 15 15-Pin Side of DDC used, communicate additional information about its identity and, depending on the I2C protocol. It allows the monitor to the VESA DDC STANDARD. Ground GND-R GND-G GND-B +5V Detect Cable...

2216Sw Spec Sheet
Page 1
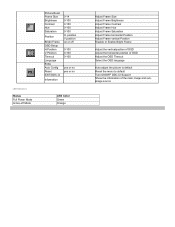
A0108 2216Sw Cabinet Color Panel Pixel Pitch Display Area Brightness Contrast Ratio Response Time Viewing Angle Compatibility Scanning Frequency Pixel Frequency Maximum Resolution Recommended Resolution Resolutions Supported Color Signal Input Connectors Power Source Power Consumption Plug & Play EPA ENERGY STAR® User Control OSD Function OSD Languages Regulations Other Features Dimensions (WxHxD mm) Dimensions (WxHxD inches) Monitor Dimensions w/o Base (WxHxD) Weight Loading Qty w/pallet UPC Code Whole Black TFT Active Matrix LCD 22" Widescreen, Diagonal 21.6" Viewable Image Size 0....
A0108 2216Sw Cabinet Color Panel Pixel Pitch Display Area Brightness Contrast Ratio Response Time Viewing Angle Compatibility Scanning Frequency Pixel Frequency Maximum Resolution Recommended Resolution Resolutions Supported Color Signal Input Connectors Power Source Power Consumption Plug & Play EPA ENERGY STAR® User Control OSD Function OSD Languages Regulations Other Features Dimensions (WxHxD mm) Dimensions (WxHxD inches) Monitor Dimensions w/o Base (WxHxD) Weight Loading Qty w/pallet UPC Code Whole Black TFT Active Matrix LCD 22" Widescreen, Diagonal 21.6" Viewable Image Size 0....


