Operating Instructions
Page 1
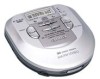
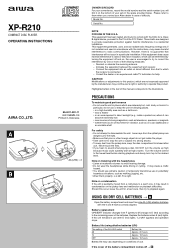
... the pickup lens, keep dust from that pins or other foreign object do not use . d c XP-R210 COMPACT DISC PLAYER OPERATING INSTRUCTIONS A A B 8A-HC1-901-11 000316BMN-O9 Printed in Indonesia AA (LR6) × 2 OWNER'S RECORD For your convenience, record the model number and the serial number (you contact your set) in a particular installation. Connect the equipment into an outlet on condensation If the unit is right. It...
... the pickup lens, keep dust from that pins or other foreign object do not use . d c XP-R210 COMPACT DISC PLAYER OPERATING INSTRUCTIONS A A B 8A-HC1-901-11 000316BMN-O9 Printed in Indonesia AA (LR6) × 2 OWNER'S RECORD For your convenience, record the model number and the serial number (you contact your set) in a particular installation. Connect the equipment into an outlet on condensation If the unit is right. It...

Operating Instructions
Page 2
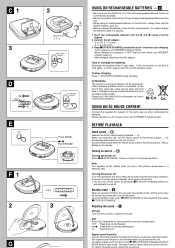
... batteries, remove them properly; Turn the volume control to the lowest level before starting playback and slowly turn the volume up to avoid hearing damage. • Do not wear the headphones while driving or cycling. USING ON DRY CELL BATTERIES → A Open the battery compartment and insert two size AA (LR6) alkaline batteries with the 0 and 9 marks correctly aligned. Battery life (using alkaline batteries LR6) The setting...
... batteries, remove them properly; Turn the volume control to the lowest level before starting playback and slowly turn the volume up to avoid hearing damage. • Do not wear the headphones while driving or cycling. USING ON DRY CELL BATTERIES → A Open the battery compartment and insert two size AA (LR6) alkaline batteries with the 0 and 9 marks correctly aligned. Battery life (using alkaline batteries LR6) The setting...
Operating Instructions
Page 3
... them until the auto power off function automatically turns off → D Turning the power on Press e PLAY/PAUSE. BEFORE PLAYBACK HOLD switch → D Release the HOLD switch before it is set the HOLD switch to start playback, then press sSTOP/OFF/CHARGE. Turning the power off If no new operations are pressed when the HOLD switch is opened. 1 Insert the rechargeable batteries with the 0 and 9 marks correctly aligned. 2 Connect the AC adaptor. 1 to DC 5 ~ 6 V jack 2 to a wall...
... them until the auto power off function automatically turns off → D Turning the power on Press e PLAY/PAUSE. BEFORE PLAYBACK HOLD switch → D Release the HOLD switch before it is set the HOLD switch to start playback, then press sSTOP/OFF/CHARGE. Turning the power off If no new operations are pressed when the HOLD switch is opened. 1 Insert the rechargeable batteries with the 0 and 9 marks correctly aligned. 2 Connect the AC adaptor. 1 to DC 5 ~ 6 V jack 2 to a wall...

Operating Instructions
Page 4
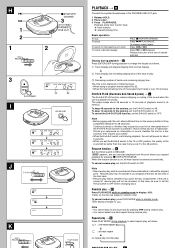
... powerful sound and deeper bass. : Deep bass is emphasized. : Deep bass is set the HOLD switch to open the disc compartment. 2 Place a disc in stop mode. If buttons are done within 30 seconds from the end of a CD-R/RW disc. Standby mode → D When an operation finishes, the unit goes into standby mode until the auto power off function automatically turns off → D Turning the power on Press e PLAY/PAUSE. Adjusting the sound → E Volume Turn the VOL control to start playback...
... powerful sound and deeper bass. : Deep bass is emphasized. : Deep bass is set the HOLD switch to open the disc compartment. 2 Place a disc in stop mode. If buttons are done within 30 seconds from the end of a CD-R/RW disc. Standby mode → D When an operation finishes, the unit goes into standby mode until the auto power off function automatically turns off → D Turning the power on Press e PLAY/PAUSE. Adjusting the sound → E Volume Turn the VOL control to start playback...
Operating Instructions
Page 5
... to select repeat play as follows. 1 Track display and elapsed playing time (normal display) V 2 Track display and remaining playing time of the track in play V 3 Remaining number of tracks and remaining playing time The time is not displayed in random order. To resume, press it to shocks. Display during playback → I J K 2 ENTER/DISP V V V V PLAYBACK → H Connect the supplied headphones to the PHONES/LINE OUT jack. 1 Release HOLD. 2 Place a disc. 3 Press PLAY/PAUSE. To cancel the E•A•S•S PLUS function, set the...
... to select repeat play as follows. 1 Track display and elapsed playing time (normal display) V 2 Track display and remaining playing time of the track in play V 3 Remaining number of tracks and remaining playing time The time is not displayed in random order. To resume, press it to shocks. Display during playback → I J K 2 ENTER/DISP V V V V PLAYBACK → H Connect the supplied headphones to the PHONES/LINE OUT jack. 1 Release HOLD. 2 Place a disc. 3 Press PLAY/PAUSE. To cancel the E•A•S•S PLUS function, set the...

Operating Instructions
Page 6
... auto power off function turns the power off , resume play will not be better than the case that you open the disc compartment. Resume function → K Set the HOLD switch to display . To check the programmed tracks Press ENTER/DISP repeatedly before you proceed to the end of playback. Note • The program is also erased when the disc compartment is activated. To cancel random play Press sSTOP/OFF/CHARGE. a track number b program number...
... auto power off function turns the power off , resume play will not be better than the case that you open the disc compartment. Resume function → K Set the HOLD switch to display . To check the programmed tracks Press ENTER/DISP repeatedly before you proceed to the end of playback. Note • The program is also erased when the disc compartment is activated. To cancel random play Press sSTOP/OFF/CHARGE. a track number b program number...
Operating Instructions
Page 7
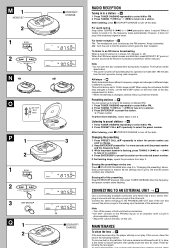
... lens becomes dirty, the player will be deactivated. • The power is turned off the radio. When using the unit where the AM step changes to 9 kHz, set to 9 kHz. • When the AM step is weak. Connect the stereo mini-plug to the PHONES/LINE OUT jack of the unit and connect the phono plugs to the analog input terminals of the disc compartment to 10 kHz...
... lens becomes dirty, the player will be deactivated. • The power is turned off the radio. When using the unit where the AM step changes to 9 kHz, set to 9 kHz. • When the AM step is weak. Connect the stereo mini-plug to the PHONES/LINE OUT jack of the unit and connect the phono plugs to the analog input terminals of the disc compartment to 10 kHz...

Operating Instructions
Page 8
... inputs of this unit. Each preset station is erased. Finish by one Press sSTOP/OFF/CHARGE after step 2 in lens cleaning solution. Wipe gently from step 2. After playing, store the disc in to a station. 4 Press ENTER/DISP to select the preset number. SPECIFICATIONS Tracking system 3-beam laser Laser pickup Semiconductor laser D/A conversion 4-times oversampling digital filter + 1-bit DAC Frequency response 20 - 20,000 Hz (47 k ohms) Output PHONES/LINE OUT jack (stereo mini-jack) Frequency...
... inputs of this unit. Each preset station is erased. Finish by one Press sSTOP/OFF/CHARGE after step 2 in lens cleaning solution. Wipe gently from step 2. After playing, store the disc in to a station. 4 Press ENTER/DISP to select the preset number. SPECIFICATIONS Tracking system 3-beam laser Laser pickup Semiconductor laser D/A conversion 4-times oversampling digital filter + 1-bit DAC Frequency response 20 - 20,000 Hz (47 k ohms) Output PHONES/LINE OUT jack (stereo mini-jack) Frequency...


