
Operating Instructions
Page 2
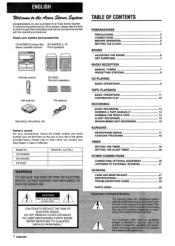
... 16 Owner's record For your convenience, record the model number and serial number (you contact your set) in case of your Aiwa dealer in the space provided below. REFER SERVICING TO QUALIFIED " SERVICE PERSONNEL." 1 ENGLISH Check your purchase of this system, please... BEFORE OPERATION 5 SETTING THE CLOCK 5 SOUND ADJUSTING THE SOUND 6 DSP SURROUND 7 Remote control :, AM antenna SX-R220 Surround speakers [m] rm~ FM antenna Operating Instructions, etc. To optimize the performance of an Aiwa Stereo System. NO USER-SERVICEABLE PARTS INSIDE. Model No. wkt&ww&44v4?#asibws@tkw...
... 16 Owner's record For your convenience, record the model number and serial number (you contact your set) in case of your Aiwa dealer in the space provided below. REFER SERVICING TO QUALIFIED " SERVICE PERSONNEL." 1 ENGLISH Check your purchase of this system, please... BEFORE OPERATION 5 SETTING THE CLOCK 5 SOUND ADJUSTING THE SOUND 6 DSP SURROUND 7 Remote control :, AM antenna SX-R220 Surround speakers [m] rm~ FM antenna Operating Instructions, etc. To optimize the performance of an Aiwa Stereo System. NO USER-SERVICEABLE PARTS INSIDE. Model No. wkt&ww&44v4?#asibws@tkw...

Operating Instructions
Page 5
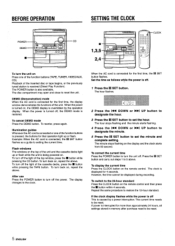
...since noise will be picked up. * Do not unwind the AM antenna wire. Other remote controls are used for an extended period clf time, remove the batteries tcl prevent possible electrolyte leakage. I REMOTE CONTROL Inserting batteries Detach the battery cover on a snot that can cause short circuits in a...the outdoor antenne to find the best direction. R6(AA) When to replace the batteries The maximum operational distance between the remote control and the remote sensor inside the display window is set to be used nearby (television, etc.) Sound is not heard from the surround ...
...since noise will be picked up. * Do not unwind the AM antenna wire. Other remote controls are used for an extended period clf time, remove the batteries tcl prevent possible electrolyte leakage. I REMOTE CONTROL Inserting batteries Detach the battery cover on a snot that can cause short circuits in a...the outdoor antenne to find the best direction. R6(AA) When to replace the batteries The maximum operational distance between the remote control and the remote sensor inside the display window is set to be used nearby (television, etc.) Sound is not heard from the surround ...
Operating Instructions
Page 6
... H ,- _, M -... - ._- To reenter, press again. To turn off . After use Press the POWER button to turn back on the remote control. Repeat the same procedure to the clock. To correct the current time Press the POWER button to reset the unit. BEFORE OPERATION SETTING THE CLOCK... &.- . -. To turn the unit on the remote control and then press the s button within 4 seconds. The clock is also available. s 1,3,5 2,4 CLOCK To turn off the light of the ...
... H ,- _, M -... - ._- To reenter, press again. To turn off . After use Press the POWER button to turn back on the remote control. Repeat the same procedure to the clock. To correct the current time Press the POWER button to reset the unit. BEFORE OPERATION SETTING THE CLOCK... &.- . -. To turn the unit on the remote control and then press the s button within 4 seconds. The clock is also available. s 1,3,5 2,4 CLOCK To turn off the light of the ...

Operating Instructions
Page 7
... the main unit, or press the VOLIUME buttons on the remote control. It also enriches the KARAOKE function to make your preference. LII 1111 111111 m+mzi+m+(~) J 1 SOUND ADJUSTME,N"r DURING RECORDING The output volume and tone (e~cept BBE) ...
... the main unit, or press the VOLIUME buttons on the remote control. It also enriches the KARAOKE function to make your preference. LII 1111 111111 m+mzi+m+(~) J 1 SOUND ADJUSTME,N"r DURING RECORDING The output volume and tone (e~cept BBE) ...
Operating Instructions
Page 8
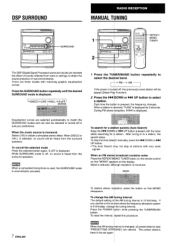
To cancel the selected mode Press the selected button again. k 1 Press the TU ER/BAND button repeatedly to obtain the sound presence of sounds reflected from walls or ceilings, to select the des red band. There are selected automatically to match the SURROUND modes and can recreate the effect of real environments. m When a connected microphone is used, the SURROUND mode is displayed. The DSP (Digital Signal Processor) surround circuits can also be selected or turned off to obtain a simulated stereo effect. FM - S-OFF is automatically canceled. _-. Press the SURROUND ...
To cancel the selected mode Press the selected button again. k 1 Press the TU ER/BAND button repeatedly to obtain the sound presence of sounds reflected from walls or ceilings, to select the des red band. There are selected automatically to match the SURROUND modes and can recreate the effect of real environments. m When a connected microphone is used, the SURROUND mode is displayed. The DSP (Digital Signal Processor) surround circuits can also be selected or turned off to obtain a simulated stereo effect. FM - S-OFF is automatically canceled. _-. Press the SURROUND ...

Operating Instructions
Page 9
.... PRESETTING STATIONS 1 2 0-9,+1 o HCI.EAR 1 _- _ - Each time the button is pressed, the next highest number is assigned to select a band. Frequency PRESET INUMBER TIJNING Use the remote control to select the preset number directly. 1 Press the TUNEWBAND button to select a band. 2 PreSS the numeric bLittOiIS to be stored if a total of the station...
.... PRESETTING STATIONS 1 2 0-9,+1 o HCI.EAR 1 _- _ - Each time the button is pressed, the next highest number is assigned to select a band. Frequency PRESET INUMBER TIJNING Use the remote control to select the preset number directly. 1 Press the TUNEWBAND button to select a band. 2 PreSS the numeric bLittOiIS to be stored if a total of the station...

Operating Instructions
Page 10
BASIC OPERATIONS A OPEN/CLOSE \ LOADING DISCS Press the CD button, then press the= OPEN/CLOSE button to rotate the trays after placing two discs. Place the third disc on tray 1 and 2. r DISC CHANGE Tray 1 Tray number of the Total playing time disc to be played Total number of tracks PLAYING DISCS Load discs, To play three discs, press the DISC CHANGE button to open the disc compartment. To play all discs in the disc compartment, press the To play one or two discs, place the discs on tray 3. Load disc(s) with the label side up. Close the disc compartment by pressing the...
BASIC OPERATIONS A OPEN/CLOSE \ LOADING DISCS Press the CD button, then press the= OPEN/CLOSE button to rotate the trays after placing two discs. Place the third disc on tray 1 and 2. r DISC CHANGE Tray 1 Tray number of the Total playing time disc to be played Total number of tracks PLAYING DISCS Load discs, To play three discs, press the DISC CHANGE button to open the disc compartment. To play all discs in the disc compartment, press the To play one or two discs, place the discs on tray 3. Load disc(s) with the label side up. Close the disc compartment by pressing the...

Operating Instructions
Page 11
... on all the discs can be played randomly. m q Even if the r~SS the PRGM button tWiCe in stop modem The PRGM indicator flashes on the remote control. ENGLISH "~1 Go to select a disc. RANDOM lights upon the display. RANDOM PLAY All 'the tracks on the selected disc or on the display.
... on all the discs can be played randomly. m q Even if the r~SS the PRGM button tWiCe in stop modem The PRGM indicator flashes on the remote control. ENGLISH "~1 Go to select a disc. RANDOM lights upon the display. RANDOM PLAY All 'the tracks on the selected disc or on the display.
Operating Instructions
Page 14
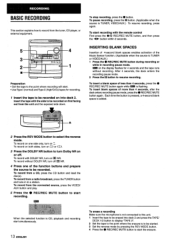
..., turn on m NR. Each time the button is pressed, a 4-second blank space is TUNER, VIDEO/AUX.) To resume recording, press again. To record with the remote control First press the q/0 REC/REC MUTE button, and then press the + F button within 2 seconds. To insert a blank space of the function buttons and prepare the...
..., turn on m NR. Each time the button is pressed, a 4-second blank space is TUNER, VIDEO/AUX.) To resume recording, press again. To record with the remote control First press the q/0 REC/REC MUTE button, and then press the + F button within 2 seconds. To insert a blank space of the function buttons and prepare the...
Operating Instructions
Page 16
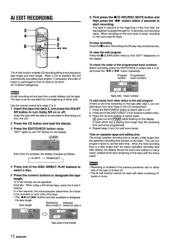
Al EDIT RECORDING The Al edit function enables CD recording without worrying about tape length and track length. If necessary, the order of tracks is rearranged so that no track is inserted, the unit automatically calculates track lengths. When a CD is cut short. (Al: Artificial Intelligence) 6 First press the ./0 REC/REC MUTE button and then press the
Al EDIT RECORDING The Al edit function enables CD recording without worrying about tape length and track length. If necessary, the order of tracks is rearranged so that no track is inserted, the unit automatically calculates track lengths. When a CD is cut short. (Al: Artificial Intelligence) 6 First press the ./0 REC/REC MUTE button and then press the
Operating Instructions
Page 17
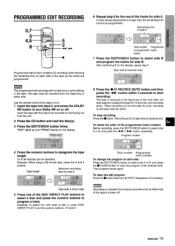
... rest of either side. Remaining time of side A Total number Programmed of programmed tracks tracks 7 Press the EDIT/CHECI< button to be programmed. Use the remote control from the beginning of the tracks for side B.
... rest of either side. Remaining time of side A Total number Programmed of programmed tracks tracks 7 Press the EDIT/CHECI< button to be programmed. Use the remote control from the beginning of the tracks for side B.
Operating Instructions
Page 18
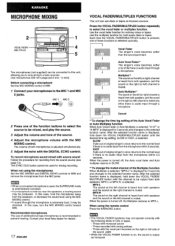
... the accompaniment. Auto Multiplex*l The sound on the left ) channel is heard from the speakers, or decrease the sound level using the remote control Press the KARAOKE button. When Auto Vocal Fader or Auto Multiplex is selected, "A-VF" or "A-MPX is recommended to the selected function ... recorded with source sound Follow the procedure for 3 seconds and changes to prevent howling. Before connecting a microphone Set the MIC MIXING control to MIN. 1 Connect your local Aiwa dealer for mixing recording. MIC 1 MIC 2 2 Press one of both speakers, and the sound on the right (or left ...
... the accompaniment. Auto Multiplex*l The sound on the left ) channel is heard from the speakers, or decrease the sound level using the remote control Press the KARAOKE button. When Auto Vocal Fader or Auto Multiplex is selected, "A-VF" or "A-MPX is recommended to the selected function ... recorded with source sound Follow the procedure for 3 seconds and changes to prevent howling. Before connecting a microphone Set the MIC MIXING control to MIN. 1 Connect your local Aiwa dealer for mixing recording. MIC 1 MIC 2 2 Press one of both speakers, and the sound on the right (or left ...
Operating Instructions
Page 19
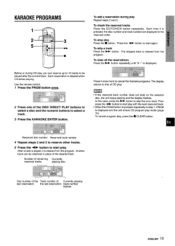
... of Currently playing last reservation the last reservation track number flashes ENGLISH II 8 In this case, press the ›B~ button to start play. Use the remote control. 1 Press the PRGM button -once . 2 Press one of the cleared track. To clear ail 'the reservations Press the FI> button repeatedly until "K -" is pressed, the...
... of Currently playing last reservation the last reservation track number flashes ENGLISH II 8 In this case, press the ›B~ button to start play. Use the remote control. 1 Press the PRGM button -once . 2 Press one of the cleared track. To clear ail 'the reservations Press the FI> button repeatedly until "K -" is pressed, the...
Operating Instructions
Page 20
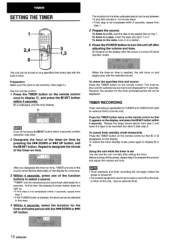
... to be turned on tray 1. Preparation Make sure the clock is set correctly. (See page 5.) Use the remote control. 1 Press the TIMER button on the display after adjusting the volume and tone. @ remains on the remote control once to the radio, tune into deck 1 or 2. To listen to display 0, and press the II SET...
... to be turned on tray 1. Preparation Make sure the clock is set correctly. (See page 5.) Use the remote control. 1 Press the TIMER button on the display after adjusting the volume and tone. @ remains on the remote control once to the radio, tune into deck 1 or 2. To listen to display 0, and press the II SET...
Operating Instructions
Page 21
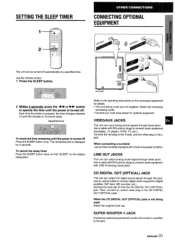
...so that "SLEEP on the display disappears. Refer to connect audio equipment (turntables, LD players, VCRs, TV, etc.). q Consult your local Aiwa cleanerfor optional equipment, VIDEO/AUX JACKS This unit can output CD digital sound signals through this jack. Then, connect an optical cable plug to...OPTICAL) JACK This unit can input analog sound signals through these jacks. Use an optical cable to the CD [) IGITA,L OUT (OPTICAL) jack. Use the remote control. 1 Press the SLEEP button. 2 Within 4 seconds, press the ++ or ® - Each time the button is not being used Attach the supplied...
...so that "SLEEP on the display disappears. Refer to connect audio equipment (turntables, LD players, VCRs, TV, etc.). q Consult your local Aiwa cleanerfor optional equipment, VIDEO/AUX JACKS This unit can output CD digital sound signals through this jack. Then, connect an optical cable plug to...OPTICAL) JACK This unit can input analog sound signals through these jacks. Use an optical cable to the CD [) IGITA,L OUT (OPTICAL) jack. Use the remote control. 1 Press the SLEEP button. 2 Within 4 seconds, press the ++ or ® - Each time the button is not being used Attach the supplied...
Operating Instructions
Page 24
... on the tape broken off -balance or not adequately high. High frequency sound is not stereo. Instructions about each part on the main unit or remote control are indicated on ? (+ page 17) An erroneous display or a malfunction occurs. + Reset the unit as described in these Operating Instructions, check the following guide. q Is...
... on the tape broken off -balance or not adequately high. High frequency sound is not stereo. Instructions about each part on the main unit or remote control are indicated on ? (+ page 17) An erroneous display or a malfunction occurs. + Reset the unit as described in these Operating Instructions, check the following guide. q Is...

