
Operating Instructions
Page 2
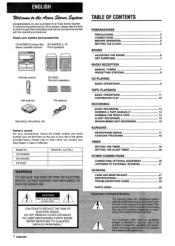
... RECORDING 16 Owner's record For your convenience, record the model number and serial number (you will find them when you contact your system and accessories CX-NV9000 Compact disc SX-NAV900 (L, R) stereo cassette receiver Front speakers PREPARATIONS Precautions 2 CONNECTIONS 3 BEFORE OPERATION 5 SETTING THE CLOCK 5 SOUND ADJUSTING THE SOUND 6 DSP SURROUND 7 Remote control :, AM antenna SX-R220 Surround speakers [m] rm~ FM antenna Operating Instructions, etc. NO USER-SERVICEABLE PARTS INSIDE. To optimize the performance of an Aiwa Stereo System. wkt&ww&44v4?#asibws@tkw TABLE...
... RECORDING 16 Owner's record For your convenience, record the model number and serial number (you will find them when you contact your system and accessories CX-NV9000 Compact disc SX-NAV900 (L, R) stereo cassette receiver Front speakers PREPARATIONS Precautions 2 CONNECTIONS 3 BEFORE OPERATION 5 SETTING THE CLOCK 5 SOUND ADJUSTING THE SOUND 6 DSP SURROUND 7 Remote control :, AM antenna SX-R220 Surround speakers [m] rm~ FM antenna Operating Instructions, etc. NO USER-SERVICEABLE PARTS INSIDE. To optimize the performance of an Aiwa Stereo System. wkt&ww&44v4?#asibws@tkw TABLE...

Operating Instructions
Page 3
... Instructions. To avoid defeating the safety feature of the polarized plug, do not force it so that generate heat. Never handle the AC power plug with care. Ipower cords should not be used in a very humid room - tJnplug the AC power cord from a cold spot to the National Electrical Code ~ ANTENNA LEAD IN WIRE 'T 6 GROUND CLAMP / ELECTRIC SERVICE EQUIPMENT \% , .~, NEC-NATIONAL ELECTRICAL CODE...
... Instructions. To avoid defeating the safety feature of the polarized plug, do not force it so that generate heat. Never handle the AC power plug with care. Ipower cords should not be used in a very humid room - tJnplug the AC power cord from a cold spot to the National Electrical Code ~ ANTENNA LEAD IN WIRE 'T 6 GROUND CLAMP / ELECTRIC SERVICE EQUIPMENT \% , .~, NEC-NATIONAL ELECTRICAL CODE...

Operating Instructions
Page 4
... between the surround speakers. Right surround speaker 3 ENGLISH I o Surround spe~ker cord +4 Both speakers can be connected to the o terminal and the black cord to the 0 terminal. 2 Connect the surround speakers to the SPEAKERS L terminals. The speaker cord with the white stripe should be connected as shown in the illustration in the end. Connect the right surround speaker cord to the SURROUND SPEAKERS R terminal, and left speakers to the SURROUND SPEAKERS L terminal. IMPORTANT q Connect the speakers, antennas, and...
... between the surround speakers. Right surround speaker 3 ENGLISH I o Surround spe~ker cord +4 Both speakers can be connected to the o terminal and the black cord to the 0 terminal. 2 Connect the surround speakers to the SPEAKERS L terminals. The speaker cord with the white stripe should be connected as shown in the illustration in the end. Connect the right surround speaker cord to the SURROUND SPEAKERS R terminal, and left speakers to the SURROUND SPEAKERS L terminal. IMPORTANT q Connect the speakers, antennas, and...

Operating Instructions
Page 5
..., replace the batteries with new ones. R6(AA) When to replace the batteries The maximum operational distance between the remote control and the remote sensor inside the display window is set to off. Other remote controls are used for an extended period clf time, remove the batteries tcl prevent possible electrolyte leakage. AM loop antenna: Position to the FM 75 Q terminals. Improper connections can hold its ends to make the...
..., replace the batteries with new ones. R6(AA) When to replace the batteries The maximum operational distance between the remote control and the remote sensor inside the display window is set to off. Other remote controls are used for an extended period clf time, remove the batteries tcl prevent possible electrolyte leakage. AM loop antenna: Position to the FM 75 Q terminals. Improper connections can hold its ends to make the...
Operating Instructions
Page 6
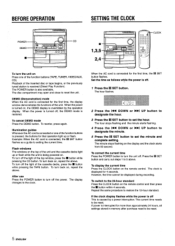
... tuned station is received (Direct Play Function). To correct the current time Press the POWER button to turn back on the remote control. The clock is restored. When the power is connected, the II SET button flashes as follows wh.ile the power is pressed, the buttons for the first time, the display window demonstrates the functions of the cassette decks, press the s button while pressing the TAPE button. To turn the unit off , the DEMO mode is displayed...
... tuned station is received (Direct Play Function). To correct the current time Press the POWER button to turn back on the remote control. The clock is restored. When the power is connected, the II SET button flashes as follows wh.ile the power is pressed, the buttons for the first time, the display window demonstrates the functions of the cassette decks, press the s button while pressing the TAPE button. To turn the unit off , the DEMO mode is displayed...

Operating Instructions
Page 7
... Press the GEQ button repeatedly until the desired equalization curve is pressed, the level changes. Each time it is displayed. Press the T-BASS button. ROCK: Powerful sound emphasizing treble and bass POP: More presence in . Each time it is recommended that BBE be distorted when the T-BASS system is used for a disc or tape in which low frequency sound is output from the speakers while the headphones are plugged in the...
... Press the GEQ button repeatedly until the desired equalization curve is pressed, the level changes. Each time it is displayed. Press the T-BASS button. ROCK: Powerful sound emphasizing treble and bass POP: More presence in . Each time it is recommended that BBE be distorted when the T-BASS system is used for a disc or tape in which low frequency sound is output from the speakers while the headphones are plugged in the...
Operating Instructions
Page 8
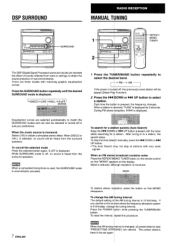
.... DSPSURROUND MANUAL TUNING SURROUND REPEATI MONO TUNER .- __ _-. Press the SURROUND button repeatedly until the desired SURROUND mode is displayed. ~DISCO+LIVE+HALL+ I S-oFF] (cancel) Equalization curves are three modes with matching graphic equalization curves. m When a connected microphone is used, the SURROUND mode is tur ed off, the previously tuned station will be played (Direct Pla Function). 2 Press the l The DSP (Digital Signal Processor) surround circuits can also be selected or turned off , no sound will...
.... DSPSURROUND MANUAL TUNING SURROUND REPEATI MONO TUNER .- __ _-. Press the SURROUND button repeatedly until the desired SURROUND mode is displayed. ~DISCO+LIVE+HALL+ I S-oFF] (cancel) Equalization curves are three modes with matching graphic equalization curves. m When a connected microphone is used, the SURROUND mode is tur ed off, the previously tuned station will be played (Direct Pla Function). 2 Press the l The DSP (Digital Signal Processor) surround circuits can also be selected or turned off , no sound will...

Operating Instructions
Page 10
... third disc on tray 1 and 2. r DISC CHANGE Tray 1 Tray number of the Total playing time disc to be played Total number of tracks PLAYING DISCS Load discs, To play one or two discs, place the discs on tray 3. Load disc(s) with the label side up. To play all discs in the disc compartment, press the Close the disc compartment by pressing the = OPEN/CLOSE button. To play three discs, press the DISC CHANGE button to open the disc compartment. BASIC OPERATIONS A OPEN/CLOSE \ LOADING DISCS Press the CD button...
... third disc on tray 1 and 2. r DISC CHANGE Tray 1 Tray number of the Total playing time disc to be played Total number of tracks PLAYING DISCS Load discs, To play one or two discs, place the discs on tray 3. Load disc(s) with the label side up. To play all discs in the disc compartment, press the Close the disc compartment by pressing the = OPEN/CLOSE button. To play three discs, press the DISC CHANGE button to open the disc compartment. BASIC OPERATIONS A OPEN/CLOSE \ LOADING DISCS Press the CD button...

Operating Instructions
Page 11
RANDOM PLAY All 'the tracks on the selected disc or on the remote control. To cancel random play, press again. Go to select a disc. ENGLISH "~1 The selected disc is pressed once in step 1, the unit enters the KARAOKE PROGRAMS (page 18). 2 p~~ss one of the DISC DIRECT pLAY buttons to the next step when the tray stops rotating. m q Even if the r~SS the PRGM button tWiCe in...
RANDOM PLAY All 'the tracks on the selected disc or on the remote control. To cancel random play, press again. Go to select a disc. ENGLISH "~1 The selected disc is pressed once in step 1, the unit enters the KARAOKE PROGRAMS (page 18). 2 p~~ss one of the DISC DIRECT pLAY buttons to the next step when the tray stops rotating. m q Even if the r~SS the PRGM button tWiCe in...

Operating Instructions
Page 12
... open the cassette holder. q When tapes are always played back on 2. UINR For tapes recorded with the exposed side down. For tapes recorded without DOLBY NR, turn on M NR. To play one or both sides. To select a reverse mode (deck 2 only) Each time the REV MODE button is pressed, the reverse mode changes. Press theTAPE button and press the= EJECT mark to close. BASIC OPERATIONS s +b DIRECTION/ PRESET - DOWN B r-fp & INSERTING TAPES...
... open the cassette holder. q When tapes are always played back on 2. UINR For tapes recorded with the exposed side down. For tapes recorded without DOLBY NR, turn on M NR. To play one or both sides. To select a reverse mode (deck 2 only) Each time the REV MODE button is pressed, the reverse mode changes. Press theTAPE button and press the= EJECT mark to close. BASIC OPERATIONS s +b DIRECTION/ PRESET - DOWN B r-fp & INSERTING TAPES...
Operating Instructions
Page 14
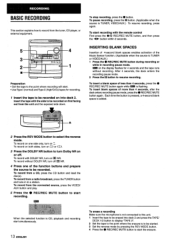
... selected function is CD, playback and recording start simultaneously. 13 ENGLISH To erase a recording Make sure the microphone is not connected to this unit. 1 Insert the tape to be erased into deck 2. After 4 seconds, the deck enters the recording pause mode, 2 Press the II button to resume recording. To record from a radio broadcast, press the TUNER button and tune in recording pause mode. ~ on the display flashes for recording. 1 Insert the tape...
... selected function is CD, playback and recording start simultaneously. 13 ENGLISH To erase a recording Make sure the microphone is not connected to this unit. 1 Insert the tape to be erased into deck 2. After 4 seconds, the deck enters the recording pause mode, 2 Press the II button to resume recording. To record from a radio broadcast, press the TUNER button and tune in recording pause mode. ~ on the display flashes for recording. 1 Insert the tape...
Operating Instructions
Page 16
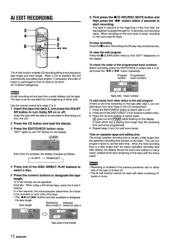
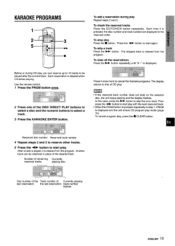
When a CD is cut short. (Al: Artificial Intelligence) 6 First press the ./0 REC/REC MUTE button and then press the If necessary, the order of tracks is rearranged so that no track is inserted, the unit automatically calculates track lengths. Al EDIT RECORDING The Al edit function enables CD recording without worrying about tape length and track length.
When a CD is cut short. (Al: Artificial Intelligence) 6 First press the ./0 REC/REC MUTE button and then press the If necessary, the order of tracks is rearranged so that no track is inserted, the unit automatically calculates track lengths. Al EDIT RECORDING The Al edit function enables CD recording without worrying about tape length and track length.
Operating Instructions
Page 17
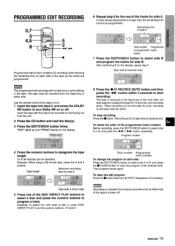
... program the tracks for side A. A track whose playing time is longer than the remaining time cannot be recorded from the unit. 2 Press the CD button and load the disc(s). 3 Press the EDIT/CHECK button twice. Remaining time of side A Total number Programmed of the tracks for side B. The tape must be programmed. "EDIT" lights up and "PRGM" flashes on the display, repeat step 5. Use the remote control from a point halfway in the tape...
... program the tracks for side A. A track whose playing time is longer than the remaining time cannot be recorded from the unit. 2 Press the CD button and load the disc(s). 3 Press the EDIT/CHECK button twice. Remaining time of side A Total number Programmed of the tracks for side B. The tape must be programmed. "EDIT" lights up and "PRGM" flashes on the display, repeat step 5. Use the remote control from a point halfway in the tape...
Operating Instructions
Page 18
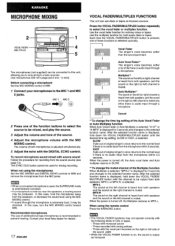
... microphones from both speakers and the sound on the right (or left channel is displayed, hold down the VOCAL FADER/ MULTIPLEX button until the desired time lag setting, SLOW or FAST, is adiusted simultaneously. 5 Adjust the echo with mini plugs (03.5 mm, '/6 inch). When using the microphones Set the MIC MIXING and DIGITAL ECHO controls to be mixed, and .p-lav the source. 3 Adjust the volume and tone...
... microphones from both speakers and the sound on the right (or left channel is displayed, hold down the VOCAL FADER/ MULTIPLEX button until the desired time lag setting, SLOW or FAST, is adiusted simultaneously. 5 Adjust the echo with mini plugs (03.5 mm, '/6 inch). When using the microphones Set the MIC MIXING and DIGITAL ECHO controls to be mixed, and .p-lav the source. 3 Adjust the volume and tone...
Operating Instructions
Page 19
... error track. Each time ii is pressed, the disc number and track number are displayed in step 1, PRGMI is played, it finishes playing. To cancel program play Press the W button. To clear ail 'the reservations Press the FI> button repeatedly until "K -" is cleared from the program. u Reserved disc number Reserved track number 4 Repeat steps 2 and 3 to reserve other tracks. 5 Press the + E button to start play. Use the remote control. 1 Press the PRGM button -once . 2 Press one of the DISC DIRECT PLAY buttons...
... error track. Each time ii is pressed, the disc number and track number are displayed in step 1, PRGMI is played, it finishes playing. To cancel program play Press the W button. To clear ail 'the reservations Press the FI> button repeatedly until "K -" is cleared from the program. u Reserved disc number Reserved track number 4 Repeat steps 2 and 3 to reserve other tracks. 5 Press the + E button to start play. Use the remote control. 1 Press the PRGM button -once . 2 Press one of the DISC DIRECT PLAY buttons...
Operating Instructions
Page 20
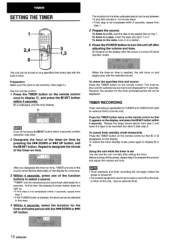
... 4 seconds. 1 2,4 6 3 1,2 The duration for the timer-activated period can be played first on the display after adjusting the volume and tone. @ remains on tray 1. Preparation Make sure the clock is turned off after the power is set correctly. (See page 5.) Use the remote control. 1 Press the TIMER button on the remote control once to a tape, inserl the tape into a station. 6 Press the POWER button to be turned on time by pressing the 1 q If this step...
... 4 seconds. 1 2,4 6 3 1,2 The duration for the timer-activated period can be played first on the display after adjusting the volume and tone. @ remains on tray 1. Preparation Make sure the clock is turned off after the power is set correctly. (See page 5.) Use the remote control. 1 Press the TIMER button on the remote control once to a tape, inserl the tape into a station. 6 Press the POWER button to be turned on time by pressing the 1 q If this step...
Operating Instructions
Page 21
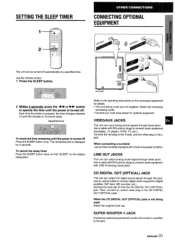
... turned off automatically at a specified time. SUPER WOOFER d JACK Connect an optional pc)wered sub woofer with a built-in equalizer amplifier. Obtain the necessary connecting cords. Use an optical cable to the CD [) IGITA,L OUT (OPTICAL) jack. Then, connect an optical cable plug to connect digital audio equipment (digital amplifier, DAT deck, MD recorder, etc.). SETTING THE SLEEP TIMER 1 2 CONNECTING OIPTIONAL EQUIPMENT The unit can output CD digital sound signals through this jack. Specified time To check the time remaining until the power is displayed...
... turned off automatically at a specified time. SUPER WOOFER d JACK Connect an optional pc)wered sub woofer with a built-in equalizer amplifier. Obtain the necessary connecting cords. Use an optical cable to the CD [) IGITA,L OUT (OPTICAL) jack. Then, connect an optical cable plug to connect digital audio equipment (digital amplifier, DAT deck, MD recorder, etc.). SETTING THE SLEEP TIMER 1 2 CONNECTING OIPTIONAL EQUIPMENT The unit can output CD digital sound signals through this jack. Specified time To check the time remaining until the power is displayed...
Operating Instructions
Page 22
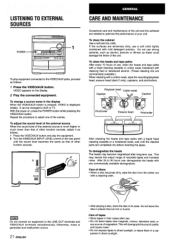
... 30 hours use . Care of the unit. It can be changed to the LINE OUT terminals and VIDEO/AUX terminals simultaneously. If the surfaces are needed to the VI DEO/AUX jacks, proceed as follows. 1 Press the VIDEO/AUX button and play the equipment. 2 Turn the VI DEO/AUX INPUT LEVEL control on the rear panel until the cleaned parts are completely dry before inserting the tapes, To...
... 30 hours use . Care of the unit. It can be changed to the LINE OUT terminals and VIDEO/AUX terminals simultaneously. If the surfaces are needed to the VI DEO/AUX jacks, proceed as follows. 1 Press the VIDEO/AUX button and play the equipment. 2 Turn the VI DEO/AUX INPUT LEVEL control on the rear panel until the cleaned parts are completely dry before inserting the tapes, To...
Operating Instructions
Page 23
... head x 1 Compact disc player section Laser Semiconductor laser (1= 780 nm) D-A converter 1 bit dual Signal-to Part 15 of ElBE; Reorient or relocate the receiving antenna. Total Harmonic Distortion 0.1 % (75 W, 1 kHz, 6 ohms, DIN AUDIO) VIDEO/AUX: 200 mV (adjustable) MIC 1, MIC 2: 1.3 mV (10 kohms) LINE OUT 200 mV SUPER WOOFER: 2.7 V SPEAKERS: accept speakers of 6 ohms or more SURROUND SPEAKERS: accept speakers of 16 ohms or more PHONES (stereo jack): accepts headphones...
... head x 1 Compact disc player section Laser Semiconductor laser (1= 780 nm) D-A converter 1 bit dual Signal-to Part 15 of ElBE; Reorient or relocate the receiving antenna. Total Harmonic Distortion 0.1 % (75 W, 1 kHz, 6 ohms, DIN AUDIO) VIDEO/AUX: 200 mV (adjustable) MIC 1, MIC 2: 1.3 mV (10 kohms) LINE OUT 200 mV SUPER WOOFER: 2.7 V SPEAKERS: accept speakers of 6 ohms or more SURROUND SPEAKERS: accept speakers of 16 ohms or more PHONES (stereo jack): accepts headphones...
Operating Instructions
Page 24
... function button pressed? q Is the Karaoke function turned on? (+ page 17) An erroneous display or a malfunction occurs. + Reset the unit as described in alphabetic order) Parts BBE % EDIT/CHECK (EDIT/CHECK) W CLEAR CLOCK DEMO DIGITAL ECHO +> DIRECTION/PRESET DISC CHANGE DISC DIRECT PLAY DOLBY NR q Is a tape recorded without Dolby NR played back with the Dolby NR system operating? (+ page 11) q Is the recording/playback head dirty? (+ page 21) CD PLAYER SECTION The CD player does not play...
... function button pressed? q Is the Karaoke function turned on? (+ page 17) An erroneous display or a malfunction occurs. + Reset the unit as described in alphabetic order) Parts BBE % EDIT/CHECK (EDIT/CHECK) W CLEAR CLOCK DEMO DIGITAL ECHO +> DIRECTION/PRESET DISC CHANGE DISC DIRECT PLAY DOLBY NR q Is a tape recorded without Dolby NR played back with the Dolby NR system operating? (+ page 11) q Is the recording/playback head dirty? (+ page 21) CD PLAYER SECTION The CD player does not play...


