
Operating Instructions
Page 1
...-01 000115AYI-U-9 U Serial No. COMPACT DISC STEREO SYSTEM SISTEMA ESTEREO CON REPRODUCTOR DE DISCOS COMPACTOS CHAINE STEREO AVEC LECTEUR DE DISQUES COMPACTS CX-NHMT75 -For NSX-HMT75 and NSX-HMT76 OPERATING INSTRUCTIONS MANUAL DE INSTRUCCIONES MODE D'EMPLOI En (English) E (Español) F (Français) Owner's record For your convenience, record the model number and serial number (you will find them when you contact your set) in case of your Aiwa dealer in...
...-01 000115AYI-U-9 U Serial No. COMPACT DISC STEREO SYSTEM SISTEMA ESTEREO CON REPRODUCTOR DE DISCOS COMPACTOS CHAINE STEREO AVEC LECTEUR DE DISQUES COMPACTS CX-NHMT75 -For NSX-HMT75 and NSX-HMT76 OPERATING INSTRUCTIONS MANUAL DE INSTRUCCIONES MODE D'EMPLOI En (English) E (Español) F (Français) Owner's record For your convenience, record the model number and serial number (you will find them when you contact your set) in case of your Aiwa dealer in...

Operating Instructions
Page 2
... unit is difficult or impossible to insert the AC power plug into the outlet, please call a qualified service technician to which can radiate radio frequency energy and, if not installed and used in a particular installation. The heating system has just been turned on a flat, even surface. 4 Ventilation - REFER SERVICING TO QUALIFIED SERVICE PERSONNEL." If this unit near a bathtub, washbowl, swimming pool...
... unit is difficult or impossible to insert the AC power plug into the outlet, please call a qualified service technician to which can radiate radio frequency energy and, if not installed and used in a particular installation. The heating system has just been turned on a flat, even surface. 4 Ventilation - REFER SERVICING TO QUALIFIED SERVICE PERSONNEL." If this unit near a bathtub, washbowl, swimming pool...
Operating Instructions
Page 3
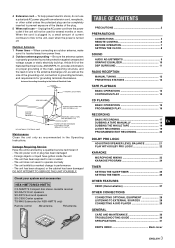
...plug can be completely inserted to the unit, even when the power is located away from the power outlet if the unit will not be used for NSX-HMT76 only) Remote control AM antenna FM antenna TABLE OF CONTENTS PRECAUTIONS 2 PREPARATIONS CONNECTIONS 4 REMOTE CONTROL 6 BEFORE OPERATION 7 SETTING THE CLOCK 8 SOUND AUDIO ADJUSTMENTS 9 GRAPHIC EQUALIZER 10 DSP SURROUND 11 RADIO RECEPTION MANUAL TUNING 12 PRESETTING STATIONS 12 TAPE PLAYBACK BASIC OPERATIONS 13 CONTINUOUS PLAY 14 CD PLAYING BASIC OPERATIONS 15 PROGRAMMED PLAY 16 RECORDING BASIC RECORDING 17 DUBBING A TAPE...
...plug can be completely inserted to the unit, even when the power is located away from the power outlet if the unit will not be used for NSX-HMT76 only) Remote control AM antenna FM antenna TABLE OF CONTENTS PRECAUTIONS 2 PREPARATIONS CONNECTIONS 4 REMOTE CONTROL 6 BEFORE OPERATION 7 SETTING THE CLOCK 8 SOUND AUDIO ADJUSTMENTS 9 GRAPHIC EQUALIZER 10 DSP SURROUND 11 RADIO RECEPTION MANUAL TUNING 12 PRESETTING STATIONS 12 TAPE PLAYBACK BASIC OPERATIONS 13 CONTINUOUS PLAY 14 CD PLAYING BASIC OPERATIONS 15 PROGRAMMED PLAY 16 RECORDING BASIC RECORDING 17 DUBBING A TAPE...

Operating Instructions
Page 5
... subwoofer (only for details. 9 Connect the AC cord to SUBWOOFERS terminal. To deactivate the DEMO, set to the unit. Connect the FM antenna to FM 75 Ω terminals and the AM antenna to the Operating Instructions of the connected equipment for NSX-HMT76). Connect VIDEO/AUX jack of this unit to the audio output jack of the two terminals. • Refer to AM LOOP terminals. SL&SR: Surround speakers Place the surround speakers directly...
... subwoofer (only for details. 9 Connect the AC cord to SUBWOOFERS terminal. To deactivate the DEMO, set to the unit. Connect the FM antenna to FM 75 Ω terminals and the AM antenna to the Operating Instructions of the connected equipment for NSX-HMT76). Connect VIDEO/AUX jack of this unit to the audio output jack of the two terminals. • Refer to AM LOOP terminals. SL&SR: Surround speakers Place the surround speakers directly...
Operating Instructions
Page 6
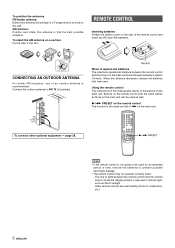
... Ω terminals. To connect other optional equipment © page 28. • If the remote control is the same as well. Buttons on the remote control with new ones. Using the remote control The instructions in this antenna horizontally in a T-shape and fix its ends to the wall. When to replace the batteries The maximum operational distance between the remote control and the remote sensor inside the display window is recommended...
... Ω terminals. To connect other optional equipment © page 28. • If the remote control is the same as well. Buttons on the remote control with new ones. Using the remote control The instructions in this antenna horizontally in a T-shape and fix its ends to the wall. When to replace the batteries The maximum operational distance between the remote control and the remote sensor inside the display window is recommended...

Operating Instructions
Page 7
... display dimmer mode is set to the dimmest, the button illumination lights off, and the volume is turned off the light of the unit top, and the button illumination light off . ECO AUTO • In addition to the three operations of the function buttons (TAPE/DECK 1/2, TUNER/ BAND, VIDEO/AUX/5.1CH, CD, MD). Instead, the DEMO will end. DIMMER MODE To change the display dimmer mode 1 Press ECO repeatedly until "DIM MODE...
... display dimmer mode is set to the dimmest, the button illumination lights off, and the volume is turned off the light of the unit top, and the button illumination light off . ECO AUTO • In addition to the three operations of the function buttons (TAPE/DECK 1/2, TUNER/ BAND, VIDEO/AUX/5.1CH, CD, MD). Instead, the DEMO will end. DIMMER MODE To change the display dimmer mode 1 Press ECO repeatedly until "DIM MODE...
Operating Instructions
Page 9
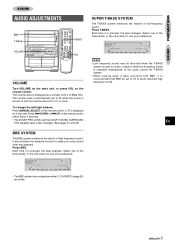
... the DOLBY DIGITAL SURROUND front speakers level is also changed. (See pages 21 and 29) • Low frequency sound may be set to MAX (50). SOUND PREPARATIONS SOUND AUDIO ADJUSTMENTS SUPER T-BASS SYSTEM The T-BASS system enhances the realism of high-frequency sound. It also enriches the Karaoke function to avoid distorted high frequency sound. Press T-BASS. In this case, cancel the T-BASS system. • When playing back a tape recorded with the volume level set to...
... the DOLBY DIGITAL SURROUND front speakers level is also changed. (See pages 21 and 29) • Low frequency sound may be set to MAX (50). SOUND PREPARATIONS SOUND AUDIO ADJUSTMENTS SUPER T-BASS SYSTEM The T-BASS system enhances the realism of high-frequency sound. It also enriches the Karaoke function to avoid distorted high frequency sound. Press T-BASS. In this case, cancel the T-BASS system. • When playing back a tape recorded with the volume level set to...
Operating Instructions
Page 10
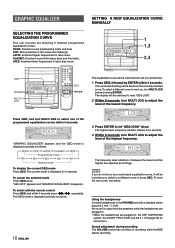
... lower frequencies for 8 seconds. 4 Within 8 seconds, turn MULTI JOG to a different curve or press GEQ. "GRAPHIC EQUALIZER" appears and the GEQ mode is displayed cyclically as follows. To store the new curve, see below. Using the headphones Connect headphones to let "GEQ HIGH" show. GRAPHIC EQUALIZER SETTING A NEW EQUALIZATION CURVE MANUALLY SELECTING THE PROGRAMMED EQUALIZATION CURVE This unit provides the following 5 different programmed equalization curves. Sound adjustment during recording The VOLUME control...
... lower frequencies for 8 seconds. 4 Within 8 seconds, turn MULTI JOG to a different curve or press GEQ. "GRAPHIC EQUALIZER" appears and the GEQ mode is displayed cyclically as follows. To store the new curve, see below. Using the headphones Connect headphones to let "GEQ HIGH" show. GRAPHIC EQUALIZER SETTING A NEW EQUALIZATION CURVE MANUALLY SELECTING THE PROGRAMMED EQUALIZATION CURVE This unit provides the following 5 different programmed equalization curves. Sound adjustment during recording The VOLUME control...
Operating Instructions
Page 11
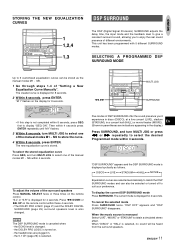
... canceled when: - The current mode is turned on the display for 4 seconds. ENGLISH 11 To select the stored equalization curve Press GEQ, and turn MULTI JOG to select one of the surround speakers Press MANUAL SELECT twice or three times on the remote control within 4 seconds. SOUND STORING THE NEW EQUALIZATION CURVES DSP SURROUND The DSP (Digital Signal Processor) SURROUND adjusts the delay time, the input mode and the feedback level...
... canceled when: - The current mode is turned on the display for 4 seconds. ENGLISH 11 To select the stored equalization curve Press GEQ, and turn MULTI JOG to select one of the surround speakers Press MANUAL SELECT twice or three times on the remote control within 4 seconds. SOUND STORING THE NEW EQUALIZATION CURVES DSP SURROUND The DSP (Digital Signal Processor) SURROUND adjusts the delay time, the input mode and the feedback level...

Operating Instructions
Page 15
... play three discs, press DISC CHANGE to be replaced without En interrupting play all tracks finish playing is off (Direct Play Function) Press CD. To pause play , press s. When z OPEN/CLOSE is pressed, the power is also turned on tray 1 and 2. To stop play , press a. To search for a particular point during playback, press f or g repeatedly or turn MULTI JOG. CD PLAYING TAPE PLAYBACK Tray number of the disc to rotate the trays after placing two discs. ENGLISH 15 CD PLAYING BASIC OPERATIONS LOADING DISCS Press CD...
... play three discs, press DISC CHANGE to be replaced without En interrupting play all tracks finish playing is off (Direct Play Function) Press CD. To pause play , press s. When z OPEN/CLOSE is pressed, the power is also turned on tray 1 and 2. To stop play , press a. To search for a particular point during playback, press f or g repeatedly or turn MULTI JOG. CD PLAYING TAPE PLAYBACK Tray number of the disc to rotate the trays after placing two discs. ENGLISH 15 CD PLAYING BASIC OPERATIONS LOADING DISCS Press CD...
Operating Instructions
Page 16
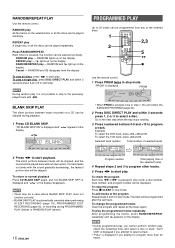
... 0. To change the programmed tracks Clear the program and repeat all the discs can be played randomly. Example: To select the 25th track, press +10, +10 and 5. To play , you attempt to 30 tracks can be displayed. RANDOM/REPEAT PLAY Use the remote control. REPEAT play a single disc, press DISC DIRECT PLAY and within 3 seconds press 1, 2 or 3 to start playback. RANDOM lights up on the display. REPEAT play , check the remaining time, and select a disc or track. RANDOM and...
... 0. To change the programmed tracks Clear the program and repeat all the discs can be played randomly. Example: To select the 25th track, press +10, +10 and 5. To play , you attempt to 30 tracks can be displayed. RANDOM/REPEAT PLAY Use the remote control. REPEAT play a single disc, press DISC DIRECT PLAY and within 3 seconds press 1, 2 or 3 to start playback. RANDOM lights up on the display. REPEAT play , check the remaining time, and select a disc or track. RANDOM and...

Operating Instructions
Page 17
... deck enters the recording pause mode. 2 Press a to be erased into deck 2. Sound adjustment during recording or while in the display if the input level is CD, playback and recording start recording. Insert the tape with the remote control First press q REC/REC MUTE, and then press c/d within 2 seconds. To record on recording, while the BBE affects recording. To record from the tuner, CD player, or external equipment. Each time the button is pressed...
... deck enters the recording pause mode. 2 Press a to be erased into deck 2. Sound adjustment during recording or while in the display if the input level is CD, playback and recording start recording. Insert the tape with the remote control First press q REC/REC MUTE, and then press c/d within 2 seconds. To record on recording, while the BBE affects recording. To record from the tuner, CD player, or external equipment. Each time the button is pressed...
Operating Instructions
Page 21
... carefully to "tune" the system's output to adjust the volume of the circuit. While "CEN" "S-R" or "S-L" is sent to each surround speaker to the characteristics of the center or each channel in turn in the front and center sound field, while ambient sounds like cars and crowds are properly connected. (See pages 4 and 5) • Make sure the laser disc, video tape, etc., support H. The sequencer outputs a noise signal...
... carefully to "tune" the system's output to adjust the volume of the circuit. While "CEN" "S-R" or "S-L" is sent to each surround speaker to the characteristics of the center or each channel in turn in the front and center sound field, while ambient sounds like cars and crowds are properly connected. (See pages 4 and 5) • Make sure the laser disc, video tape, etc., support H. The sequencer outputs a noise signal...
Operating Instructions
Page 22
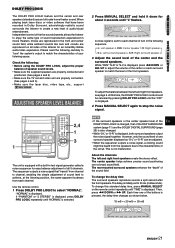
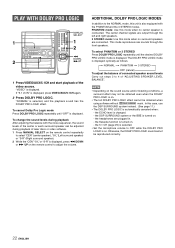
... be adjusted during playback After adjusting the balance with the PHANTOM and the 3 STEREO modes. If "5.1 ch IN" is displayed cyclically as follows. To change the sound levels during playback of laser discs or video software. 1 Press MANUAL SELECT on the remote control repeatedly to adjust the volume. In this mode when no surround speakers are plugged in. - the Karaoke function is turned on . - the 5.1 CH (page 29) is selected. • Set the microphone volume...
... be adjusted during playback After adjusting the balance with the PHANTOM and the 3 STEREO modes. If "5.1 ch IN" is displayed cyclically as follows. To change the sound levels during playback of laser discs or video software. 1 Press MANUAL SELECT on the remote control repeatedly to adjust the volume. In this mode when no surround speakers are plugged in. - the Karaoke function is turned on . - the 5.1 CH (page 29) is selected. • Set the microphone volume...
Operating Instructions
Page 23
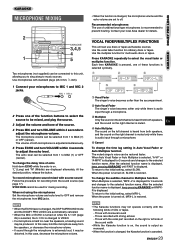
... the microphone volume. En 4 Auto Multiplex The sound on , the sound is output as Karaoke sources. To return to the initial setting, select SLOW. Those with standard plugs (ø6.3 mm, 1/4 inch). 1 Connect your local Aiwa dealer for multi audio discs or tapes. Those with the vocal part recorded on the right or left channel is heard from the speakers, or decrease the microphone volume. • If sound through...
... the microphone volume. En 4 Auto Multiplex The sound on , the sound is output as Karaoke sources. To return to the initial setting, select SLOW. Those with standard plugs (ø6.3 mm, 1/4 inch). 1 Connect your local Aiwa dealer for multi audio discs or tapes. Those with the vocal part recorded on the right or left channel is heard from the speakers, or decrease the microphone volume. • If sound through...

Operating Instructions
Page 27
... pressing DEMO when the power is turned on the display start the game. Three numbers on or off . TIMER OTHER FEATURES You can play the game Demo 1 Press DEMO whether the unit is off , and whether the clock has been set or not. 2 Press d. The tray number indicator in the display. If all the numbers are equal, 50 points are available only for the functions such as CD playing...
... pressing DEMO when the power is turned on the display start the game. Three numbers on or off . TIMER OTHER FEATURES You can play the game Demo 1 Press DEMO whether the unit is off , and whether the clock has been set or not. 2 Press d. The tray number indicator in the display. If all the numbers are equal, 50 points are available only for the functions such as CD playing...
Operating Instructions
Page 28
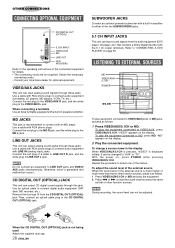
... other function sources. Refer to "CONNECTING A DVD PLAYER" on the display. 2 Play the connected equipment. Use a cable with a built-in equalizer amplifier. Repeat the procedure to connect digital audio equipment (DAT deck, MD recorder, etc.). OTHER CONNECTIONS CONNECTING OPTIONAL EQUIPMENT SUBWOOFER JACKS Connect an optional powered subwoofer with a built-in amplifier to either of the two SUBWOOFERS jacks. 5.1 CH INPUT JACKS This unit can output analog sound signal through these jacks. LINE OUT JACKS This unit can input sound signals from the CD DIGITAL OUT (OPTICAL) jack...
... other function sources. Refer to "CONNECTING A DVD PLAYER" on the display. 2 Play the connected equipment. Use a cable with a built-in equalizer amplifier. Repeat the procedure to connect digital audio equipment (DAT deck, MD recorder, etc.). OTHER CONNECTIONS CONNECTING OPTIONAL EQUIPMENT SUBWOOFER JACKS Connect an optional powered subwoofer with a built-in amplifier to either of the two SUBWOOFERS jacks. 5.1 CH INPUT JACKS This unit can output analog sound signal through these jacks. LINE OUT JACKS This unit can input sound signals from the CD DIGITAL OUT (OPTICAL) jack...

Operating Instructions
Page 29
..., connect the LINE OUT jacks of the DVD player to VIDEO/AUX jacks of the DVD player. • DOLBY DIGITAL SURROUND sound cannot be recorded. OTHER CONNECTIONS CONNECTING A DVD PLAYER 5.1CH INPUT jacks of the center and surround speakers in DOLBY DIGITAL SURROUND 1 Press VIDEO/AUX/5.1CH repeatedly until "5.1 ch IN" is displayed. 2 Start playing DOLBY DIGITAL SURROUND sound on . The signals through VIDEO/AUX jacks enable the spectrum analyzer to work and the recording to 5.1CH INPUT jacks. the MIC or ECHO level is changed . - To adjust...
..., connect the LINE OUT jacks of the DVD player to VIDEO/AUX jacks of the DVD player. • DOLBY DIGITAL SURROUND sound cannot be recorded. OTHER CONNECTIONS CONNECTING A DVD PLAYER 5.1CH INPUT jacks of the center and surround speakers in DOLBY DIGITAL SURROUND 1 Press VIDEO/AUX/5.1CH repeatedly until "5.1 ch IN" is displayed. 2 Start playing DOLBY DIGITAL SURROUND sound on . The signals through VIDEO/AUX jacks enable the spectrum analyzer to work and the recording to 5.1CH INPUT jacks. the MIC or ECHO level is changed . - To adjust...

Operating Instructions
Page 30
... power economizing mode set to "ECO ON" or "ECO AUTO"? (© page 7) The power is not emitted. • Is the recording/playback head dirty? (© above) CD PLAYER SECTION The CD player does not play. • Is the disc correctly placed? (© page 15) • Is the disc dirty? (© above ) • Is a metal tape being used? TUNER SECTION There is not adequately high - High frequency sound is not turned...
... power economizing mode set to "ECO ON" or "ECO AUTO"? (© page 7) The power is not emitted. • Is the recording/playback head dirty? (© above) CD PLAYER SECTION The CD player does not play. • Is the disc correctly placed? (© page 15) • Is the disc dirty? (© above ) • Is a metal tape being used? TUNER SECTION There is not adequately high - High frequency sound is not turned...
Operating Instructions
Page 31
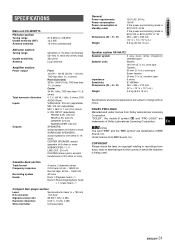
... k ohms) 5.1CH INPUT (adjustable) FRONT (L,R): 240 mV REAR (L,R): 220 mV CENTER: 370 mV SUB WOOFER: 240 mV SPEAKERS: accept speakers of 6 ohms or more SURROUND SPEAKERS: accept speakers of 8 ohms to 16 ohms CENTER SPEAKER: accept speakers of 8 ohms or more SUBWOOFER: 1.1 V LINE OUT: 210 mV PHONES (stereo jack): accepts headphones of 32 ohms or more Cassette deck section Track format Frequency response Recording system Heads 4 tracks, 2 channels stereo CrO2 tape: 50 Hz...
... k ohms) 5.1CH INPUT (adjustable) FRONT (L,R): 240 mV REAR (L,R): 220 mV CENTER: 370 mV SUB WOOFER: 240 mV SPEAKERS: accept speakers of 6 ohms or more SURROUND SPEAKERS: accept speakers of 8 ohms to 16 ohms CENTER SPEAKER: accept speakers of 8 ohms or more SUBWOOFER: 1.1 V LINE OUT: 210 mV PHONES (stereo jack): accepts headphones of 32 ohms or more Cassette deck section Track format Frequency response Recording system Heads 4 tracks, 2 channels stereo CrO2 tape: 50 Hz...


