
Operating Instructions
Page 3
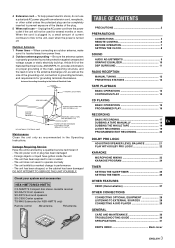
...extension cord, receptacle, or other outlet unless the polarized plug can be used for NSX-HMT76 only) Remote control AM antenna FM antenna TABLE OF CONTENTS PRECAUTIONS 2 PREPARATIONS CONNECTIONS 4 REMOTE CONTROL 6 BEFORE OPERATION 7 SETTING THE CLOCK 8 SOUND AUDIO ADJUSTMENTS 9 GRAPHIC EQUALIZER 10 DSP SURROUND 11 ... has been damaged DO NOT ATTEMPT TO SERVICE THE UNIT YOURSELF. Check your system and accessories NSX-HMT75/NSX-HMT76 CX-NHMT75 Compact disc stereo cassette receiver SX-NAJ72 Front speakers SX-R275 Surround speakers SX-C605 Center speaker TS-W45 Subwoofer (for...
...extension cord, receptacle, or other outlet unless the polarized plug can be used for NSX-HMT76 only) Remote control AM antenna FM antenna TABLE OF CONTENTS PRECAUTIONS 2 PREPARATIONS CONNECTIONS 4 REMOTE CONTROL 6 BEFORE OPERATION 7 SETTING THE CLOCK 8 SOUND AUDIO ADJUSTMENTS 9 GRAPHIC EQUALIZER 10 DSP SURROUND 11 ... has been damaged DO NOT ATTEMPT TO SERVICE THE UNIT YOURSELF. Check your system and accessories NSX-HMT75/NSX-HMT76 CX-NHMT75 Compact disc stereo cassette receiver SX-NAJ72 Front speakers SX-R275 Surround speakers SX-C605 Center speaker TS-W45 Subwoofer (for...
Operating Instructions
Page 6
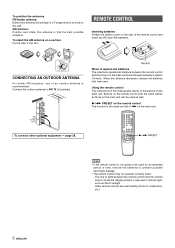
... unit can be used for an extended period of sight between the remote control and the sensor on the remote control with new ones. When to replace the batteries The maximum operational distance between the remote control and the remote sensor inside the display window is recommended. To position the antennas FM... correctly when: - Buttons on the main unit should be used as well. CONNECTING AN OUTDOOR ANTENNA For better FM reception, use of the remote control and insert two R6 (size AA) batteries. To stand the AM antenna on a surface Fix the claw to intense light, such as that...
... unit can be used for an extended period of sight between the remote control and the sensor on the remote control with new ones. When to replace the batteries The maximum operational distance between the remote control and the remote sensor inside the display window is recommended. To position the antennas FM... correctly when: - Buttons on the main unit should be used as well. CONNECTING AN OUTDOOR ANTENNA For better FM reception, use of the remote control and insert two R6 (size AA) batteries. To stand the AM antenna on a surface Fix the claw to intense light, such as that...
Operating Instructions
Page 9
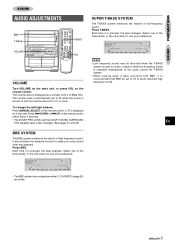
... Low frequency sound may be set to off position to 21 or more. VOLUME Turn VOLUME on the main unit, or press VOL on the remote control within these 4 seconds. • The DOLBY PRO LOGIC and the DOLBY DIGITAL SURROUND front speakers level is used for 4 seconds. The volume ...sound. Each time it is originally emphasized. Press r DOWN or t UP on the remote control. The volume level is pressed, the level changes. To change the left/right balance Press MANUAL SELECT on the remote control. It also enriches the Karaoke function to suit your voice sound clear and pleasant. Select...
... Low frequency sound may be set to off position to 21 or more. VOLUME Turn VOLUME on the main unit, or press VOL on the remote control within these 4 seconds. • The DOLBY PRO LOGIC and the DOLBY DIGITAL SURROUND front speakers level is used for 4 seconds. The volume ...sound. Each time it is originally emphasized. Press r DOWN or t UP on the remote control. The volume level is pressed, the level changes. To change the left/right balance Press MANUAL SELECT on the remote control. It also enriches the Karaoke function to suit your voice sound clear and pleasant. Select...
Operating Instructions
Page 10
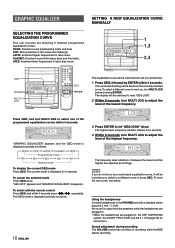
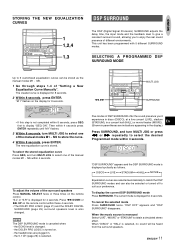
...the programmed equalization curves within 4 seconds press for 4 seconds. No sound is displayed cyclically as follows. Sound adjustment during recording The VOLUME control has no effect on the currently selected curve. Press GEQ, and turn MULTI JOG to work on, turn MULTI JOG before pressing ENTER...CLASSIC JAZZ Programmed mode M5 M4 M3 M2 M1 Manual mode To display the current GEQ mode Press GEQ. To select with the remote control Press GEQ, and within 4 seconds. The highest level frequency indicator flashes for jazz-type music The equalization curve can be switched to...
...the programmed equalization curves within 4 seconds press for 4 seconds. No sound is displayed cyclically as follows. Sound adjustment during recording The VOLUME control has no effect on the currently selected curve. Press GEQ, and turn MULTI JOG to work on, turn MULTI JOG before pressing ENTER...CLASSIC JAZZ Programmed mode M5 M4 M3 M2 M1 Manual mode To display the current GEQ mode Press GEQ. To select with the remote control Press GEQ, and within 4 seconds. The highest level frequency indicator flashes for jazz-type music The equalization curve can be switched to...
Operating Instructions
Page 11
...different environments. "DSP OFF" appears and "DSP SURROUND" disappears. To adjust the volume of the manual modes M1 - Press f DOWN or g UP on the remote control. The DSP SURROUND mode is turned on the display for 4 seconds. the 5.1 CH (page 29) is monaural Select "LIVE", "MOVIE" or "STADIUM" to...in the display.) Press SURROUND, and turn MULTI JOG to select one of the surround speakers Press MANUAL SELECT twice or three times on the remote control within these 4 seconds. • The DOLBY PRO LOGIC (page 21) and the DOLBY DIGITAL SURROUND (page 29) surround speakers level is...
...different environments. "DSP OFF" appears and "DSP SURROUND" disappears. To adjust the volume of the manual modes M1 - Press f DOWN or g UP on the remote control. The DSP SURROUND mode is turned on the display for 4 seconds. the 5.1 CH (page 29) is monaural Select "LIVE", "MOVIE" or "STADIUM" to...in the display.) Press SURROUND, and turn MULTI JOG to select one of the surround speakers Press MANUAL SELECT twice or three times on the remote control within these 4 seconds. • The DOLBY PRO LOGIC (page 21) and the DOLBY DIGITAL SURROUND (page 29) surround speakers level is...
Operating Instructions
Page 12
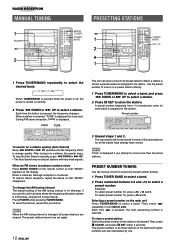
...select a band. When the AM tuning interval is changed, all other stations in an area where the frequency allocation system is turned on the remote control so that "MONO" disappears. "FULL" is assigned to select a preset number. Selecting a preset number on the display. Each time the ... stations for a station quickly (Auto Search) Keep f DOWN or g UP pressed until the frequency starts to be cleared. PRESET NUMBER TUNING Use the remote control to select the preset number directly. 1 Press TUNER BAND to select a band. 2 Press numbered buttons 0-9 and +10 to the station. When a...
...select a band. When the AM tuning interval is changed, all other stations in an area where the frequency allocation system is turned on the remote control so that "MONO" disappears. "FULL" is assigned to select a preset number. Selecting a preset number on the display. Each time the ... stations for a station quickly (Auto Search) Keep f DOWN or g UP pressed until the frequency starts to be cleared. PRESET NUMBER TUNING Use the remote control to select the preset number directly. 1 Press TUNER BAND to select a band. 2 Press numbered buttons 0-9 and +10 to the station. When a...

Operating Instructions
Page 15
.... • The unit may not play a CD-R/RW disc that disc. ENGLISH 15 To play . 1 Press DISC CHANGE. 2 Remove the discs and replace with the remote control 1 Press DISC DIRECT PLAY and within 3 seconds press 1, 2 or 3 to select a disc. 2 Press numbered buttons 0-9 and +10 to be replaced without En interrupting play one...
.... • The unit may not play a CD-R/RW disc that disc. ENGLISH 15 To play . 1 Press DISC CHANGE. 2 Remove the discs and replace with the remote control 1 Press DISC DIRECT PLAY and within 3 seconds press 1, 2 or 3 to select a disc. 2 Press numbered buttons 0-9 and +10 to be replaced without En interrupting play one...
Operating Instructions
Page 16
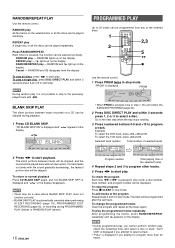
... • BLANK SKIP PLAY is pressed, the function can be played back without interruption. RANDOM/REPEAT play . " appears in stop mode. Use the remote control. 1 Press PRGM twice in the PROGRAMMED PLAY Up to start play - To check the program Each time f or g is pressed once in stop ...mode. To change the programmed tracks Clear the program and repeat all discs, press d to select a disc. RANDOM/REPEAT PLAY Use the remote control. REPEAT play . RANDOM lights up on the selected disc or all the discs can be programmed after the last track. RANDOM and " light...
... • BLANK SKIP PLAY is pressed, the function can be played back without interruption. RANDOM/REPEAT play . " appears in stop mode. Use the remote control. 1 Press PRGM twice in the PROGRAMMED PLAY Up to start play - To check the program Each time f or g is pressed once in stop ...mode. To change the programmed tracks Clear the program and repeat all discs, press d to select a disc. RANDOM/REPEAT PLAY Use the remote control. REPEAT play . RANDOM lights up on the selected disc or all the discs can be programmed after the last track. RANDOM and " light...

Operating Instructions
Page 17
... CD player, or external equipment. To record from a radio broadcast, press TUNER/BAND and tune in recording pause mode. 4 on a tape with the remote control First press q REC/REC MUTE, and then press c/d within 2 seconds. When recording an externally connected source via the VIDEO/ AUX or the MD jacks...Music Sensor function. (Applicable when the source is TUNER/ BAND, VIDEO/AUX/5.1CH or MD.) 1 Press w REC/REC MUTE during recording The VOLUME control has no effect on one side only, select p. INSERTING BLANK SPACES Insertion of more than 4 seconds, press w En REC/REC MUTE again while 4...
... CD player, or external equipment. To record from a radio broadcast, press TUNER/BAND and tune in recording pause mode. 4 on a tape with the remote control First press q REC/REC MUTE, and then press c/d within 2 seconds. When recording an externally connected source via the VIDEO/ AUX or the MD jacks...Music Sensor function. (Applicable when the source is TUNER/ BAND, VIDEO/AUX/5.1CH or MD.) 1 Press w REC/REC MUTE during recording The VOLUME control has no effect on one side only, select p. INSERTING BLANK SPACES Insertion of more than 4 seconds, press w En REC/REC MUTE again while 4...

Operating Instructions
Page 19
... edit program Press s CLEAR twice so that no track is usually a little longer than the remaining time cannot be recorded on the remote control to designate the tape length. 10 to designate the tape length. To check the order of the programmed track numbers Before recording, press...recording side B: Second recording side ENGLISH 19 Tape length Remaining time Programmed of the tape is rearranged so that "EDIT" disappears on the remote control to be programmed. Insert the tape with discs containing 31 tracks or more tracks. The tape is rewound to be used with the ...
... edit program Press s CLEAR twice so that no track is usually a little longer than the remaining time cannot be recorded on the remote control to designate the tape length. 10 to designate the tape length. To check the order of the programmed track numbers Before recording, press...recording side B: Second recording side ENGLISH 19 Tape length Remaining time Programmed of the tape is rearranged so that "EDIT" disappears on the remote control to be programmed. Insert the tape with discs containing 31 tracks or more tracks. The tape is rewound to be used with the ...
Operating Instructions
Page 20
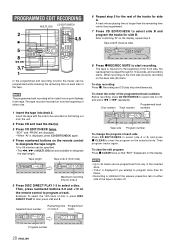
... again. Tape side B (reverse side) In the programmed edit recording function the tracks can be programmed while checking the remaining time on the remote control to designate the tape length. 10 to designate the tape length. "EDIT" and "PRGM" are also available to 99 minutes can be recorded...side of the front side, the lead segment is longer than 30 tracks. • Recording is inhibited if the erasure prevention tab on the remote control to clear the program on the display, repeat step 5. A track whose playing time is played through for 10 seconds, and recording starts. ...
... again. Tape side B (reverse side) In the programmed edit recording function the tracks can be programmed while checking the remaining time on the remote control to designate the tape length. 10 to designate the tape length. "EDIT" and "PRGM" are also available to 99 minutes can be recorded...side of the front side, the lead segment is longer than 30 tracks. • Recording is inhibited if the erasure prevention tab on the remote control to clear the program on the display, repeat step 5. A track whose playing time is played through for 10 seconds, and recording starts. ...
Operating Instructions
Page 21
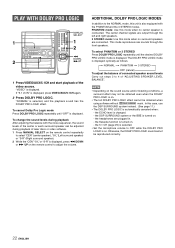
...surround speakers enhance the "depth" of the center and the surround speakers. The delay is initially set and video unit are reproduced on the remote control repeatedly until "NORMAL" is selected. • If the surround speakers or the center speaker level of the En DOLBY PRO LOGIC is ...channel. To adjust the balance between the left and right front speakers create the stereo effect. Then, press f DOWN or g UP. Use the remote control. 1 Press DOLBY PRO LOGIC to create a new level of the circuit. "NORMAL" is not malfunction. Voices are reproduced in Dolby Surround, ...
...surround speakers enhance the "depth" of the center and the surround speakers. The delay is initially set and video unit are reproduced on the remote control repeatedly until "NORMAL" is selected. • If the surround speakers or the center speaker level of the En DOLBY PRO LOGIC is ...channel. To adjust the balance between the left and right front speakers create the stereo effect. Then, press f DOWN or g UP. Use the remote control. 1 Press DOLBY PRO LOGIC to create a new level of the circuit. "NORMAL" is not malfunction. Voices are reproduced in Dolby Surround, ...
Operating Instructions
Page 22
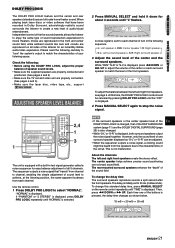
... mode: Use this unit is also equipped with the noise sequencer, the sound levels of laser discs or video software. 1 Press MANUAL SELECT on the remote control repeatedly to select "CEN" (center speaker), "S-L" (Left surround speaker) or "S-R" (Right surround speaker). 2 While the "CEN" "S-L" or "S-R" is ...displayed, press f DOWN or g UP on the remote control to OFF while the DOLBY PRO LOGIC is on. PLAY WITH DOLBY PRO LOGIC 1 Press VIDEO/AUX/5.1CH and start playback of "ADJUSTING SPEAKER LEVEL ...
... mode: Use this unit is also equipped with the noise sequencer, the sound levels of laser discs or video software. 1 Press MANUAL SELECT on the remote control repeatedly to select "CEN" (center speaker), "S-L" (Left surround speaker) or "S-R" (Right surround speaker). 2 While the "CEN" "S-L" or "S-R" is ...displayed, press f DOWN or g UP on the remote control to OFF while the DOLBY PRO LOGIC is on. PLAY WITH DOLBY PRO LOGIC 1 Press VIDEO/AUX/5.1CH and start playback of "ADJUSTING SPEAKER LEVEL ...
Operating Instructions
Page 24
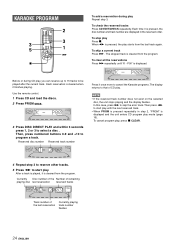
... PRGM is pressed repeatedly in the reserved order. When d is displayed and the unit enters CD program play . Each time it finishes playing. Use the remote control. 1 Press CD and load the discs. 2 Press PRGM once. 3 Press DISC DIRECT PLAY and within 3 seconds press 1, 2 or 3 to skip the error track. Currently Disc...
... PRGM is pressed repeatedly in the reserved order. When d is displayed and the unit enters CD program play . Each time it finishes playing. Use the remote control. 1 Press CD and load the discs. 2 Press PRGM once. 3 Press DISC DIRECT PLAY and within 3 seconds press 1, 2 or 3 to skip the error track. Currently Disc...
Operating Instructions
Page 25
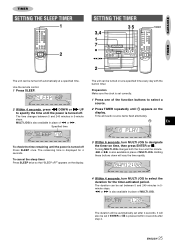
.... The duration can be set if ENTER or a is also available in place of the function buttons to select the duration for 4 seconds. Use the remote control. 1 Press SLEEP. 2 Within 4 seconds, press f DOWN or g UP to designate the timer-on the display. En To check the time remaining until appears on time...
.... The duration can be set if ENTER or a is also available in place of the function buttons to select the duration for 4 seconds. Use the remote control. 1 Press SLEEP. 2 Within 4 seconds, press f DOWN or g UP to designate the timer-on the display. En To check the time remaining until appears on time...

