
Operating Instructions
Page 1
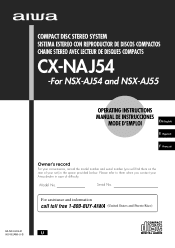
...-01 000102AMI-U-B U COMPACT DISC STEREO SYSTEM SISTEMA ESTEREO CON REPRODUCTOR DE DISCOS COMPACTOS CHAINE STEREO AVEC LECTEUR DE DISQUES COMPACTS CX-NAJ54 -For NSX-AJ54 and NSX-AJ55 OPERATING INSTRUCTIONS MANUAL DE INSTRUCCIONES MODE D'EMPLOI En (English) E (Español) F (Français) Owner's record For your convenience, record the model number and serial number (you will find them when you contact your set) in case of your Aiwa dealer in the...
...-01 000102AMI-U-B U COMPACT DISC STEREO SYSTEM SISTEMA ESTEREO CON REPRODUCTOR DE DISCOS COMPACTOS CHAINE STEREO AVEC LECTEUR DE DISQUES COMPACTS CX-NAJ54 -For NSX-AJ54 and NSX-AJ55 OPERATING INSTRUCTIONS MANUAL DE INSTRUCCIONES MODE D'EMPLOI En (English) E (Español) F (Français) Owner's record For your convenience, record the model number and serial number (you will find them when you contact your set) in case of your Aiwa dealer in the...

Operating Instructions
Page 2
... TO RAIN OR MOISTURE. NO USER-SERVICEABLE PARTS INSIDE. All warnings and cautions in the Operating Instructions and on circuit different from the rear and the top of electric shock to a warm spot - Quick stops, excessive force, and uneven surfaces may block the ventilation openings. - Moisture may cause harmful interference to the power outlet. - Do not pull the cord itself. -
... TO RAIN OR MOISTURE. NO USER-SERVICEABLE PARTS INSIDE. All warnings and cautions in the Operating Instructions and on circuit different from the rear and the top of electric shock to a warm spot - Quick stops, excessive force, and uneven surfaces may block the ventilation openings. - Moisture may cause harmful interference to the power outlet. - Do not pull the cord itself. -
Operating Instructions
Page 3
... CX-NAJ54 Compact disc stereo cassette receiver SX-WNAJ53 Front speakers SX-R275 Surround speakers Remote control AM antenna FM antenna TABLE OF CONTENTS PRECAUTIONS 2 PREPARATIONS CONNECTIONS 4 REMOTE CONTROL 6 BEFORE OPERATION 6 SETTING THE CLOCK 7 SOUND AUDIO ADJUSTMENTS 8 GRAPHIC EQUALIZER 8 RADIO RECEPTION MANUAL TUNING 9 PRESETTING STATIONS 10 TAPE PLAYBACK BASIC OPERATIONS 11 CD PLAYING BASIC OPERATIONS 12 PROGRAMMED PLAY 13 RECORDING BASIC RECORDING 14 DUBBING A TAPE MANUALLY 15 DUBBING THE WHOLE TAPE 15 AI EDIT RECORDING 16 PROGRAMMED EDIT RECORDING 17 En TIMER...
... CX-NAJ54 Compact disc stereo cassette receiver SX-WNAJ53 Front speakers SX-R275 Surround speakers Remote control AM antenna FM antenna TABLE OF CONTENTS PRECAUTIONS 2 PREPARATIONS CONNECTIONS 4 REMOTE CONTROL 6 BEFORE OPERATION 6 SETTING THE CLOCK 7 SOUND AUDIO ADJUSTMENTS 8 GRAPHIC EQUALIZER 8 RADIO RECEPTION MANUAL TUNING 9 PRESETTING STATIONS 10 TAPE PLAYBACK BASIC OPERATIONS 11 CD PLAYING BASIC OPERATIONS 12 PROGRAMMED PLAY 13 RECORDING BASIC RECORDING 14 DUBBING A TAPE MANUALLY 15 DUBBING THE WHOLE TAPE 15 AI EDIT RECORDING 16 PROGRAMMED EDIT RECORDING 17 En TIMER...
Operating Instructions
Page 4
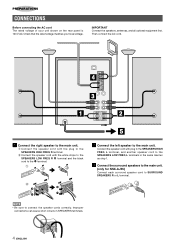
... NSX-AJ55) Connect each surround speaker cord to SURROUND SPEAKERS R or L terminal. • Be sure to connect the speaker cords correctly. Check that the rated voltage matches your unit shown on the rear panel is 120 V AC. IMPORTANT Connect the speakers, antennas, and all optional equipment first. Then connect the AC cord. 1 Connect the right speaker to the main unit. 1 Connect the speaker cord with the plug to the SPEAKERS HIGH FREQ R terminal. 2 Connect...
... NSX-AJ55) Connect each surround speaker cord to SURROUND SPEAKERS R or L terminal. • Be sure to connect the speaker cords correctly. Check that the rated voltage matches your unit shown on the rear panel is 120 V AC. IMPORTANT Connect the speakers, antennas, and all optional equipment first. Then connect the AC cord. 1 Connect the right speaker to the main unit. 1 Connect the speaker cord with the plug to the SPEAKERS HIGH FREQ R terminal. 2 Connect...
Operating Instructions
Page 5
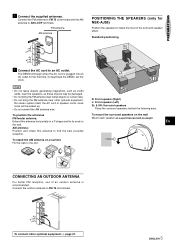
... surround speakers on the wall FM feeder antenna: Mount each speaker on a surface Fix the claw to an AC outlet. The DEMO will be picked up. • Do not unwind the AM antenna wire. PREPARATIONS 4 Connect the supplied antennas. Standard positioning 5 Connect the AC cord to the slot. AM antenna: Position and rotate this antenna horizontally in a T-shape and fix its weight. To deactivate the DEMO, set the clock...
... surround speakers on the wall FM feeder antenna: Mount each speaker on a surface Fix the claw to an AC outlet. The DEMO will be picked up. • Do not unwind the AM antenna wire. PREPARATIONS 4 Connect the supplied antennas. Standard positioning 5 Connect the AC cord to the slot. AM antenna: Position and rotate this antenna horizontally in a T-shape and fix its weight. To deactivate the DEMO, set the clock...

Operating Instructions
Page 6
... the DEMO. ECO AUTO • In addition to the three operations of the display and the buttons brighten for 10 minutes. The line of the inserted disc or tape begins, or the previously tuned station is turned off , and the volume is turned on by conducting four ECO operations as direct sunlight - To use SHIFT on , the disc compartment may not operate correctly when: - When the power is received (Direct Play Function). Playback...
... the DEMO. ECO AUTO • In addition to the three operations of the display and the buttons brighten for 10 minutes. The line of the inserted disc or tape begins, or the previously tuned station is turned off , and the volume is turned on by conducting four ECO operations as direct sunlight - To use SHIFT on , the disc compartment may not operate correctly when: - When the power is received (Direct Play Function). Playback...
Operating Instructions
Page 7
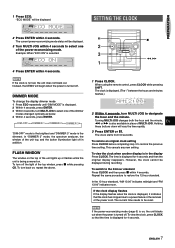
... clock is turned off. When using the remote control, press CLOCK while pressing SHIFT. The time is also available in place of the power cord. Instead, the DEMO will be reset. The clock is the dimmest. Turning MULTI JOG changes both the hour and the minute. En f or g is displayed for 4 seconds. 7 ENGLISH The clock starts from 00 seconds. However, the clock cannot be displayed. If the power-economizing mode...
... clock is turned off. When using the remote control, press CLOCK while pressing SHIFT. The time is also available in place of the power cord. Instead, the DEMO will be reset. The clock is the dimmest. Turning MULTI JOG changes both the hour and the minute. En f or g is displayed for 4 seconds. 7 ENGLISH The clock starts from 00 seconds. However, the clock cannot be displayed. If the power-economizing mode...
Operating Instructions
Page 8
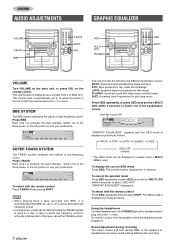
... more. SOUND AUDIO ADJUSTMENTS GRAPHIC EQUALIZER VOLUME Turn VOLUME on the main unit, or press VOL on the remote control. In this case, cancel the T-BASS system. 8 ENGLISH This unit provides the following five different equalization curves. The GEQ mode is output from 0 to 16 when the power is used . The volume level is automatically set to MAX (31). No sound is displayed cyclically as a number from the speakers while the...
... more. SOUND AUDIO ADJUSTMENTS GRAPHIC EQUALIZER VOLUME Turn VOLUME on the main unit, or press VOL on the remote control. In this case, cancel the T-BASS system. 8 ENGLISH This unit provides the following five different equalization curves. The GEQ mode is output from 0 to 16 when the power is used . The volume level is automatically set to MAX (31). No sound is displayed cyclically as a number from the speakers while the...
Operating Instructions
Page 9
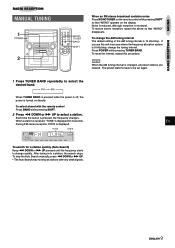
... a band with very weak signals. 9 ENGLISH The preset stations have to be set again. 1 Press TUNER BAND repeatedly to change rapidly. Each time the button is monaural. After tuning in an area where the frequency allocation system is turned on the display. SOUND RADIO RECEPTION RADIO RECEPTION MANUAL TUNING When an FM stereo broadcast contains noise Press MONO TUNER on the remote control while pressing SHIFT so that "MONO" disappears. FM...
... a band with very weak signals. 9 ENGLISH The preset stations have to be set again. 1 Press TUNER BAND repeatedly to change rapidly. Each time the button is monaural. After tuning in an area where the frequency allocation system is turned on the display. SOUND RADIO RECEPTION RADIO RECEPTION MANUAL TUNING When an FM stereo broadcast contains noise Press MONO TUNER on the remote control while pressing SHIFT so that "MONO" disappears. FM...

Operating Instructions
Page 11
... power is opened. To stop the tape. To set to select a deck. The counter is also set the tape counter to play , press s. The selected deck number is designed for Type II tapes. TAPE PLAYBACK RADIO RECEPTION TAPE PLAYBACK BASIC OPERATIONS This unit is displayed. When tapes are loaded in the display. En Tape counter ENGLISH 11 To pause play , press again. To fast forward or rewind, press f or g. Push the cassette...
... power is opened. To stop the tape. To set to select a deck. The counter is also set the tape counter to play , press s. The selected deck number is designed for Type II tapes. TAPE PLAYBACK RADIO RECEPTION TAPE PLAYBACK BASIC OPERATIONS This unit is displayed. When tapes are loaded in the display. En Tape counter ENGLISH 11 To pause play , press again. To fast forward or rewind, press f or g. Push the cassette...
Operating Instructions
Page 12
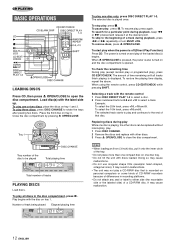
.... When z OPEN/CLOSE is pressed, the power is also turned on tray 3. When using the remote control, press CD EDIT/CHECK while pressing SHIFT. To stop play , press again. Place the third disc on and the disc compartment is playing, the other discs can be played Total playing time Total number of a track during playback, press f or g repeatedly or turn MULTI JOG. The power is displayed. The selected track starts to play one disc only, press DISC DIRECT PLAY 1-3. The...
.... When z OPEN/CLOSE is pressed, the power is also turned on tray 3. When using the remote control, press CD EDIT/CHECK while pressing SHIFT. To stop play , press again. Place the third disc on and the disc compartment is playing, the other discs can be played Total playing time Total number of a track during playback, press f or g repeatedly or turn MULTI JOG. The power is displayed. The selected track starts to play one disc only, press DISC DIRECT PLAY 1-3. The...
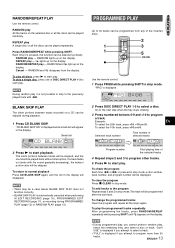
Operating Instructions
Page 13
... displayed . 2 Press DISC DIRECT PLAY 1-3 to normal playback Press CD BLANK SKIP again, and the dot in the display will appear in stop mode. Each time it is automatically canceled when performing AI EDIT RECORDING (page 16), PROGRAMMED EDIT RECORDING (page 17), or recording during playback. 1 Press CD BLANK SKIP. "PRG" is pressed, the function can be skipped during PROGRAMMED PLAY (page 13) or RANDOM PLAY (page 13). CD PLAYING RANDOM/REPEAT PLAY Use the remote control...
... displayed . 2 Press DISC DIRECT PLAY 1-3 to normal playback Press CD BLANK SKIP again, and the dot in the display will appear in stop mode. Each time it is automatically canceled when performing AI EDIT RECORDING (page 16), PROGRAMMED EDIT RECORDING (page 17), or recording during playback. 1 Press CD BLANK SKIP. "PRG" is pressed, the function can be skipped during PROGRAMMED PLAY (page 13) or RANDOM PLAY (page 13). CD PLAYING RANDOM/REPEAT PLAY Use the remote control...
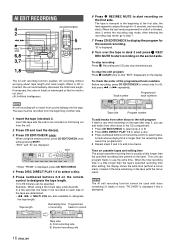
Operating Instructions
Page 14
... the tuner, CD player, or external equipment. To record on into deck 2 and press TAPE DECK 1/2 to display "TP 2". 2 Set the tape to resume recording. Sound adjustment during recording or while in to start simultaneously. To record from a CD, press CD and load the disc(s). To pause recording, press a. (Applicable when the source is CD, playback and recording start recording. To record from a connected source, press VIDEO/AUX. 3 Press w REC/REC MUTE to a station. Each time the button...
... the tuner, CD player, or external equipment. To record on into deck 2 and press TAPE DECK 1/2 to display "TP 2". 2 Set the tape to resume recording. Sound adjustment during recording or while in to start simultaneously. To record from a CD, press CD and load the disc(s). To pause recording, press a. (Applicable when the source is CD, playback and recording start recording. To record from a connected source, press VIDEO/AUX. 3 Press w REC/REC MUTE to a station. Each time the button...
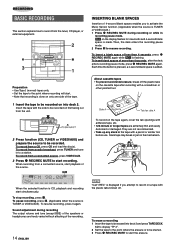
Operating Instructions
Page 16
... the recording stop mode. Time on cassette tapes and editing time The actual cassette recording time is played through for the second recording. AI EDIT RECORDING The AI edit recording function enables CD recording without a minus mark), instead of the time remaining on each side of the tape are determined. • f, g or MULTI JOG are displayed. • When "PRGM" is displayed, press CD EDIT/CHECK. 4 Press DISC DIRECT PLAY 1-3 to select a disc. 5 Press numbered buttons 0-9 on the remote control to...
... the recording stop mode. Time on cassette tapes and editing time The actual cassette recording time is played through for the second recording. AI EDIT RECORDING The AI edit recording function enables CD recording without a minus mark), instead of the time remaining on each side of the tape are determined. • f, g or MULTI JOG are displayed. • When "PRGM" is displayed, press CD EDIT/CHECK. 4 Press DISC DIRECT PLAY 1-3 to select a disc. 5 Press numbered buttons 0-9 on the remote control to...
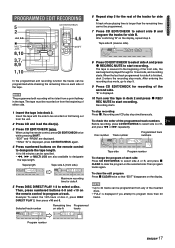
Operating Instructions
Page 17
... the programmed track numbers En Before recording, press CD EDIT/CHECK to step 9. 9 Press CD EDIT/CHECK for side B. After entering the recording stop simultaneously. Recording and CD play stop mode, go to select side A or B, and press f or g repeatedly. Then program tracks again. When using the remote control, press CD EDIT/CHECK twice while pressing SHIFT. Selected track number Remaining time Programmed on the display, repeat step 5. The tape is displayed. 10 Turn over the tape in the tape. After...
... the programmed track numbers En Before recording, press CD EDIT/CHECK to step 9. 9 Press CD EDIT/CHECK for side B. After entering the recording stop simultaneously. Recording and CD play stop mode, go to select side A or B, and press f or g repeatedly. Then program tracks again. When using the remote control, press CD EDIT/CHECK twice while pressing SHIFT. Selected track number Remaining time Programmed on the display, repeat step 5. The tape is displayed. 10 Turn over the tape in the tape. After...
Operating Instructions
Page 19
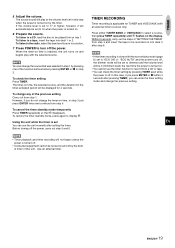
... use the timer function to display 5. Before turning off the power. TIMER RECORDING Timer recording is turned on and off . Within 6 seconds, carry out the steps of the function buttons before pressing ENTER or a in step 3. To listen to a CD, load the disc to be recorded on tray 1. Using the unit while the timer is set to 16 when the power is reached, the unit turns on and begins play at the volume level set...
... use the timer function to display 5. Before turning off the power. TIMER RECORDING Timer recording is turned on and off . Within 6 seconds, carry out the steps of the function buttons before pressing ENTER or a in step 3. To listen to a CD, load the disc to be recorded on tray 1. Using the unit while the timer is set to 16 when the power is reached, the unit turns on and begins play at the volume level set...
Operating Instructions
Page 20
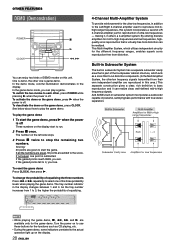
... play the game demo. To change the probability of ultra-low frequencies - making it can be realized. To deactivate the demo or the game demo, press CLOCK. Turn the power on the left side stops. 3 Press s twice to play a game. To activate the demo or the game demo, press c when the power is subtracted. The tray number indicator in the display. This Multi Amplifier System, which acts as CD playing...
... play the game demo. To change the probability of ultra-low frequencies - making it can be realized. To deactivate the demo or the game demo, press CLOCK. Turn the power on the left side stops. 3 Press s twice to play a game. To activate the demo or the game demo, press c when the power is subtracted. The tray number indicator in the display. This Multi Amplifier System, which acts as CD playing...
Operating Instructions
Page 21
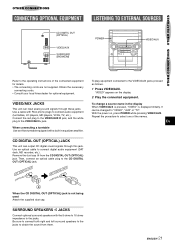
... input analog sound signals through this jack. "VIDEO" appears on , press POWER while pressing VIDEO/AUX. Use an optical cable to obtain the sound from the CD DIGITAL OUT (OPTICAL) jack. Be sure to connect both right and left surround speakers to the jacks to connect digital audio equipment (DAT deck, MD recorder, etc.). VIDEO/AUX JACKS This unit can output CD digital sound signals through these jacks. To change a source name in equalizer amplifier. Then, connect an optical cable plug to the jacks. SURROUND SPEAKERS 3 JACKS Connect optional surround speakers...
... input analog sound signals through this jack. "VIDEO" appears on , press POWER while pressing VIDEO/AUX. Use an optical cable to obtain the sound from the CD DIGITAL OUT (OPTICAL) jack. Be sure to connect both right and left surround speakers to the jacks to connect digital audio equipment (DAT deck, MD recorder, etc.). VIDEO/AUX JACKS This unit can output CD digital sound signals through these jacks. To change a source name in equalizer amplifier. Then, connect an optical cable plug to the jacks. SURROUND SPEAKERS 3 JACKS Connect optional surround speakers...

Operating Instructions
Page 22
... the recording/playback head dirty? (© page 22) CD PLAYER SECTION The CD player does not play. • Is the disc correctly placed? (© page 12) • Is the disc dirty? (© page 22) • Is the lens affected by disconnecting the AC cord, and connect it again in a few seconds. Do not use , clean the tape heads with a separately sold demagnetizing cassette. high frequency sound is...
... the recording/playback head dirty? (© page 22) CD PLAYER SECTION The CD player does not play. • Is the disc correctly placed? (© page 12) • Is the disc dirty? (© page 22) • Is the lens affected by disconnecting the AC cord, and connect it again in a few seconds. Do not use , clean the tape heads with a separately sold demagnetizing cassette. high frequency sound is...
Operating Instructions
Page 23
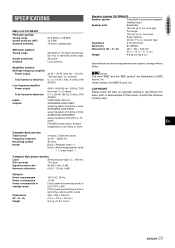
... PHONES (stereo jack): accepts headphones of 32 ohms or more Cassette deck section Track format Frequency response Recording system Heads 4 tracks, 2 channels stereo 50 Hz - 15000 Hz AC bias Deck 1: Playback head × 1 Deck 2: Recording/playback head × 1, erase head × 1 Compact disc player section Laser Semiconductor laser (λ = 780 nm) D/A converter 1 bit dual Signal-to-noise ratio 85 dB (1 kHz, 0 dB) Harmonic distortion 0.05 % (1 kHz, 0 dB) General Power...
... PHONES (stereo jack): accepts headphones of 32 ohms or more Cassette deck section Track format Frequency response Recording system Heads 4 tracks, 2 channels stereo 50 Hz - 15000 Hz AC bias Deck 1: Playback head × 1 Deck 2: Recording/playback head × 1, erase head × 1 Compact disc player section Laser Semiconductor laser (λ = 780 nm) D/A converter 1 bit dual Signal-to-noise ratio 85 dB (1 kHz, 0 dB) Harmonic distortion 0.05 % (1 kHz, 0 dB) General Power...


