User Guide
Page 4
...Setup 40 LAN Settings 41 Wireless Settings 43 Configuring Wireless 43 Encryption 44 Internet Settings 50 Connection Type 50 DNS 55 Hostname & MAC 56 Routing 57 Static Routes 57 RIP Parameters 58 Routing Table 59 Firewall 59 Special Applications 60 Virtual Servers 61 Client IP Filters 62 MAC Address Filtering... 66 DMZ 67 Advanced 68 DDNS 70 SNMP 71 SNMP Community 71 SNMP Trap 72 System Tools 73 Restart Router 73 Reset to Factory Default 73 Backup/Restore Settings 74 ...
...Setup 40 LAN Settings 41 Wireless Settings 43 Configuring Wireless 43 Encryption 44 Internet Settings 50 Connection Type 50 DNS 55 Hostname & MAC 56 Routing 57 Static Routes 57 RIP Parameters 58 Routing Table 59 Firewall 59 Special Applications 60 Virtual Servers 61 Client IP Filters 62 MAC Address Filtering... 66 DMZ 67 Advanced 68 DDNS 70 SNMP 71 SNMP Community 71 SNMP Trap 72 System Tools 73 Restart Router 73 Reset to Factory Default 73 Backup/Restore Settings 74 ...
User Guide
Page 5
... Defaults 80 Wireless Networking 81 Recovering from Corrupted Software 83 Frequently Asked Questions 84 A IP ADDRESSING The Internet Protocol Suite 85 Managing the Router over the Network 85 IP Addresses and Subnet Masks 85 How does a Device Obtain an IP Address and Subnet Mask? 87 DHCP Addressing 87 Static Addressing 87 Auto-IP Addressing 87 B TECHNICAL SPECIFICATIONS OfficeConnect ADSL Wireless 11g Firewall Router...
... Defaults 80 Wireless Networking 81 Recovering from Corrupted Software 83 Frequently Asked Questions 84 A IP ADDRESSING The Internet Protocol Suite 85 Managing the Router over the Network 85 IP Addresses and Subnet Masks 85 How does a Device Obtain an IP Address and Subnet Mask? 87 DHCP Addressing 87 Static Addressing 87 Auto-IP Addressing 87 B TECHNICAL SPECIFICATIONS OfficeConnect ADSL Wireless 11g Firewall Router...
User Guide
Page 34
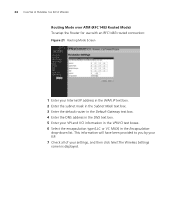
... use with an RFC1483 routed connection: Figure 21 Routing Mode Screen 1 Enter your Internet IP address in the WAN IP text box. 2 Enter the subnet mask in the Subnet Mask text box. 3 Enter the default router in the Default Gateway text box. 4 Enter the DNS address in the Encapsulation drop-down list. This information will... VPI/VCI text boxes. 6 Select the encapsulation type (LLC or VC MUX) in the DNS text box. 5 Enter your settings, and then click Next.The Wireless Settings screen is displayed.
... use with an RFC1483 routed connection: Figure 21 Routing Mode Screen 1 Enter your Internet IP address in the WAN IP text box. 2 Enter the subnet mask in the Subnet Mask text box. 3 Enter the default router in the Default Gateway text box. 4 Enter the DNS address in the Encapsulation drop-down list. This information will... VPI/VCI text boxes. 6 Select the encapsulation type (LLC or VC MUX) in the DNS text box. 5 Enter your settings, and then click Next.The Wireless Settings screen is displayed.

User Guide
Page 39
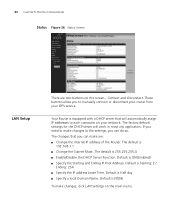
... will appear in Figure 26 on page 40. When you changed the Router LAN IP address during initial configuration, use the new IP address instead. 5 ROUTER CONFIGURATION Navigating Through the Router Configuration Pages This chapter describes all screens is a main menu, as a reference. The default URL is provided as shown in the main part of the...
... will appear in Figure 26 on page 40. When you changed the Router LAN IP address during initial configuration, use the new IP address instead. 5 ROUTER CONFIGURATION Navigating Through the Router Configuration Pages This chapter describes all screens is a main menu, as a reference. The default URL is provided as shown in the main part of the...
User Guide
Page 40
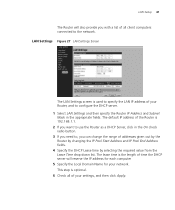
...■ Change the Internal IP address of the Router. Connect and Disconnect. The default is 255.255.255.0 ■ Enable/Disable the DHCP Server Function. The changes that will work in most any application. The default is 192.168.1.1 ■ Change the Subnet Mask. Default is Half day ■... you can make are two buttons on this screen - Your Router is Starting: 2 / Ending: 254 ■ Specify the IP address Lease Time. Default is ON (Enabled) ■ Specify the Starting and Ending IP Pool Address. Default is equipped with a DHCP server that you need to each ...
...■ Change the Internal IP address of the Router. Connect and Disconnect. The default is 255.255.255.0 ■ Enable/Disable the DHCP Server Function. The changes that will work in most any application. The default is 192.168.1.1 ■ Change the Subnet Mask. Default is Half day ■... you can make are two buttons on this screen - Your Router is Starting: 2 / Ending: 254 ■ Specify the IP address Lease Time. Default is ON (Enabled) ■ Specify the Starting and Ending IP Pool Address. Default is equipped with a DHCP server that you need to each ...
User Guide
Page 41
... DHCP server. 1 Select LAN Settings and then specify the Router IP Address and Subnet Mask in the appropriate fields. The default IP address of the Router is used to specify the LAN IP address of addresses given out by the Router by changing the IP Pool Start Address and IP Pool End Address fields. 4 Specify the DHCP Lease time...
... DHCP server. 1 Select LAN Settings and then specify the Router IP Address and Subnet Mask in the appropriate fields. The default IP address of the Router is used to specify the LAN IP address of addresses given out by the Router by changing the IP Pool Start Address and IP Pool End Address fields. 4 Specify the DHCP Lease time...
User Guide
Page 48
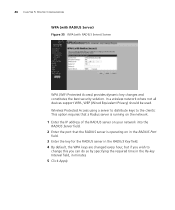
... 1 Enter the IP address of the RADIUS server on your network into the RADIUS Server field. 2 Enter the port that the RADIUS server is operating on in the RADIUS Port field. 3 Enter the key for the RADIUS server in the RADIUS Key field. 4 By default, the WPA keys... Interval field, in minutes 5 Click Apply. 48 CHAPTER 5: ROUTER CONFIGURATION WPA (with RADIUS Server) Figure 35 WPA (with RADIUS Server) Screen WPA (WiFi Protected Access) provides dynamic key changes and constitutes the best security solution. In a wireless network where not all devices support WPA, WEP (Wired Equivalent Privacy...
... 1 Enter the IP address of the RADIUS server on your network into the RADIUS Server field. 2 Enter the port that the RADIUS server is operating on in the RADIUS Port field. 3 Enter the key for the RADIUS server in the RADIUS Key field. 4 By default, the WPA keys... Interval field, in minutes 5 Click Apply. 48 CHAPTER 5: ROUTER CONFIGURATION WPA (with RADIUS Server) Figure 35 WPA (with RADIUS Server) Screen WPA (WiFi Protected Access) provides dynamic key changes and constitutes the best security solution. In a wireless network where not all devices support WPA, WEP (Wired Equivalent Privacy...
User Guide
Page 52
...it at the default value. 10 Click Apply. Re-enter your password in the Retype Password field. 3 If your ISP assigns your IP address dynamically then select Yes in the IP assigned by ISP field. This information is provided to you want your Router to step 4. Then enter the IP address and Subnet... Mask information provided by your ISP into the IP address and Subnet Mask fields. 4 ...
...it at the default value. 10 Click Apply. Re-enter your password in the Retype Password field. 3 If your ISP assigns your IP address dynamically then select Yes in the IP assigned by ISP field. This information is provided to you want your Router to step 4. Then enter the IP address and Subnet... Mask information provided by your ISP into the IP address and Subnet Mask fields. 4 ...
User Guide
Page 54
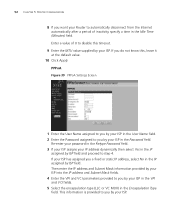
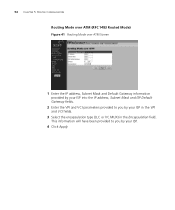
54 CHAPTER 5: ROUTER CONFIGURATION Routing Mode over ATM (RFC 1483 Routed Mode) Figure 41 Routing Mode over ATM Screen 1 Enter the IP address, Subnet Mask and Default Gateway information provided by your ISP into the IP address, Subnet Mask and ISP Default Gateway fields. 2 Enter the VPI and VCI parameters provided to you by your ISP in the VPI and VCI fields. 3 Select the encapsulation type (LLC or VC MUX) in the Encapsulation field. This information will have been provided to you by your ISP. 4 Click Apply.
54 CHAPTER 5: ROUTER CONFIGURATION Routing Mode over ATM (RFC 1483 Routed Mode) Figure 41 Routing Mode over ATM Screen 1 Enter the IP address, Subnet Mask and Default Gateway information provided by your ISP into the IP address, Subnet Mask and ISP Default Gateway fields. 2 Enter the VPI and VCI parameters provided to you by your ISP in the VPI and VCI fields. 3 Select the encapsulation type (LLC or VC MUX) in the Encapsulation field. This information will have been provided to you by your ISP. 4 Click Apply.
User Guide
Page 55
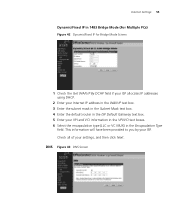
... Bridge Mode Screen 1 Check the Get WAN IP By DCHP field if your ISP allocates IP addresses using DHCP. 2 Enter your Internet IP address in the WAN IP text box. 3 Enter the subnet mask in the Subnet Mask text box. 4 Enter the default router in the ISP Default Gateway text box. 5 Enter your VPI and VCI information...
... Bridge Mode Screen 1 Check the Get WAN IP By DCHP field if your ISP allocates IP addresses using DHCP. 2 Enter your Internet IP address in the WAN IP text box. 3 Enter the subnet mask in the Subnet Mask text box. 4 Enter the default router in the ISP Default Gateway text box. 5 Enter your VPI and VCI information...

User Guide
Page 56
... connected directly to the cable modem, select Clone or ■ To reset the MAC Address to the default, select Reset MAC. 3 Click Apply to save the settings. If you are now using a Static IP connection type, then you do not have to enter a DNS address. Hostname & MAC To configure the..., it is the one that you may need to enter a specific DNS address and secondary DNS address for your Router, select Internet Settings, then from the sub-menu select Hostname & MAC. 56 CHAPTER 5: ROUTER CONFIGURATION If your ISP provided you with specific DNS addresses to use, enter them into the...
... connected directly to the cable modem, select Clone or ■ To reset the MAC Address to the default, select Reset MAC. 3 Click Apply to save the settings. If you are now using a Static IP connection type, then you do not have to enter a DNS address. Hostname & MAC To configure the..., it is the one that you may need to enter a specific DNS address and secondary DNS address for your Router, select Internet Settings, then from the sub-menu select Hostname & MAC. 56 CHAPTER 5: ROUTER CONFIGURATION If your ISP provided you with specific DNS addresses to use, enter them into the...

User Guide
Page 70
70 CHAPTER 5: ROUTER CONFIGURATION DDNS The Router provides a list of dynamic DNS providers for you to make this service active. Before you can be either TZO.com or DynDNS. DDNS is disabled by default. DynDNS If you to map a static domain name to display the screen shown in Figure 59. This ...Service Provider from the drop-down list. TZO.com If you must obtain an account, password and static domain name from . Select DDNS to a dynamic IP address. Dynamic Domain Name Server (DDNS) enables you select DYNDNS: 1 In the Domain Name text box, enter the domain name. 2 In the ...
70 CHAPTER 5: ROUTER CONFIGURATION DDNS The Router provides a list of dynamic DNS providers for you to make this service active. Before you can be either TZO.com or DynDNS. DDNS is disabled by default. DynDNS If you to map a static domain name to display the screen shown in Figure 59. This ...Service Provider from the drop-down list. TZO.com If you must obtain an account, password and static domain name from . Select DDNS to a dynamic IP address. Dynamic Domain Name Server (DDNS) enables you select DYNDNS: 1 In the Domain Name text box, enter the domain name. 2 In the ...

User Guide
Page 80
... screens as required by your computers are not configured to use a Web proxy. Forgotten Password and Reset to Factory Defaults If you can re-establish your Router connection to the Internet. On Windows computers, this . ■ Check that the PPPoE or PPPoA user name and password ...has an IP address of the Router). Use the Internet Settings screen to verify this can browse to the Router configuration screens but cannot log on the Router is illuminated. ■ Ensure that you have forgotten the password, follow the steps below to reset the Router to its factory default configuration....
... screens as required by your computers are not configured to use a Web proxy. Forgotten Password and Reset to Factory Defaults If you can re-establish your Router connection to the Internet. On Windows computers, this . ■ Check that the PPPoE or PPPoA user name and password ...has an IP address of the Router). Use the Internet Settings screen to verify this can browse to the Router configuration screens but cannot log on the Router is illuminated. ■ Ensure that you have forgotten the password, follow the steps below to reset the Router to its factory default configuration....

User Guide
Page 116
... NIC wireless 14 P Password 27, 75 Poison Reverse 58 PPPoA 31 PPPoA Screen 31 PPPoA Settings Screen 52 PPPoE 26, 30, 31 PPPoE Screen 30 PPPoE Settings Screen 51 R Remote Admin 68 Reset to Factory Default Screen 73 Reset to Factory Defaults 80 Restart Router Screen 73 RFC 1483 Bridged Mode 32, 53 RFC... technical 89 SSID 31, 32, 33, 35, 36, 43 Static Addressing 87 Static Route Parameters Screen 57 Status Screen 28, 40 Subnet Mask 85 T TCP/IP 23, 25, 85 Technical specifications 89 standards 89 Time and Time Zone screen 76 TZO.com 70 U Universal Plug and Play 68 Upgrade Screen 74...
... NIC wireless 14 P Password 27, 75 Poison Reverse 58 PPPoA 31 PPPoA Screen 31 PPPoA Settings Screen 52 PPPoE 26, 30, 31 PPPoE Screen 30 PPPoE Settings Screen 51 R Remote Admin 68 Reset to Factory Default Screen 73 Reset to Factory Defaults 80 Restart Router Screen 73 RFC 1483 Bridged Mode 32, 53 RFC... technical 89 SSID 31, 32, 33, 35, 36, 43 Static Addressing 87 Static Route Parameters Screen 57 Status Screen 28, 40 Subnet Mask 85 T TCP/IP 23, 25, 85 Technical specifications 89 standards 89 Time and Time Zone screen 76 TZO.com 70 U Universal Plug and Play 68 Upgrade Screen 74...

