
Getting Started Guide
Page 1
DUA1740-0AAA03 Rev. 01 Published September 2004 SuperStack® 3 Switch 3812, Switch 3824, and Switch 3848 Getting Started Guide 3C17401 3C17400 3CR17402-91 http://www.3com.com/ Part No.
DUA1740-0AAA03 Rev. 01 Published September 2004 SuperStack® 3 Switch 3812, Switch 3824, and Switch 3848 Getting Started Guide 3C17401 3C17400 3CR17402-91 http://www.3com.com/ Part No.
Getting Started Guide
Page 3
...-T/ 100BASE-TX/ 1000BASE-T Ports 14 Dual Personality SFP Ports 14 Console Port 14 LEDs 15 Switch - CONTENTS ABOUT THIS GUIDE Conventions 8 Related Documentation 9 Accessing Online Documentation 9 Documentation Comments 10 1 INTRODUCING THE SUPERSTACK 3 SWITCH 3812, SWITCH 3824, AND SWITCH 3848 About the Switch 12 Summary of LEDs 23 Rear View Detail 16 Power Socket 17 Redundant Power System...
...-T/ 100BASE-TX/ 1000BASE-T Ports 14 Dual Personality SFP Ports 14 Console Port 14 LEDs 15 Switch - CONTENTS ABOUT THIS GUIDE Conventions 8 Related Documentation 9 Accessing Online Documentation 9 Documentation Comments 10 1 INTRODUCING THE SUPERSTACK 3 SWITCH 3812, SWITCH 3824, AND SWITCH 3848 About the Switch 12 Summary of LEDs 23 Rear View Detail 16 Power Socket 17 Redundant Power System...
Getting Started Guide
Page 4
Connecting a Redundant Power Supply (Switch 3848 only) 23 Choosing the Correct Cables 24 SFP Operation 25 Approved SFP Transceivers 25 Inserting an SFP Transceiver 25 Removing an SFP Transceiver 27 3 ... 32 Manually Configuring IP Information 32 Connecting to the Console Port 32 Viewing Automatically Configured IP Information 36 Using 3Com Network Supervisor 36 Connecting to the Console Port 36 Methods of Managing a Switch 39 Command Line Interface Management 39 Web Interface Management 40 SNMP Management 40 Setting Up Command Line Interface Management...
Connecting a Redundant Power Supply (Switch 3848 only) 23 Choosing the Correct Cables 24 SFP Operation 25 Approved SFP Transceivers 25 Inserting an SFP Transceiver 25 Removing an SFP Transceiver 27 3 ... 32 Manually Configuring IP Information 32 Connecting to the Console Port 32 Viewing Automatically Configured IP Information 36 Using 3Com Network Supervisor 36 Connecting to the Console Port 36 Methods of Managing a Switch 39 Command Line Interface Management 39 Web Interface Management 40 SNMP Management 40 Setting Up Command Line Interface Management...
Getting Started Guide
Page 5
A SAFETY INFORMATION Important Safety Information 52 L'information de Sécurité Importante 54 Wichtige Sicherheitsinformationen 56 Power Cord Set - Japan 57 B PIN-OUTS Null Modem Cable 59 PC-AT Serial Cable 60 Modem Cable 61 RJ-45 Pin Assignments 61 C TECHNICAL SPECIFICATIONS Switch 3812, Switch 3824, and Switch 3848 63 D OBTAINING SUPPORT FOR YOUR PRODUCT Register Your Product to Gain Service Benefits 65 Purchase Value-Added Services 65 Troubleshoot Online 65 Access Software Downloads 66 Contact Us 66 Telephone Technical Support and Repair 66 INDEX REGULATORY NOTICES
A SAFETY INFORMATION Important Safety Information 52 L'information de Sécurité Importante 54 Wichtige Sicherheitsinformationen 56 Power Cord Set - Japan 57 B PIN-OUTS Null Modem Cable 59 PC-AT Serial Cable 60 Modem Cable 61 RJ-45 Pin Assignments 61 C TECHNICAL SPECIFICATIONS Switch 3812, Switch 3824, and Switch 3848 63 D OBTAINING SUPPORT FOR YOUR PRODUCT Register Your Product to Gain Service Benefits 65 Purchase Value-Added Services 65 Troubleshoot Online 65 Access Software Downloads 66 Contact Us 66 Telephone Technical Support and Repair 66 INDEX REGULATORY NOTICES

Getting Started Guide
Page 7
... guide is intended for the following: ■ Management Interface Reference Guide - Please refer to install and use 3Com® SuperStack® 3 Switch 3812 (3C17401), Switch 3824 (3C17400), or Switch 3848 (3CR17402-91) in its default state. If the information in the release notes that accompanies your product ... in the release notes. Most user guides and release notes are responsible for small to the 3Com SuperStack 3 Switch 3812, Switch 3824, or Switch 3848. ■ 3Com Network Supervisor - ABOUT THIS GUIDE This guide provides all the information you detailed information on the...
... guide is intended for the following: ■ Management Interface Reference Guide - Please refer to install and use 3Com® SuperStack® 3 Switch 3812 (3C17401), Switch 3824 (3C17400), or Switch 3848 (3CR17402-91) in its default state. If the information in the release notes that accompanies your product ... in the release notes. Most user guides and release notes are responsible for small to the 3Com SuperStack 3 Switch 3812, Switch 3824, or Switch 3848. ■ 3Com Network Supervisor - ABOUT THIS GUIDE This guide provides all the information you detailed information on the...
Getting Started Guide
Page 9
...Switch. Related Documentation 9 Related Documentation In addition to this guide, each Switch documentation set includes the following online documentation: ■ Switch Implementation Guide (PDF format). ■ Switch Management Interface Reference Guide (HTML format). ■ Other documentation relating to the Switch 3812, Switch 3824, or Switch... 3848 (PDF format). It is supplied on the features supported by each Switch. ■ a summary of the web interface and command line interface commands for the Switch...accompanies the Switch. ■ Management...
...Switch. Related Documentation 9 Related Documentation In addition to this guide, each Switch documentation set includes the following online documentation: ■ Switch Implementation Guide (PDF format). ■ Switch Management Interface Reference Guide (HTML format). ■ Other documentation relating to the Switch 3812, Switch 3824, or Switch... 3848 (PDF format). It is supplied on the features supported by each Switch. ■ a summary of the web interface and command line interface commands for the Switch...accompanies the Switch. ■ Management...
Getting Started Guide
Page 10
... help make our documentation more useful to 3Com at: pddtechpubs_comments@3com.com Please include the following information when commenting: Document title, Document part number (on the CD-ROM. Example: Part Number DUA1740-0AAA03 SuperStack 3 Switch 3812, Switch 3824, and Switch 3848 Getting Started Guide Page 10 If ...page) and Page number (if appropriate). Documentation Comments Your suggestions are very important to maintain the structure of the CD-ROM. 3Com recommends that you will be displayed automatically. 2 Select the Documentation section from the CD-ROM: 1 Insert the CD-ROM ...
... help make our documentation more useful to 3Com at: pddtechpubs_comments@3com.com Please include the following information when commenting: Document title, Document part number (on the CD-ROM. Example: Part Number DUA1740-0AAA03 SuperStack 3 Switch 3812, Switch 3824, and Switch 3848 Getting Started Guide Page 10 If ...page) and Page number (if appropriate). Documentation Comments Your suggestions are very important to maintain the structure of the CD-ROM. 3Com recommends that you will be displayed automatically. 2 Select the Documentation section from the CD-ROM: 1 Insert the CD-ROM ...
Getting Started Guide
Page 11
1 INTRODUCING THE SUPERSTACK 3 SWITCH 3812, SWITCH 3824, AND SWITCH 3848 This chapter contains introductory information about the hardware and the following topics: ■ About the Switch ■ Switch - It covers summary information about the Switch 3812, Switch 3824, and Switch 3848 and how they can be used in your network. Front View Detail ■ Switch - Rear View Detail ■ Default Settings
1 INTRODUCING THE SUPERSTACK 3 SWITCH 3812, SWITCH 3824, AND SWITCH 3848 This chapter contains introductory information about the hardware and the following topics: ■ About the Switch ■ Switch - It covers summary information about the Switch 3812, Switch 3824, and Switch 3848 and how they can be used in your network. Front View Detail ■ Switch - Rear View Detail ■ Default Settings
Getting Started Guide
Page 12
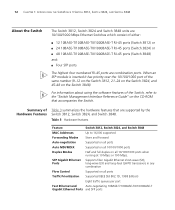
...), long-wave (LX) and long-haul (LH70) transceivers in any combination Flow Control Supported on the Switch 3848). 12 CHAPTER 1: INTRODUCING THE SUPERSTACK 3 SWITCH 3812, SWITCH 3824, AND SWITCH 3848 About the Switch The Switch 3812, Switch 3824 and Switch 3848 units are 10/100/1000 Mbps Ethernet Switches which consist of either: ■ 12 10BASE-T/100BASE-TX/1000BASE-T RJ-45 ports...
...), long-wave (LX) and long-haul (LH70) transceivers in any combination Flow Control Supported on the Switch 3848). 12 CHAPTER 1: INTRODUCING THE SUPERSTACK 3 SWITCH 3812, SWITCH 3824, AND SWITCH 3848 About the Switch The Switch 3812, Switch 3824 and Switch 3848 units are 10/100/1000 Mbps Ethernet Switches which consist of either: ■ 12 10BASE-T/100BASE-TX/1000BASE-T RJ-45 ports...
Getting Started Guide
Page 13
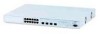
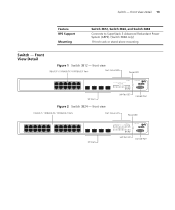
front view Front View Detail Feature RPS Support Mounting Switch 3812, Switch 3824, and Switch 3848 Connects to SuperStack 3 Advanced Redundant Power System (ARPS). (Switch 3848 only) 19-inch rack or stand-alone mounting Figure 1 Switch 3812 - Front View Detail 13 Switch - Switch - front view Figure 2 Switch 3824 -
front view Front View Detail Feature RPS Support Mounting Switch 3812, Switch 3824, and Switch 3848 Connects to SuperStack 3 Advanced Redundant Power System (ARPS). (Switch 3848 only) 19-inch rack or stand-alone mounting Figure 1 Switch 3812 - Front View Detail 13 Switch - Switch - front view Figure 2 Switch 3824 -
Getting Started Guide
Page 14
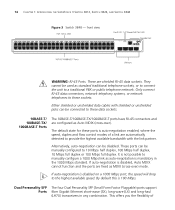
... the flexibility of a link are fixed as Auto MDIX (cross-over ) mode. These are configured as MDIX (cross-over ). 14 CHAPTER 1: INTRODUCING THE SUPERSTACK 3 SWITCH 3812, SWITCH 3824, AND SWITCH 3848 Figure 3 Switch 3848 - They cannot be disabled. Dual Personality SFP The four Dual Personality SFP (Small Form Factor Pluggable) ports support Ports fiber Gigabit Ethernet...
... the flexibility of a link are fixed as Auto MDIX (cross-over ) mode. These are configured as MDIX (cross-over ). 14 CHAPTER 1: INTRODUCING THE SUPERSTACK 3 SWITCH 3812, SWITCH 3824, AND SWITCH 3848 Figure 3 Switch 3848 - They cannot be disabled. Dual Personality SFP The four Dual Personality SFP (Small Form Factor Pluggable) ports support Ports fiber Gigabit Ethernet...
Getting Started Guide
Page 15
...Mbps) link is present, and the port is set to autobaud (up to color. Console Port The console port allows you to your PC. The Switch 3812 and Switch 3824 have a DB-9 serial connector and need a serial cable to connect to connect a terminal and perform remote or local out-of-band management.... Green for one second, Amber for Correct Operation of LEDs" on the front of the Switch, and how to read their status according to a maximum of auto-negotiating flow control. As the speed and duplex modes are capable of 19,200...
...Mbps) link is present, and the port is set to autobaud (up to color. Console Port The console port allows you to your PC. The Switch 3812 and Switch 3824 have a DB-9 serial connector and need a serial cable to connect to connect a terminal and perform remote or local out-of-band management.... Green for one second, Amber for Correct Operation of LEDs" on the front of the Switch, and how to read their status according to a maximum of auto-negotiating flow control. As the speed and duplex modes are capable of 19,200...
Getting Started Guide
Page 16
...running a Power On Self Test). Green flashing The Switch is either downloading software or is booting-up. Fans are above critical temperature but below critical temperature. 16 CHAPTER 1: INTRODUCING THE SUPERSTACK 3 SWITCH 3812, SWITCH 3824, AND SWITCH 3848 LED Color Indicates Off No link is a ...fault with the Power Supply Unit. Red The Switch has a fault with the Power Supply unit. Off The Switch is not receiving power or there is...
...running a Power On Self Test). Green flashing The Switch is either downloading software or is booting-up. Fans are above critical temperature but below critical temperature. 16 CHAPTER 1: INTRODUCING THE SUPERSTACK 3 SWITCH 3812, SWITCH 3824, AND SWITCH 3848 LED Color Indicates Off No link is a ...fault with the Power Supply Unit. Red The Switch has a fault with the Power Supply unit. Off The Switch is not receiving power or there is...
Getting Started Guide
Page 17
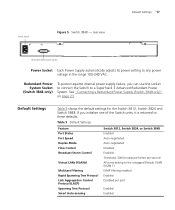
...power supply failure, you initialize one of the Switch units, it is returned to a SuperStack 3 Advanced Redundant Power System. If you can use this socket to connect the Switch to these defaults. See "Connecting a Redundant Power Supply (Switch 3848 only)" on page 23. Table 5...(VLANs) Multicast Filtering Rapid Spanning Tree Protocol Link Aggregation Control Protocol (LACP) Spanning Tree Protocol Smart Auto-sensing Switch 3812, Switch 3824, or Switch 3848 Enabled Auto-negotiated Auto-negotiated Disabled Enabled Threshold: 3000 broadcast frames per second All ports belong to any ...
...power supply failure, you initialize one of the Switch units, it is returned to a SuperStack 3 Advanced Redundant Power System. If you can use this socket to connect the Switch to these defaults. See "Connecting a Redundant Power Supply (Switch 3848 only)" on page 23. Table 5...(VLANs) Multicast Filtering Rapid Spanning Tree Protocol Link Aggregation Control Protocol (LACP) Spanning Tree Protocol Smart Auto-sensing Switch 3812, Switch 3824, or Switch 3848 Enabled Auto-negotiated Auto-negotiated Disabled Enabled Threshold: 3000 broadcast frames per second All ports belong to any ...
Getting Started Guide
Page 18
18 CHAPTER 1: INTRODUCING THE SUPERSTACK 3 SWITCH 3812, SWITCH 3824, AND SWITCH 3848 If you initialize a Switch unit by selecting System > Control > Initialize in the Web interface or by entering system control initialize in the Command Line Interface, the following settings are retained to allow you to connect to and manage the Switch: ■ IP Address ■ Subnet Mask ■ Default Gateway
18 CHAPTER 1: INTRODUCING THE SUPERSTACK 3 SWITCH 3812, SWITCH 3824, AND SWITCH 3848 If you initialize a Switch unit by selecting System > Control > Initialize in the Web interface or by entering system control initialize in the Command Line Interface, the following settings are retained to allow you to connect to and manage the Switch: ■ IP Address ■ Subnet Mask ■ Default Gateway
Getting Started Guide
Page 19
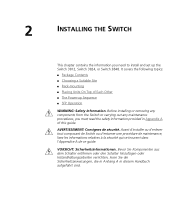
..., lesen Sie die Sicherheitsanweisungen, die in Anhang A in Appendix A of Each Other ■ The Power-up the Switch 3812, Switch 3824, or Switch 3848. 2 INSTALLING THE SWITCH This chapter contains the information you must read the safety information provided in diesem Handbuch aufgeführt sind. It covers...Suitable Site ■ Rack-mounting ■ Placing Units On Top of this guide. Before installing or removing any components from the Switch or carrying out any maintenance procedures, you need to install and set up Sequence ■ SFP Operation WARNING: Safety Information.
..., lesen Sie die Sicherheitsanweisungen, die in Anhang A in Appendix A of Each Other ■ The Power-up the Switch 3812, Switch 3824, or Switch 3848. 2 INSTALLING THE SWITCH This chapter contains the information you must read the safety information provided in diesem Handbuch aufgeführt sind. It covers...Suitable Site ■ Rack-mounting ■ Placing Units On Top of this guide. Before installing or removing any components from the Switch or carrying out any maintenance procedures, you need to install and set up Sequence ■ SFP Operation WARNING: Safety Information.
Getting Started Guide
Page 20
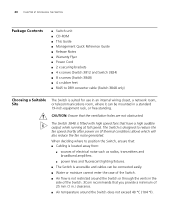
...9632; Power Cord ■ 2 x securing brackets ■ 4 x screws (Switch 3812 and Switch 3824) ■ 8 x screws (Switch 3848) ■ 4 x rubber feet ■ RJ45 to DB9 converter cable (Switch 3848 only) Choosing a Suitable Site The Switch is suited for use in an internal wiring closet, a network room, or ...be mounted in .) clearance. ■ Air temperature around the Switch or through the vents in the side of the Switch. 3Com recommends that you provide a minimum of the Switch. ■ Air flow is not restricted around the Switch does not exceed 40 °C (104 °F).
...9632; Power Cord ■ 2 x securing brackets ■ 4 x screws (Switch 3812 and Switch 3824) ■ 8 x screws (Switch 3848) ■ 4 x rubber feet ■ RJ45 to DB9 converter cable (Switch 3848 only) Choosing a Suitable Site The Switch is suited for use in an internal wiring closet, a network room, or ...be mounted in .) clearance. ■ Air temperature around the Switch or through the vents in the side of the Switch. 3Com recommends that you provide a minimum of the Switch. ■ Air flow is not restricted around the Switch does not exceed 40 °C (104 °F).
Getting Started Guide
Page 21
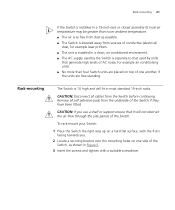
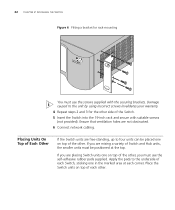
...temperature. ■ The air is as free from dust as shown in a clean, air conditioned environment. ■ The AC supply used by the Switch is 1U high and will not obstruct the air flow through the side panels of conductive (electrical) dust, for example laser printers. ■ The ...unit is installed in Figure 6. 3 Insert the screws and tighten with a suitable screwdriver. Remove all cables from the Switch before continuing. Rack-mounting The Switch is separate to that used by units that it will fit in most standard 19-inch racks. To rack-mount your...
...temperature. ■ The air is as free from dust as shown in a clean, air conditioned environment. ■ The AC supply used by the Switch is 1U high and will not obstruct the air flow through the side panels of conductive (electrical) dust, for example laser printers. ■ The ...unit is installed in Figure 6. 3 Insert the screws and tighten with a suitable screwdriver. Remove all cables from the Switch before continuing. Rack-mounting The Switch is separate to that used by units that it will fit in most standard 19-inch racks. To rack-mount your...
Getting Started Guide
Page 22
... the pads to four units can be positioned at each corner. If you must use the screws supplied with suitable screws (not provided). Place the Switch units on top of the other side of the other . Ensure that ventilation holes are mixing a variety of each... are free-standing, up to the underside of each other , you are not obstructed. 6 Connect network cabling. 22 CHAPTER 2: INSTALLING THE SWITCH Figure 6 Fitting a bracket for the other . Damage caused to the unit by using incorrect screws invalidates your warranty. 4 Repeat steps 2 and 3 for rack-mounting You ...
... the pads to four units can be positioned at each corner. If you must use the screws supplied with suitable screws (not provided). Place the Switch units on top of the other side of the other . Ensure that ventilation holes are mixing a variety of each... are free-standing, up to the underside of each other , you are not obstructed. 6 Connect network cabling. 22 CHAPTER 2: INSTALLING THE SWITCH Figure 6 Fitting a bracket for the other . Damage caused to the unit by using incorrect screws invalidates your warranty. 4 Repeat steps 2 and 3 for rack-mounting You ...
Getting Started Guide
Page 23
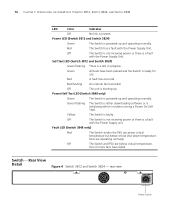
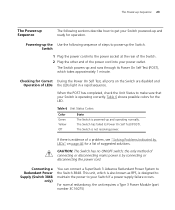
.... Powering-up the Use the following sections describe how to get your Switch powered-up and ready for the LED. Connecting a Redundant Power Supply (Switch 3848 only) You can connect a SuperStack 3 Advance Redundant Power System to your Switch if a power supply failure occurs. Switch 1 Plug the power cord into your power outlet. Table 6 shows possible...
.... Powering-up the Use the following sections describe how to get your Switch powered-up and ready for the LED. Connecting a Redundant Power Supply (Switch 3848 only) You can connect a SuperStack 3 Advance Redundant Power System to your Switch if a power supply failure occurs. Switch 1 Plug the power cord into your power outlet. Table 6 shows possible...


