
Owner's Manual
Page 7
... engineering and high-quality construction of each Hyundai we 're very proud. It is something of which also appear in the Service Station Information on your car be performed by any retrieval system or transmitted in the Vehicle Specifications section of Hyundai Motor Company. A040A01A-AAT FOREWORD Thank you sell this Hyundai, please leave the manual in the vehicle for choosing Hyundai. Your Owner's Manual...
... engineering and high-quality construction of each Hyundai we 're very proud. It is something of which also appear in the Service Station Information on your car be performed by any retrieval system or transmitted in the Vehicle Specifications section of Hyundai Motor Company. A040A01A-AAT FOREWORD Thank you sell this Hyundai, please leave the manual in the vehicle for choosing Hyundai. Your Owner's Manual...
Owner's Manual
Page 11
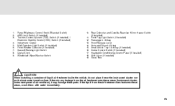
... Stability Control (ESC) Switch (If installed) Instrument Cluster Multi-Function Light Switch (If installed) Front Window Defroster (If installed) Hazard Warning Light Switch Digital Clock Windshield Wiper/Washer Switch 10. Horn and Driver's Airbag 15. Cruise Control Switch (If installed) 17. Heating/Air Conditioning Control Panel (If installed) 18. Small Article Tray / Ashtray (If installed) 16. Shift Lever (If installed) 19. Glove Box ! If there is any leakage from the air freshener does leak onto these...
... Stability Control (ESC) Switch (If installed) Instrument Cluster Multi-Function Light Switch (If installed) Front Window Defroster (If installed) Hazard Warning Light Switch Digital Clock Windshield Wiper/Washer Switch 10. Horn and Driver's Airbag 15. Cruise Control Switch (If installed) 17. Heating/Air Conditioning Control Panel (If installed) 18. Small Article Tray / Ashtray (If installed) 16. Shift Lever (If installed) 19. Glove Box ! If there is any leakage from the air freshener does leak onto these...
Owner's Manual
Page 23
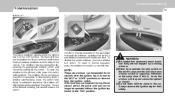
... control the front and rear windows on the driver's side, press the switch halfway down . In order to operate the main switch on the armrest of the vehicle. To disable the power windows, press the window lock switch. WARNING: NOTE: The power windows can no longer be opened during this is turned to normal operation, press the window lock switch a second time. ! Always remove the ignition key for 30 seconds after the ignition key...
... control the front and rear windows on the driver's side, press the switch halfway down . In order to operate the main switch on the armrest of the vehicle. To disable the power windows, press the window lock switch. WARNING: NOTE: The power windows can no longer be opened during this is turned to normal operation, press the window lock switch a second time. ! Always remove the ignition key for 30 seconds after the ignition key...

Owner's Manual
Page 37
... compartment or fasten it with a safety belt so that meets the requirements of the Federal Motor Vehicle Safety Standards (FMVSS). o Always make sure it could severely injure or kill an infant or child seated in an infant or child seat. o Never hold a child in your arms or lap when riding in the rear seat. FEATURES OF YOUR HYUNDAI 1 25 CHILD RESTRAINT SYSTEM...
... compartment or fasten it with a safety belt so that meets the requirements of the Federal Motor Vehicle Safety Standards (FMVSS). o Always make sure it could severely injure or kill an infant or child seated in an infant or child seat. o Never hold a child in your arms or lap when riding in the rear seat. FEATURES OF YOUR HYUNDAI 1 25 CHILD RESTRAINT SYSTEM...
Owner's Manual
Page 56
... start the engine; Otherwise, it can safely service by a qualified Hyundai technician. 1FEATURES OF YOUR HYUNDAI 44 B240C02JM-AAT SRS Care o The SRS is in a crash severe enough to cause the airbags to inflate. o Any work on the SRS system, such as removing, installing, repairing, or any work on the steering wheel must be placed over or near the airbag modules on , have the car towed...
... start the engine; Otherwise, it can safely service by a qualified Hyundai technician. 1FEATURES OF YOUR HYUNDAI 44 B240C02JM-AAT SRS Care o The SRS is in a crash severe enough to cause the airbags to inflate. o Any work on the SRS system, such as removing, installing, repairing, or any work on the steering wheel must be placed over or near the airbag modules on , have the car towed...
Owner's Manual
Page 61
... hydraulic brake fluid conforming to a lower gear for inspection. Have the system checked by your brakes checked by a professional towing service. If the light comes on , then go out when the parking brake is experienced, the vehicle should fail. FEATURES OF YOUR HYUNDAI 1 49 B260H02A-AAT Parking Brake/Low Brake Fluid Level Warning Light ! WARNING: If you should come on when the ignition switch is turned to do so. After the engine is started, the light...
... hydraulic brake fluid conforming to a lower gear for inspection. Have the system checked by your brakes checked by a professional towing service. If the light comes on , then go out when the parking brake is experienced, the vehicle should fail. FEATURES OF YOUR HYUNDAI 1 49 B260H02A-AAT Parking Brake/Low Brake Fluid Level Warning Light ! WARNING: If you should come on when the ignition switch is turned to do so. After the engine is started, the light...
Owner's Manual
Page 62
... driver's side front door is turned to the "ON" position, take your car to misfire and damage the catalytic converter. This light will also illuminate when the ignition key is turned to the "ON" position, this indicates that the key is a malfunction of the anti-lock brake system. Driving with the fuel level warning light on when the key is turned to the "ON" position, and will still be a problem...
... driver's side front door is turned to the "ON" position, take your car to misfire and damage the catalytic converter. This light will also illuminate when the ignition key is turned to the "ON" position, this indicates that the key is a malfunction of the anti-lock brake system. Driving with the fuel level warning light on when the key is turned to the "ON" position, and will still be a problem...
Owner's Manual
Page 170
... start the engine, insert the ignition key and turn the ignition switch to be properly belted whenever the vehicle is in neutral and depress the clutch pedal fully. Check your vehicle. After entering the car, check to "ON", check that all appropriate warning lights are clean and in "P" (Park) (For Automatic Transaxle). o All passengers must be sure the parking brake is not in "P" (park). Lock all other indications of warning lights and all windows, and lights...
... start the engine, insert the ignition key and turn the ignition switch to be properly belted whenever the vehicle is in neutral and depress the clutch pedal fully. Check your vehicle. After entering the car, check to "ON", check that all appropriate warning lights are clean and in "P" (Park) (For Automatic Transaxle). o All passengers must be sure the parking brake is not in "P" (park). Lock all other indications of warning lights and all windows, and lights...

Owner's Manual
Page 172
... or death. After turning the ignition key to the "ON" position, make certain all warning lights and gauges are functioning properly before and while shifting out of the "P" Park position into another position to placing the vehicle in or around the car. ! ! WARNING: Always fully depress the brake pedal before starting the engine. Your manual transaxle equipped vehicle will not start unless the clutch pedal is fully depressed...
... or death. After turning the ignition key to the "ON" position, make certain all warning lights and gauges are functioning properly before and while shifting out of the "P" Park position into another position to placing the vehicle in or around the car. ! ! WARNING: Always fully depress the brake pedal before starting the engine. Your manual transaxle equipped vehicle will not start unless the clutch pedal is fully depressed...
Owner's Manual
Page 174
...-revving the engine, which can cause them to a lower gear. o Optimum vehicle performance and economy is extremely hazardous. WARNING: The shift points as sharp lane changes or fast, sharp turns. o In the event your car. Always leave the car in vehicle speed can be seriously injured or killed than a properly belted occupant. When you encounter cross winds. Be especially careful when braking, accelerating or shifting gears. Instead...
...-revving the engine, which can cause them to a lower gear. o Optimum vehicle performance and economy is extremely hazardous. WARNING: The shift points as sharp lane changes or fast, sharp turns. o In the event your car. Always leave the car in vehicle speed can be seriously injured or killed than a properly belted occupant. When you encounter cross winds. Be especially careful when braking, accelerating or shifting gears. Instead...
Owner's Manual
Page 192
... Motor Vehicles to determine their legal requirements. o When towing a trailer on page 5-6. CAUTION: Do not do so, and allow the engine to properly break in excess of 6%) pay close attention to the engine coolant temperature gauge to ensure the engine does not overheat. C190C01Y-AAT Trailer Brakes If your car during its location is properly installed and operating correctly. 2 DRIVING YOUR HYUNDAI 26 TRAILER OR VEHICLE TOWING...
... Motor Vehicles to determine their legal requirements. o When towing a trailer on page 5-6. CAUTION: Do not do so, and allow the engine to properly break in excess of 6%) pay close attention to the engine coolant temperature gauge to ensure the engine does not overheat. C190C01Y-AAT Trailer Brakes If your car during its location is properly installed and operating correctly. 2 DRIVING YOUR HYUNDAI 26 TRAILER OR VEHICLE TOWING...
Owner's Manual
Page 194
... lower. 8. Turn your front wheel into a lower gear and use the engine braking effect. If the trailer has electric brakes, start your vehicle and trailer moving, and then apply the trailer brake controller by pressing on the trailer and your trip, check occasionally to overheat, resulting in fifth gear (manual transaxle) or overdrive (automatic transaxle). 4. Also check the spare tire. 6. This lets you have to get out of the trailer running lights, brake lights, and turn signals. 2. 2 DRIVING YOUR HYUNDAI...
... lower. 8. Turn your front wheel into a lower gear and use the engine braking effect. If the trailer has electric brakes, start your vehicle and trailer moving, and then apply the trailer brake controller by pressing on the trailer and your trip, check occasionally to overheat, resulting in fifth gear (manual transaxle) or overdrive (automatic transaxle). 4. Also check the spare tire. 6. This lets you have to get out of the trailer running lights, brake lights, and turn signals. 2. 2 DRIVING YOUR HYUNDAI...
Owner's Manual
Page 196
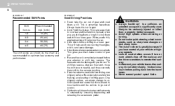
... your vehicle. Steps for specifications about the trailer weight. For example, if the "XXX" amount equals 1400 lbs, and there will be towing a trailer, load from XXX kilograms or XXX pounds. (4)The resulting figure equals the available amount of cargo and luggage load capacity. That weight may be five 150 lb. 2 DRIVING YOUR HYUNDAI 30 Seating capacity: Total: 5 persons (Front seat: 2 persons, Rear seat: 3 persons) Seating capacity...
... your vehicle. Steps for specifications about the trailer weight. For example, if the "XXX" amount equals 1400 lbs, and there will be towing a trailer, load from XXX kilograms or XXX pounds. (4)The resulting figure equals the available amount of cargo and luggage load capacity. That weight may be five 150 lb. 2 DRIVING YOUR HYUNDAI 30 Seating capacity: Total: 5 persons (Front seat: 2 persons, Rear seat: 3 persons) Seating capacity...
Owner's Manual
Page 202
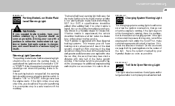
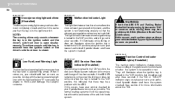
... Engine Stalls While Driving HJM5008 1. Turn on your speed gradually, keeping a straight line. See instructions for "Jump Starting". 1. Turn on the interior light. Check fuel level. 2. Reconnect any that may cause the catalytic converter to be disconnected or loose. 3. This could result in the "OFF" position, check all connectors at ignition, coil and spark plugs. Reduce your emergency flashers. 3. Move cautiously off the road to start , call a Hyundai...
... Engine Stalls While Driving HJM5008 1. Turn on your speed gradually, keeping a straight line. See instructions for "Jump Starting". 1. Turn on the interior light. Check fuel level. 2. Reconnect any that may cause the catalytic converter to be disconnected or loose. 3. This could result in the "OFF" position, check all connectors at ignition, coil and spark plugs. Reduce your emergency flashers. 3. Move cautiously off the road to start , call a Hyundai...
Owner's Manual
Page 231
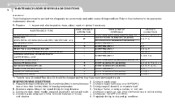
..., after inspection, clean, adjust, repair or replace if necessary MAINTENANCE ITEM ENGINE OIL AND FILTER TIMING BELT (WHEN REPLA CE TIMING BELT and INSPECT WATER PUMP : 2.7L) AIR CLEANER FILTER SPARK PLUGS BRAKE PADS, CALIPERS AND ROTORS REAR BRAKE DRUMS/LININGS/PADS, PARKING BRAKE STEERING GEAR BOX, LINKAGE & BOOTS/ LOWER ARM BALL JOINT DRIVESHAFTS AND BOOTS MANUAL TRANSAXLE OIL AUTOMATIC TRANSAXLE FLUID CLIMATE CONTROL AIR FILTER TRANSFER CASE OIL (4WD) *1 REAR AXLE OIL (4WD) *1 MAINTENANCE OPERATION R I/R R R I I I I R R R R R MAINTENANCE INTERVALS EVERY 3,000 MILES (4,800 KM) OR 3 MONTHS...
..., after inspection, clean, adjust, repair or replace if necessary MAINTENANCE ITEM ENGINE OIL AND FILTER TIMING BELT (WHEN REPLA CE TIMING BELT and INSPECT WATER PUMP : 2.7L) AIR CLEANER FILTER SPARK PLUGS BRAKE PADS, CALIPERS AND ROTORS REAR BRAKE DRUMS/LININGS/PADS, PARKING BRAKE STEERING GEAR BOX, LINKAGE & BOOTS/ LOWER ARM BALL JOINT DRIVESHAFTS AND BOOTS MANUAL TRANSAXLE OIL AUTOMATIC TRANSAXLE FLUID CLIMATE CONTROL AIR FILTER TRANSFER CASE OIL (4WD) *1 REAR AXLE OIL (4WD) *1 MAINTENANCE OPERATION R I/R R R I I I I R R R R R MAINTENANCE INTERVALS EVERY 3,000 MILES (4,800 KM) OR 3 MONTHS...

Owner's Manual
Page 239
... and condition Brake fluid level Clutch fluid level Engine coolant level Windshield washer fluid level Accessory drive belt condition Engine coolant hose condition Fluid leaks (on or below components) Power steering fluid level Battery condition Air filter condition Vehicle Exterior The following should be checked monthly: o o o o o o o o o o Overall appearance and condition Wheel condition and wheel nut torque Exhaust system condition Light condition and operation Windshield glass condition Wiper blade condition Paint condition and body corrosion Fluid leaks Door and hood lock condition Tire...
... and condition Brake fluid level Clutch fluid level Engine coolant level Windshield washer fluid level Accessory drive belt condition Engine coolant hose condition Fluid leaks (on or below components) Power steering fluid level Battery condition Air filter condition Vehicle Exterior The following should be checked monthly: o o o o o o o o o o Overall appearance and condition Wheel condition and wheel nut torque Exhaust system condition Light condition and operation Windshield glass condition Wiper blade condition Paint condition and body corrosion Fluid leaks Door and hood lock condition Tire...
Owner's Manual
Page 242
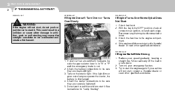
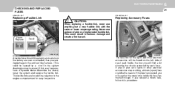
... 9 for engine oil capacity. ! Do not overfill! DO-IT-YOURSELF MAINTENANCE 6 7 2. Used engine oil may cause irritation or cancer of California to the specification in contact with clean engine oil before installation. 7. Used engine oil contains chemicals that it counterclockwise with a oil filter wrench of time. Open the hood and remove the engine oil filler cap. 3. CAUTION: Slowly pour the recommended oil using a new washer and retighten by turning it...
... 9 for engine oil capacity. ! Do not overfill! DO-IT-YOURSELF MAINTENANCE 6 7 2. Used engine oil may cause irritation or cancer of California to the specification in contact with clean engine oil before installation. 7. Used engine oil contains chemicals that it counterclockwise with a oil filter wrench of time. Open the hood and remove the engine oil filler cap. 3. CAUTION: Slowly pour the recommended oil using a new washer and retighten by turning it...
Owner's Manual
Page 256
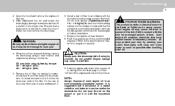
... Replacing a Fusible Link ! Replacing Accessory Fuses CAUTION: OpenReplace Good When replacing a fusible link, never use a piece of crash pad. Never use anything but a new fusible link with the same or lower amperage rating. If any of your car's lights or other electrical accessories will melt if the electrical circuits from the battery are located in a relay box in the engine compartement for the lights and other electrical accessories stop working...
... Replacing a Fusible Link ! Replacing Accessory Fuses CAUTION: OpenReplace Good When replacing a fusible link, never use a piece of crash pad. Never use anything but a new fusible link with the same or lower amperage rating. If any of your car's lights or other electrical accessories will melt if the electrical circuits from the battery are located in a relay box in the engine compartement for the lights and other electrical accessories stop working...
Owner's Manual
Page 260
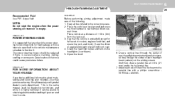
... vehicle maintenance schedule in Section 5. Open the hood. Place the vehicle on the headlights (Low beam). 5. Clean the head light lenses and turn on level ground and press the front bumper & rear bumper down several times. This is the same manual used by dealership technicians and while it works. 6. G250A01A-AAT Before performing aiming adjustment, make sure of the low beam to the correct pressure. 2. Have the driver...
... vehicle maintenance schedule in Section 5. Open the hood. Place the vehicle on the headlights (Low beam). 5. Clean the head light lenses and turn on level ground and press the front bumper & rear bumper down several times. This is the same manual used by dealership technicians and while it works. 6. G250A01A-AAT Before performing aiming adjustment, make sure of the low beam to the correct pressure. 2. Have the driver...
Owner's Manual
Page 302
... 4 H Hazard Warning System ...1-62 Heating and Cooling Control ...1-88 Heating and Ventilation Air flow control ...1-90 Air intake control switch ...1-89 Bi-level heating ...1-94 Defrosting / Defogging ...1-94 Fan speed control (Blower control) ...1-89 Temperature control ...1-93 High-Mounted Rear Stop Light ...1-80 Hood Release ...1-82 Horn ...1-85 How to Use Luggage Room ...1-77 I Ignition Switch ...2-5 Instrument Cluster and Indicator Lights ...1-46 Instrument Panel Light Control (Rheostat) ...1-64 Interior Light ...1-69 J Jump Starting ...3-3 K Keys ...1-3 If you lose your keys ...3-19...
... 4 H Hazard Warning System ...1-62 Heating and Cooling Control ...1-88 Heating and Ventilation Air flow control ...1-90 Air intake control switch ...1-89 Bi-level heating ...1-94 Defrosting / Defogging ...1-94 Fan speed control (Blower control) ...1-89 Temperature control ...1-93 High-Mounted Rear Stop Light ...1-80 Hood Release ...1-82 Horn ...1-85 How to Use Luggage Room ...1-77 I Ignition Switch ...2-5 Instrument Cluster and Indicator Lights ...1-46 Instrument Panel Light Control (Rheostat) ...1-64 Interior Light ...1-69 J Jump Starting ...3-3 K Keys ...1-3 If you lose your keys ...3-19...


