Owner's Manual
Page 70
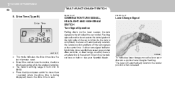
o The meter's working range is not in the system. o Press the trip computer switch for a burnedout fuse or bulb or see your Hyundai dealer. Lane Change Signal HJM2187-C HJM2089 o This mode indicates the drive time since the last tripmeter reset. As the turn is completed, the lever ...turn signals on the right side of the car to 99:59. o Even if the vehicle is from 0:00 to blink. 1FEATURES OF YOUR HYUNDAI 58 MULTI-FUNCTION LIGHT SWITCH 5. Pushing upwards on the lever causes the turn signals at all, there is a malfunction in motion, the drive time keeps going while...
o The meter's working range is not in the system. o Press the trip computer switch for a burnedout fuse or bulb or see your Hyundai dealer. Lane Change Signal HJM2187-C HJM2089 o This mode indicates the drive time since the last tripmeter reset. As the turn is completed, the lever ...turn signals on the right side of the car to 99:59. o Even if the vehicle is from 0:00 to blink. 1FEATURES OF YOUR HYUNDAI 58 MULTI-FUNCTION LIGHT SWITCH 5. Pushing upwards on the lever causes the turn signals at all, there is a malfunction in motion, the drive time keeps going while...
Owner's Manual
Page 170
...drive.' ! Check that the interior and exterior mirrors are operating and that all appropriate warning lights are clean and in the "P" (Park) position or the negative battery terminal is in position. 5. Check your Hyundai has an automatic transaxle, place the shift lever in "P" (Park) (For Automatic Transaxle). ...when operating your vehicle for more that 15 seconds. Turn off all lights and accessories that the shift lever is equipped with your seat belt and be sure there are not needed. 9. Lock all bulbs when key is moving. o Always check the surrounding areas near your...
...drive.' ! Check that the interior and exterior mirrors are operating and that all appropriate warning lights are clean and in the "P" (Park) position or the negative battery terminal is in position. 5. Check your Hyundai has an automatic transaxle, place the shift lever in "P" (Park) (For Automatic Transaxle). ...when operating your vehicle for more that 15 seconds. Turn off all lights and accessories that the shift lever is equipped with your seat belt and be sure there are not needed. 9. Lock all bulbs when key is moving. o Always check the surrounding areas near your...
Owner's Manual
Page 236
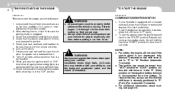
... Checking the Free-play ...6-19 Checking Drive Belts ...6-20 Checking and Replacing Fuses ...6-21 Checking the Battery ...6-23 Power Steering Fluid Level ...6-24 Replacement of Light Bulbs ...6-27 Bulb Wattage ...6-34 Fuse Panel Description ...6-35 6 6
... Checking the Free-play ...6-19 Checking Drive Belts ...6-20 Checking and Replacing Fuses ...6-21 Checking the Battery ...6-23 Power Steering Fluid Level ...6-24 Replacement of Light Bulbs ...6-27 Bulb Wattage ...6-34 Fuse Panel Description ...6-35 6 6

Owner's Manual
Page 262
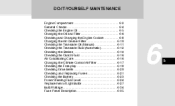
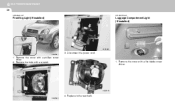
...The next paragraph shows how to replace the burned-out bulb with petroleum products, such as oil, gasoline, etc. HJM5012 4. Headlight and Front Turn Signal Light 1. Wear eye protection. 2. Be sure to reach the light bulbs so they may be sure the switch is caused ...YOURSELF MAINTENANCE 6 27 REPLACEMENT OF LIGHT BULBS G260A02A-AAT G270A02O-AAT Before attempting to replace a light bulb, be changed. If the water leaks into the lamp bulb circuitry, have the vehicle checked by an Authorized Hyundai Dealer. 5. Disconnect the power cord from the bulb base in the back of ...
...The next paragraph shows how to replace the burned-out bulb with petroleum products, such as oil, gasoline, etc. HJM5012 4. Headlight and Front Turn Signal Light 1. Wear eye protection. 2. Be sure to reach the light bulbs so they may be sure the switch is caused ...YOURSELF MAINTENANCE 6 27 REPLACEMENT OF LIGHT BULBS G260A02A-AAT G270A02O-AAT Before attempting to replace a light bulb, be changed. If the water leaks into the lamp bulb circuitry, have the vehicle checked by an Authorized Hyundai Dealer. 5. Disconnect the power cord from the bulb base in the back of ...

Owner's Manual
Page 263
6 DO-IT-YOURSELFMAINTENANCE 28 HJM5016 HJM5017 HJM5018 6. Push the bulb spring to promptly dispose of the old bulb. 11.Check for proper headlight aim. 12.To replace the front turn signal light bulb, remove from the bulb base in the back of the new bulb. Reattach the bulb spring and reconnect the connector. 10.Use the protective cap...
6 DO-IT-YOURSELFMAINTENANCE 28 HJM5016 HJM5017 HJM5018 6. Push the bulb spring to promptly dispose of the old bulb. 11.Check for proper headlight aim. 12.To replace the front turn signal light bulb, remove from the bulb base in the back of the new bulb. Reattach the bulb spring and reconnect the connector. 10.Use the protective cap...

Owner's Manual
Page 264
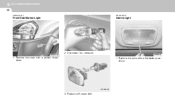
... or cracked. To replace the rear combination light (stop/ tail light, turn signal light, back-up light, side mark light), take it out from the bulb holder by turning it counterclockwise. (1) Stop/Tail light (2) Turn signal light (3) Back-up light (4) Tail light 4. DO-IT-YOURSELF MAINTENANCE 6 29 G270B01JM-AAT Rear Combination Light 1. Turn the bulb on only when installing in flying fragments...
... or cracked. To replace the rear combination light (stop/ tail light, turn signal light, back-up light, side mark light), take it out from the bulb holder by turning it counterclockwise. (1) Stop/Tail light (2) Turn signal light (3) Back-up light (4) Tail light 4. DO-IT-YOURSELF MAINTENANCE 6 29 G270B01JM-AAT Rear Combination Light 1. Turn the bulb on only when installing in flying fragments...
Owner's Manual
Page 265
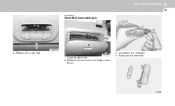
G270C01JM 1. Remove the bolts with a flat blade screw driver. Remove the cover with a wrench. 1. HJM5050 4. Remove the cover with a phillips screw driver. 2. HJM5048 6 DO-IT-YOURSELFMAINTENANCE 30 G270I02JM-GAT G270C02TB-GAT Front fog Light (If installed) Luggage Compartment Light (If Installed) HJM5049 HJM5047 3. Disconnect the power cord. Replace to the new bulb.
G270C01JM 1. Remove the bolts with a flat blade screw driver. Remove the cover with a wrench. 1. HJM5050 4. Remove the cover with a phillips screw driver. 2. HJM5048 6 DO-IT-YOURSELFMAINTENANCE 30 G270I02JM-GAT G270C02TB-GAT Front fog Light (If installed) Luggage Compartment Light (If Installed) HJM5049 HJM5047 3. Disconnect the power cord. Replace to the new bulb.

Owner's Manual
Page 266
DO-IT-YOURSELF MAINTENANCE 6 31 G270C02JM-AAT Cargo Light G270C02JM HJM5024 2. Replace with a flat blade screwdriver. HTB284 3. Disconnect the power cord. Remove the cover with a new bulb. 1. Replace to the new bulb. Open the tail gate. 2. HJM5023 3.
DO-IT-YOURSELF MAINTENANCE 6 31 G270C02JM-AAT Cargo Light G270C02JM HJM5024 2. Replace with a flat blade screwdriver. HTB284 3. Disconnect the power cord. Remove the cover with a new bulb. 1. Replace to the new bulb. Open the tail gate. 2. HJM5023 3.
Owner's Manual
Page 267
G270E01JM HJM5025 1. G270E03HR 3. Disconnect the connector. Replace with a flat blade screwdriver. Remove the cover with a new bulb. Remove the cover with a phillips screwdriver. 1. 6 DO-IT-YOURSELFMAINTENANCE 32 G270E01O-AAT G270G01O-AAT Front Side Marker Light Interior Light G270E02HR 2.
G270E01JM HJM5025 1. G270E03HR 3. Disconnect the connector. Replace with a flat blade screwdriver. Remove the cover with a new bulb. Remove the cover with a phillips screwdriver. 1. 6 DO-IT-YOURSELFMAINTENANCE 32 G270E01O-AAT G270G01O-AAT Front Side Marker Light Interior Light G270E02HR 2.
Owner's Manual
Page 268
HTB284 Replace with a flat blade screwdriver. Remove the cover with a new bulb. 1. Disconnect the connector. 4. Open the glove box. 2. HJM5045 3. Replace with a new bulb. DO-IT-YOURSELF MAINTENANCE 6 33 G270H01O-AAT Glove Box Illuminated Light HJM5026 HJM5039 2.
HTB284 Replace with a flat blade screwdriver. Remove the cover with a new bulb. 1. Disconnect the connector. 4. Open the glove box. 2. HJM5045 3. Replace with a new bulb. DO-IT-YOURSELF MAINTENANCE 6 33 G270H01O-AAT Glove Box Illuminated Light HJM5026 HJM5039 2.
Owner's Manual
Page 269
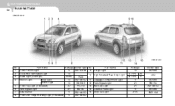
... 34 BULB WATTAGE G280A02JM-AAT G280A01JM-U No. 1 2 3 4 5 6 7 8 Part Name Wattage Socket type No. Part Name Front Postion Light 5 9 Cargo Light W2.1x9.5d Glove Box Illuminated Light 10 10 High Mounted Rear Stop Light Head Light (Low/High) 55/60 P43t Map Light Interior Light 10 W2.1x9.5D 11 Luggage Compartment Light Room Light 10 12 Turn Signal Light S8...
... 34 BULB WATTAGE G280A02JM-AAT G280A01JM-U No. 1 2 3 4 5 6 7 8 Part Name Wattage Socket type No. Part Name Front Postion Light 5 9 Cargo Light W2.1x9.5d Glove Box Illuminated Light 10 10 High Mounted Rear Stop Light Head Light (Low/High) 55/60 P43t Map Light Interior Light 10 W2.1x9.5D 11 Luggage Compartment Light Room Light 10 12 Turn Signal Light S8...
Owner's Manual
Page 300
... ...6-14 Electronic Stability Control (ESC) ...2-15 Fluid ...6-11 Pedal clearance ...6-20 Pedal free-play ...6-19 Practices ...2-19 Breaking-In your New Hyundai ...1-3 Bulb Replacement ...6-27 C California Perchlorate Notice ...5-10 Care of Cassette Tapes ...1-152 Care of Disc ...1-152 Catalytic Converter ...7-3 Child-Protector Rear Door ..." System ...1-28 Cigarette Lighter ...1-64 Clock ...1-64 Clutch Checking fluid ...6-16 Pedal free-play ...6-19 Combination Light Auto light ...1-60 Headlight flasher ...1-59 Headlight switch ...1-59 High-beam switch ...1-59 Lane change signal ...1-58 Parking...
... ...6-14 Electronic Stability Control (ESC) ...2-15 Fluid ...6-11 Pedal clearance ...6-20 Pedal free-play ...6-19 Practices ...2-19 Breaking-In your New Hyundai ...1-3 Bulb Replacement ...6-27 C California Perchlorate Notice ...5-10 Care of Cassette Tapes ...1-152 Care of Disc ...1-152 Catalytic Converter ...7-3 Child-Protector Rear Door ..." System ...1-28 Cigarette Lighter ...1-64 Clock ...1-64 Clutch Checking fluid ...6-16 Pedal free-play ...6-19 Combination Light Auto light ...1-60 Headlight flasher ...1-59 Headlight switch ...1-59 High-beam switch ...1-59 Lane change signal ...1-58 Parking...
Owner's Manual
Page 302
... Horn ...1-85 How to Use Luggage Room ...1-77 I Ignition Switch ...2-5 Instrument Cluster and Indicator Lights ...1-46 Instrument Panel Light Control (Rheostat) ...1-64 Interior Light ...1-69 J Jump Starting ...3-3 K Keys ...1-3 If you lose your keys ...3-19 Positions ...2-5 L Light Bulbs Replacement ...6-27 Luggage Compartment Light ...1-77 Luggage Net ...1-79 M Maintenance Intervals Explanation of scheduled maintenance items ...5-7 Maintenance under severe...
... Horn ...1-85 How to Use Luggage Room ...1-77 I Ignition Switch ...2-5 Instrument Cluster and Indicator Lights ...1-46 Instrument Panel Light Control (Rheostat) ...1-64 Interior Light ...1-69 J Jump Starting ...3-3 K Keys ...1-3 If you lose your keys ...3-19 Positions ...2-5 L Light Bulbs Replacement ...6-27 Luggage Compartment Light ...1-77 Luggage Net ...1-79 M Maintenance Intervals Explanation of scheduled maintenance items ...5-7 Maintenance under severe...


