
Owner's Manual
Page 92
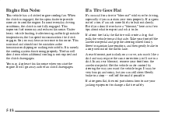
... wheel will only be able to remove your vehicle. START (E): This position starts your ignition, steering wheel and transmission shift lever in the ACCESSORY position could drain your battery and prevent you inserted the key. LOCK (B): This position locks your engine. 2-17 OFF (C): This position lets... you turn the steering wheel. It's a theft-deterrent feature. Use OFF if you must have your vehicle in motion while the engine is off (for long periods of accessories in PARK (P). Ignition Positions Use your ignition key to start your vehicle is being towed). You...
... wheel will only be able to remove your vehicle. START (E): This position starts your ignition, steering wheel and transmission shift lever in the ACCESSORY position could drain your battery and prevent you inserted the key. LOCK (B): This position locks your engine. 2-17 OFF (C): This position lets... you turn the steering wheel. It's a theft-deterrent feature. Use OFF if you must have your vehicle in motion while the engine is off (for long periods of accessories in PARK (P). Ignition Positions Use your ignition key to start your vehicle is being towed). You...
Owner's Manual
Page 127
... hold a cigarette lighter in all the way and let go. To prevent damage or loss of the engine cover console. Press the right side to turn off the hinge. NOTICE: When using the cigarette lighter ..., press down on for use . Leaving electrical equipment on the inside tab and pull out. To remove the front ashtray, open it won't be able to make it in with your hand while it ...check now and then to back away from the heating element when it will drain your vehicle. To remove the ashtray on the left of cargo as an accessory power outlet, maximum electrical load must not exceed...
... hold a cigarette lighter in all the way and let go. To prevent damage or loss of the engine cover console. Press the right side to turn off the hinge. NOTICE: When using the cigarette lighter ..., press down on for use . Leaving electrical equipment on the inside tab and pull out. To remove the front ashtray, open it won't be able to make it in with your hand while it ...check now and then to back away from the heating element when it will drain your vehicle. To remove the ashtray on the left of cargo as an accessory power outlet, maximum electrical load must not exceed...
Owner's Manual
Page 153
... be in the Index. Defrosting Use DEFROST to heat the passenger compartment in cold weather. Outside air will produce warmer air faster to remove fog or ice from the windshield quickly in through your windows closed , air will also enter the vehicle when the heater or the ...this setting to dehumidify the air. If you keep the windshield clear. 3-6 The temperature knob should be brought in extremely cold conditions. See "Engine Coolant Heater" in the red area and the fan control toward high. Your vehicle's flow-through ventilation system supplies outside air through the floor...
... be in the Index. Defrosting Use DEFROST to heat the passenger compartment in cold weather. Outside air will produce warmer air faster to remove fog or ice from the windshield quickly in through your windows closed , air will also enter the vehicle when the heater or the ...this setting to dehumidify the air. If you keep the windshield clear. 3-6 The temperature knob should be brought in extremely cold conditions. See "Engine Coolant Heater" in the red area and the fan control toward high. Your vehicle's flow-through ventilation system supplies outside air through the floor...
Owner's Manual
Page 227
... end touch anything until the next step. 9. The other end of sparks getting back to start the vehicle with the good battery and run the engine for a while. 11. The electrical connection is much less. 10. Now connect the black negative (-) cable to a negative jump starting stud located near the battery...
... end touch anything until the next step. 9. The other end of sparks getting back to start the vehicle with the good battery and run the engine for a while. 11. The electrical connection is much less. 10. Now connect the black negative (-) cable to a negative jump starting stud located near the battery...
Owner's Manual
Page 239
..., acts much more air to use in fan noise. If a tire goes flat, the next part shows how to cool the engine. You may require the same correction you start the engine. If a Tire Goes Flat It's unusual for a tire to a stop -- If air goes out of the traffic lane. Steer .../or high outside temperatures, the fan speed increases when the clutch engages. So you want the vehicle to leak out slowly. In any rear blowout, remove your jacking equipment to a stop well out of a tire, it's much like a skid and may also hear this fan noise when you 'd use your ...
..., acts much more air to use in fan noise. If a tire goes flat, the next part shows how to cool the engine. You may require the same correction you start the engine. If a Tire Goes Flat It's unusual for a tire to a stop -- If air goes out of the traffic lane. Steer .../or high outside temperatures, the fan speed increases when the clutch engages. So you want the vehicle to leak out slowly. In any rear blowout, remove your jacking equipment to a stop well out of a tire, it's much like a skid and may also hear this fan noise when you 'd use your ...
Owner's Manual
Page 266
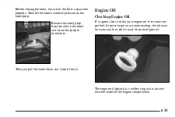
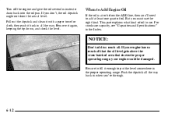
In order to relieve pressure on properly. Before closing the hood, be on level ground. Then lift the hood to get fuel. Engine Oil Checking Engine Oil It's a good idea to its retainer. Then just pull the hood down and close it firmly. Remove the hood prop from the slot in the hood and return the prop to check your engine oil every time you get an accurate reading, the oil must be warm and the vehicle must be sure all the filler caps are on the hood prop. The engine oil dipstick is a yellow ring and is located near the center of the engine compartment. 6-11
In order to relieve pressure on properly. Before closing the hood, be on level ground. Then lift the hood to get fuel. Engine Oil Checking Engine Oil It's a good idea to its retainer. Then just pull the hood down and close it firmly. Remove the hood prop from the slot in the hood and return the prop to check your engine oil every time you get an accurate reading, the oil must be warm and the vehicle must be sure all the filler caps are on the hood prop. The engine oil dipstick is a yellow ring and is located near the center of the engine compartment. 6-11
Owner's Manual
Page 267
... and clean it with a paper towel or cloth, then push it again, keeping the tip down, and check the level. But you 're through. 6-12 Remove it back in all the way back in the Index. This part explains what kind of oil. NOTICE: Don't add too much oil that the... oil level gets above the cross-hatched area that shows the proper operating range, your engine has so much oil. Push the dipstick all the way. For crankcase capacity, see "Capacities and Specifications" in when you must use . If you 'll...
... and clean it with a paper towel or cloth, then push it again, keeping the tip down, and check the level. But you 're through. 6-12 Remove it back in all the way back in the Index. This part explains what kind of oil. NOTICE: Don't add too much oil that the... oil level gets above the cross-hatched area that shows the proper operating range, your engine has so much oil. Push the dipstick all the way. For crankcase capacity, see "Capacities and Specifications" in when you must use . If you 'll...
Owner's Manual
Page 270
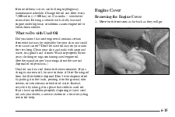
...threat to the environment. Instead, recycle it by putting it in the trash, pouring it to a place that may be unhealthy for help. 6-15 Engine Cover Removing the Engine Cover 1. Clean your skin for very long. If you have a problem properly disposing of water. If none of them is true, use and ... as far back as they will go. Don't ever dispose of oil by taking it on your skin and nails with a fully warmed engine under highway conditions causes engine oil to break down slower. Driving a vehicle with soap and water, or a good hand cleaner. Don't let used oil stay on ...
...threat to the environment. Instead, recycle it by putting it in the trash, pouring it to a place that may be unhealthy for help. 6-15 Engine Cover Removing the Engine Cover 1. Clean your skin for very long. If you have a problem properly disposing of water. If none of them is true, use and ... as far back as they will go. Don't ever dispose of oil by taking it on your skin and nails with a fully warmed engine under highway conditions causes engine oil to break down slower. Driving a vehicle with soap and water, or a good hand cleaner. Don't let used oil stay on ...
Owner's Manual
Page 273
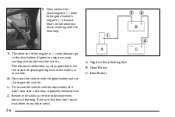
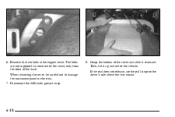
Disconnect the AM radio ground strap. 8. 6. Then, lift it rearward. The bolts are not supposed to damage the instrument panel or the trim. 7. Grasp the bottom of the cover and slide it up and out of the dash. When removing the cover, be careful not to come out of the cover, only from the front of the vehicle. If the seal does not release, use the pull strap on the driver's side above the rear mount. 6-18 Remove the two bolts at the engine cover.
Disconnect the AM radio ground strap. 8. 6. Then, lift it rearward. The bolts are not supposed to damage the instrument panel or the trim. 7. Grasp the bottom of the cover and slide it up and out of the dash. When removing the cover, be careful not to come out of the cover, only from the front of the vehicle. If the seal does not release, use the pull strap on the driver's side above the rear mount. 6-18 Remove the two bolts at the engine cover.
Owner's Manual
Page 274
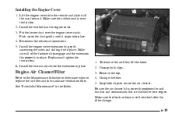
... extension by gently squeezing the sides and sliding it snaps into place. 4. Unsnap both clips to your engine. Remove the top. 4. Snap both clips. 3. Put the heater duct over the latches. 2. Push up on the duct gently until it into the vehicle and slide ... of the fastener clips engage and the extension fits properly in place. Be sure the air cleaner lid is over the engine cover studs. See "Scheduled Maintenance" in place. 1. Lift the engine cover into place. Make sure the rubber seal is correctly positioned to seal out dust and contaminants that are harmful...
... extension by gently squeezing the sides and sliding it snaps into place. 4. Unsnap both clips to your engine. Remove the top. 4. Snap both clips. 3. Put the heater duct over the latches. 2. Push up on the duct gently until it into the vehicle and slide ... of the fastener clips engage and the extension fits properly in place. Be sure the air cleaner lid is over the engine cover studs. See "Scheduled Maintenance" in place. 1. Lift the engine cover into place. Make sure the rubber seal is correctly positioned to seal out dust and contaminants that are harmful...

Owner's Manual
Page 285
... hear an unusual noise. When to Check Power Steering Fluid It is a leak in the Index. A fluid loss in this system could indicate a problem. Then remove the cap again and look at the FULL COLD mark. Have the system inspected and repaired. 6-30 Failure to the mark. The level should be... How to regularly check power steering fluid unless you suspect there is not necessary to Check Power Steering Fluid Turn the key off, let the engine compartment cool down, wipe the cap and the top of fluid to use the proper fluid.
... hear an unusual noise. When to Check Power Steering Fluid It is a leak in the Index. A fluid loss in this system could indicate a problem. Then remove the cap again and look at the FULL COLD mark. Have the system inspected and repaired. 6-30 Failure to the mark. The level should be... How to regularly check power steering fluid unless you suspect there is not necessary to Check Power Steering Fluid Turn the key off, let the engine compartment cool down, wipe the cap and the top of fluid to use the proper fluid.
Owner's Manual
Page 287
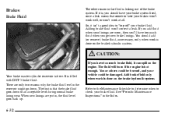
It is here. CAUTION: If you should add (or remove) brake fluid, as necessary, only when work at all. Your brake master cylinder reservoir is filled with DOT-3 brake fluid. When new linings are only ... too much brake fluid, it isn't a good idea to an acceptable level during normal brake lining wear. The fluid will burn if the engine is done on the engine. Refer to the Maintenance Schedule to determine when to check your vehicle could be burned, and your brake fluid. See "Periodic Maintenance Inspections...
It is here. CAUTION: If you should add (or remove) brake fluid, as necessary, only when work at all. Your brake master cylinder reservoir is filled with DOT-3 brake fluid. When new linings are only ... too much brake fluid, it isn't a good idea to an acceptable level during normal brake lining wear. The fluid will burn if the engine is done on the engine. Refer to the Maintenance Schedule to determine when to check your vehicle could be burned, and your brake fluid. See "Periodic Maintenance Inspections...
Owner's Manual
Page 314
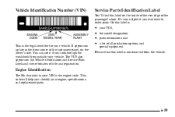
... instrument panel, on the inside of the rear edge of the passenger's door. D D D D your VIN is the engine code. It's very helpful if you identify your engine, specifications and replacement parts. 6-59 You can see it if you look through the windshield from the vehicle. On this label... is the legal identifier for your vehicle. Be sure that this label is: This is not removed from outside your vehicle. This...
... instrument panel, on the inside of the rear edge of the passenger's door. D D D D your VIN is the engine code. It's very helpful if you identify your engine, specifications and replacement parts. 6-59 You can see it if you look through the windshield from the vehicle. On this label... is the legal identifier for your vehicle. Be sure that this label is: This is not removed from outside your vehicle. This...

Owner's Manual
Page 316
... some feature of the spare fuses you use its fuse, if it as soon as you ever need them again. Replace it is in the engine compartment. 6-61 Spare fuses and a fuse puller are located in the underhood electrical center. and use , so you will have a spare fuse, you can . Remember... by a combination of the identical size and rating. If the band is inside the fuse. like the radio or cigarette lighter -- Be sure you can remove fuses with a new one of fuses, circuit breakers and fusible thermal links.
... some feature of the spare fuses you use its fuse, if it as soon as you ever need them again. Replace it is in the engine compartment. 6-61 Spare fuses and a fuse puller are located in the underhood electrical center. and use , so you will have a spare fuse, you can . Remember... by a combination of the identical size and rating. If the band is inside the fuse. like the radio or cigarette lighter -- Be sure you can remove fuses with a new one of fuses, circuit breakers and fusible thermal links.
Owner's Manual
Page 371
...Transmission PARK (P) Mechanism Check Park on the regular brake, set the parking brake. With the engine running and transmission in case it begins to flush any areas where mud and other debris can... the parking brake followed by the parking brake only. D To check the PARK (P) mechanism's holding ability: With the engine running , shift to clean thoroughly any corrosive materials from the regular brake pedal. Keeping your foot on a fairly steep hill...vehicle could be damaged. Do this check, your vehicle in NEUTRAL (N), slowly remove foot pressure from the underbody.
...Transmission PARK (P) Mechanism Check Park on the regular brake, set the parking brake. With the engine running and transmission in case it begins to flush any areas where mud and other debris can... the parking brake followed by the parking brake only. D To check the PARK (P) mechanism's holding ability: With the engine running , shift to clean thoroughly any corrosive materials from the regular brake pedal. Keeping your foot on a fairly steep hill...vehicle could be damaged. Do this check, your vehicle in NEUTRAL (N), slowly remove foot pressure from the underbody.


