Warranty Guide 1st Printing
Page 17
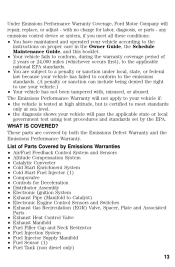
..., state, or federal law because your vehicle will repair, replace, or adjust - Under Emissions Performance Warranty Coverage, Ford Motor Company will pass the applicable state or local government test using test procedures and standards set by the EPA. The Emissions Performance Warranty will not apply to your vehicle if: • the vehicle...
..., state, or federal law because your vehicle will repair, replace, or adjust - Under Emissions Performance Warranty Coverage, Ford Motor Company will pass the applicable state or local government test using test procedures and standards set by the EPA. The Emissions Performance Warranty will not apply to your vehicle if: • the vehicle...

Owner Guide 1st Printing
Page 6
Instrumentation Instrument cluster (pg. 8) Gearshift (includes O/D OFF control) (pg. 169) Turn signal and wiper/washer control (pg. 86) Driver air bag (pg. 140) O/D OFF F FUEL E 3 2 1 TRAC OFF 4 5 6 TRAC ACTIVE 7 THEFT 40 20 40 60 80 BRAKE O/D FF ON/O 120 80 100 160 km/h TEMP H RPMX1000 MPH mi RES P ON SET + OFF CST _ Instrument panel dimmer control (pg. 27) Headlamp control (pg. 26) Speed control (pg. 82) Traction control* (pg. 167) 6
Instrumentation Instrument cluster (pg. 8) Gearshift (includes O/D OFF control) (pg. 169) Turn signal and wiper/washer control (pg. 86) Driver air bag (pg. 140) O/D OFF F FUEL E 3 2 1 TRAC OFF 4 5 6 TRAC ACTIVE 7 THEFT 40 20 40 60 80 BRAKE O/D FF ON/O 120 80 100 160 km/h TEMP H RPMX1000 MPH mi RES P ON SET + OFF CST _ Instrument panel dimmer control (pg. 27) Headlamp control (pg. 26) Speed control (pg. 82) Traction control* (pg. 167) 6
Owner Guide 1st Printing
Page 16
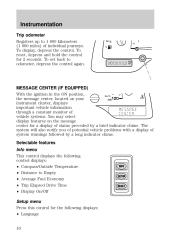
..., located on the message center for 2 seconds. To display, depress the control. To reset, depress and hold the control for a display of individual journeys. To set back to 1 600 kilometers (1 000 miles) of status preceded by a long indicator chime. Selectable features Info menu This control displays the following control displays: •...
..., located on the message center for 2 seconds. To display, depress the control. To reset, depress and hold the control for a display of individual journeys. To set back to 1 600 kilometers (1 000 miles) of status preceded by a long indicator chime. Selectable features Info menu This control displays the following control displays: •...

Owner Guide 1st Printing
Page 17
... message or a warning message for three seconds. Instrumentation • Units (English/Metric) • System Check • Single/Dual Display Mode Reset Press this control to set the language choice. Press and hold the RESET control to select and reset functions shown in the INFO menu and SETUP menu. Press the RESET...
... message or a warning message for three seconds. Instrumentation • Units (English/Metric) • System Check • Single/Dual Display Mode Reset Press this control to set the language choice. Press and hold the RESET control to select and reset functions shown in the INFO menu and SETUP menu. Press the RESET...
Owner Guide 1st Printing
Page 21
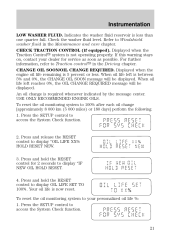
... control for service as soon as possible. Instrumentation LOW WASHER FLUID. Indicates the washer fluid reservoir is not operating properly. Refer to display OIL LIFE SET TO 100%. When oil life left reaches 0%, the OIL CHANGE REQUIRED message will be displayed. Press and release the RESET control to your dealer for...
... control for service as soon as possible. Instrumentation LOW WASHER FLUID. Indicates the washer fluid reservoir is not operating properly. Refer to display OIL LIFE SET TO 100%. When oil life left reaches 0%, the OIL CHANGE REQUIRED message will be displayed. Press and release the RESET control to your dealer for...

Owner Guide 1st Printing
Page 23
... areas (zones) have a magnetic north compass point that varies slightly from steel structures and high voltage lines. Turn ignition to the zone map. 4. A correct zone setting will become noticeable as the vehicle crosses multiple zones. For optimum calibration, turn off all electrical accessories (heater/air conditioning, wipers, etc.) and make sure...
... areas (zones) have a magnetic north compass point that varies slightly from steel structures and high voltage lines. Turn ignition to the zone map. 4. A correct zone setting will become noticeable as the vehicle crosses multiple zones. For optimum calibration, turn off all electrical accessories (heater/air conditioning, wipers, etc.) and make sure...
Owner Guide 1st Printing
Page 24
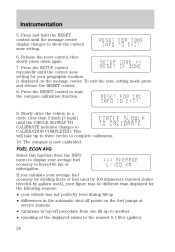
... (miles traveled by dividing liters of the displayed values to complete calibration. 10. Press the SETUP control repeatedly until the correct zone setting for the following reasons: • your vehicle was not perfectly level during fill-up • differences in the automatic shut-off ...different than 5 km/h [3 mph]) until the message center display changes to display your geographic location is now calibrated. To exit the zone setting mode press and release the RESET control. 8. Slowly drive the vehicle in a circle (less than displayed for your average fuel economy in...
... (miles traveled by dividing liters of the displayed values to complete calibration. 10. Press the SETUP control repeatedly until the correct zone setting for the following reasons: • your vehicle was not perfectly level during fill-up • differences in the automatic shut-off ...different than 5 km/h [3 mph]) until the message center display changes to display your geographic location is now calibrated. To exit the zone setting mode press and release the RESET control. 8. Slowly drive the vehicle in a circle (less than displayed for your average fuel economy in...
Owner Guide 1st Printing
Page 25
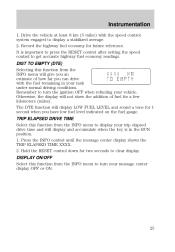
It is in your vehicle. The DTE function will display and accumulate when the key is important to press the RESET control after setting the speed control to turn the ignition OFF when refueling your tank under normal driving conditions. Hold the RESET control down for future reference. Instrumentation 1. ...
It is in your vehicle. The DTE function will display and accumulate when the key is important to press the RESET control after setting the speed control to turn the ignition OFF when refueling your tank under normal driving conditions. Hold the RESET control down for future reference. Instrumentation 1. ...
Owner Guide 1st Printing
Page 30
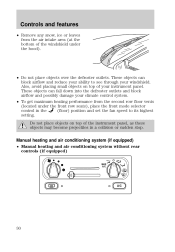
... get maximum heating performance from the air intake area (at the bottom of the instrument panel, as these objects may become projectiles in the setting. Also, avoid placing small objects on top of the windshield under the front row seats), place the front mode selector (floor) position and... set the fan speed to see through your windshield. Manual heating and air conditioning system (if equipped) • Manual heating and air conditioning system ...
... get maximum heating performance from the air intake area (at the bottom of the instrument panel, as these objects may become projectiles in the setting. Also, avoid placing small objects on top of the windshield under the front row seats), place the front mode selector (floor) position and... set the fan speed to see through your windshield. Manual heating and air conditioning system (if equipped) • Manual heating and air conditioning system ...

Owner Guide 1st Printing
Page 32
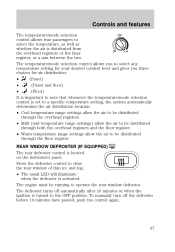
... (floor) register. • Mid-temperature range air is delivered from the air during operation, it is normal if clear water drips on the main control set to any fan speed (except OFF), the rear temperature control: • regulates the temperature of the airflow for the rear passenger compartment. • determines the...
... (floor) register. • Mid-temperature range air is delivered from the air during operation, it is normal if clear water drips on the main control set to any fan speed (except OFF), the rear temperature control: • regulates the temperature of the airflow for the rear passenger compartment. • determines the...
Owner Guide 1st Printing
Page 35
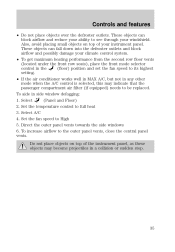
... the side windows 6. These objects can block airflow and reduce your ability to see through your instrument panel. To increase airflow to full heat 3. Set the temperature control to the outer panel vents, close the central panel vents. Select A/C 4. Also, avoid placing small objects on top of your ...from the second row floor vents (located under the front row seats), place the front mode selector (floor) position and set the fan speed to its highest control in the setting. • If the air conditioner works well in MAX A/C, but not in any other mode when the A/C control ...
... the side windows 6. These objects can block airflow and reduce your ability to see through your instrument panel. To increase airflow to full heat 3. Set the temperature control to the outer panel vents, close the central panel vents. Select A/C 4. Also, avoid placing small objects on top of your ...from the second row floor vents (located under the front row seats), place the front mode selector (floor) position and set the fan speed to its highest control in the setting. • If the air conditioner works well in MAX A/C, but not in any other mode when the A/C control ...

Owner Guide 1st Printing
Page 36
... distributed from the rear seat registers at the corresponding speed. • If the rear fan control on the main climate control system is set to REAR CTL, rear seat passengers can control their climate comfort level. The rear climate system fan speed control allows rear passengers to control... the volume of air that is set in any of the fan speed positions, air will be distributed from the rear registers. 36 Controls and features Rear passenger compartment climate ...
... distributed from the rear seat registers at the corresponding speed. • If the rear fan control on the main climate control system is set to REAR CTL, rear seat passengers can control their climate comfort level. The rear climate system fan speed control allows rear passengers to control... the volume of air that is set in any of the fan speed positions, air will be distributed from the rear registers. 36 Controls and features Rear passenger compartment climate ...
Owner Guide 1st Printing
Page 37
...features The temperature/mode selection control allows rear passengers to the OFF position. The temperature/mode selection control allows you to select any temperature setting for your desired comfort level and gives you three choices for air distribution: (Panel) • (Panel and floor) • (... is turned to select the temperature, as well as whether the air is set to a specific temperature setting, the system automatically determines the air distribution location: • Cool temperature range settings allow the air to be distributed through the floor register. Press the defroster ...
...features The temperature/mode selection control allows rear passengers to the OFF position. The temperature/mode selection control allows you to select any temperature setting for your desired comfort level and gives you three choices for air distribution: (Panel) • (Panel and floor) • (... is turned to select the temperature, as well as whether the air is set to a specific temperature setting, the system automatically determines the air distribution location: • Cool temperature range settings allow the air to be distributed through the floor register. Press the defroster ...

Owner Guide 1st Printing
Page 39
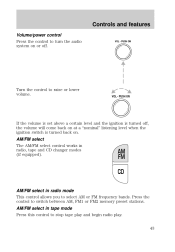
... find the next • Press listenable station up the band (whether or not a listenable station is located there). Controls and features If the volume is set above a certain level and the ignition is turned off, the volume will come back on at a "nominal" listening level when the ignition switch is located...
... find the next • Press listenable station up the band (whether or not a listenable station is located there). Controls and features If the volume is set above a certain level and the ignition is turned off, the volume will come back on at a "nominal" listening level when the ignition switch is located...

Owner Guide 1st Printing
Page 40
... The bass adjust control allows you to four preset AM stations and eight FM stations (four in FM1 and four in memory on selecting a station. 3. Setting memory preset stations 1. Treble adjust The treble adjust control allows you to adjust the desired level. 40 TONE CLK VOL PUSH ON TONE CLK VOL...
... The bass adjust control allows you to four preset AM stations and eight FM stations (four in FM1 and four in memory on selecting a station. 3. Setting memory preset stations 1. Treble adjust The treble adjust control allows you to adjust the desired level. 40 TONE CLK VOL PUSH ON TONE CLK VOL...

Owner Guide 1st Printing
Page 41
...ON TONE CLK TONE CLK SEEK TUNE SEEK TUNE To set the hour, press and hold the CLK control until CLOCK SET appears in the display and press the TUNE control: TONE CLK 41 Setting the clock Press CLK to increase hours. To set the minute, press and hold the CLK control until CLOCK... SET appears in the display and press the SEEK control: • &#...
...ON TONE CLK TONE CLK SEEK TUNE SEEK TUNE To set the hour, press and hold the CLK control until CLOCK SET appears in the display and press the TUNE control: TONE CLK 41 Setting the clock Press CLK to increase hours. To set the minute, press and hold the CLK control until CLOCK... SET appears in the display and press the SEEK control: • &#...
Owner Guide 1st Printing
Page 43
PUSH ON If the volume is set above a certain level and the ignition is turned off, the volume will come back on at a "nominal" listening level when the ignition switch is turned ...
PUSH ON If the volume is set above a certain level and the ignition is turned off, the volume will come back on at a "nominal" listening level when the ignition switch is turned ...

Owner Guide 1st Printing
Page 45
SCAN Scan function in memory on selecting a station. 3. Setting memory preset stations 1. If a selection has been playing for TUNE three seconds or more information on the control you DISCS press , the CD changer will ...
SCAN Scan function in memory on selecting a station. 3. Setting memory preset stations 1. If a selection has been playing for TUNE three seconds or more information on the control you DISCS press , the CD changer will ...

Owner Guide 1st Printing
Page 49
... are trademarks of a tape. Dolby noise 4 reduction reduces the amount of hiss and static during tape playback. Setting the clock Press CLK to activate (and deactivate) Dolby noise reduction. To set the hour, press and hold the CLK control and press the SEEK control: CLK TAPE AMS 49 Eject function...
... are trademarks of a tape. Dolby noise 4 reduction reduces the amount of hiss and static during tape playback. Setting the clock Press CLK to activate (and deactivate) Dolby noise reduction. To set the hour, press and hold the CLK control and press the SEEK control: CLK TAPE AMS 49 Eject function...

Owner Guide 1st Printing
Page 50
..., etc.), the media information will always be displayed. 50 Controls and features • • to decrease hours and to increase minutes. SEEK TUNE DISCS To set the minute, press and hold the CLK control and press the TUNE control: CLK TAPE AMS • • to decrease minutes and to increase hours...
..., etc.), the media information will always be displayed. 50 Controls and features • • to decrease hours and to increase minutes. SEEK TUNE DISCS To set the minute, press and hold the CLK control and press the TUNE control: CLK TAPE AMS • • to decrease minutes and to increase hours...


