Scheduled Maintenance Guide 3rd Printing
Page 8
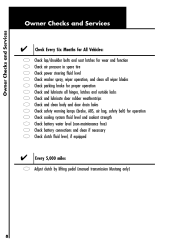
... body and door drain holes safety warning lamps (brake, ABS, air bag, safety belt) for operation cooling system fluid level and coolant strength battery water level (non-maintenance free) battery connections and clean if necessary clutch fluid level, if equipped Every 5,000 miles Adjust clutch by lifting pedal (manual transmission Mustang only) 8
... body and door drain holes safety warning lamps (brake, ABS, air bag, safety belt) for operation cooling system fluid level and coolant strength battery water level (non-maintenance free) battery connections and clean if necessary clutch fluid level, if equipped Every 5,000 miles Adjust clutch by lifting pedal (manual transmission Mustang only) 8

Owner Guide 1st Printing
Page 5
Introduction Vehicle Symbol Glossary Child Safety Door Lock/Unlock Panic Alarm Engine Coolant Interior Luggage Compartment Release Symbol Engine Oil Engine Coolant Temperature Battery Do Not Open When Hot Avoid Smoking, Flames, or Sparks Explosive Gas Battery Acid Fan Warning Maintain Correct Fluid Level Engine Air Filter Jack MAX MIN Power Steering Fluid Emission System Passenger Compartment Air Filter 5
Introduction Vehicle Symbol Glossary Child Safety Door Lock/Unlock Panic Alarm Engine Coolant Interior Luggage Compartment Release Symbol Engine Oil Engine Coolant Temperature Battery Do Not Open When Hot Avoid Smoking, Flames, or Sparks Explosive Gas Battery Acid Fan Warning Maintain Correct Fluid Level Engine Air Filter Jack MAX MIN Power Steering Fluid Emission System Passenger Compartment Air Filter 5

Owner Guide 1st Printing
Page 8
The light also illuminates when the battery is turned to the ON position. The ignition must be less than the advertised capacity since there is fuel still in the tank. The lamp ...
The light also illuminates when the battery is turned to the ON position. The ignition must be less than the advertised capacity since there is fuel still in the tank. The lamp ...

Owner Guide 1st Printing
Page 27
... lights. • Rotate control to next position (adjustment dial) and move up position or next position (adjustment dial) to turn on all interior lights. Battery saver The battery saver will not turn off and the headlamp control is switched to full brightness. This control also has other features that are activated when...
... lights. • Rotate control to next position (adjustment dial) and move up position or next position (adjustment dial) to turn on all interior lights. Battery saver The battery saver will not turn off and the headlamp control is switched to full brightness. This control also has other features that are activated when...
Owner Guide 1st Printing
Page 103
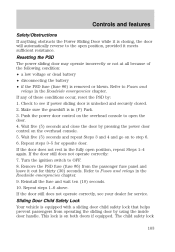
If any of the following condition: • a low voltage or dead battery • disconnecting the battery • if the PSD fuse (fuse #6) is in the Roadside emergencies chapter. Push the power door control on both doors if equipped. Wait five (5) seconds ...
If any of the following condition: • a low voltage or dead battery • disconnecting the battery • if the PSD fuse (fuse #6) is in the Roadside emergencies chapter. Push the power door control on both doors if equipped. Wait five (5) seconds ...
Owner Guide 1st Printing
Page 110
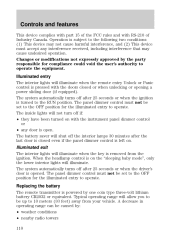
... in operating range can be up to operate the equipment. Controls and features This device complies with part 15 of Industry Canada. The battery saver will not turn off the interior lamps 30 minutes after 25 seconds or when the driver's door is open. The panel dimmer control... Unlock or Panic control is pressed with the doors closed even if the panel dimmer control is powered by one coin type three-volt lithium battery CR2032 or equivalent. Illuminated exit The interior lights will illuminate. Changes or modifications not expressly approved by : • weather conditions •...
... in operating range can be up to operate the equipment. Controls and features This device complies with part 15 of Industry Canada. The battery saver will not turn off the interior lamps 30 minutes after 25 seconds or when the driver's door is open. The panel dimmer control... Unlock or Panic control is pressed with the doors closed even if the panel dimmer control is powered by one coin type three-volt lithium battery CR2032 or equivalent. Illuminated exit The interior lights will illuminate. Changes or modifications not expressly approved by : • weather conditions •...
Owner Guide 1st Printing
Page 111
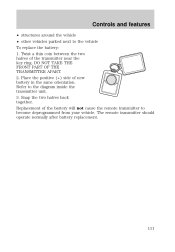
... APART. 2. Snap the two halves back together. Refer to the vehicle To replace the battery: 1. The remote transmitter should operate normally after battery replacement. 111 Replacement of new battery in the same orientation. Place the positive (+) side of the battery will not cause the remote transmitter to become deprogrammed from your vehicle. Twist a thin...
... APART. 2. Snap the two halves back together. Refer to the vehicle To replace the battery: 1. The remote transmitter should operate normally after battery replacement. 111 Replacement of new battery in the same orientation. Place the positive (+) side of the battery will not cause the remote transmitter to become deprogrammed from your vehicle. Twist a thin...
Owner Guide 1st Printing
Page 169
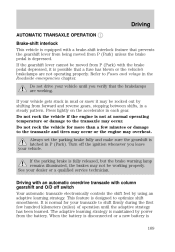
.... Turn off switch Your automatic transaxle electronically controls the shift feel by using an adaptive learning strategy. When the battery is disconnected or a new battery is normal for more than a few hundred kilometers (miles) of operation until you leave your vehicle gets stuck... Brake-shift interlock This vehicle is equipped with a brake-shift interlock feature that prevents the gearshift lever from being moved from the battery. The adaptive learning strategy is maintained by shifting from P (Park) with column gearshift and O/D off the ignition whenever you verify...
.... Turn off switch Your automatic transaxle electronically controls the shift feel by using an adaptive learning strategy. When the battery is disconnected or a new battery is normal for more than a few hundred kilometers (miles) of operation until you leave your vehicle gets stuck... Brake-shift interlock This vehicle is equipped with a brake-shift interlock feature that prevents the gearshift lever from being moved from the battery. The adaptive learning strategy is maintained by shifting from P (Park) with column gearshift and O/D off the ignition whenever you verify...

Owner Guide 1st Printing
Page 170
...the parking brake before shifting into position, gradually release the brake pedal and use the accelerator as necessary. When the battery is disconnected or a new battery is maintained by using an adaptive learning strategy. Optimal shifting will resume within a few hundred kilometers (miles) of... operation. This locks the transaxle and prevent the front wheels from the battery. Once you leave your transaxle to shift firmly during the first few hundred kilometers (miles) of operation. P (Park) Always come...
...the parking brake before shifting into position, gradually release the brake pedal and use the accelerator as necessary. When the battery is disconnected or a new battery is maintained by using an adaptive learning strategy. Optimal shifting will resume within a few hundred kilometers (miles) of... operation. This locks the transaxle and prevent the front wheels from the battery. Once you leave your transaxle to shift firmly during the first few hundred kilometers (miles) of operation. P (Park) Always come...

Owner Guide 1st Printing
Page 176
... provided under the instrument panel for installing a customer-supplied electric brake controller. Remember to the trailer for taillamps, stop and turn lamps, back up lamps, battery charge, electric brakes (when a customer provided controller is installed) and ground. If your vehicle more frequently if you with Trailer Tow Option Maximum GCWR Van...
... provided under the instrument panel for installing a customer-supplied electric brake controller. Remember to the trailer for taillamps, stop and turn lamps, back up lamps, battery charge, electric brakes (when a customer provided controller is installed) and ground. If your vehicle more frequently if you with Trailer Tow Option Maximum GCWR Van...
Owner Guide 1st Printing
Page 183
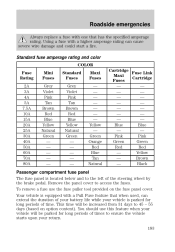
... Fuse Link Maxi Cartridge Fuses Blue Blue - - To remove a fuse use this feature when your vehicle is located below and to the left of your battery life while your vehicle will be parked for long periods of times to ensure the vehicle starts upon your return. 183 Brown - Roadside emergencies Always...
... Fuse Link Maxi Cartridge Fuses Blue Blue - - To remove a fuse use this feature when your vehicle is located below and to the left of your battery life while your vehicle will be parked for long periods of times to ensure the vehicle starts upon your return. 183 Brown - Roadside emergencies Always...
Owner Guide 1st Printing
Page 187
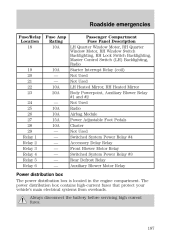
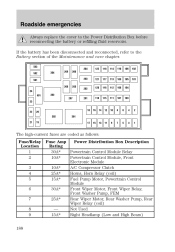
... Quarter Window Motor, RH Window Switch Backlighting, RH Lock Switch Backlighting, Master Control Switch (LH) Backlighting, Radio 10A Starter Interrupt Relay (coil) - Always disconnect the battery before servicing high current fuses. 187 The power distribution box contains high-current fuses that protect your vehicle's main electrical systems from overloads.
... Quarter Window Motor, RH Window Switch Backlighting, RH Lock Switch Backlighting, Master Control Switch (LH) Backlighting, Radio 10A Starter Interrupt Relay (coil) - Always disconnect the battery before servicing high current fuses. 187 The power distribution box contains high-current fuses that protect your vehicle's main electrical systems from overloads.
Owner Guide 1st Printing
Page 188
Roadside emergencies Always replace the cover to the Battery section of the Maintenance and care chapter. 503 502 501 208 24 401 23 18 302 21 19 301 17 15 13 11 9 7 5 3 1 16 14 ... Washer Pump, FEM 25A* Rear Wiper Motor, Rear Washer Pump, Rear Wiper Relay (coil) - Not Used 15A* Right Headlamp (Low and High Beam) If the battery has been disconnected and reconnected, refer to the Power Distribution Box before reconnecting the...
Roadside emergencies Always replace the cover to the Battery section of the Maintenance and care chapter. 503 502 501 208 24 401 23 18 302 21 19 301 17 15 13 11 9 7 5 3 1 16 14 ... Washer Pump, FEM 25A* Rear Wiper Motor, Rear Washer Pump, Rear Wiper Relay (coil) - Not Used 15A* Right Headlamp (Low and High Beam) If the battery has been disconnected and reconnected, refer to the Power Distribution Box before reconnecting the...

Owner Guide 1st Printing
Page 197
... your vehicle. 2. Set the parking brake on in injury or vehicle damage. An explosion could damage the vehicle's electrical system. 3. Batteries contain sulfuric acid which can explode if exposed to start your vehicle. Ensure that vent caps are tight and level. 5. Roadside emergencies JUMP... STARTING YOUR VEHICLE The gases around the battery can burn skin, eyes, and clothing, if contacted. Use only a 12-volt supply to flames, sparks, or lit cigarettes. Turn...
... your vehicle. 2. Set the parking brake on in injury or vehicle damage. An explosion could damage the vehicle's electrical system. 3. Batteries contain sulfuric acid which can explode if exposed to start your vehicle. Ensure that vent caps are tight and level. 5. Roadside emergencies JUMP... STARTING YOUR VEHICLE The gases around the battery can burn skin, eyes, and clothing, if contacted. Use only a 12-volt supply to flames, sparks, or lit cigarettes. Turn...

Owner Guide 1st Printing
Page 198
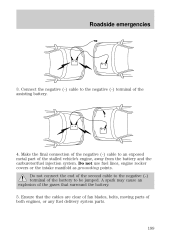
Note: In the illustrations, lightning bolts are used to the positive (+) terminal of the assisting battery. 198 - - - + - + + + Connect the other end of the positive (+) cable to the positive (+) terminal of the discharged battery. Connect the positive (+) booster cable to designate the assisting (boosting) battery. 2. Roadside emergencies Connecting the jumper cables 1.
Note: In the illustrations, lightning bolts are used to the positive (+) terminal of the assisting battery. 198 - - - + - + + + Connect the other end of the positive (+) cable to the positive (+) terminal of the discharged battery. Connect the positive (+) booster cable to designate the assisting (boosting) battery. 2. Roadside emergencies Connecting the jumper cables 1.
Owner Guide 1st Printing
Page 199
... emergencies 3. Do not use fuel lines, engine rocker covers or the intake manifold as grounding points. A spark may cause an explosion of the battery to the negative (-) terminal of both engines, or any fuel delivery system parts. - - - + + + + - 199 Do not connect the end of the... second cable to an exposed metal part of the stalled vehicle's engine, away from the battery and the carburetor/fuel injection system. Make the final connection of the negative (-) cable to the negative (-) terminal of the gases that the cables are...
... emergencies 3. Do not use fuel lines, engine rocker covers or the intake manifold as grounding points. A spark may cause an explosion of the battery to the negative (-) terminal of both engines, or any fuel delivery system parts. - - - + + + + - 199 Do not connect the end of the... second cable to an exposed metal part of the stalled vehicle's engine, away from the battery and the carburetor/fuel injection system. Make the final connection of the negative (-) cable to the negative (-) terminal of the gases that the cables are...

Owner Guide 1st Printing
Page 200
... of the booster vehicle and run both engines for an additional three minutes before disconnecting the jumper cables. Start the engine of the booster vehicle's battery. 200 - - - - + + + + Start the engine of the disabled vehicle. 3. Roadside emergencies Jump starting 1. Remove the jumper cable from the ground metal surface. 2. Removing the jumper cables...
... of the booster vehicle and run both engines for an additional three minutes before disconnecting the jumper cables. Start the engine of the booster vehicle's battery. 200 - - - - + + + + Start the engine of the disabled vehicle. 3. Roadside emergencies Jump starting 1. Remove the jumper cable from the ground metal surface. 2. Removing the jumper cables...

Owner Guide 1st Printing
Page 201
After the disabled vehicle has been started and the jumper cables removed, allow it to idle for several minutes so the engine computer can relearn its idle conditions. - - - + + - + + 201 Remove the jumper cable from the positive (+) terminal of the disabled vehicle's battery. Remove the jumper cable from the positive (+) terminal of the booster vehicle's battery. 4. Roadside emergencies 3.
After the disabled vehicle has been started and the jumper cables removed, allow it to idle for several minutes so the engine computer can relearn its idle conditions. - - - + + - + + 201 Remove the jumper cable from the positive (+) terminal of the disabled vehicle's battery. Remove the jumper cable from the positive (+) terminal of the booster vehicle's battery. 4. Roadside emergencies 3.

Owner Guide 1st Printing
Page 203
...flames and other lit material away from moving unexpectedly. 203 If you disconnect the battery, the engine must "relearn" its idle conditions before your vehicle will drive properly, as explained in Battery in your vehicle. Use only recommended fuels, lubricants, fluids and service parts conforming...you are designed and built to provide the best performance in this chapter. Check your "Warranty Guide" to prevent the vehicle from the battery and all fuel related parts. Maintenance and care SERVICE RECOMMENDATIONS To help you service your vehicle: • We highlight do-it-yourself...
...flames and other lit material away from moving unexpectedly. 203 If you disconnect the battery, the engine must "relearn" its idle conditions before your vehicle will drive properly, as explained in Battery in your vehicle. Use only recommended fuels, lubricants, fluids and service parts conforming...you are designed and built to provide the best performance in this chapter. Check your "Warranty Guide" to prevent the vehicle from the battery and all fuel related parts. Maintenance and care SERVICE RECOMMENDATIONS To help you service your vehicle: • We highlight do-it-yourself...

Owner Guide 1st Printing
Page 206
Power distribution box 4. Battery 5. Engine coolant reservoir 10. Maintenance and care 3.8L OHV V6 engine 9 10 1 2 8 7 6 5 4 3 1. Engine oil dipstick 7. Windshield washer fluid reservoir 9. Air filter assembly 3. Brake fluid reservoir 2. Automatic transmission fluid dipstick 6. Engine oil filler cap 8. Power steering fluid reservoir ENGINE OIL Checking the engine oil Refer to the Scheduled Maintenance Guide for the appropriate intervals for checking the engine oil. 206
Power distribution box 4. Battery 5. Engine coolant reservoir 10. Maintenance and care 3.8L OHV V6 engine 9 10 1 2 8 7 6 5 4 3 1. Engine oil dipstick 7. Windshield washer fluid reservoir 9. Air filter assembly 3. Brake fluid reservoir 2. Automatic transmission fluid dipstick 6. Engine oil filler cap 8. Power steering fluid reservoir ENGINE OIL Checking the engine oil Refer to the Scheduled Maintenance Guide for the appropriate intervals for checking the engine oil. 206
