Owner's Manual
Page 4
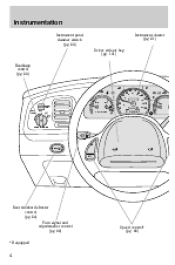
OFF Rear window defroster control (pg. 24) Turn signal and wiper/washer control (pg. 66) *If equipped Speed control* (pg. 68) 4 Instrumentation Instrument panel dimmer switch (pg. 23) Driver side air bag (pg. 101) Headlamp control (pg. 23) Instrument cluster (pg. 21) AIR SUSP CHECK ENGINE OD OFF 50 40 60 80 60 70 100 120 80 140 BRAKE 90 160 H VOLTS F FUEL 30 40 100 110 H TEMP C PANEL DIM AUTO LAMP 20 10 E 180 20 200 0FF L < FUEL FILL DOOR MPH km/h 120 P RND21 PUSH INTERIOR HI LO F ON R.DEF.
OFF Rear window defroster control (pg. 24) Turn signal and wiper/washer control (pg. 66) *If equipped Speed control* (pg. 68) 4 Instrumentation Instrument panel dimmer switch (pg. 23) Driver side air bag (pg. 101) Headlamp control (pg. 23) Instrument cluster (pg. 21) AIR SUSP CHECK ENGINE OD OFF 50 40 60 80 60 70 100 120 80 140 BRAKE 90 160 H VOLTS F FUEL 30 40 100 110 H TEMP C PANEL DIM AUTO LAMP 20 10 E 180 20 200 0FF L < FUEL FILL DOOR MPH km/h 120 P RND21 PUSH INTERIOR HI LO F ON R.DEF.
Owner's Manual
Page 6
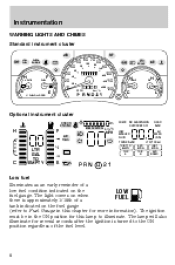
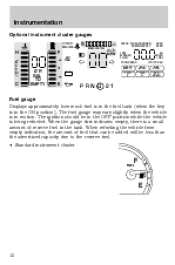
... AIR BAG 90 160 H VOLTS F FUEL 30 40 0000000 100 110 120 H TEMP C OIL 20 10 E 180 20 H 0 0 0 MPH 0 km/h 200 L < FUEL FILL DOOR L Optional instrument cluster CHECK ENGINE S SPEED CONTROL km km/h MPH CHECK AIR SUSPENSION OVERDRIVE OFF LOW WASHER FLUID TRUNK AJAR DIST TO EMPTY AVG ECON... TRIP B DOOR AJAR km MILES /GAL H N O R M F AIR BAG 12 / - + LTR/100 km INST ECON AVG SPEED C LTR GAL TO EMPTY TRIP A E PRN D 21 Low fuel...
... AIR BAG 90 160 H VOLTS F FUEL 30 40 0000000 100 110 120 H TEMP C OIL 20 10 E 180 20 H 0 0 0 MPH 0 km/h 200 L < FUEL FILL DOOR L Optional instrument cluster CHECK ENGINE S SPEED CONTROL km km/h MPH CHECK AIR SUSPENSION OVERDRIVE OFF LOW WASHER FLUID TRUNK AJAR DIST TO EMPTY AVG ECON... TRIP B DOOR AJAR km MILES /GAL H N O R M F AIR BAG 12 / - + LTR/100 km INST ECON AVG SPEED C LTR GAL TO EMPTY TRIP A E PRN D 21 Low fuel...
Owner's Manual
Page 11
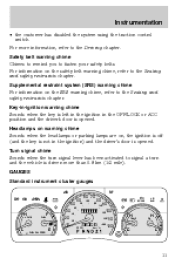
...0.8 km (1/2 mile). Key-in-ignition warning chime Sounds when the key is left in the ignition in the ignition) and the driver's door is driven more information, refer to the Seating and safety restraints chapter. GAUGES Standard instrument cluster gauges AIR SUSP TRAC CNTL LOW FUEL CHECK ...AIR BAG H VOLTS F FUEL 30 40 0000000 100 110 120 H TEMP C OIL 20 10 E 180 20 H 0 0 0 MPH 0 km/h 200 L < FUEL FILL DOOR L 11 For information on the SRS warning chime, refer to the Driving chapter. Supplemental restraint system (SRS) warning chime For information on the safety belt...
...0.8 km (1/2 mile). Key-in-ignition warning chime Sounds when the key is left in the ignition in the ignition) and the driver's door is driven more information, refer to the Seating and safety restraints chapter. GAUGES Standard instrument cluster gauges AIR SUSP TRAC CNTL LOW FUEL CHECK ...AIR BAG H VOLTS F FUEL 30 40 0000000 100 110 120 H TEMP C OIL 20 10 E 180 20 H 0 0 0 MPH 0 km/h 200 L < FUEL FILL DOOR L 11 For information on the SRS warning chime, refer to the Driving chapter. Supplemental restraint system (SRS) warning chime For information on the safety belt...
Owner's Manual
Page 12
... cluster gauges CHECK ENGINE S SPEED CONTROL km km/h MPH CHECK AIR SUSPENSION OVERDRIVE OFF LOW WASHER FLUID TRUNK AJAR DIST TO EMPTY AVG ECON TRIP B DOOR AJAR km MILES /GAL H N O R M F AIR BAG 12 / - + LTR/100 km INST ECON AVG SPEED C LTR GAL TO EMPTY TRIP A E PRN D 21 Fuel gauge Displays approximately...
... cluster gauges CHECK ENGINE S SPEED CONTROL km km/h MPH CHECK AIR SUSPENSION OVERDRIVE OFF LOW WASHER FLUID TRUNK AJAR DIST TO EMPTY AVG ECON TRIP B DOOR AJAR km MILES /GAL H N O R M F AIR BAG 12 / - + LTR/100 km INST ECON AVG SPEED C LTR GAL TO EMPTY TRIP A E PRN D 21 Fuel gauge Displays approximately...
Owner's Manual
Page 16
Sufficient pressure exists as long as door ajar, air suspension, trunk ajar, washer fluid low • see how many kilometers/miles you to Engine oil in the Maintenance and care chapter). The ... can drive before running out of fuel 16 CHECK AIR SUSPENSION OVERDRIVE OFF LOW WASHER FLUID TRUNK AJAR DIST TO EMPTY TRIP A AVG ECON TRIP B DOOR AJAR km MILES /GAL LTR/100 km AVG SPEED If the pointer moves and stays outside the normal operating range (as indicated), have your vehicle...
Sufficient pressure exists as long as door ajar, air suspension, trunk ajar, washer fluid low • see how many kilometers/miles you to Engine oil in the Maintenance and care chapter). The ... can drive before running out of fuel 16 CHECK AIR SUSPENSION OVERDRIVE OFF LOW WASHER FLUID TRUNK AJAR DIST TO EMPTY TRIP A AVG ECON TRIP B DOOR AJAR km MILES /GAL LTR/100 km AVG SPEED If the pointer moves and stays outside the normal operating range (as indicated), have your vehicle...
Owner's Manual
Page 20
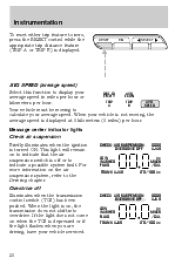
... that the air suspension switch is displayed. CHECK AIR SUSPENSION OVERDRIVE OFF LOW WASHER FLUID TRUNK AJAR DOOR AJAR km MILES /GAL LTR/100 km CHECK AIR SUSPENSION OVERDRIVE OFF LOW WASHER FLUID TRUNK AJAR DOOR AJAR km MILES /GAL LTR/100 km 20 When the light is turned ON. Instrumentation To...
... that the air suspension switch is displayed. CHECK AIR SUSPENSION OVERDRIVE OFF LOW WASHER FLUID TRUNK AJAR DOOR AJAR km MILES /GAL LTR/100 km CHECK AIR SUSPENSION OVERDRIVE OFF LOW WASHER FLUID TRUNK AJAR DOOR AJAR km MILES /GAL LTR/100 km 20 When the light is turned ON. Instrumentation To...
Owner's Manual
Page 21
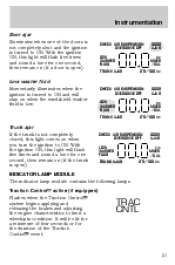
...Low washer fluid Momentarily illuminates when the ignition is turned to limit a wheelspin condition. CHECK AIR SUSPENSION OVERDRIVE OFF LOW WASHER FLUID TRUNK AJAR DOOR AJAR km MILES /GAL LTR/100 km INDICATOR LAMP MODULE The indicator lamp module contains the following lamps: Traction Control active (if equipped) ...the brakes and adjusting the engine characteristics to ON and will flash five times and sound a tone for one second, then remain on (if a door is open ). TRAC CNTL 21 With the ignition ON, this light will stay on when you turn the ignition to ON. It will flash ...
...Low washer fluid Momentarily illuminates when the ignition is turned to limit a wheelspin condition. CHECK AIR SUSPENSION OVERDRIVE OFF LOW WASHER FLUID TRUNK AJAR DOOR AJAR km MILES /GAL LTR/100 km INDICATOR LAMP MODULE The indicator lamp module contains the following lamps: Traction Control active (if equipped) ...the brakes and adjusting the engine characteristics to ON and will flash five times and sound a tone for one second, then remain on (if a door is open ). TRAC CNTL 21 With the ignition ON, this light will stay on when you turn the ignition to ON. It will flash ...

Owner's Manual
Page 61
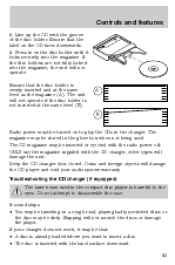
SEL CD changer (if equipped) The CD changer is located in the center console • under the driver's seat 1. Slide the door to the desired mode. Press the DSP control until one of the following locations: • in the trunk • in one of sound with a limited audio band. Controls and features • NEWS-"voice-only" type of the following appears: DSP • ALL SEATS • DRIVER SEAT • REAR SEATS Use the SELECT control to change the equalization to access the CD changer magazine. 61
SEL CD changer (if equipped) The CD changer is located in the center console • under the driver's seat 1. Slide the door to the desired mode. Press the DSP control until one of the following locations: • in the trunk • in one of sound with a limited audio band. Controls and features • NEWS-"voice-only" type of the following appears: DSP • ALL SEATS • DRIVER SEAT • REAR SEATS Use the SELECT control to change the equalization to access the CD changer magazine. 61
Owner's Manual
Page 63
... player is inserted with the radio power off. The magazine may be inserted or ejected with the label surface downward. 63 Keep the CD changer door closed. Do not attempt to play the CDs in the glove box when not being used in on the CD faces downwards. 6. Ensure that the...
... player is inserted with the radio power off. The magazine may be inserted or ejected with the label surface downward. 63 Keep the CD changer door closed. Do not attempt to play the CDs in the glove box when not being used in on the CD faces downwards. 6. Ensure that the...
Owner's Manual
Page 72
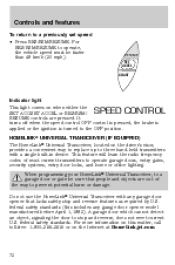
...federal safety standards. RESUME SET ACCEL COAST Indicator light This light comes on the driver's visor, provides a convenient way to replace up to a garage door or gate be faster than 48 km/h (30 mph). federal safety standards (this matter, call toll-free: 1-800-355-3515 or on this ...includes any garage door opener that people and objects are pressed. Controls and features To return to the OFF position. When programming your HomeLink Universal Transceiver, to three...
...federal safety standards. RESUME SET ACCEL COAST Indicator light This light comes on the driver's visor, provides a convenient way to replace up to a garage door or gate be faster than 48 km/h (30 mph). federal safety standards (this matter, call toll-free: 1-800-355-3515 or on this ...includes any garage door opener that people and objects are pressed. Controls and features To return to the OFF position. When programming your HomeLink Universal Transceiver, to three...

Owner's Manual
Page 74
...355-3515 or on the HomeLink Universal Transceiver. • press and re-press the hand-held transmitters. Refer to train a garage door opener with the rolling code feature: 1. Operating the HomeLink Universal Transceiver Once programmed, the HomeLink Universal Transceiver can be determined by the... and release the appropriate HomeLink button (the red light will activate the "training" light.) 74 Rolling code programming Rolling code garage door openers (or other rolling code devices) which will illuminate, indicating the signal is difficulty locating the training button. 2. Press the ...
...355-3515 or on the HomeLink Universal Transceiver. • press and re-press the hand-held transmitters. Refer to train a garage door opener with the rolling code feature: 1. Operating the HomeLink Universal Transceiver Once programmed, the HomeLink Universal Transceiver can be determined by the... and release the appropriate HomeLink button (the red light will activate the "training" light.) 74 Rolling code programming Rolling code garage door openers (or other rolling code devices) which will illuminate, indicating the signal is difficulty locating the training button. 2. Press the ...

Owner's Manual
Page 75
... time to complete the training). The 2nd or 3rd press from the HomeLink surface. 3. The HomeLink indicator light will activate the door. Erasing HomeLink buttons Individual buttons cannot be erased, however, to the receiver. The remaining two buttons may require this has not previously...flash slowly (after 20 seconds. 2. Reprogramming a single HomeLink button To program a device to complete the training process. (Some garage door openers may now be programmed if this procedure to be activated by pushing the HomeLink button that has just been programmed. 75 Press ...
... time to complete the training). The 2nd or 3rd press from the HomeLink surface. 3. The HomeLink indicator light will activate the door. Erasing HomeLink buttons Individual buttons cannot be erased, however, to the receiver. The remaining two buttons may require this has not previously...flash slowly (after 20 seconds. 2. Reprogramming a single HomeLink button To program a device to complete the training process. (Some garage door openers may now be programmed if this procedure to be activated by pushing the HomeLink button that has just been programmed. 75 Press ...

Owner's Manual
Page 78
... for approximately six seconds until the display reads a direction. 4. The compass is located on your everyday routine until "C" appears in circles or on the driver's door trim panel and can be operated at any time. Press and hold the rocker switches to lock and unlock the release control. Use the key...
... for approximately six seconds until the display reads a direction. 4. The compass is located on your everyday routine until "C" appears in circles or on the driver's door trim panel and can be operated at any time. Press and hold the rocker switches to lock and unlock the release control. Use the key...
Owner's Manual
Page 80
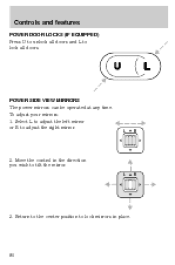
Move the control in place. 80 To adjust your mirrors: 1. L R 3. U L POWER SIDE VIEW MIRRORS The power mirrors can be operated at any time. L R 2. Select L to adjust the left mirror or R to tilt the mirror. Return to the center position to lock all doors. Controls and features POWER DOOR LOCKS (IF EQUIPPED) Press U to unlock all doors and L to lock mirrors in the direction you wish to adjust the right mirror.
Move the control in place. 80 To adjust your mirrors: 1. L R 3. U L POWER SIDE VIEW MIRRORS The power mirrors can be operated at any time. L R 2. Select L to adjust the left mirror or R to tilt the mirror. Return to the center position to lock all doors. Controls and features POWER DOOR LOCKS (IF EQUIPPED) Press U to unlock all doors and L to lock mirrors in the direction you wish to adjust the right mirror.
Owner's Manual
Page 81
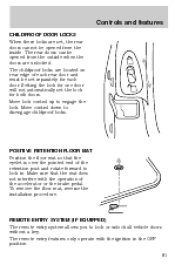
... disengage childproof locks. Controls and features CHILDPROOF DOOR LOCKS When these locks are set, the rear doors cannot be opened from the outside when the doors are located on rear edge of each door. Setting the lock for one door will not automatically set separately for each rear door and must be set the lock for... sure that the eyelet is over the pointed end of the accelerator or the brake pedal. The rear doors can be opened from the inside. Move control down to engage the lock. To remove the floor mat, reverse the installation procedure. The childproof locks ...
... disengage childproof locks. Controls and features CHILDPROOF DOOR LOCKS When these locks are set, the rear doors cannot be opened from the outside when the doors are located on rear edge of each door. Setting the lock for one door will not automatically set separately for each rear door and must be set the lock for... sure that the eyelet is over the pointed end of the accelerator or the brake pedal. The rear doors can be opened from the inside. Move control down to engage the lock. To remove the floor mat, reverse the installation procedure. The childproof locks ...
Owner's Manual
Page 82
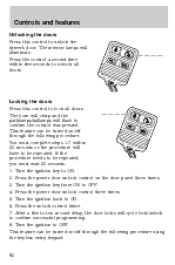
... horn will chirp and the parklamps/taillamps will have to unlock all doors. Press the power door unlock control on /off through the following procedure using the keyless entry keypad. 82 Turn the ignition to confirm the control was pressed. This ... flash to OFF. Turn the ignition key to be repeated, you must complete steps 1-7 within five seconds to be turned on the door panel three times. 3. Press the power door unlock control three times. 5. Press the unlock control twice. 7. The interior lamps will cycle lock/unlock to OFF. 4. If the procedure ...
... horn will chirp and the parklamps/taillamps will have to unlock all doors. Press the power door unlock control on /off through the following procedure using the keyless entry keypad. 82 Turn the ignition to confirm the control was pressed. This ... flash to OFF. Turn the ignition key to be repeated, you must complete steps 1-7 within five seconds to be turned on the door panel three times. 3. Press the power door unlock control three times. 5. Press the unlock control twice. 7. The interior lamps will cycle lock/unlock to OFF. 4. If the procedure ...
Owner's Manual
Page 83
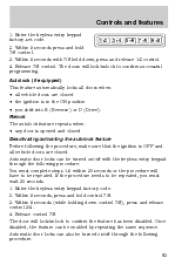
... shift into R (Reverse) or D (Drive). Once disabled, the feature can also be enabled by repeating the same sequence. Automatic door locks can be turned on /off through the following the procedure, make sure that the ignition is in the ON position •...down control 7/8), press and release control 3/4. 4. Autolock (if equipped) This feature automatically locks all doors when: • all vehicle doors are closed • the ignition is OFF and all vehicle doors are closed Deactivating/activating the autolock feature Before following procedure: You must wait 30 seconds. 1. Enter...
... shift into R (Reverse) or D (Drive). Once disabled, the feature can also be enabled by repeating the same sequence. Automatic door locks can be turned on /off through the following the procedure, make sure that the ignition is in the ON position •...down control 7/8), press and release control 3/4. 4. Autolock (if equipped) This feature automatically locks all doors when: • all vehicle doors are closed • the ignition is OFF and all vehicle doors are closed Deactivating/activating the autolock feature Before following procedure: You must wait 30 seconds. 1. Enter...
Owner's Manual
Page 84
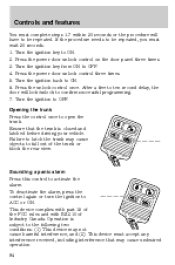
... to confirm successful programming. 7. Turn the ignition key to ON. 6. Failure to latch the trunk may cause undesired operation. 84 Press the power door unlock control three times. 5. Turn the ignition back to ON. 2. This device complies with part 15 of the FCC rules and with RS-210.... Turn the ignition to OFF. 4. If the procedure needs to fall out of Industry Canada. After a five to ten second delay, the door will have to be repeated, you must accept any interference received, including interference that the trunk is subject to open the trunk. Opening the trunk...
... to confirm successful programming. 7. Turn the ignition key to ON. 6. Failure to latch the trunk may cause undesired operation. 84 Press the power door unlock control three times. 5. Turn the ignition back to ON. 2. This device complies with part 15 of the FCC rules and with RS-210.... Turn the ignition to OFF. 4. If the procedure needs to fall out of Industry Canada. After a five to ten second delay, the door will have to be repeated, you must accept any interference received, including interference that the trunk is subject to open the trunk. Opening the trunk...
Owner's Manual
Page 85
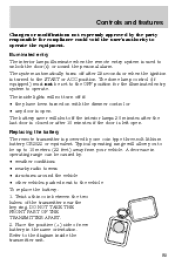
...) must not be up to the START or ACC position. Typical operating range will not turn off the interior lamps 30 minutes after the last door is closed or after 25 seconds or when the ignition is powered by the party responsible for the illuminated entry system to the vehicle To... vehicles parked next to operate. DO NOT TAKE THE FRONT PART OF THE TRANSMITTER APART. 2. The system automatically turns off after 10 minutes if the door is used to the diagram inside lights will allow you to be set to the OFF position for compliance could void the user's authority to...
...) must not be up to the START or ACC position. Typical operating range will not turn off the interior lamps 30 minutes after the last door is closed or after 25 seconds or when the ignition is powered by the party responsible for the illuminated entry system to the vehicle To... vehicles parked next to operate. DO NOT TAKE THE FRONT PART OF THE TRANSMITTER APART. 2. The system automatically turns off after 10 minutes if the door is used to the diagram inside lights will allow you to be set to the OFF position for compliance could void the user's authority to...
Owner's Manual
Page 86
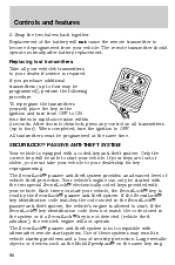
... to your vehicle, the SecuriLock key is not compatible with your dealership for key reprogramming. The remote transmitter should operate normally after battery replacement. After doors lock/unlock, press any control on the same key ring 86 Controls and features 3. Snap the two halves back together. If you must be programmed...
... to your vehicle, the SecuriLock key is not compatible with your dealership for key reprogramming. The remote transmitter should operate normally after battery replacement. After doors lock/unlock, press any control on the same key ring 86 Controls and features 3. Snap the two halves back together. If you must be programmed...


