Owner's Manual
Page 3
Index ...Service Station Information ... Starting Your Explorer ...67 Warning Lights and Gauges ...79 Instrument Panel Controls ...Steering Column Controls ...Features ...Electronic Sound Systems ...109 135 147 207 245 295 317 323 327 333 411 421 444 Driving Your Explorer ...Roadside Emergencies ...Customer Assistance ... Reporting Safety Defects Accessories ...Servicing Your Explorer ...Quick Index ... Table of Contents Introductory Information Safety Restraints ...1 9 ...
Index ...Service Station Information ... Starting Your Explorer ...67 Warning Lights and Gauges ...79 Instrument Panel Controls ...Steering Column Controls ...Features ...Electronic Sound Systems ...109 135 147 207 245 295 317 323 327 333 411 421 444 Driving Your Explorer ...Roadside Emergencies ...Customer Assistance ... Reporting Safety Defects Accessories ...Servicing Your Explorer ...Quick Index ... Table of Contents Introductory Information Safety Restraints ...1 9 ...
Owner's Manual
Page 29
... of the rear-facing seat against the seatback, move the passenger seat as far back from the instrument panel as possible. The force of the rapidly inflating passenger air bag could push the top of the instrument panel, or lean over near the air bag cover on the proper use of seat belts, child...
... of the rear-facing seat against the seatback, move the passenger seat as far back from the instrument panel as possible. The force of the rapidly inflating passenger air bag could push the top of the instrument panel, or lean over near the air bag cover on the proper use of seat belts, child...
Owner's Manual
Page 30
... steering wheel. at 1-800-782-4356. Ask for brochure FPS-8602. The driver air bag is in the center of this vehicle, please refer to Ford's brochure entitled Some Important Information About Air Bag Supplemental Restraint System which connects the components. The right front passenger seat air bag (if equipped) is... which can be obtained by calling Helm Inc. How the Air Bag Supplemental Restraint System Operates The Air Bag Supplemental Restraint System consists of the instrument panel ledge above the glove compartment. 28
... steering wheel. at 1-800-782-4356. Ask for brochure FPS-8602. The driver air bag is in the center of this vehicle, please refer to Ford's brochure entitled Some Important Information About Air Bag Supplemental Restraint System which connects the components. The right front passenger seat air bag (if equipped) is... which can be obtained by calling Helm Inc. How the Air Bag Supplemental Restraint System Operates The Air Bag Supplemental Restraint System consists of the instrument panel ledge above the glove compartment. 28
Owner's Manual
Page 55
... seat properly, the child may be injured in the buckle. Forward facing child seats must have the passenger seat moved as far back from the instrument panel as possible. An unsecured safety seat could result in your vehicle. REAR-FACING INFANT SEATS MUST ALWAYS BE PLACED IN THE REAR SEAT. Failure to...
... seat properly, the child may be injured in the buckle. Forward facing child seats must have the passenger seat moved as far back from the instrument panel as possible. An unsecured safety seat could result in your vehicle. REAR-FACING INFANT SEATS MUST ALWAYS BE PLACED IN THE REAR SEAT. Failure to...
Owner's Manual
Page 57
... use of your Ford or Lincoln-Mercury dealer. For more information on top tether straps see your vehicle. Accident statistics suggest that seating position, and make sure the tongue is capable of the child. Forward facing child seats must have the passenger seat moved as far back from the instrument panel as possible...
... use of your Ford or Lincoln-Mercury dealer. For more information on top tether straps see your vehicle. Accident statistics suggest that seating position, and make sure the tongue is capable of the child. Forward facing child seats must have the passenger seat moved as far back from the instrument panel as possible...
Owner's Manual
Page 73
... engine, then try again. s At temperatures above 10˚F (-12˚C): If the engine does not start in fifteen (15) seconds on the instrument panel to make sure that they work. Turn the key to Start Your Vehicle at the beginning of this section. 2. Follow the steps under Preparing to... when starting your engine: 1. If you have difficulty in turning the key, rotate the steering wheel slightly because it may be binding. Starting Your Explorer Before you start your vehicle, you should test the warning lights on the first try, turn the key to OFF, wait approximately ten (10)...
... engine, then try again. s At temperatures above 10˚F (-12˚C): If the engine does not start in fifteen (15) seconds on the instrument panel to make sure that they work. Turn the key to Start Your Vehicle at the beginning of this section. 2. Follow the steps under Preparing to... when starting your engine: 1. If you have difficulty in turning the key, rotate the steering wheel slightly because it may be binding. Starting Your Explorer Before you start your vehicle, you should test the warning lights on the first try, turn the key to OFF, wait approximately ten (10)...
Owner's Manual
Page 80
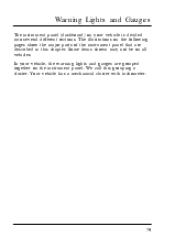
Your vehicle has a mechanical cluster with tachometer. 79 The illustrations on the following pages show the major parts of the instrument panel that are grouped together on the instrument panel. Warning Lights and Gauges The instrument panel (dashboard) on your vehicle, the warning lights and gauges are described in this grouping a cluster. We call this chapter. In your vehicle is divided into several different sections. Some items shown may not be on all vehicles.
Your vehicle has a mechanical cluster with tachometer. 79 The illustrations on the following pages show the major parts of the instrument panel that are grouped together on the instrument panel. Warning Lights and Gauges The instrument panel (dashboard) on your vehicle, the warning lights and gauges are described in this grouping a cluster. We call this chapter. In your vehicle is divided into several different sections. Some items shown may not be on all vehicles.
Owner's Manual
Page 102
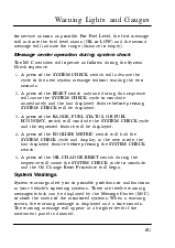
... will be displayed. 3. Message center operation during system check The M/C switches will operate as possible. The warning message will appear at a brighter level if the instrument panel is displayed and a tone sounds. A press of the SYSTEM CHECK switch will indicate the range (distance to empty). Warning Lights and Gauges for service as...
... will be displayed. 3. Message center operation during system check The M/C switches will operate as possible. The warning message will appear at a brighter level if the instrument panel is displayed and a tone sounds. A press of the SYSTEM CHECK switch will indicate the range (distance to empty). Warning Lights and Gauges for service as...
Owner's Manual
Page 110
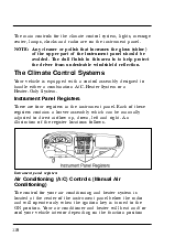
...conditioner and heater will operate only when the ignition key is turned to the ON position. The dull finish in the instrument panel. Each of the instrument panel below the radio and will heat and/or cool your air conditioning and heater system is located at the center of ...these registers contains a louver assembly which can be avoided. An illustration of the instrument panel should be manually adjusted to handle either a combination A/C-Heater System or a Heater-Only System. NOTE: Any cleaner or polish that increases ...
...conditioner and heater will operate only when the ignition key is turned to the ON position. The dull finish in the instrument panel. Each of the instrument panel below the radio and will heat and/or cool your air conditioning and heater system is located at the center of ...these registers contains a louver assembly which can be avoided. An illustration of the instrument panel should be manually adjusted to handle either a combination A/C-Heater System or a Heater-Only System. NOTE: Any cleaner or polish that increases ...

Owner's Manual
Page 111
... knob. The temperature control knob setting determines the temperature of the air that flows into the vehicle. The function selector control knob allows you select. Instrument Panel Controls and temperature you to select heating or cooling and determine where the air will be directed. Any position selected between the two extreme temperatures...
... knob. The temperature control knob setting determines the temperature of the air that flows into the vehicle. The function selector control knob allows you select. Instrument Panel Controls and temperature you to select heating or cooling and determine where the air will be directed. Any position selected between the two extreme temperatures...
Owner's Manual
Page 112
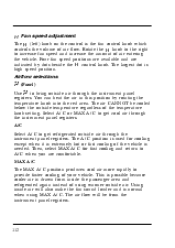
...vehicle is high speed position. The A/C position is used for fast cooling and return to bring outside air through the instrument panel registers. Airflow selections Q (Panel) Use Q to A/C when you are indicated by rotating the temperature knob into the red area. You can heat the...fan speed positions are available and are comfortable. MAX A/C The MAX A/C position produces cool air more rapidly to get cool air through the instrument panel registers. A/C Select A/C to provide faster cooling of air flow. H Fan speed adjustment The H (left) knob on the control is ...
...vehicle is high speed position. The A/C position is used for fast cooling and return to bring outside air through the instrument panel registers. Airflow selections Q (Panel) Use Q to A/C when you are indicated by rotating the temperature knob into the red area. You can heat the...fan speed positions are available and are comfortable. MAX A/C The MAX A/C position produces cool air more rapidly to get cool air through the instrument panel registers. A/C Select A/C to provide faster cooling of air flow. H Fan speed adjustment The H (left) knob on the control is ...
Owner's Manual
Page 113
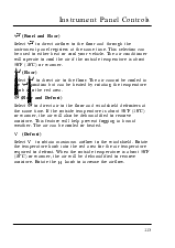
... heated by rotating the temperature knob into the red area for the air temperature required to the floor and windshield defrosters at the same time. Instrument Panel Controls S (Panel and Floor) Select S to direct airflow to the floor. R (Floor) Select R to direct air to the floor and through the...
... heated by rotating the temperature knob into the red area for the air temperature required to the floor and windshield defrosters at the same time. Instrument Panel Controls S (Panel and Floor) Select S to direct airflow to the floor. R (Floor) Select R to direct air to the floor and through the...
Owner's Manual
Page 114
... comfort. This will help you to override the automatic operation with manual override buttons. 114 The intake area is located at the center of the instrument panel below the radio and will operate only when the ignition key is located at the bottom of your engine. Operating tips The following tips will...
... comfort. This will help you to override the automatic operation with manual override buttons. 114 The intake area is located at the center of the instrument panel below the radio and will operate only when the ignition key is located at the bottom of your engine. Operating tips The following tips will...
Owner's Manual
Page 115
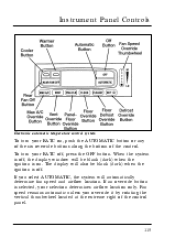
... of the six override buttons along the bottom of the control panel. 115 If you override it by rotating the vertical thumbwheel located at the extreme right of the control. The display will automatically determine fan speed and airflow location. Instrument Panel Controls Electronic automatic temperature control system To turn your selection determines...
... of the six override buttons along the bottom of the control panel. 115 If you override it by rotating the vertical thumbwheel located at the extreme right of the control. The display will automatically determine fan speed and airflow location. Instrument Panel Controls Electronic automatic temperature control system To turn your selection determines...

Owner's Manual
Page 117
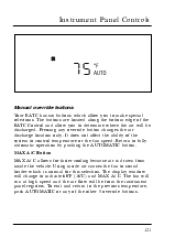
The EATC will need no additional attention. 117 Under normal conditions, your EATC will automatically heat or cool to achieve the set temperature. The selected temperature and AUTO will be shown in the display window. Instrument Panel Controls Automatic operation Push the AUTOMATIC button and select the desired temperature.
The EATC will need no additional attention. 117 Under normal conditions, your EATC will automatically heat or cool to achieve the set temperature. The selected temperature and AUTO will be shown in the display window. Instrument Panel Controls Automatic operation Push the AUTOMATIC button and select the desired temperature.

Owner's Manual
Page 119
... thumbwheel Your EATC automatically adjusts the fan speed to the existing conditions. The thumbwheel is located at the extreme right side of the EATC control panel and is between 68˚F (20˚C) and 78˚F (26˚C). To control the fan speed yourself, use the thumbwheel which will not speed.... Changing the temperature setting by several degrees outside this range will cancel the automatic fan speed control. You must push AUTOMATIC for LO speeds. 119 Instrument Panel Controls The average temperature range used is marked with a H symbol.
... thumbwheel Your EATC automatically adjusts the fan speed to the existing conditions. The thumbwheel is located at the extreme right side of the EATC control panel and is between 68˚F (20˚C) and 78˚F (26˚C). To control the fan speed yourself, use the thumbwheel which will not speed.... Changing the temperature setting by several degrees outside this range will cancel the automatic fan speed control. You must push AUTOMATIC for LO speeds. 119 Instrument Panel Controls The average temperature range used is marked with a H symbol.
Owner's Manual
Page 121
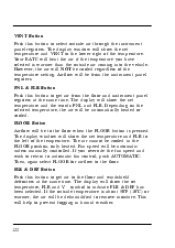
... override buttons Your EATC has six buttons which is normal for faster cooling because air is drawn from the instrument panel registers. To exit and return to fully automatic operation by pushing the AUTOMATIC button. MAX A/C Button MAX A/C allows for this selection. Return to the previous ...
... override buttons Your EATC has six buttons which is normal for faster cooling because air is drawn from the instrument panel registers. To exit and return to fully automatic operation by pushing the AUTOMATIC button. MAX A/C Button MAX A/C allows for this selection. Return to the previous ...
Owner's Manual
Page 122
... air cannot be cooled regardless of the temperature. FLR & DEF Button Push this button to select outside air through the instrument panel registers. The display will be from the floor and instrument panel registers at the same time. However, the air will show the set temperature and VENT to the lower right of the... display will show the set temperature and FLR to the left of the temperature setting. VENT Button Push this button to get air from the instrument panel registers.
... air cannot be cooled regardless of the temperature. FLR & DEF Button Push this button to select outside air through the instrument panel registers. The display will be from the floor and instrument panel registers at the same time. However, the air will show the set temperature and VENT to the lower right of the... display will show the set temperature and FLR to the left of the temperature setting. VENT Button Push this button to get air from the instrument panel registers.
Owner's Manual
Page 123
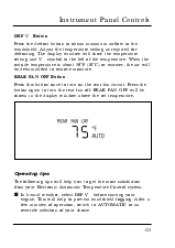
Instrument Panel Controls DEF V Button Press the defrost button to obtain maximum airflow to turn on the rear fan circuit. When the outside temperature is about 50&#...
Instrument Panel Controls DEF V Button Press the defrost button to obtain maximum airflow to turn on the rear fan circuit. When the outside temperature is about 50&#...

Owner's Manual
Page 126
... the heating elements that are bonded to the inside of the radio. Push the switch and release. The defroster turns off . NOTE: Never use sharp instruments or window cleaners with abrasives to turn on . It will also automatically shut off . Push switch again to clean the inside of the rear window... and cause damage to the right of your vehicle and start the engine. 3. Get in your rear window. If the window is located on the instrument panel to the rear window defroster. 126 The control switch is not clear, turn off automatically after approximately 10 minutes.
... the heating elements that are bonded to the inside of the radio. Push the switch and release. The defroster turns off . NOTE: Never use sharp instruments or window cleaners with abrasives to turn on . It will also automatically shut off . Push switch again to clean the inside of the rear window... and cause damage to the right of your vehicle and start the engine. 3. Get in your rear window. If the window is located on the instrument panel to the rear window defroster. 126 The control switch is not clear, turn off automatically after approximately 10 minutes.


