
Owner's Manual
Page 28
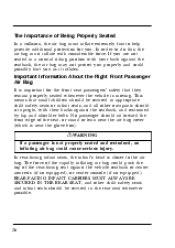
...-facing seat against the vehicle seatback or center armrests (if so equipped), or center console (if so equipped). In rear-facing infant seats, the infant's head is near the glove box). No passenger should sit upright, with your back against the seatback, and restrained by lap and shoulder belts. If you...
...-facing seat against the vehicle seatback or center armrests (if so equipped), or center console (if so equipped). In rear-facing infant seats, the infant's head is near the glove box). No passenger should sit upright, with your back against the seatback, and restrained by lap and shoulder belts. If you...

Owner's Manual
Page 31
... speed, some frontal collisions at about 28 mph (45 km/h). The air bag system is designed to deploy in a fraction of similar size and weight) head-on at speeds above 28 mph (45 km/h) will not inflate the air bag.
... speed, some frontal collisions at about 28 mph (45 km/h). The air bag system is designed to deploy in a fraction of similar size and weight) head-on at speeds above 28 mph (45 km/h) will not inflate the air bag.
Owner's Manual
Page 40
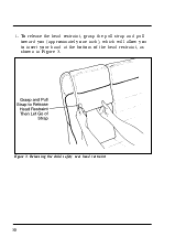
1. Figure 3: Releasing the child safety seat head restraint 38 To release the head restraint, grasp the pull strap and pull toward you (approximately one inch), which will allow you to insert your hand at the bottom of the head restraint, as shown in Figure 3.
1. Figure 3: Releasing the child safety seat head restraint 38 To release the head restraint, grasp the pull strap and pull toward you (approximately one inch), which will allow you to insert your hand at the bottom of the head restraint, as shown in Figure 3.

Owner's Manual
Page 41
Figure 4: Positioning child safety seat head restraint and release of child seat cushion 3. Pull both velcro straps to the full up position. Release strap and slide the head restraint to release the child seat cushion. Refer to Figure 4. 39 Safety Restraints 2. Refer to Figure 4.
Figure 4: Positioning child safety seat head restraint and release of child seat cushion 3. Pull both velcro straps to the full up position. Release strap and slide the head restraint to release the child seat cushion. Refer to Figure 4. 39 Safety Restraints 2. Refer to Figure 4.
Owner's Manual
Page 53
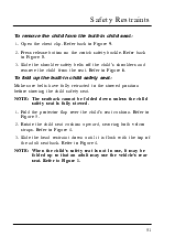
... fully stowed. 1. Refer to Figure 8. 3. Open the chest clip. Refer back to Figure 1. 51 Safety Restraints To remove the child from the seat. Slide the head restraint down unless the child safety seat is not in child seat: 1. Fold the protector flap over the child's seat cushion.
... fully stowed. 1. Refer to Figure 8. 3. Open the chest clip. Refer back to Figure 1. 51 Safety Restraints To remove the child from the seat. Slide the head restraint down unless the child safety seat is not in child seat: 1. Fold the protector flap over the child's seat cushion.
Owner's Manual
Page 101
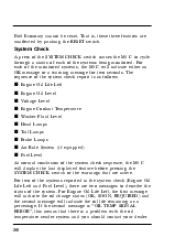
... second message will indicate the oil life remaining as follows: s Engine Oil Life Left s Engine Oil Level s Voltage Level s Engine Coolant Temperature s Washer Fluid Level s Head Lamps s Tail Lamps s Brake Lamps s Air Ride System (if equipped) s Fuel Level At normal conclusion of the systems reported in the system check (Engine Oil...
... second message will indicate the oil life remaining as follows: s Engine Oil Life Left s Engine Oil Level s Voltage Level s Engine Coolant Temperature s Washer Fluid Level s Head Lamps s Tail Lamps s Brake Lamps s Air Ride System (if equipped) s Fuel Level At normal conclusion of the systems reported in the system check (Engine Oil...

Owner's Manual
Page 105
... your vehicle, even though the oil is less than one quarter full. To check your rear parking (tail) lamps and at the correct level. Check Head Lamps This warning message is displayed when you turn on your oil: 1. Low Washer Fluid Light This warning message is displayed when the washer fluid...
... your vehicle, even though the oil is less than one quarter full. To check your rear parking (tail) lamps and at the correct level. Check Head Lamps This warning message is displayed when you turn on your oil: 1. Low Washer Fluid Light This warning message is displayed when the washer fluid...
Owner's Manual
Page 174
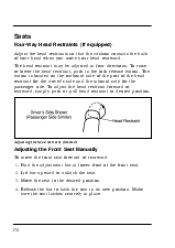
...and the inboard side for the passenger side. To adjust the head restraint forward or rearward, simply push or pull head restraint to unlatch the seat. 3. Adjusting the head restraint (limited) Adjusting the Front Seat Manually To move your head rearward. Move the seat to latch the seat in four ... the bar to the desired position. 4. Seats Four-Way Head Restraints (If equipped) Adjust the head restraints so that the cushion contacts the back of your head when you move the front seat forward or rearward: 1. The head restraint may be adjusted in its new position. The button is...
...and the inboard side for the passenger side. To adjust the head restraint forward or rearward, simply push or pull head restraint to unlatch the seat. 3. Adjusting the head restraint (limited) Adjusting the Front Seat Manually To move your head rearward. Move the seat to latch the seat in four ... the bar to the desired position. 4. Seats Four-Way Head Restraints (If equipped) Adjust the head restraints so that the cushion contacts the back of your head when you move the front seat forward or rearward: 1. The head restraint may be adjusted in its new position. The button is...
Owner's Manual
Page 177
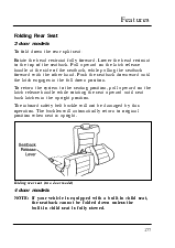
... door model) 4 door models NOTE: If your vehicle is upright. Features Folding Rear Seat 2 door models To fold down the rear split seat: Rotate the head restraint fully forward. Lower the head restraint to original position when seat is equipped with the other hand.
... door model) 4 door models NOTE: If your vehicle is upright. Features Folding Rear Seat 2 door models To fold down the rear split seat: Rotate the head restraint fully forward. Lower the head restraint to original position when seat is equipped with the other hand.

Owner's Manual
Page 183
The memory switch is also equipped with power lumbar support, infinite position seatback and four way head restraints. 183 The power controls on the outboard side of the power mirror switch. It is located in several directions. Features Using the Power Seats (If equipped) If your vehicle has the power seat option, you can adjust it in the driver door trim panel forward of the seat. The controls are on the driver's seat Three Person Memory Seats - Explorer Limited Only Your Explorer Limited has a three person memory driver seat which includes power tracks.
The memory switch is also equipped with power lumbar support, infinite position seatback and four way head restraints. 183 The power controls on the outboard side of the power mirror switch. It is located in several directions. Features Using the Power Seats (If equipped) If your vehicle has the power seat option, you can adjust it in the driver door trim panel forward of the seat. The controls are on the driver's seat Three Person Memory Seats - Explorer Limited Only Your Explorer Limited has a three person memory driver seat which includes power tracks.

Owner's Manual
Page 218
... order to keep your cassette tape player performing the way it was meant to, read and follow these simple precautions: s Using a Ford Cassette Cleaning Cartridge to clean the tape player head after 10-12 hours of the radio. Using headphones with cassettes or CD, seeking the next ("SEEK a") or previous ("b SEEK") selection...
... order to keep your cassette tape player performing the way it was meant to, read and follow these simple precautions: s Using a Ford Cassette Cleaning Cartridge to clean the tape player head after 10-12 hours of the radio. Using headphones with cassettes or CD, seeking the next ("SEEK a") or previous ("b SEEK") selection...

Owner's Manual
Page 228
...turning the hub until the tape is loose inside the cassette, tighten it was meant to, read and follow these simple precautions: s Using a Ford Cassette Cleaning Cartridge to stop the tape player and resume radio play will help maintain the best playback sound and proper tape operation. s Protect ...cassettes from tape to AM/FM mode Press the "AM/FM" button to clean the tape player head after 10-12 hours of play . Two mini 3.5mm (1/8") jack headphone sets may jam the tape player mechanism. Using the Dolby B noise reduction...
...turning the hub until the tape is loose inside the cassette, tighten it was meant to, read and follow these simple precautions: s Using a Ford Cassette Cleaning Cartridge to stop the tape player and resume radio play will help maintain the best playback sound and proper tape operation. s Protect ...cassettes from tape to AM/FM mode Press the "AM/FM" button to clean the tape player head after 10-12 hours of play . Two mini 3.5mm (1/8") jack headphone sets may jam the tape player mechanism. Using the Dolby B noise reduction...

