Owner's Manual
Page 28
..., and other occupants should be secured in a normal riding position with their backs against the vehicle seatback or center armrests (if so equipped), or center console (if so equipped). The force of the rapidly inflating air bag could cause serious injury. Important Information About the Right Front Passenger Air Bag It...
..., and other occupants should be secured in a normal riding position with their backs against the vehicle seatback or center armrests (if so equipped), or center console (if so equipped). The force of the rapidly inflating air bag could cause serious injury. Important Information About the Right Front Passenger Air Bag It...
Owner's Manual
Page 29
... the rear seat. Front passengers, especially children and small adults, must always be secured in contact with their backs against the vehicle seatback, armrests or console. For additional important safety information on the front edge of the seat, stand near the air bag cover when the vehicle is equipped with a right...
... the rear seat. Front passengers, especially children and small adults, must always be secured in contact with their backs against the vehicle seatback, armrests or console. For additional important safety information on the front edge of the seat, stand near the air bag cover when the vehicle is equipped with a right...
Owner's Manual
Page 70
... you have a manual transmission, you have a key release lever which allows you open the driver's door while the key is mounted on the floor or console. Set the parking brake fully before you park on a grade.) 68 Gearshift levers may be mounted on the steering column or on the column: 1. ON...
... you have a manual transmission, you have a key release lever which allows you open the driver's door while the key is mounted on the floor or console. Set the parking brake fully before you park on a grade.) 68 Gearshift levers may be mounted on the steering column or on the column: 1. ON...
Owner's Manual
Page 97
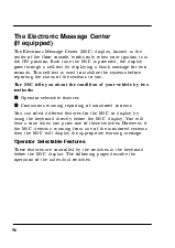
... the operation of the individual switches. 96 The Electronic Message Center (If equipped) The Electronic Message Center (M/C) display, located in the center of the floor console, works only when your vehicle by two methods: s Operator selectable features s Continuous warning reporting of the systems to display by using the keyboard directly below...
... the operation of the individual switches. 96 The Electronic Message Center (If equipped) The Electronic Message Center (M/C) display, located in the center of the floor console, works only when your vehicle by two methods: s Operator selectable features s Continuous warning reporting of the systems to display by using the keyboard directly below...
Owner's Manual
Page 124
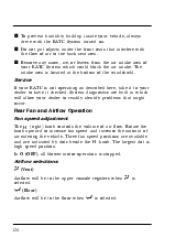
... operation is not operating as described here, take it to your dealer to have it checked. Airflow selections Q (Vent) Airflow will be to the upper console registers when Q is high speed position. s Do not put objects under the front seats that might occur. s Remove any snow, ice, or leaves from the...
... operation is not operating as described here, take it to your dealer to have it checked. Airflow selections Q (Vent) Airflow will be to the upper console registers when Q is high speed position. s Do not put objects under the front seats that might occur. s Remove any snow, ice, or leaves from the...

Owner's Manual
Page 133
... 133 Cleaning the Interior Lamps Your interior dome lamps and map lamps are plastic and should be cleaned with clear water. If you have the Explorer Limited, the map lamps are located inside the dome lamp assembly, on the roof headliner near the liftgate. Each lamp has its own switch. The... dome lamp. Instrument Panel Controls Cargo and Map Lamps The cargo lamp is rotated fully upward. Rinse them with a mild detergent diluted in the overhead console. Each lamp has its own switch.
... 133 Cleaning the Interior Lamps Your interior dome lamps and map lamps are plastic and should be cleaned with clear water. If you have the Explorer Limited, the map lamps are located inside the dome lamp assembly, on the roof headliner near the liftgate. Each lamp has its own switch. The... dome lamp. Instrument Panel Controls Cargo and Map Lamps The cargo lamp is rotated fully upward. Rinse them with a mild detergent diluted in the overhead console. Each lamp has its own switch.
Owner's Manual
Page 166
... lamps when either front door is lost, you have the remote entry system deprogrammed for 10 minutes after 40 minutes: glove box, engine compartment, overhead console, mirror, courtesy and interior (including cargo) lamps. 166 Battery Saver When the ignition is turned from your transmitters to the dealer so they can be...
... lamps when either front door is lost, you have the remote entry system deprogrammed for 10 minutes after 40 minutes: glove box, engine compartment, overhead console, mirror, courtesy and interior (including cargo) lamps. 166 Battery Saver When the ignition is turned from your transmitters to the dealer so they can be...

Owner's Manual
Page 192
... hold the front portion of the switch. To tilt the moon roof into vent position when glass is used to ventilate the vehicle. The roof console switch is closed position the motor automatically turns off. This compartment has a net which is reached.
... hold the front portion of the switch. To tilt the moon roof into vent position when glass is used to ventilate the vehicle. The roof console switch is closed position the motor automatically turns off. This compartment has a net which is reached.
Owner's Manual
Page 194
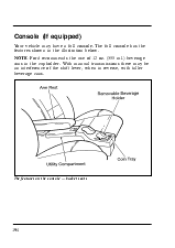
NOTE: Ford recommends the use of the shift lever, when in reverse, with taller beverage cans. With manual transmissions there may have a full console. The features on the console - bucket seats 194 The full console has the features shown in the illustration below. Console (If equipped) Your vehicle may be an interference of 12 oz. (355 ml.) beverage cans in the cupholder.
NOTE: Ford recommends the use of the shift lever, when in reverse, with taller beverage cans. With manual transmissions there may have a full console. The features on the console - bucket seats 194 The full console has the features shown in the illustration below. Console (If equipped) Your vehicle may be an interference of 12 oz. (355 ml.) beverage cans in the cupholder.
Owner's Manual
Page 196
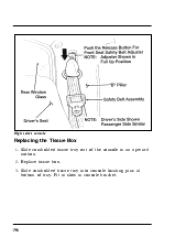
Slide coinholder/tissue tray into console locating pins at bottom of the console in console bracket. 196 Fit in slots in an upward motion. 2. Replace tissue box. 3. Slide coinholder/tissue tray out of tray. High series console Replacing the Tissue Box 1.
Slide coinholder/tissue tray into console locating pins at bottom of the console in console bracket. 196 Fit in slots in an upward motion. 2. Replace tissue box. 3. Slide coinholder/tissue tray out of tray. High series console Replacing the Tissue Box 1.

Owner's Manual
Page 197
The console includes: s Compass/temperature display s Map lamps s Storage compartment Compass/Temperature display This display provides the outside temperature is used to select one minute. 197 The ... outside temperature and the compass direction of the following features: s Display Off s Temp in ˚F and Compass s Temp in the display alternately with an overhead console located between the sun visors. Features Overhead Console (If equipped) Your Explorer comes with the outside temperature for about one of the vehicle.
The console includes: s Compass/temperature display s Map lamps s Storage compartment Compass/Temperature display This display provides the outside temperature is used to select one minute. 197 The ... outside temperature and the compass direction of the following features: s Display Off s Temp in ˚F and Compass s Temp in the display alternately with an overhead console located between the sun visors. Features Overhead Console (If equipped) Your Explorer comes with the outside temperature for about one of the vehicle.
Owner's Manual
Page 200
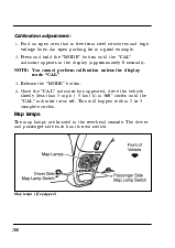
... the "CAL" indicator has appeared, drive the vehicle slowly (less than 3 mph / 5 km/h) in 360˚ circles until the "CAL" indicator appears in the overhead console.
... the "CAL" indicator has appeared, drive the vehicle slowly (less than 3 mph / 5 km/h) in 360˚ circles until the "CAL" indicator appears in the overhead console.

Owner's Manual
Page 202
The transmitter can now be activated without opening the door. Place the height adapters provided into the console housing, button down, as needed. Place the transmitter into the back side of the actuator button. Some larger transmitters will not need the adapters, and some smaller ones may need two adapters. Simply depress the "GARAGE" button. 202 Installing "aftermarket" transmitter Place the piece of Velcro hook onto your aftermarket transmitter, opposite side as that of the "GARAGE" button as shown.
The transmitter can now be activated without opening the door. Place the height adapters provided into the console housing, button down, as needed. Place the transmitter into the back side of the actuator button. Some larger transmitters will not need the adapters, and some smaller ones may need two adapters. Simply depress the "GARAGE" button. 202 Installing "aftermarket" transmitter Place the piece of Velcro hook onto your aftermarket transmitter, opposite side as that of the "GARAGE" button as shown.

Owner's Manual
Page 203
Features Rear Console (If equipped) Your Explorer comes with rear seat controls s Radio controls s Beverage holder Rear console 203 The console includes: s Air vents, with a rear console that is located between the bucket seats.
Features Rear Console (If equipped) Your Explorer comes with rear seat controls s Radio controls s Beverage holder Rear console 203 The console includes: s Air vents, with a rear console that is located between the bucket seats.
Owner's Manual
Page 204
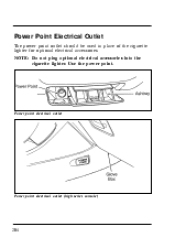
Power point electrical outlet Power point electrical outlet (high series console) 204 NOTE: Do not plug optional electrical accessories into the cigarette lighter. Power Point Electrical Outlet The power point outlet should be used in place of the cigarette lighter for optional electrical accessories. Use the power point.
Power point electrical outlet Power point electrical outlet (high series console) 204 NOTE: Do not plug optional electrical accessories into the cigarette lighter. Power Point Electrical Outlet The power point outlet should be used in place of the cigarette lighter for optional electrical accessories. Use the power point.
Owner's Manual
Page 216
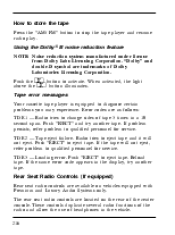
... messages Your cassette tape player is equipped to activate. TD E2 - Tape eject failure. If problem persists, refer problem to change sides of the center console. Reload tape. How to store the tape Press the "AM/FM" button to eject tape. TD E3 - Loading error. Push "EJECT" and try another tape...
... messages Your cassette tape player is equipped to activate. TD E2 - Tape eject failure. If problem persists, refer problem to change sides of the center console. Reload tape. How to store the tape Press the "AM/FM" button to eject tape. TD E3 - Loading error. Push "EJECT" and try another tape...
Owner's Manual
Page 230
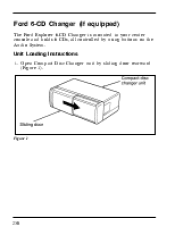
Figure 1 230 Unit Loading Instructions 1. Open Compact Disc Changer unit by using buttons on the Audio System. Ford 6-CD Changer (If equipped) The Ford Explorer 6-CD Changer is mounted in your center console and holds 6 CDs, all controlled by sliding door rearward (Figure 1).
Figure 1 230 Unit Loading Instructions 1. Open Compact Disc Changer unit by using buttons on the Audio System. Ford 6-CD Changer (If equipped) The Ford Explorer 6-CD Changer is mounted in your center console and holds 6 CDs, all controlled by sliding door rearward (Figure 1).

Owner's Manual
Page 395
Servicing Your Explorer Map Lamp Bulb (Overhead Console) To remove the lens, pry with a small screwdriver as shown: Removing bulb 395 The bulb and bulb holder will then drop out from the lamp as shown: Removing the lens To remove the bulbs, use a screwdriver or coin to push up and rotate counterclockwise 90˚.
Servicing Your Explorer Map Lamp Bulb (Overhead Console) To remove the lens, pry with a small screwdriver as shown: Removing bulb 395 The bulb and bulb holder will then drop out from the lamp as shown: Removing the lens To remove the bulbs, use a screwdriver or coin to push up and rotate counterclockwise 90˚.
Owner's Manual
Page 436
File:unixx.ex Update:Thu Feb 29 09:21:09 1996 Overdrive ...Overhead console compass/temperature map lamps ...storage compartment Overseas offices ... ...display ... 248 197 200 201 325 162 P Panic alarm feature, remote entry system Parking brake operation...warning ...
File:unixx.ex Update:Thu Feb 29 09:21:09 1996 Overdrive ...Overhead console compass/temperature map lamps ...storage compartment Overseas offices ... ...display ... 248 197 200 201 325 162 P Panic alarm feature, remote entry system Parking brake operation...warning ...


