Owner's Manual
Page 335
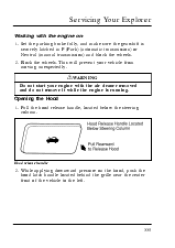
... unexpectedly. Servicing Your Explorer Working with the air cleaner removed and do not remove it while the engine is securely latched in P (Park) (automatic transmission) or Neutral (manual transmission) and block the wheels. 2. Set the parking brake fully, and make sure the gearshift is running. Opening the Hood 1. Pull the hood release handle, located...
... unexpectedly. Servicing Your Explorer Working with the air cleaner removed and do not remove it while the engine is securely latched in P (Park) (automatic transmission) or Neutral (manual transmission) and block the wheels. 2. Set the parking brake fully, and make sure the gearshift is running. Opening the Hood 1. Pull the hood release handle, located...

Owner's Manual
Page 336
Be sure to oil the hood latch every six months to find items that you should regularly service. 336 The following page shows a diagram of this chapter before opening the hood. Engine Compartment Your Explorer has either a 4.0 Liter EFI, V-6 engine or a 5.0 Liter EFI, V-8 engine. Always attempt to lift the hood after closing to make it is securely latched. Hood NOTE: Read and understand Precautions When Servicing Your Vehicle at the beginning of the engine and where to maintain smooth operation. Close the hood with enough force to be sure it latch.
Be sure to oil the hood latch every six months to find items that you should regularly service. 336 The following page shows a diagram of this chapter before opening the hood. Engine Compartment Your Explorer has either a 4.0 Liter EFI, V-6 engine or a 5.0 Liter EFI, V-8 engine. Always attempt to lift the hood after closing to make it is securely latched. Hood NOTE: Read and understand Precautions When Servicing Your Vehicle at the beginning of the engine and where to maintain smooth operation. Close the hood with enough force to be sure it latch.

Owner's Manual
Page 349
...1. Locate the engine oil dipstick (highlighted in P (Park) or 1 (manual transmission). 3. Servicing Your Explorer Checking and Adding Engine Oil Since the proper amount of engine oil is important for the engine oil to drain... gearshift is fully seated. Remember the engine must be off after it back into the oil pan. 2. Open the hood. Turn the engine off , the oil must be warm and the vehicle must be parked on level ground. Wipe ...heat. 4. Engine oil dipstick 349 Set the parking brake, making sure it is securely latched in yellow) and carefully pull it out of the engine. 5.
...1. Locate the engine oil dipstick (highlighted in P (Park) or 1 (manual transmission). 3. Servicing Your Explorer Checking and Adding Engine Oil Since the proper amount of engine oil is important for the engine oil to drain... gearshift is fully seated. Remember the engine must be off after it back into the oil pan. 2. Open the hood. Turn the engine off , the oil must be warm and the vehicle must be parked on level ground. Wipe ...heat. 4. Engine oil dipstick 349 Set the parking brake, making sure it is securely latched in yellow) and carefully pull it out of the engine. 5.

Owner's Manual
Page 409
...Start engine every 15 days. s With your foot on the brake, shift through all the gears while the engine is washed. Servicing Your Explorer s If vehicles are stored outside, they require regular maintenance to prevent fading. s Touch-up raw or primed metal to prevent discoloration. s ... s Wash vehicle thoroughly to oxidation. This can damage rubber and other polymers in exposed locations. s Keep all hood, door and trunk lid hinges and latches with high-quality unleaded fuel until it reaches normal operating temperature. Run at fast idle until the first automatic shutoff...
...Start engine every 15 days. s With your foot on the brake, shift through all the gears while the engine is washed. Servicing Your Explorer s If vehicles are stored outside, they require regular maintenance to prevent fading. s Touch-up raw or primed metal to prevent discoloration. s ... s Wash vehicle thoroughly to oxidation. This can damage rubber and other polymers in exposed locations. s Keep all hood, door and trunk lid hinges and latches with high-quality unleaded fuel until it reaches normal operating temperature. Run at fast idle until the first automatic shutoff...
Owner's Manual
Page 432
... . 110 . . 34 . 136 432 File:unixx.ex Update:Thu Feb 29 09:21:09 1996 High beams indicator light ...operation...High-mount brakelamp, description . High-mount brakelamp:location ...Hitch...Hood latch location ...lubrication specifications ...release lever ...working under the hood...Horn ...Hoses, checking ... ... ... ... ... ... ... ... ... ...127, ... 91 136 134 134 289 335 406 335 334 140...
... . 110 . . 34 . 136 432 File:unixx.ex Update:Thu Feb 29 09:21:09 1996 High beams indicator light ...operation...High-mount brakelamp, description . High-mount brakelamp:location ...Hitch...Hood latch location ...lubrication specifications ...release lever ...working under the hood...Horn ...Hoses, checking ... ... ... ... ... ... ... ... ... ...127, ... 91 136 134 134 289 335 406 335 334 140...

Scheduled Maintenance Guide 1st Printing
Page 55
If any of these conditions are noted, bring them to the attention of your dealer or qualified service technician as soon as possible. At least once a year: u Lubricate door hinges and checks, and hood hinges. u Lubricate door rubber weatherstrips. u Clean battery and terminals, check electrolyte level on low maintenance (auxiliary and replacement) batteries. u Lubricate door and hood locks and latches. Owner Maintenance Checks 55
If any of these conditions are noted, bring them to the attention of your dealer or qualified service technician as soon as possible. At least once a year: u Lubricate door hinges and checks, and hood hinges. u Lubricate door rubber weatherstrips. u Clean battery and terminals, check electrolyte level on low maintenance (auxiliary and replacement) batteries. u Lubricate door and hood locks and latches. Owner Maintenance Checks 55


