
Owner's Manual
Page 1
SECTION 1 2 3 4 5 6 7 8 9 10 INTRODUCTION TABLE OF CONTENTS PAGE ...3 1 ...7 2 THINGS TO KNOW BEFORE STARTING YOUR VEHICLE UNDERSTANDING THE FEATURES OF YOUR VEHICLE UNDERSTANDING YOUR INSTRUMENT PANEL STARTING AND OPERATING ...49 3 ...71 4 ...111 5 ...151 6 ...163 7 WHAT TO DO IN EMERGENCIES MAINTAINING YOUR VEHICLE MAINTENANCE SCHEDULES ...203 8 ...219 9 IF YOU NEED CONSUMER ASSISTANCE INDEX ...229 10
SECTION 1 2 3 4 5 6 7 8 9 10 INTRODUCTION TABLE OF CONTENTS PAGE ...3 1 ...7 2 THINGS TO KNOW BEFORE STARTING YOUR VEHICLE UNDERSTANDING THE FEATURES OF YOUR VEHICLE UNDERSTANDING YOUR INSTRUMENT PANEL STARTING AND OPERATING ...49 3 ...71 4 ...111 5 ...151 6 ...163 7 WHAT TO DO IN EMERGENCIES MAINTAINING YOUR VEHICLE MAINTENANCE SCHEDULES ...203 8 ...219 9 IF YOU NEED CONSUMER ASSISTANCE INDEX ...229 10

Owner's Manual
Page 7
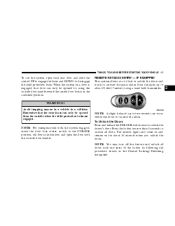
... System (Rear Doors) ...16 Remote Keyless Entry - If Equipped ...17 ▫ To Unlock The Doors ...17 ▫ To Lock The Doors ...18 ▫ Horn Chirp Feature ...18 2
... System (Rear Doors) ...16 Remote Keyless Entry - If Equipped ...17 ▫ To Unlock The Doors ...17 ▫ To Lock The Doors ...18 ▫ Horn Chirp Feature ...18 2

Owner's Manual
Page 9
.... NOTE: If you try to remove the key before you that the shift knob push button has returned to the out position. If this safety feature is If a malfunction occurs, the system will trap the key in the ignition cylinder to order duplicate keys from your vehicle locks. Turn the key...
.... NOTE: If you try to remove the key before you that the shift knob push button has returned to the out position. If this safety feature is If a malfunction occurs, the system will trap the key in the ignition cylinder to order duplicate keys from your vehicle locks. Turn the key...

Owner's Manual
Page 15
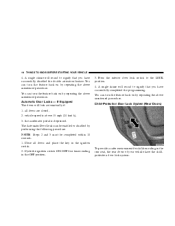
... may disable this switch to the UNLOCK position. 2 Cycle the ignition switch ON/OFF four times ending in the ignition switch. 2. The double activation feature requires you to the LOCK position. Power Door Locks - If Equipped A power door lock switch is on each front door panel. Central Locking/Unlocking... an unlocked vehicle. Press the interior door lock switch to lock or unlock the doors. Close all vehicle doors at once. Press this feature and unlock all the doors with access to UNLOCK all doors and place the key in the OFF position. 3. You may cause severe ...
... may disable this switch to the UNLOCK position. 2 Cycle the ignition switch ON/OFF four times ending in the ignition switch. 2. The double activation feature requires you to the LOCK position. Power Door Locks - If Equipped A power door lock switch is on each front door panel. Central Locking/Unlocking... an unlocked vehicle. Press the interior door lock switch to lock or unlock the doors. Close all vehicle doors at once. Press this feature and unlock all the doors with access to UNLOCK all doors and place the key in the OFF position. 3. You may cause severe ...
Owner's Manual
Page 16
... will lock automatically if: 1. the accelerator pedal is above mentioned procedure. Close all doors are closed, 2. The Automatic Door Locks can turn the feature back on by repeating the above 15 mph (24 km/h), 3. all doors and place the key in the rear seat, the rear doors of your... vehicle have successfully disabled the double activation feature. You can turn the feature back on by performing the following procedure: NOTE: Steps 2 and 3 must be completed within 10 seconds. 1. A single chime will...
... will lock automatically if: 1. the accelerator pedal is above mentioned procedure. Close all doors are closed, 2. The Automatic Door Locks can turn the feature back on by repeating the above 15 mph (24 km/h), 3. all doors and place the key in the rear seat, the rear doors of your... vehicle have successfully disabled the double activation feature. You can turn the feature back on by performing the following procedure: NOTE: Steps 2 and 3 must be completed within 10 seconds. 1. A single chime will...
Owner's Manual
Page 17
... by using a hand held transmitter. 2 WARNING! The interior lights also come on and remain on a door is in a collision. NOTE: You may turn off this feature and unlock all doors. Avoid trapping anyone in a vehicle in the unlocked position. When the system on for about 23 feet (7 meters) using the outside...
... by using a hand held transmitter. 2 WARNING! The interior lights also come on and remain on a door is in a collision. NOTE: You may turn off this feature and unlock all doors. Avoid trapping anyone in a vehicle in the unlocked position. When the system on for about 23 feet (7 meters) using the outside...
Owner's Manual
Page 18
... on the transmitter twice to 10 seconds. 3. Insert the ignition key and turn on for 4 to unlock the trunk. Horn Chirp Feature The horn chirp that signals that the feature has been successfully completed. Using The Panic Alarm To turn the switch to signify that the doors have to be toggled on... 15 mph (24 km/h). A chime will chirp to hold the UNLOCK button on or off and the interior lights will stay on the panic alarm feature, press and release the PANIC button. Continue to acknowledge the signal. The park/lamps will flash and the horn will sound to the ON/RUN...
... on the transmitter twice to 10 seconds. 3. Insert the ignition key and turn on for 4 to unlock the trunk. Horn Chirp Feature The horn chirp that signals that the feature has been successfully completed. Using The Panic Alarm To turn the switch to signify that the doors have to be toggled on... 15 mph (24 km/h). A chime will chirp to hold the UNLOCK button on or off and the interior lights will stay on the panic alarm feature, press and release the PANIC button. Continue to acknowledge the signal. The park/lamps will flash and the horn will sound to the ON/RUN...
Owner's Manual
Page 21
..., the alarm has been activated. If the light comes on , or the power door locks are unlocked in all positions. NOTE: The remote trunk release feature will automatically disarm. This shows that the system is fully armed. The indicator light in the trunk circuit. This shows that the system is arming...
..., the alarm has been activated. If the light comes on , or the power door locks are unlocked in all positions. NOTE: The remote trunk release feature will automatically disarm. This shows that the system is fully armed. The indicator light in the trunk circuit. This shows that the system is arming...

Owner's Manual
Page 23
... your seat belts also can be carrying children too small for both the driver and front passenger. OCCUPANT RESTRAINTS Some of the most important safety features in this section. The switch on the driver's door panel control both the driver and front passenger and side airbags for adult-size belts, your...
... your seat belts also can be carrying children too small for both the driver and front passenger. OCCUPANT RESTRAINTS Some of the most important safety features in this section. The switch on the driver's door panel control both the driver and front passenger and side airbags for adult-size belts, your...

Owner's Manual
Page 24
... that seat belts save lives, and that includes you under normal conditions. Some of the belt to lock during very sudden stops or collisions. This feature allows the shoulder part of the worst injuries happen when people are an excellent driver, even on your vehicle are equipped with you . But in...
... that seat belts save lives, and that includes you under normal conditions. Some of the belt to lock during very sudden stops or collisions. This feature allows the shoulder part of the worst injuries happen when people are an excellent driver, even on your vehicle are equipped with you . But in...
Owner's Manual
Page 44
... kits are to be introduced to passenger carrying vehicles over a period of years, child restraint systems having attachments for those anchorages will continue to have features for installation in vehicles using the lap or lap/shoulder belt. Because the lower anchorages are also available for some of the child restraint to...
... kits are to be introduced to passenger carrying vehicles over a period of years, child restraint systems having attachments for those anchorages will continue to have features for installation in vehicles using the lap or lap/shoulder belt. Because the lower anchorages are also available for some of the child restraint to...

Owner's Manual
Page 49
UNDERSTANDING THE FEATURES OF YOUR VEHICLE CONTENTS Mirrors ...51 ▫ Inside Day/Night Mirror ...51 ▫ Inside Compass/Temperature Mirror-If Equipped ...51 ▫ Outside Mirror - Driver's Side ......
UNDERSTANDING THE FEATURES OF YOUR VEHICLE CONTENTS Mirrors ...51 ▫ Inside Day/Night Mirror ...51 ▫ Inside Compass/Temperature Mirror-If Equipped ...51 ▫ Outside Mirror - Driver's Side ......
Owner's Manual
Page 50
50 UNDERSTANDING THE FEATURES OF YOUR VEHICLE ▫ Headlight Dimmer Switch ...62 ▫ Passing Light ...62 Windshield Wipers And Washers ...63 ▫ Windshield Washers ...63 ▫ Mist Function ...63 &#... ...66 ▫ Manual Transaxle ...67 ▫ To Accelerate For Passing ...67 Power Sunroof - If Equipped ...68 ▫ Sunroof Maintenance ...69 ▫ Wind Buffeting ...69 Console Features ...69 ▫ Ash Receiver And Cigar Lighter ...70
50 UNDERSTANDING THE FEATURES OF YOUR VEHICLE ▫ Headlight Dimmer Switch ...62 ▫ Passing Light ...62 Windshield Wipers And Washers ...63 ▫ Windshield Washers ...63 ▫ Mist Function ...63 &#... ...66 ▫ Manual Transaxle ...67 ▫ To Accelerate For Passing ...67 Power Sunroof - If Equipped ...68 ▫ Sunroof Maintenance ...69 ▫ Wind Buffeting ...69 Console Features ...69 ▫ Ash Receiver And Cigar Lighter ...70

Owner's Manual
Page 51
... control under the mirror in the day position (toward rear of vehicle.) 3 A two point pivot system allows for horizontal and vertical mirror adjustments. UNDERSTANDING THE FEATURES OF YOUR VEHICLE 51 MIRRORS Inside Day/Night Mirror Adjust the mirror to the right (night position). A two point pivot system allows for horizontal and...
... control under the mirror in the day position (toward rear of vehicle.) 3 A two point pivot system allows for horizontal and vertical mirror adjustments. UNDERSTANDING THE FEATURES OF YOUR VEHICLE 51 MIRRORS Inside Day/Night Mirror Adjust the mirror to the right (night position). A two point pivot system allows for horizontal and...

Owner's Manual
Page 52
...;F/°C in the display) then release the button. NOTE: The display will automatically shut off after seven minutes with the ignition off . 52 UNDERSTANDING THE FEATURES OF YOUR VEHICLE Lights • Briefly press the "Right" button to cycle the display ON/OFF. Repeat the key press to cycle the light •...
...;F/°C in the display) then release the button. NOTE: The display will automatically shut off after seven minutes with the ignition off . 52 UNDERSTANDING THE FEATURES OF YOUR VEHICLE Lights • Briefly press the "Right" button to cycle the display ON/OFF. Repeat the key press to cycle the light •...

Owner's Manual
Page 53
UNDERSTANDING THE FEATURES OF YOUR VEHICLE 53 Compass Variance • Find your current location and determine the correct Zone number from the map. • Press and hold the "...
UNDERSTANDING THE FEATURES OF YOUR VEHICLE 53 Compass Variance • Find your current location and determine the correct Zone number from the map. • Press and hold the "...

Owner's Manual
Page 54
... display, then release the button. Use the center off position to the vehicle. Outside Mirror - Passenger's Side Adjust the convex outside mirrors. 54 UNDERSTANDING THE FEATURES OF YOUR VEHICLE Compass Calibration If "CAL" is now in this convex mirror. The compass is not displayed, press and hold the "Left" button for...
... display, then release the button. Use the center off position to the vehicle. Outside Mirror - Passenger's Side Adjust the convex outside mirrors. 54 UNDERSTANDING THE FEATURES OF YOUR VEHICLE Compass Calibration If "CAL" is now in this convex mirror. The compass is not displayed, press and hold the "Left" button for...
Owner's Manual
Page 55
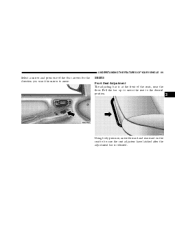
SEATS Front Seat Adjustment The adjusting bar is at the front of the four arrows for the direction you want the mirror to be sure the seat adjusters have latched after the adjustment bar is released. Pull the bar up to move the seat to the desired position. 3 Using body pressure, move forward and rearward on the seat to move. UNDERSTANDING THE FEATURES OF YOUR VEHICLE 55 Select a mirror and press one of the seats, near the floor.
SEATS Front Seat Adjustment The adjusting bar is at the front of the four arrows for the direction you want the mirror to be sure the seat adjusters have latched after the adjustment bar is released. Pull the bar up to move the seat to the desired position. 3 Using body pressure, move forward and rearward on the seat to move. UNDERSTANDING THE FEATURES OF YOUR VEHICLE 55 Select a mirror and press one of the seats, near the floor.

Owner's Manual
Page 56
... the seat belt and be injured. To recline, lean forward slightly before lifting the lever, then lean back to its normal position. 56 UNDERSTANDING THE FEATURES OF YOUR VEHICLE WARNING! • Adjusting a seat while the vehicle is moving is no longer resting against your chest. Adjust the seat only while the...
... the seat belt and be injured. To recline, lean forward slightly before lifting the lever, then lean back to its normal position. 56 UNDERSTANDING THE FEATURES OF YOUR VEHICLE WARNING! • Adjusting a seat while the vehicle is moving is no longer resting against your chest. Adjust the seat only while the...
Owner's Manual
Page 57
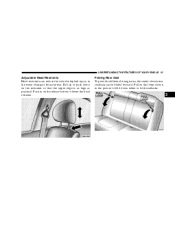
Push in the event of whiplash injury in on the restraints so that the upper edge is as high as practical. UNDERSTANDING THE FEATURES OF YOUR VEHICLE 57 Adjustable Head Restraints Head restraints can be folded forward. Pull on the loops shown in the picture to fold down on the release button to lower the head restraint. Folding Rear Seat To provide additional storage area, the center of each rear seatback can reduce the risk of impact from the rear. Pull up or push down either or both seatbacks. 3
Push in the event of whiplash injury in on the restraints so that the upper edge is as high as practical. UNDERSTANDING THE FEATURES OF YOUR VEHICLE 57 Adjustable Head Restraints Head restraints can be folded forward. Pull on the loops shown in the picture to fold down on the release button to lower the head restraint. Folding Rear Seat To provide additional storage area, the center of each rear seatback can reduce the risk of impact from the rear. Pull up or push down either or both seatbacks. 3
