
Owner's Manual
Page 18
... Press the TRUNK button on the transmitter for 3 minutes unless you turn the switch to be toggled on . When the panic alarm is on the headlights and park/lamps will flash, the horn will pulse on and off the panic alarm by using the following procedure: 1. Horn Chirp Feature The horn...
... Press the TRUNK button on the transmitter for 3 minutes unless you turn the switch to be toggled on . When the panic alarm is on the headlights and park/lamps will flash, the horn will pulse on and off the panic alarm by using the following procedure: 1. Horn Chirp Feature The horn...

Owner's Manual
Page 20
... EQUIPPED The system monitors the doors, trunk key cylinder, and ignition for another 15 minutes. For the first 3 minutes the horn will sound and the headlights, park/turn signal lights, tail lights and the indicator light in the cluster will signal for about 18 minutes. Remove the keys from the ignition...
... EQUIPPED The system monitors the doors, trunk key cylinder, and ignition for another 15 minutes. For the first 3 minutes the horn will sound and the headlights, park/turn signal lights, tail lights and the indicator light in the cluster will signal for about 18 minutes. Remove the keys from the ignition...

Owner's Manual
Page 49
... Close The Hood ...58 Lights ...60 ▫ Front Map/Reading Lights - If Equipped ...60 ▫ Interior Lights ...60 ▫ Multi-Function Control Lever ...61 ▫ Headlights, Parking Lights, Instrument Panel Lights ...61 ▫ Daytime Running Lights (Canada Only) ...62 ▫ Lights-On Reminder ...62 ▫ Fog Lights - If Equipped ...62 ▫...
... Close The Hood ...58 Lights ...60 ▫ Front Map/Reading Lights - If Equipped ...60 ▫ Interior Lights ...60 ▫ Multi-Function Control Lever ...61 ▫ Headlights, Parking Lights, Instrument Panel Lights ...61 ▫ Daytime Running Lights (Canada Only) ...62 ▫ Lights-On Reminder ...62 ▫ Fog Lights - If Equipped ...62 ▫...
Owner's Manual
Page 50
50 UNDERSTANDING THE FEATURES OF YOUR VEHICLE ▫ Headlight Dimmer Switch ...62 ▫ Passing Light ...62 Windshield Wipers And Washers ...63 ▫ Windshield Washers ...63 ▫ Mist Function ...63 ▫ Intermittent Wiper System ...63 &#...
50 UNDERSTANDING THE FEATURES OF YOUR VEHICLE ▫ Headlight Dimmer Switch ...62 ▫ Passing Light ...62 Windshield Wipers And Washers ...63 ▫ Windshield Washers ...63 ▫ Mist Function ...63 ▫ Intermittent Wiper System ...63 &#...

Owner's Manual
Page 51
A two point pivot system allows for horizontal and vertical mirror adjustment. Annoying headlight glare can be adjusted while set in the clockwise direction, so the knob points to center the view through the rear window. Inside Compass/Temperature ... small control under the mirror in the day position (toward rear of vehicle.) 3 A two point pivot system allows for horizontal and vertical mirror adjustments. Annoying headlight glare can be adjusted while set in the day position (knob points towards rear of vehicle).
A two point pivot system allows for horizontal and vertical mirror adjustment. Annoying headlight glare can be adjusted while set in the clockwise direction, so the knob points to center the view through the rear window. Inside Compass/Temperature ... small control under the mirror in the day position (toward rear of vehicle.) 3 A two point pivot system allows for horizontal and vertical mirror adjustments. Annoying headlight glare can be adjusted while set in the day position (knob points towards rear of vehicle).

Owner's Manual
Page 60
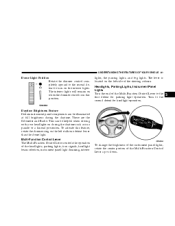
Dimmer Control With the park lights or headlights on, rotating the dimmer control for the interior lights on the MultiFunction Control Lever upward will increase the brightness of the rearview mirror. The interior ...
Dimmer Control With the park lights or headlights on, rotating the dimmer control for the interior lights on the MultiFunction Control Lever upward will increase the brightness of the rearview mirror. The interior ...
Owner's Manual
Page 61
... THE FEATURES OF YOUR VEHICLE 61 Dome Light Position Rotate the dimmer control completely upward to the second detent to turn signals, headlight beam selection, instrument panel light dimming, interior To change the brightness of the instrument panel lights, rotate the center portion of .... The lever is located on when the dimmer control is in a parade or a funeral procession. Turn to the first detent for headlight operation. 3 Daytime Brightness Feature Certain instrument panel components can be illuminated at full brightness during the daytime such as in this feature,...
... THE FEATURES OF YOUR VEHICLE 61 Dome Light Position Rotate the dimmer control completely upward to the second detent to turn signals, headlight beam selection, instrument panel light dimming, interior To change the brightness of the instrument panel lights, rotate the center portion of .... The lever is located on when the dimmer control is in a parade or a funeral procession. Turn to the first detent for headlight operation. 3 Daytime Brightness Feature Certain instrument panel components can be illuminated at full brightness during the daytime such as in this feature,...
Owner's Manual
Page 62
...moved, it would suggest that the fuse or indicator bulb is released. Fog Lights - If Equipped The front fog light switch is opened. Headlight Dimmer Switch Pull the Multi-Function Control Lever towards you . Passing Light You can signal a lane change by lightly pulling the Multi-Function ...The fog lights will turn on at high beam and remain on until the lever is defective. Selecting high beam headlights or park lights will only operate with your headlights by moving the lever partially up or down . Turn Signals Move the Multi-Function Control Lever up or down ...
...moved, it would suggest that the fuse or indicator bulb is released. Fog Lights - If Equipped The front fog light switch is opened. Headlight Dimmer Switch Pull the Multi-Function Control Lever towards you . Passing Light You can signal a lane change by lightly pulling the Multi-Function ...The fog lights will turn on at high beam and remain on until the lever is defective. Selecting high beam headlights or park lights will only operate with your headlights by moving the lever partially up or down . Turn Signals Move the Multi-Function Control Lever up or down ...

Owner's Manual
Page 79
...on during driving, it is operating properly. The light should come on, have the brake system inspected as soon as possible to switch the headlights from high or low beam. 7. Turn Signal Indicators The arrows will continue to the ON position and may stay on for each gear range...is not on. The warning light should be checked frequently to a point midway between ON and START. Turn the ignition key to assure that the headlights are on high beam. If the ABS light is on, the brake system should be serviced as soon as possible. 3. Speedometer Indicates vehicle speed...
...on during driving, it is operating properly. The light should come on, have the brake system inspected as soon as possible to switch the headlights from high or low beam. 7. Turn Signal Indicators The arrows will continue to the ON position and may stay on for each gear range...is not on. The warning light should be checked frequently to a point midway between ON and START. Turn the ignition key to assure that the headlights are on high beam. If the ABS light is on, the brake system should be serviced as soon as possible. 3. Speedometer Indicates vehicle speed...
Owner's Manual
Page 164
... Corrosion ...190 Fuses ...195 ▫ Underhood Fuses (Power Distribution Center) ...195 ▫ Interior Fuses ...195 Vehicle Storage ...196 Replacement Bulbs ...196 Bulb Replacement ...197 ▫ Headlight Bulb Replacement ...197 ▫ Front Park/Turn Signal Lights ...199 ▫ Front Sidemarker Light ...199 ▫ Tail/Stop, Rear Turn Signals And Back-Up Lights...
... Corrosion ...190 Fuses ...195 ▫ Underhood Fuses (Power Distribution Center) ...195 ▫ Interior Fuses ...195 Vehicle Storage ...196 Replacement Bulbs ...196 Bulb Replacement ...197 ▫ Headlight Bulb Replacement ...197 ▫ Front Park/Turn Signal Lights ...199 ▫ Front Sidemarker Light ...199 ▫ Tail/Stop, Rear Turn Signals And Back-Up Lights...
Owner's Manual
Page 193
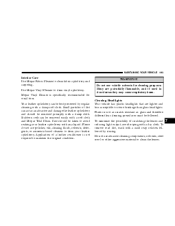
...leather conditioner is specifically recommended for cleaning purposes. MAINTAINING YOUR VEHICLE 193 Interior Care Use Mopar Fabric Cleaner to clean vinyl upholstery. Cleaning Headlights Your vehicle has plastic headlights that are potentially flammable, and if used in closed areas they may cause respiratory harm. Do not use polishes, oils, cleaning fluids... the lenses and reducing light output, avoid wiping with any liquid. Mopar Vinyl Cleaner is not required to stone breakage than glass headlights. Many are lighter and less susceptible to maintain the original condition.
...leather conditioner is specifically recommended for cleaning purposes. MAINTAINING YOUR VEHICLE 193 Interior Care Use Mopar Fabric Cleaner to clean vinyl upholstery. Cleaning Headlights Your vehicle has plastic headlights that are potentially flammable, and if used in closed areas they may cause respiratory harm. Do not use polishes, oils, cleaning fluids... the lenses and reducing light output, avoid wiping with any liquid. Mopar Vinyl Cleaner is not required to stone breakage than glass headlights. Many are lighter and less susceptible to maintain the original condition.
Owner's Manual
Page 197
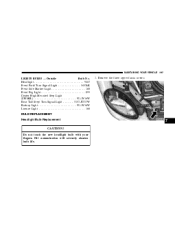
MAINTAINING YOUR VEHICLE 197 LIGHTS BULBS - Outside Bulb No. Oil contamination will severely shorten bulb life. Remove the three upper fascia screws. 7 CAUTION! Do not touch the new headlight bulb with your fingers. Headlight ...9007 Front Park/Turn Signal Light ...3457AK Front Side Marker Light...168 Front Fog Light ...899 Center High Mounted Stop Light (CHMSL) ...921-W16W Rear Tail/Stop/Turn Signal Light ...3157-P27/7W Backup Light ...921-W16W License Light ...168 BULB REPLACEMENT Headlight Bulb Replacement 1.
MAINTAINING YOUR VEHICLE 197 LIGHTS BULBS - Outside Bulb No. Oil contamination will severely shorten bulb life. Remove the three upper fascia screws. 7 CAUTION! Do not touch the new headlight bulb with your fingers. Headlight ...9007 Front Park/Turn Signal Light ...3457AK Front Side Marker Light...168 Front Fog Light ...899 Center High Mounted Stop Light (CHMSL) ...921-W16W Rear Tail/Stop/Turn Signal Light ...3157-P27/7W Backup Light ...921-W16W License Light ...168 BULB REPLACEMENT Headlight Bulb Replacement 1.

Owner's Manual
Page 198
... out until the rubber grommet on the screw starts to the fender by a molded pin. CAUTION! Remove two screws from the headlight assembly and remove the assembly from behind the bumper fascia and grille. 3. Disconnect the electrical connector. 4. During installation, be sure... when tightening the inboard screw, to only tighten until the molded pin clears the fender, then slide the headlight out from the vehicle. NOTE: The headlight assembly is located to compress against the headlamp module housing. Remove the retaining ring and replace the bulb. 198 MAINTAINING YOUR...
... out until the rubber grommet on the screw starts to the fender by a molded pin. CAUTION! Remove two screws from the headlight assembly and remove the assembly from behind the bumper fascia and grille. 3. Disconnect the electrical connector. 4. During installation, be sure... when tightening the inboard screw, to only tighten until the molded pin clears the fender, then slide the headlight out from the vehicle. NOTE: The headlight assembly is located to compress against the headlamp module housing. Remove the retaining ring and replace the bulb. 198 MAINTAINING YOUR...
Owner's Manual
Page 199
... and remove it from socket and replace Center High Mounted Stop Light 1. Pull the bulb out of the socket and replace the bulb. Remove the headlight assembly 2. Remove the screws and push-pins from the housing. 3. Remove the bulb and socket assembly from the rear light mounting area. 2. Open the trunk...
... and remove it from socket and replace Center High Mounted Stop Light 1. Pull the bulb out of the socket and replace the bulb. Remove the headlight assembly 2. Remove the screws and push-pins from the housing. 3. Remove the bulb and socket assembly from the rear light mounting area. 2. Open the trunk...
Owner's Manual
Page 231
... Changing A Flat Tire ...153 Charging System Light ...80 Chart, Tire Sizing ...126 Child Restraint ...39 Child Safety Locks ...16 Circuit Breakers ...195 Cleaning Glass ...194 Headlights ...193 Climate Control ...102 Clock ...83 Compact Disc Changer ...99 Compact Disc Maintenance ...101 Compact Spare Tire ...136 Compass ...51 Compass Calibration ...54 Compass Variance...
... Changing A Flat Tire ...153 Charging System Light ...80 Chart, Tire Sizing ...126 Child Restraint ...39 Child Safety Locks ...16 Circuit Breakers ...195 Cleaning Glass ...194 Headlights ...193 Climate Control ...102 Clock ...83 Compact Disc Changer ...99 Compact Disc Maintenance ...101 Compact Spare Tire ...136 Compass ...51 Compass Calibration ...54 Compass Variance...
Owner's Manual
Page 232
... ...62 Dealer Service ...168 Defroster, Rear Window ...110 Defroster, Windshield ...48,103,106 Deploying, Airbag ...37 Diagnostic System, Onboard ...166 Dimmer Control ...60 Dimmer Switch, Headlight ...62 Disarming, Theft System ...21 Disposal Engine Oil ...172 Domelight ...61 Door Locks ...14 Door Locks, Automatic ...16 Downshifting ...121 Drive Belts ...173 Driving On...
... ...62 Dealer Service ...168 Defroster, Rear Window ...110 Defroster, Windshield ...48,103,106 Deploying, Airbag ...37 Diagnostic System, Onboard ...166 Dimmer Control ...60 Dimmer Switch, Headlight ...62 Disarming, Theft System ...21 Disposal Engine Oil ...172 Domelight ...61 Door Locks ...14 Door Locks, Automatic ...16 Downshifting ...121 Drive Belts ...173 Driving On...
Owner's Manual
Page 234
... Blends ...142 Gauges Coolant Temperature ...82 Fuel ...81 Tachometer ...79 Gearshift ...117 General Information ...13 Glass Cleaning ...194 Hazard Warning Flasher ...152 Head Restraints ...57 Headlights ...61 Bulb Replacement ...197 Cleaning ...193 High Beam ...79 Switch ...61 Heater ...102 Hood Prop ...59 Hood Release ...58 Hoses ...184 Ignition Key ...9 Wiring System...
... Blends ...142 Gauges Coolant Temperature ...82 Fuel ...81 Tachometer ...79 Gearshift ...117 General Information ...13 Glass Cleaning ...194 Hazard Warning Flasher ...152 Head Restraints ...57 Headlights ...61 Bulb Replacement ...197 Cleaning ...193 High Beam ...79 Switch ...61 Heater ...102 Hood Prop ...59 Hood Release ...58 Hoses ...184 Ignition Key ...9 Wiring System...
Owner's Manual
Page 235
... ...60 Airbag ...39,47,80 Anti-Lock ...79 Brake Warning ...78 Center Mounted Stop ...199 Daytime Running ...62 Dimmer Switch, Headlight ...61,62 Dome ...61 Exterior Check ...48 Fog ...62,78 Headlights On Reminder ...62 High Beam Indicator ...79 Instrument Cluster ...61 Interior ...60 Lights On Reminder ...62 Low Fuel ...81 Malfunction...
... ...60 Airbag ...39,47,80 Anti-Lock ...79 Brake Warning ...78 Center Mounted Stop ...199 Daytime Running ...62 Dimmer Switch, Headlight ...61,62 Dome ...61 Exterior Check ...48 Fog ...62,78 Headlights On Reminder ...62 High Beam Indicator ...79 Instrument Cluster ...61 Interior ...60 Lights On Reminder ...62 Low Fuel ...81 Malfunction...

Owner Manual
Page 20
... the key into the ignition and turn on the panic alarm feature, press and release the PANIC button. When the panic alarm is on the headlights and park/lamps will flash, the horn will pulse on and off the panic alarm by using the following procedure: 1.
... the key into the ignition and turn on the panic alarm feature, press and release the PANIC button. When the panic alarm is on the headlights and park/lamps will flash, the horn will pulse on and off the panic alarm by using the following procedure: 1.
Owner Manual
Page 22
.... For the first 3 minutes the horn will automatically disarm. To set the alarm: 1. The indicator light in any manner, the system will sound and the headlights, park/turn signal lights, tail lights and the indicator light in the trunk circuit. This shows that the system is an even gap between the...
.... For the first 3 minutes the horn will automatically disarm. To set the alarm: 1. The indicator light in any manner, the system will sound and the headlights, park/turn signal lights, tail lights and the indicator light in the trunk circuit. This shows that the system is an even gap between the...
