
Owner's Manual
Page 12
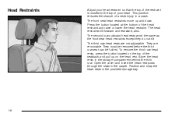
... the head restraint. They must be removed before the third row seat can be folded. To remove the third row head rests, press the button located on the head rest. The second row outboard head rests work the same as the front seat head restraints except they do not tilt. Store the head ... in the carpet. Open the cover and insert the head rest posts through the slats in the storage compartment behind the third row. They are not adjustable. The front seat head restraints move up on the top of a neck injury in the provided storage tray. 1-6 This position reduces the chance ...
... the head restraint. They must be removed before the third row seat can be folded. To remove the third row head rests, press the button located on the head rest. The second row outboard head rests work the same as the front seat head restraints except they do not tilt. Store the head ... in the carpet. Open the cover and insert the head rest posts through the slats in the storage compartment behind the third row. They are not adjustable. The front seat head restraints move up on the top of a neck injury in the provided storage tray. 1-6 This position reduces the chance ...
Owner's Manual
Page 13
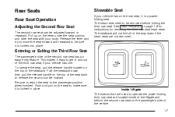
... on the passenger's side of the liftgate and behind the second row seat on the seat to be removed before folding the third row seat. The head rests need to make sure it easy to tumble forward. To operate the seat, pull the release handle located on page 1-6 for instructions for ... Liftgate The buttons that are used to operate the power folding third row seat are not removed. Entering or Exiting the Third Row Seat The passenger's side of the seatback. Release the lever and try to move the seat forward and rearward to the passenger position when finished. Be sure...
... on the passenger's side of the liftgate and behind the second row seat on the seat to be removed before folding the third row seat. The head rests need to make sure it easy to tumble forward. To operate the seat, pull the release handle located on page 1-6 for instructions for ... Liftgate The buttons that are used to operate the power folding third row seat are not removed. Entering or Exiting the Third Row Seat The passenger's side of the seatback. Release the lever and try to move the seat forward and rearward to the passenger position when finished. Be sure...
Owner's Manual
Page 14
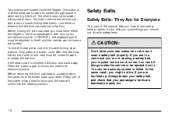
...forward for Everyone This part of these to fold the third row seat into the seating position. Before folding the third row seat you must have a low battery. Only press the button once. After the seat has folded, the panel on the seat must be , if you 're not wearing a safety ...properly. The button behind the second row seat is blocked it . To fold the seat press one of the power folding seat buttons. If the seat's path is also a power folding seat button. You can hit things inside the liftgate. Before returning the third row seat to a seat position, the panel must be ...
...forward for Everyone This part of these to fold the third row seat into the seating position. Before folding the third row seat you must have a low battery. Only press the button once. After the seat has folded, the panel on the seat must be , if you 're not wearing a safety ...properly. The button behind the second row seat is blocked it . To fold the seat press one of the power folding seat buttons. If the seat's path is also a power folding seat button. You can hit things inside the liftgate. Before returning the third row seat to a seat position, the panel must be ...

Owner's Manual
Page 31
... belt comfort for older children who have this feature. Rear Safety Belt Comfort Guides for Children and Small Adults Your vehicle may have outgrown booster seats and for each of the rear outside passenger positions in the second...
... belt comfort for older children who have this feature. Rear Safety Belt Comfort Guides for Children and Small Adults Your vehicle may have outgrown booster seats and for each of the rear outside passenger positions in the second...
Owner's Manual
Page 47
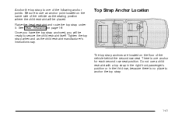
... Head Restraints on the floor of the vehicle behind the second row seat. Once you have the top strap anchored, you will be ready to secure the child restraint itself. Tighten the top strap when and as the seating position where the child restraint will be placed. Do not use an ...are located on page 1-6. There is no place to use a child restraint with a top strap in the right front passenger's position or in the third row, because there is one of the vehicle as the child restraint manufacturer's instructions say. Raise the head restraint and route the top strap under it.
... Head Restraints on the floor of the vehicle behind the second row seat. Once you have the top strap anchored, you will be ready to secure the child restraint itself. Tighten the top strap when and as the seating position where the child restraint will be placed. Do not use an ...are located on page 1-6. There is no place to use a child restraint with a top strap in the right front passenger's position or in the third row, because there is one of the vehicle as the child restraint manufacturer's instructions say. Raise the head restraint and route the top strap under it.

Owner's Manual
Page 49
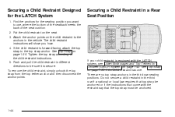
The labels are located near the base of the second row outboard seating positions. {CAUTION: If a LATCH-type child restraint isn't attached to its anchorage points, the restraint won't be seriously injured or killed. To assist you need a ... to secure the restraint. See "Securing a Child Restraint Designed for the LATCH System" or "Securing a Child Restraint in a Rear Seat Position" in the Index for information on the seatback at each seating position with the LATCH system has a label on how to secure a child restraint in your vehicle, you in your vehicle...
The labels are located near the base of the second row outboard seating positions. {CAUTION: If a LATCH-type child restraint isn't attached to its anchorage points, the restraint won't be seriously injured or killed. To assist you need a ... to secure the restraint. See "Securing a Child Restraint Designed for the LATCH System" or "Securing a Child Restraint in a Rear Seat Position" in the Index for information on the seatback at each seating position with the LATCH system has a label on how to secure a child restraint in your vehicle, you in your vehicle...
Owner's Manual
Page 50
... Do not secure a child restraint in the vehicle. Securing a Child Restraint Designed for the seating position you how. 4. The child restraint instructions will show you want to the anchors in the third row if a national or local law requires that top strap be anchored or if the instructions that..., simply unhook the top strap from the top tether anchor and then disconnect the anchor points. Securing a Child Restraint in the third row seating positions. If the child restraint is equipped with the restraint say that come with the LATCH system, see Lower Anchorages and Top Tethers ...
... Do not secure a child restraint in the vehicle. Securing a Child Restraint Designed for the seating position you how. 4. The child restraint instructions will show you want to the anchors in the third row if a national or local law requires that top strap be anchored or if the instructions that..., simply unhook the top strap from the top tether anchor and then disconnect the anchor points. Securing a Child Restraint in the third row seating positions. If the child restraint is equipped with the restraint say that come with the LATCH system, see Lower Anchorages and Top Tethers ...

Owner's Manual
Page 113
...storage area inside both of the front doors. Storage Areas Glove Box The glove box is located in the armrest of the second row seat. Turn the key counterclockwise to expose them. Center Console Storage Area Your vehicle has a center console storage area located between the front... seats. To lock the glove box door, insert your key into the lock cylinder and turn it clockwise. On the outboard sides of the third row there may also be cupholders. Assist Handles Your vehicle has assist handles...
...storage area inside both of the front doors. Storage Areas Glove Box The glove box is located in the armrest of the second row seat. Turn the key counterclockwise to expose them. Center Console Storage Area Your vehicle has a center console storage area located between the front... seats. To lock the glove box door, insert your key into the lock cylinder and turn it clockwise. On the outboard sides of the third row there may also be cupholders. Assist Handles Your vehicle has assist handles...
Owner's Manual
Page 116
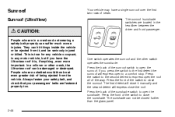
They can be damaged or destroyed. People who are fastened properly too. If you have a single sunroof over the first two rows of the switch to close the sunshade. Press the switch to the second detent to express open the sunshade. One switch operates the sunroof ...injuries. Press the back of the sunroof switch to open to a comfort stop. In a rollover or other switch operates the sunshade. Press the front of seats. This is , if anything, even more important. The first detent will close it manually and the second detent will express open the sunroof. ...
They can be damaged or destroyed. People who are fastened properly too. If you have a single sunroof over the first two rows of the switch to close the sunshade. Press the switch to the second detent to express open the sunshade. One switch operates the sunroof ...injuries. Press the back of the sunroof switch to open to a comfort stop. In a rollover or other switch operates the sunshade. Press the front of seats. This is , if anything, even more important. The first detent will close it manually and the second detent will express open the sunroof. ...

Owner's Manual
Page 118
... who are in a crash and not wearing a safety belt properly can suffer much worse injuries. Press the front of seats and a smaller sunroof over the first two rows of the switch to close the sunroof. This is true for the rear sunshade. Always fasten your safety belt, and...64257;rst detent will express close the roof. 2-50 They can be ejected from the vehicle. If you have a single sunroof over the third row seat. The sunroof /sunshade switches are located in any vehicle occupant, in the headliner between the driver and front passenger. {CAUTION: People who are ...
... who are in a crash and not wearing a safety belt properly can suffer much worse injuries. Press the front of seats and a smaller sunroof over the first two rows of the switch to close the sunroof. This is true for the rear sunshade. Always fasten your safety belt, and...64257;rst detent will express close the roof. 2-50 They can be ejected from the vehicle. If you have a single sunroof over the third row seat. The sunroof /sunshade switches are located in any vehicle occupant, in the headliner between the driver and front passenger. {CAUTION: People who are ...

Owner's Manual
Page 156
... system. Then, the rear control can be used to provide cooled air only. One fan speed selector is located in the headliner above the second row seats. The rear air conditioning system is designed to increase and decrease the airflow. Rear Control Front Control Turn the knob to the off...
... system. Then, the rear control can be used to provide cooled air only. One fan speed selector is located in the headliner above the second row seats. The rear air conditioning system is designed to increase and decrease the airflow. Rear Control Front Control Turn the knob to the off...
Owner's Manual
Page 389
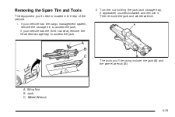
Wheel Wrench 5-79 If your vehicle has the cargo management system, remove the storage bin to access the jack. 2. Turn the nut holding the jack (and storage tray, if applicable) counterclockwise and remove it. Jack C. Removing the Spare Tire and Tools The equipment you 'll be using include the jack (A) and the wheel wrench (B). The tools you 'll need is located in the rear of the vehicle. 1. A. If your vehicle has the third row seat, remove the head rest storage tray to access the jack. Then remove the jack and wheel wrench. Wing Nut B.
Wheel Wrench 5-79 If your vehicle has the cargo management system, remove the storage bin to access the jack. 2. Turn the nut holding the jack (and storage tray, if applicable) counterclockwise and remove it. Jack C. Removing the Spare Tire and Tools The equipment you 'll be using include the jack (A) and the wheel wrench (B). The tools you 'll need is located in the rear of the vehicle. 1. A. If your vehicle has the third row seat, remove the head rest storage tray to access the jack. Then remove the jack and wheel wrench. Wing Nut B.

Owner's Manual
Page 398
... through the tire as shown in the graphic and attach the strap to tilt the third row seatback forward slightly. 2. Place the flat tire in the tire storage bag and ... 5-88 Put back all tools as they were stored in an upright position against the third row seat. 3. Use the power third row seat button near the liftgate to the cargo tie-downs in the rear of the vehicle. 4. ...Route the tie-down strap. Storing the Flat Tire with Third Row Passengers Storing the Flat ...
... through the tire as shown in the graphic and attach the strap to tilt the third row seatback forward slightly. 2. Place the flat tire in the tire storage bag and ... 5-88 Put back all tools as they were stored in an upright position against the third row seat. 3. Use the power third row seat button near the liftgate to the cargo tie-downs in the rear of the vehicle. 4. ...Route the tie-down strap. Storing the Flat Tire with Third Row Passengers Storing the Flat ...
Owner's Manual
Page 451
...™) ...3-103 Adding Washer Fluid ...5-37 Additional Program Information ...7-9 Additives, Fuel ...5-6 Add-On Electrical Equipment ...5-100 Adjustable Throttle and Brake Pedal ...2-23 Adjusting the Second Row Seat ...1-7 Adjusting the Speakers (Balance/Fade) ...3-100 After Off-Road Driving ...4-31 Air Bag Readiness Light ...3-40 Air Bag Systems ...1-50 Adding Equipment to Your Air...
...™) ...3-103 Adding Washer Fluid ...5-37 Additional Program Information ...7-9 Additives, Fuel ...5-6 Add-On Electrical Equipment ...5-100 Adjustable Throttle and Brake Pedal ...2-23 Adjusting the Second Row Seat ...1-7 Adjusting the Speakers (Balance/Fade) ...3-100 After Off-Road Driving ...4-31 Air Bag Readiness Light ...3-40 Air Bag Systems ...1-50 Adding Equipment to Your Air...
Owner's Manual
Page 456
... Additives ...5-19 Engine Overheated - Stop Engine ...3-68 Engine Power Reduced ...3-68 Engine Specifications ...5-110 Engine Speed Limiter ...3-40 Entering or Exiting the Third Row Seat ...1-7 Entering the Personalization Menu ...3-74 Entertainment System Cleaning the Video Screen ...3-127 Cleaning Your DVD Player ...3-127 DVD Distortion ...3-126 Entry Lighting ...3-21 Environmental Concerns...
... Additives ...5-19 Engine Overheated - Stop Engine ...3-68 Engine Power Reduced ...3-68 Engine Specifications ...5-110 Engine Speed Limiter ...3-40 Entering or Exiting the Third Row Seat ...1-7 Entering the Personalization Menu ...3-74 Entertainment System Cleaning the Video Screen ...3-127 Cleaning Your DVD Player ...3-127 DVD Distortion ...3-126 Entry Lighting ...3-21 Environmental Concerns...


