
Owner's Manual
Page 6
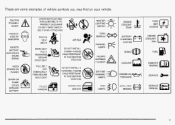
... o vehicle symbols you may find on your vehicle: f CAUTION POSSIBLE INJURY A & LATCH BOTH LAP AND SHOULDER BELTSTO PROTECT OCCUPANT DO NOT TWIST SAFETY BELT WHENAlTACHlNG FASTEN SEAT BELTS MOVE SEAT FULLY REARWARD* SECURE CHILD SEAT PULL BELT COMPLETELY rHEN SECURE CHILD SEAT 4:@ 8 LIGHTING MASTER 0 SWITCH - , e\ ENGINE COOLANT TEMP -Fb...
... o vehicle symbols you may find on your vehicle: f CAUTION POSSIBLE INJURY A & LATCH BOTH LAP AND SHOULDER BELTSTO PROTECT OCCUPANT DO NOT TWIST SAFETY BELT WHENAlTACHlNG FASTEN SEAT BELTS MOVE SEAT FULLY REARWARD* SECURE CHILD SEAT PULL BELT COMPLETELY rHEN SECURE CHILD SEAT 4:@ 8 LIGHTING MASTER 0 SWITCH - , e\ ENGINE COOLANT TEMP -Fb...
Owner's Manual
Page 13
... outside of a vehicle. not Do allow people to use safety belts properly. If you 're not wearing a safety belt, your passengers' belts are fastened properly too. 1-6 Always fasten your vehicle is extremely dangerous to be much worse. Be sure everyone in your safety belt, and check that is not equipped with safntnfbelts...
... outside of a vehicle. not Do allow people to use safety belts properly. If you 're not wearing a safety belt, your passengers' belts are fastened properly too. 1-6 Always fasten your vehicle is extremely dangerous to be much worse. Be sure everyone in your safety belt, and check that is not equipped with safntnfbelts...
Owner's Manual
Page 149
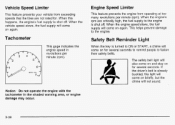
... prevents your vehicle from operating at too many revolutions per minute (rpm). When the engine's rpm are not rated for. This helps prevent damage to fasten their safety belts. Notice: Do not operate the engine with the tachometer in revolutions per minute (rpm). Tachometer This gage indicates the engine speed in...
... prevents your vehicle from operating at too many revolutions per minute (rpm). When the engine's rpm are not rated for. This helps prevent damage to fasten their safety belts. Notice: Do not operate the engine with the tachometer in revolutions per minute (rpm). Tachometer This gage indicates the engine speed in...

Owner's Manual
Page 253
... this manual can affect the airflow around it . You can be easily confused. Be sure to use the proper nuts, bolts and other fasteners. "English" and "metric" fasteners can be hurt. Be sure you attempt any service work you use the proper service manual. This may cause wind noise and affect windshield... work, see Service Publications Ordering Information on page 7-9. You could be injured and your vehicle couldbe damaged if you 'll want to use the wrong fasteners, parts canlater break or fall off.
... this manual can affect the airflow around it . You can be easily confused. Be sure to use the proper nuts, bolts and other fasteners. "English" and "metric" fasteners can be hurt. Be sure you attempt any service work you use the proper service manual. This may cause wind noise and affect windshield... work, see Service Publications Ordering Information on page 7-9. You could be injured and your vehicle couldbe damaged if you 'll want to use the wrong fasteners, parts canlater break or fall off.
Owner's Manual
Page 305
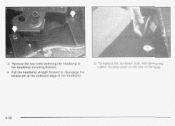
Pull the headlamp straight forward to the headlamp mounting bracket. 4. 3. To replace the low-beam bulb, first remove the rubber housing cover on the rear of the headlamp. 5. Remove the two bolts fastening the headlamp to disengage the locator pin at the outboard edge of the lamp. 5-56
Pull the headlamp straight forward to the headlamp mounting bracket. 4. 3. To replace the low-beam bulb, first remove the rubber housing cover on the rear of the headlamp. 5. Remove the two bolts fastening the headlamp to disengage the locator pin at the outboard edge of the lamp. 5-56

Owner's Manual
Page 309
Taillamps and Turn Signal Lamps 1. Move the spare tire cover out of the housing. 5-60 Gently remove the taillamp from the body. The taillamp is on the bottom of the housing and the rear turn signal lamp is on the upper part of the way. 4. Open the trunk to gair1 access to access the wing nuts. 5. Remove the rear compartment sill plate by removing the upper convenience net retainers, located at each end, as shown. 1 5. Pull the trunk trim away to the lamp housing. 2. Remove the three wing nuts that fasten the taillamp to the body. 3.
Taillamps and Turn Signal Lamps 1. Move the spare tire cover out of the housing. 5-60 Gently remove the taillamp from the body. The taillamp is on the bottom of the housing and the rear turn signal lamp is on the upper part of the way. 4. Open the trunk to gair1 access to access the wing nuts. 5. Remove the rear compartment sill plate by removing the upper convenience net retainers, located at each end, as shown. 1 5. Pull the trunk trim away to the lamp housing. 2. Remove the three wing nuts that fasten the taillamp to the body. 3.
Owner's Manual
Page 316
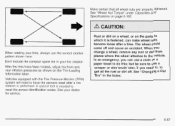
... tire rotation. See "Changing a Flat Tire" in your dealer for service. In an emergency, you can make wheel nuts become loose after a tire rotation is fastened, can use a cloth or a paper towel to have been rotated, adjust the front and rear inflation pressures as shown on the Tire-Loading Information label...
... tire rotation. See "Changing a Flat Tire" in your dealer for service. In an emergency, you can make wheel nuts become loose after a tire rotation is fastened, can use a cloth or a paper towel to have been rotated, adjust the front and rear inflation pressures as shown on the Tire-Loading Information label...
Owner's Manual
Page 321
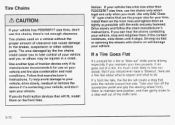
... pedal and grip the steering wheel firmly. If you maintain your tires properly. Driving too fast it or spinning the wheels with the ends securely fastened. Tire chains used on will fit, install them onthe front tires. Steer to maintain lane position, and then gently brake to leak out slowly. If...
... pedal and grip the steering wheel firmly. If you maintain your tires properly. Driving too fast it or spinning the wheels with the ends securely fastened. Tire chains used on will fit, install them onthe front tires. Steer to maintain lane position, and then gently brake to leak out slowly. If...
Owner's Manual
Page 327
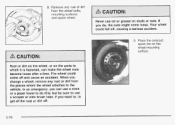
Your wheel could come loose. Rust or dirt on the leel, or on the p-.. _sto which it is fastened, can use a cloth or a paper towel to the vehicle. If you change a wheel, remove any rust or dirt from the places where the wheel attaches ...
Your wheel could come loose. Rust or dirt on the leel, or on the p-.. _sto which it is fastened, can use a cloth or a paper towel to the vehicle. If you change a wheel, remove any rust or dirt from the places where the wheel attaches ...