
Owner's Manual
Page 2
... Hood ...5-12 Headlamp Aiming ...5-50 ...5-55 Bulb Replacement Windshield Wiper Blade Replacement ...5-62 ...5-63 Tires ...5-84 Appearance Care 5-91 Vehicle Identification ...5-92 Electrical System ...Capacities and Specifications ...5-100 Normal Maintenance Replacement Parts ...5-101 Maintenance Schedule ...:...6-1 ...6-2 Maintenance Schedule Customer Assistance lnformation ...7-1 Customer Assistance lnformation ...7-2 Index ...1 the Road. The 2003 Cadillac Seville Owner Manual Seats and Restraint Systems ...1-1 Front...
... Hood ...5-12 Headlamp Aiming ...5-50 ...5-55 Bulb Replacement Windshield Wiper Blade Replacement ...5-62 ...5-63 Tires ...5-84 Appearance Care 5-91 Vehicle Identification ...5-92 Electrical System ...Capacities and Specifications ...5-100 Normal Maintenance Replacement Parts ...5-101 Maintenance Schedule ...:...6-1 ...6-2 Maintenance Schedule Customer Assistance lnformation ...7-1 Customer Assistance lnformation ...7-2 Index ...1 the Road. The 2003 Cadillac Seville Owner Manual Seats and Restraint Systems ...1-1 Front...
Owner's Manual
Page 119
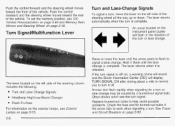
...returns automatically when the turn or lane change . Arrows that flash rapidly when signaling for burned-out bulbs if the arrow fails to work when signaling a turn , move the lever on the instrument panel... Center (DIC) will flash in the direction of the turn or lane change may be causedby a burned-out signal bulb. Hold it there until the arrow starts to flash to signal a lane change is left on page 2-49. If... the left side of the vehicle. Raise or lower the lever until the lane change . Replace burned-out bulbs to turn signal. Check the fuse and for a turn is released.
...returns automatically when the turn or lane change . Arrows that flash rapidly when signaling for burned-out bulbs if the arrow fails to work when signaling a turn , move the lever on the instrument panel... Center (DIC) will flash in the direction of the turn or lane change may be causedby a burned-out signal bulb. Hold it there until the arrow starts to flash to signal a lane change is left on page 2-49. If... the left side of the vehicle. Raise or lower the lever until the lane change . Replace burned-out bulbs to turn signal. Check the fuse and for a turn is released.
Owner's Manual
Page 250
...43 Jump Starting ...5-45 Headlamp Aiming ...5.50 Headlamp Horizontal Aiming ...-5-52 Headlamp Vertical Aiming ...-5-52 Bulb Replacement ...5.55 High Intensity Discharge (HID) Lighting ...5-55 Halogen Bulbs ...5-55 Headlamps ...5-55 Front Turn Signal Lamps ...5-59 Center High-Mounted Stoplamp (CHMSL) ...5-...59 Taillamps and Turn Signal Lamps ...5-60 Replacement Bulbs ...- 5 - 6 1 Windshield Wiper Blade Replacement ...5.62 Tires ...5.63 inflation . Tire Pressure Monitor System ...5.65 Tire Inspection and Rotation ...5.66 When It...
...43 Jump Starting ...5-45 Headlamp Aiming ...5.50 Headlamp Horizontal Aiming ...-5-52 Headlamp Vertical Aiming ...-5-52 Bulb Replacement ...5.55 High Intensity Discharge (HID) Lighting ...5-55 Halogen Bulbs ...5-55 Headlamps ...5-55 Front Turn Signal Lamps ...5-59 Center High-Mounted Stoplamp (CHMSL) ...5-...59 Taillamps and Turn Signal Lamps ...5-60 Replacement Bulbs ...- 5 - 6 1 Windshield Wiper Blade Replacement ...5.62 Tires ...5.63 inflation . Tire Pressure Monitor System ...5.65 Tire Inspection and Rotation ...5.66 When It...
Owner's Manual
Page 304
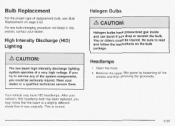
... components, of replacement bulb, see Bulb Replacement on the bulb package. If you try to read and follow the instructions on page 5-55. Have your dealer. After your vehicle's HID headlamp bulb has been replaced, you may have pressurized gas inside and can burst if you drop or scratch the bulb. Be sure to service any bulb changing procedure... is normal. 5-55 You or others could be injured. Remove the upper filler panel by loosening all the screws and then removing the grommets. Halogen bulbs have HID headlamps.
... components, of replacement bulb, see Bulb Replacement on the bulb package. If you try to read and follow the instructions on page 5-55. Have your dealer. After your vehicle's HID headlamp bulb has been replaced, you may have pressurized gas inside and can burst if you drop or scratch the bulb. Be sure to service any bulb changing procedure... is normal. 5-55 You or others could be injured. Remove the upper filler panel by loosening all the screws and then removing the grommets. Halogen bulbs have HID headlamps.
Owner's Manual
Page 305
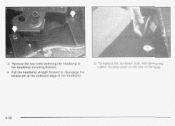
To replace the low-beam bulb, first remove the rubber housing cover on the rear of the headlamp. 5. Remove the two bolts fastening the headlamp to disengage the locator pin at the outboard edge of the lamp. 5-56 Pull the headlamp straight forward to the headlamp mounting bracket. 4. 3.
To replace the low-beam bulb, first remove the rubber housing cover on the rear of the headlamp. 5. Remove the two bolts fastening the headlamp to disengage the locator pin at the outboard edge of the lamp. 5-56 Pull the headlamp straight forward to the headlamp mounting bracket. 4. 3.
Owner's Manual
Page 307
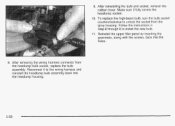
... counterclockwise to unlock the socket from the headlamp bulb socket, replace the bulb assembly. IO. Reinstall the upper filler panel by inserting the grommets, along with the screws, back into the headlamp housing. 5-58 After removing the ...wiring harness connector from the lamp housing. Reconnect it fully covers the headlamp socket. After reinstalling the bulb and socket, reinstall the rubber cover. Make...
... counterclockwise to unlock the socket from the headlamp bulb socket, replace the bulb assembly. IO. Reinstall the upper filler panel by inserting the grommets, along with the screws, back into the headlamp housing. 5-58 After removing the ...wiring harness connector from the lamp housing. Reconnect it fully covers the headlamp socket. After reinstalling the bulb and socket, reinstall the rubber cover. Make...
Owner's Manual
Page 308
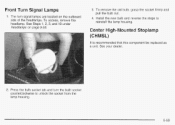
3 1. Press the bulb socket tab and turn signai iamps are iocatea on page 5-55. 7-0remove the o!d bu!h, grasp the socket firmly and pull the bulb out. 4. See your dealer. 2. To access, remove the headlamp. Center High-Mounted Stoplamp (CHMSL) It is recommended that this component be replaced as a unit. Install the new bulb and reverse the steps to unlock the socket from the lamp housing. 5-59 See Steps 1, 2,3, and 10 under Headlamps on the outboard side of the headlamps. The turn the bulb socket counterclockwise to reinstall the lamp housing.
3 1. Press the bulb socket tab and turn signai iamps are iocatea on page 5-55. 7-0remove the o!d bu!h, grasp the socket firmly and pull the bulb out. 4. See your dealer. 2. To access, remove the headlamp. Center High-Mounted Stoplamp (CHMSL) It is recommended that this component be replaced as a unit. Install the new bulb and reverse the steps to unlock the socket from the lamp housing. 5-59 See Steps 1, 2,3, and 10 under Headlamps on the outboard side of the headlamps. The turn the bulb socket counterclockwise to reinstall the lamp housing.

Owner's Manual
Page 310
Once you have replaced the burned-out bulb, reverse the steps to remove it. To remove the bulb, grasp the socket firmly and pull the bulb out. Press the bulb socket tab and turn the socket counterclockwise to reassemble the lamp assembly. 5-6 1 For any buib not iisted here contact your dealer. 7.
Once you have replaced the burned-out bulb, reverse the steps to remove it. To remove the bulb, grasp the socket firmly and pull the bulb out. Press the bulb socket tab and turn the socket counterclockwise to reassemble the lamp assembly. 5-6 1 For any buib not iisted here contact your dealer. 7.
Owner's Manual
Page 381
... Adjustment ...5-42 5-40 Brake Fluid ...Brake Pedal Travel ...5-42 5-42 BrakeWear ...Brakes ...5-40 Braking ...4-6 4-8 Braking in Emergencies ...Break-In, NewVehicle ...2-22 Bulb Replacement ...5-55 Center High-Mounted Stoplamp (CHMSL) ...5-59 2 C Cadillac Owner PrivilegesTM...7-6 California Fuel ...5-6 Canada ...7-4 Canadian Owners ...ii Capacities and Specifications ...5-100 CarbonMonoxide ...4-24,4-33,4-33 Care of Safety Belts ...5-86 Care...
... Adjustment ...5-42 5-40 Brake Fluid ...Brake Pedal Travel ...5-42 5-42 BrakeWear ...Brakes ...5-40 Braking ...4-6 4-8 Braking in Emergencies ...Break-In, NewVehicle ...2-22 Bulb Replacement ...5-55 Center High-Mounted Stoplamp (CHMSL) ...5-59 2 C Cadillac Owner PrivilegesTM...7-6 California Fuel ...5-6 Canada ...7-4 Canadian Owners ...ii Capacities and Specifications ...5-100 CarbonMonoxide ...4-24,4-33,4-33 Care of Safety Belts ...5-86 Care...
Owner's Manual
Page 391
...Removing the Flat Tire and Installing the Spare Tire ...5-76 Removing the Spare Tire and Tools ...5-74 Replacement Bulbs ...5-61 5-43 Replacing Brake System Parts ...Replacing Restraint System Parts After a Crash ...1-52 Reporting Safety Defects 7-9 CanadianGovernment ...7-9 General Motors ...7-8 United...2-45 Resetting Defaults ...Restraint System Check ...6-10 Checking Your Restraint Systems ...1-52 Replacing Restraint System Parts After a Crash ...1-52 Restraint Systems Checking ...1-52 1-52 Replacing Parts ...1-5 Restraints, Head ...Retained Accessory Power (RAP) ...2-23 Right Front Passenger...
...Removing the Flat Tire and Installing the Spare Tire ...5-76 Removing the Spare Tire and Tools ...5-74 Replacement Bulbs ...5-61 5-43 Replacing Brake System Parts ...Replacing Restraint System Parts After a Crash ...1-52 Reporting Safety Defects 7-9 CanadianGovernment ...7-9 General Motors ...7-8 United...2-45 Resetting Defaults ...Restraint System Check ...6-10 Checking Your Restraint Systems ...1-52 Replacing Restraint System Parts After a Crash ...1-52 Restraint Systems Checking ...1-52 1-52 Replacing Parts ...1-5 Restraints, Head ...Retained Accessory Power (RAP) ...2-23 Right Front Passenger...


