
eMachines C2825 Support Question
eMachines C2825 Support Question
Find answers below for this question about eMachines C2825.Need a eMachines C2825 manual? We have 1 online manual for this item!
Question posted by derzum4 on June 7th, 2011
Emachines C2825 Will Not Power Up.
C drive is about 3/4 full. Computer froze, curser unresponsive several times. Power down from switch at front. Came up. Next morning found it power down and would not power up from switch (dead as if no power to computer). Checked power switch at back of computer, found in on position. Checked power cord found 122v into computer. Unpluged cord, turned switch at back to on position and cycled switch in front. Connected power cord, no response from front switch (swith in back on). What is the red slider switch under the power cord connection do? One side "15" the other "230. Which correct? No LED lights on next to back power switch. Any ideas why computer won't power up?
Current Answers
Answer #1: Posted by Tefik on June 7th, 2011 8:53 PM
Tefik

Member since:
May 10th, 2011 Points: 447,890

Member since:
May 10th, 2011 Points: 447,890
First, do not mess with the red switch. It changes voltage for 120V - US, 240V - Euro. Wrong voltage can fry unit. Second, what size is your hard drive? (3/4 full could mean insufficient drivespace) Third, asking what is wrong is like asking a doctor on the phone what is wrong, he can't see you, he doesn't know your history, he can't guess. You need to make more data about your PC available.
Related eMachines C2825 Manual Pages
User Guide - Page 1

...
3 Do not use .
2 Follow all of all equipment plugged into the main AC power outlet does not exceed 15 amps.
9 Unplug your electrician to protect it does not exceed the amperage ...a builtin installation unless proper ventilation is a safety feature. Also, make sure that matches the power requirements of the grounding-type plug. To ensure reliableoperation of any kind on the product.
6 ...
User Guide - Page 2
... cover is removed. (Separe le
cordon d'alimentation et puis enleve le couvercle.) 2 Once removed, the cover must be replaced and screwed in position before the power supply cord is
plugged back in damage and may result in . (Apres le couvercle a enleve, visse le couvercle en place et remettre le cordon d'alimentation...
User Guide - Page 5
... may vary and look slightly different than those pictured. eMachines, stylized "e" and figure logo are trademarks of their respective owners. ©2003 eMachines, Inc.
v in this material. All other countries. eMachines, Inc. Before You Read
The information in the United... incidental or consequential damages resulting from the furnishing, performance, or use of eMachines, Inc.
User Guide - Page 8

... Instruction B-1 Fuse Warning Instruction B-1 Laser Product ...B-2
viii Solving Common Problems
Power ...A-1 Hard Disk Drive ...A-1 Optical Drive ...A-2 Audio ...A-2 Floppy Disk Drive A-3 Display & Monitor A-3 Keyboard ...A-4 Mouse ...A-4
Appendix B.
Chapter 4
Installing and Removing Drives
Removing the Cover 4-1 Replacing the Cover 4-3 Installing an Expansion Card 4-4 Installing...
User Guide - Page 9

Introduction 1-1
Introduction
System Overview
Optical drive Optical drive
(optional) USB connector
(optional) Power button
Emergency eject hole Load/Eject button Floppy disk drive(optional)
Media reader slots(optional) Power indicator Hard disk drive access indicator
IEEE 1394 connectors (optional)
USB 2.0 connectors (optional)
Headphone jack
Microphone jack USB 2.0 connectors (optional)
...
User Guide - Page 11

... chapter.
1. Setting Up Your System
This chapter describes how to any electrical device, such
as a telephone, which can move freely. A flat and hard surface. Appropriate power sources.
User Guide - Page 12
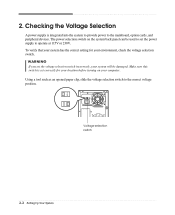
... 115V or 230V.
Using a tool such as an opened paper clip, slide the voltage selection switch to set the voltage selection switch incorrectly, your environment, check the voltage selection switch. Voltage selection switch
2-2 Setting Up Your System Checking the Voltage Selection
A power supply is set correctly for your system will be used to the correct voltage position.
User Guide - Page 13
... or cable system.
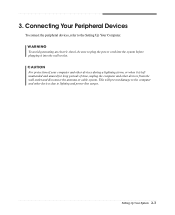
3. WARNING To avoid generating an electric shock, be sure to lighting and power line surges. Setting Up Your System 2-3 Connecting Your Peripheral Devices
To connect the peripheral devices, refer... left unattended and unused for long periods of time, unplug the computer and other devices due to plug the power cord into the system before plugging it into the wall socket.
User Guide - Page 14

Turning Off the Computer
To turn it off your computer, follow these steps: 1. Press the power button on the computer or to turn off . NOTE If the Restore CD is in the optical drive (D:) while your computer is displayed, click Turn Off to your computer. 3. In this case, the "Microsoft Windows Startup Menu...
User Guide - Page 23

...install or remove system cover, optional drives, and optional cards in this chapter. Removing the Cover
You need to remove the cover of all, disconnect the power cable from the electrical outlet and from... any telecommunications links, networks, or modems before performing any cables connected to access its power source and from the back panel. To remove the cover, follow these steps: 1. ...
User Guide - Page 30

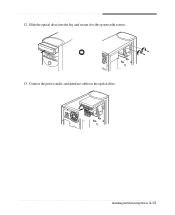
Replace the system cover according to your hard disk drive. (If you removed the hard disk drive cable from the motherboard, replace it with the retaining screw, as shown below.
8. Slide the HDD bracket into the chassis and secure it .)
9. 7. Connect the power and hard disk drive cable to the instructions in "Replacing the Cover" in this chapter. 4-8 Installing and Removing Drives
User Guide - Page 32
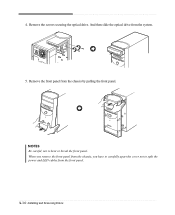
... the chassis by pulling the front panel. NOTES Be careful, not to split the power and LED cables from the front panel.
4-10 Installing and Removing Drives Remove the front panel from the system.
5. When you remove the front panel from the chassis, you have to carefully apart the cover not to...
User Guide - Page 34
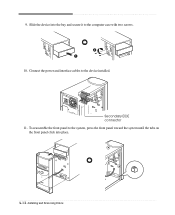
Slide the device into the bay and secure it to the system, press the front panel toward the system until the tabs on the front panel click into place.
4-12 Installing and Removing Drives Secondary EIDE connector 11. To reassemble the front panel to the computer case with two screws.
10. Connect the power and interface cables to the device installed. 9.
User Guide - Page 35
Installing and Removing Drives 4-13 Slide the optical drive into the bay and secure it to the optical drive. 12. Connect the power, audio, and interface cables to the system with screws. 13.
User Guide - Page 41
...you play button on the DVD-ROM or COMBO drive model. Using the PowerDVD 6-1 About DVD
Digital ...times the data capacity of data - A standard DVD can hold 4.7 gigabytes of a current CD. Playing the PowerDVD
How to Run the PowerDVD
If your DVD disc is a high-density storage device. And press the play the DVD that supports 16:9 widescreen and the screen is changed automatically to emachines...
User Guide - Page 42
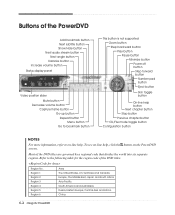
... button Repeat button Menu button Go to bookmark button
This button is not supported Zoom button Step backward button Play button Pause button Minimize button Power off button Step forward button Number pad button
Eject button
Skin toggle button
On-line help .
To see on-line help, click the button on...
User Guide - Page 43

... and Support.)
Solving Common Problems A-1 To check to see whether the wall outlet works, plug other wall outlet. Make sure the power cord is not working , use other device (such as a lamp) into the computer.
Hard Disk Drive
Cause Hard disk drive operation seems slow
Hard disk drive access indicator light stays on
Solution
The...
User Guide - Page 45

... 1.
Make sure the power cord is unformatted.
Remove...button on the empty desktop area and click ...drive can't read the diskette
Solution
Diskette is not properly connected to a grounded wall outlet. Format the diskette. (Refer to your mouse. Make sure that is write-protected. To change the display resolution or color depth, use another diskette or check the diskette by running Check...
User Guide - Page 47
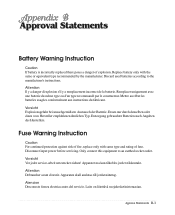
... equipment to the manufacturer's instructions. Laite on liitettävä suojakosketinistoraasian. Vorsicht Explosionsgefahr bei unsachgemäß em Austausch der Batterie. Disconnect input power before servicing. Vorsicht Vor jeder service-arbeit netzstecker ziehen! Attention Debrancher avant d'ouvrir. Approva Statements B-1 Replace battery only with same type and rating...
User Guide - Page 48
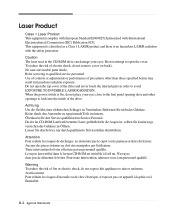
... the risk of the drive and never touch the internal parts in the CD-ROM drive can damage your eyes close to the font panel opening door and other than those specified herein may result in hazardous radiation exposure. When the power switch is no hazardous LASER radiation...the safety protection. Do not attempt to rain or moisture. Use of controls or adjustments or performance of the drive.
Similar Questions

Desktop With No Power
e-machine et1331g-05w wich suddenly power off now won't turn on if I push the power button the fans ...
e-machine et1331g-05w wich suddenly power off now won't turn on if I push the power button the fans ...
(Posted by johnnymaldon 8 years ago)

How To Replace Power Button Switch On T3302?
I can not power up my Emachines T3302 desktop? It appears to be a defective power button switch.How ...
I can not power up my Emachines T3302 desktop? It appears to be a defective power button switch.How ...
(Posted by mv1989 8 years ago)

Need Schematic Wiring Diagram For A C2825 E-machine.
DOES ANYONE HAVE A DOWNLOADABLE WIRING DIAGRAM FOR THE C2825 ??
DOES ANYONE HAVE A DOWNLOADABLE WIRING DIAGRAM FOR THE C2825 ??
(Posted by standoor 11 years ago)

Fan Wont Stop Running
I open my cpu tower to install two 1gb memory boards and two seperate wires were disconnected. I don...
I open my cpu tower to install two 1gb memory boards and two seperate wires were disconnected. I don...
(Posted by juniormustang54 12 years ago)

How Do I Connect It All Together To Work
(Posted by cookiemonsterhayley937 12 years ago)