Yamaha DKC-850 Support Question
Yamaha DKC-850 Support Question
Find answers below for this question about Yamaha DKC-850.Need a Yamaha DKC-850 manual? We have 3 online manuals for this item!
Question posted by warren12998 on March 13th, 2015
Changing Midi Defalt Setting
i would like to run my disclavier with an old school midi sequencer that doesn't have usb/midi out. i have a dkc-850 and went into setup and changed the midi input to midi from usb and it works fine. the problem is that when the dkc-850 is turned off, when it is turned back on, it defalts back to the usb midi input and i have to go thru the setup menu all over again to use my sequencer. is there a way to change the defalt on the dkc-850 to 8 pin midi so i don't have to keep doing this ?setup
Current Answers
Answer #1: Posted by TommyKervz on March 18th, 2015 9:52 AM
TommyKervz

Member since:
January 10th, 2013 Points: 17,776,833

Member since:
January 10th, 2013 Points: 17,776,833
Please refer to the operation manual on the link http://www.helpowl.com/manuals/Yamaha/DKC850/88271
Related Yamaha DKC-850 Manual Pages
Operation Manual - Page 5
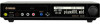
...522-9011 : 1-714-522-9301 : Player Piano Control Unit : DKC-850
This device complies with FCC regulations does not guarantee that interference will...the antenna lead-in is 300 ohm ribbon lead, change the lead-in this product in a residential environment will...please contact the local retailer authorized to eliminate the problem by Yamaha may cause undesired operation. Durch die fachgerechte...
Operation Manual - Page 10
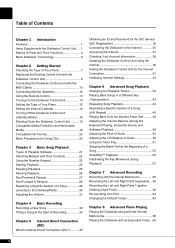
...Unit with the MIDI Cables 10 Connecting Monitor Speakers 12 Using the Remote Control 13 Turning On the Disklavier Control Unit 14 Setting the Type of Your Piano 15 Setting the Internal Calendar...Parts Separately ... 60 Recording the Left and Right Parts Together (Setting a Split Point 62 Re-recording One Part 64 Changing the Default Tempo 65
Chapter 8 Advanced Piano Playing
Playing the ...
Operation Manual - Page 11
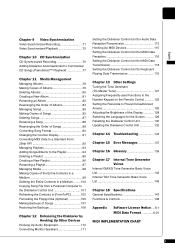
... the Order of Songs 89 Converting Song Format 90 Changing the Counter Display 91 Converting MIDI Data to a Standard Form (Strip XP 92 Managing...Setting the Disklavier Control Unit for Audio Data Reception/Transmission 113 Hooking Up MIDI Devices 115 Setting the Disklavier Control Unit for MIDI Data Reception 116 Setting the Disklavier Control Unit for MIDI Data Transmission 118 Setting...
Operation Manual - Page 13
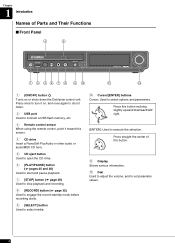
...Shows various information. 12 Dial Used to adjust the volume, and to set parameter values.
2
Press straight the center of Parts and Their Functions... CD drive Insert a PianoSoft·PlusAudio or other audio or audio/MIDI CD here.
5 CD eject button Used to open the CD drive....once to turn it on or shuts down .
2 USB port Used to connect a USB flash memory, etc.
3 Remote control sensor When ...
Operation Manual - Page 16
...
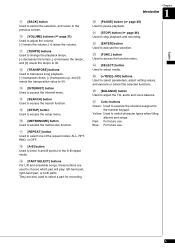
25 [+/YES]/[-/NO] buttons Used to select parameters, adjust setting values, and execute or cancel the selected functions.
26 [... lowers the volume, [+] raises the volume.
11 [TEMPO] buttons Used to change the playback tempo. [-] decreases the tempo, [+] increases the tempo, and ...Used to access the search function.
15 [SETUP] button Used to access the setup menu.
16 [METRONOME] button Used to access...
Operation Manual - Page 17
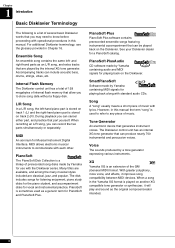
Accompanying tracks can produce nearly 700 instrumental and percussion voices. MIDI allows electronic musical instruments to know before proceeding with operational procedures in the Yamaha XG format is played on track 2 (R).
SmartPianoSoft
Software made by a tone generator expressing various instruments. The Disklavier control unit has an internal XG tone generator that can ...
Operation Manual - Page 22
The remote control supplied with two MIDI cables for input and output.
See Chapter 2 "Getting Started -
Settings
MIDI IN CH MIDI IN MIDI OUT OUT CH
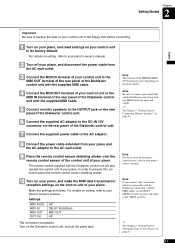
HP DELAY IN (500ms) KBD ...to the OUTPUT jack on the rear panel of the Disklavier control unit with the MIDI cables, set the piano type. For details on setting, refer to your piano's owner's manual.
2 Turn off your piano, and...
Operation Manual - Page 26
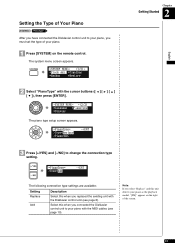
... *Display
The piano type setup screen appears.
=PianoType= >Type=Replace >Piano=REC
-+ENT
Chapter
2 Getting Started
English
3 Press [+/YES] and [-/NO] to change the connection type setting.
=PianoType= >Type=Add
-+ENT
The following connection type settings are available:
Setting Replace
Add
Description
Select this when you replaced the existing unit with the MIDI cables (see page...
Operation Manual - Page 32
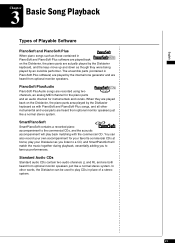
...a recorded piano accompaniment to the commercial CDs, and the acoustic accompaniment will match the music together during playback, essentially adding you to play your favorite commercial CDs at home; ... Disklavier keyboard as with the commercial CD. In other instrumental and vocal parts are recorded using two channels, an analog MIDI channel for the piano parts and an audio channel for...
Operation Manual - Page 47
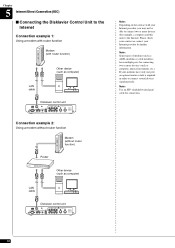
... your contract or contact your modems have multiple ports for connecting two or more devices (for connection.
Note: Some types of modems (such as computer, musical instrument, etc.).
Operation Manual - Page 52
... for the proxy server. Information
You can change the default factory settings. These settings are necessary only when a proxy server is set to "MANUAL."
In most cases, you to determine several addresses. Proxy/Proxy Port
Enter the name and the port number for the Internet Connection
English
[SETUP] "Network"
You can confirm the information of...
Operation Manual - Page 54
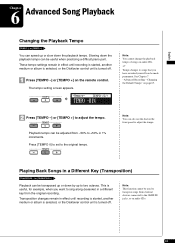
... use the dial on audio CDs.
43 The tempo setting screen appears.
=Memory= TEMPO-/0/+
TEMPO +01%
Note: You cannot change the playback tempo of songs on page 65.
2 Press...
[TRANSPOSE -] or [TRANSPOSE +]
Playback can be useful when practicing a difficult piano part.
Transposition changes remain in effect until recording is started , another medium or album is selected, or the Disklavier ...
Operation Manual - Page 62
.... Audio of the R channel is output to both of a song at 8:15 AM.
1 Press [SETUP] on page 16. See Chapter 2 "Getting Started - The setup menu screen appears.
=SETUP MENU= (1/3)
*TimerPlay *AudioI/O
*MIDI
*M-Tune
Note: The internal calendar must be set in advance in order for the timer play ."
Audio of the L channel is output...
Operation Manual - Page 65
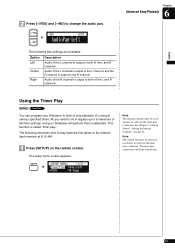
... ON and the current time is displayed - with the timer play function is set minutes.
=TimerPlay=
>TimerPlay=ON
01[M-F 08:15 PLAY Mem01]
10 Press [ENTER] to return to the setup menu screen.
11 Press [SETUP] to the right side of the current time.
=Memory=
LR SO V+00
A02-001 12:00T
Piano...
Operation Manual - Page 66
... menu screen appears.
=SETUP MENU= (1/3)
*TimerPlay *AudioI/O
*MIDI
*M-Tune
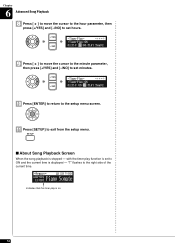
2 Select "Playback" with the cursor buttons then press [ENTER].
=SETUP MENU= _(2/3)] *Network *Playback
*Shortcut
The playback setting screen appears with the cursor flashing.
=Playback=
-+
>SkipSpace=OFF
>KeyMotion=ON
3 Press [+/YES] and [-/NO] to change the setting.
=Playback=
-+
>SkipSpace=ON...
Operation Manual - Page 77
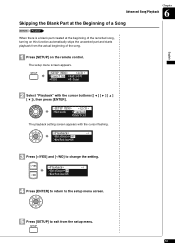
..., the tempo range is from -75% to change the beat setting on page 22.
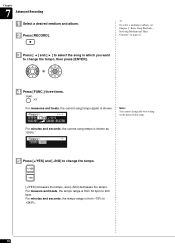
3 Press [ ] and [ ] to select the song in which you want to change the tempo, then press [ENTER].
4 Press ...and seconds, the current song tempo is shown as "000%."
=Memory=
-+
TEMPO=+000%
Note: You cannot change the tempo.
[+/YES] increases the tempo, and [-/NO] decreases the tempo. Chapter
7 Advanced Recording
1 ...
Operation Manual - Page 80
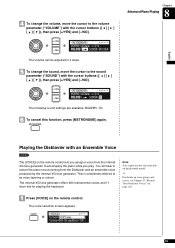
4 To change the volume, move the cursor to the volume parameter ("VOLUME") with the cursor buttons then press [+/YES] ...=TG
The following sound settings are available: BUZZER, TG
6 To cancel this function, press [METRONOME] again. The internal XG tone generator offers 480 instrumental voices and 11 drum kits for playing the keyboard. You will hear in 4 steps.
5 To change the sound, move the...
Operation Manual - Page 82

...press [ENTER].
=SETUP MENU= (1/3)
*TimerPlay *AudioI/O
*MIDI
*M-Tune
The audio I/O setting screen appears.
=...AudioI/O=
] -+
>OMNI IN=AutoDetect
>OMNI IN Vol=100
3 Select "OMNI IN" with sight.
This feature offers great listening experience with the cursor buttons ([ ] [ ]), then press [+/YES] and [-/NO] to change setting...
Additional Functions - Page 1
Disklavier Control Unit DKC-850
Additional Function Manual
(Version 3.10)
Table of Contents
Introduction 2
New Features for Version 3.10 2
Advanced Song Playback 3
Using the Timer Play 3
Enhancing the Disklavier by Hooking Up Other Devices 5
Setting the Disklavier for Audio Data Reception/Transmission 5
Other Settings 7
Assigning Frequently-used Functions to the Number Keypad on the Remote...
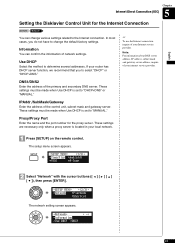
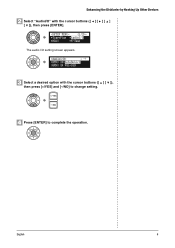
Additional Functions - Page 6
...Up Other Devices
2 Select "AudioI/O" with the cursor buttons then press [ENTER].
=SETUP MENU= (1/3)
*TimerPlay *AudioI/O
*MIDI
*M-Tune
The audio I/O setting screen appears.
=AudioI/O=
] -+
>OMNI IN=AutoDetect
>OMNI IN VOL=100
3 Select a desired option with the cursor buttons ([ ] [ ]), then press [+/YES] and [-/NO] to change setting.
4 Press [ENTER] to complete the operation.
Similar Questions

Its 2022 - Can I Still Use My Yamaha Clp-150 To Record Midi On Latest Macbook?
Dear readers, after many days of trying and investing in stupid stuff as usbc-to USB adapters and hu...
Dear readers, after many days of trying and investing in stupid stuff as usbc-to USB adapters and hu...
(Posted by angelikaborn 1 year ago)

Wanted: Yamaha Dkc-850 Disklavier Control Unit
Where can I obtain a Yamaha DKC-850 Disklavier Control Unit???Thanks...
Where can I obtain a Yamaha DKC-850 Disklavier Control Unit???Thanks...
(Posted by rcalbin 1 year ago)


Ac3m Won't Turn On
hi - my ac3m was new about 4 months ago and worked fine - i haven't played it since - i took it out ...
hi - my ac3m was new about 4 months ago and worked fine - i haven't played it since - i took it out ...
(Posted by jimj1s 11 years ago)