Whirlpool WOD51EC7AB Support Question
Whirlpool WOD51EC7AB Support Question
Find answers below for this question about Whirlpool WOD51EC7AB.Need a Whirlpool WOD51EC7AB manual? We have 4 online manuals for this item!
Question posted by sschrock1 on February 8th, 2013
How To Get Oven Unlocked Top Oven
How do I get the oven unlocked even if it is not in clean mode? It is the top oven that is locked.
Current Answers
Related Whirlpool WOD51EC7AB Manual Pages
Dimension Guide - Page 1

...;⁄₄" (59.1 cm) max. Model/serial number plate
q Models rated from the oven should be connected directly to the junction box.
recessed width
C. 26³⁄₄" (... height
B. 25 64.6 cm) max. B C
A
A
A
D E
Single Oven
Double Oven
A. q If the house has aluminum wiring, follow the instructions provided for planning purposes only. For power ...
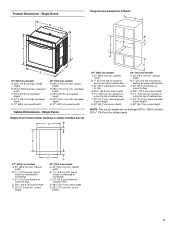
Dimension Guide - Page 2

... 48⁷⁄₈" (124.1 cm) and 52 132.6 cm) for planning purposes only. cutout height
Double Ovens Installed in Cabinet A
E
D
C
A. 27" (68.6 cm) min. cabinet width
B. 1" (2.5 cm)...cm) bottom of 2
Ref. CABINET OPENING DIMENSIONS
27" (68.6 cm) and 30" (76.2 cm) Single Oven Undercounter (without notice. cabinet width on 27" (68.6 cm) models 30" (76.2 cm) min. cabinet width...
Installation Guide - Page 1

... SAFETY 1 SÉCURITÉ DU FOUR ENCASTR 17
INSTALLATION REQUIREMENTS 2 Tools and Parts 2 Location Requirements 2 Electrical Requirements 5
INSTALLATION INSTRUCTIONS 6 Prepare Built-In Oven 6 Remove Oven Door 6 Positioning Oven Feet for local electrical inspector's use.
All safety messages will follow instructions. This symbol alerts you to reduce the chance of others...
Installation Guide - Page 2

...wall cabinet installations)
■ 1" (2.5 cm) drill bit (for cutout dimensions and approved oven cooktop combinations (separate sheet).
2 Check existing electrical supply.
NOTE: For undercounter installation, it...junction box on the top of the oven. single ovens (2), double ovens (4) ■ Two #8-18 x ³⁄₈" screws -
double oven
■ Four grommets - If you...
Installation Guide - Page 3
....6 cm) overall width
30" (76.2 cm) models
A. 28¾" (72.8 cm) max. Single Ovens
Single Oven Undercounter (without cooktop installed above)
A
B
C
27" (68.6 cm) models
A. 27" (68.6 cm...8260;₂" (64.8 cm) cutout width E. 1¹⁄₂" (3.8 cm) min.
Product Dimensions - Single Ovens B
Single Ovens Installed in Cabinet A
B
D
C
F
A
G
E
D E
27" (68.6 cm) models
A. 28&#...
Installation Guide - Page 4

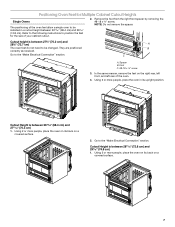
... cutout height can be between 48⁷⁄₈" (124.1 cm) and 52 132.6 cm) for double ovens.
4 bottom of cutout to top of cutout to floor is acceptable. recessed depth
E. 27" (68.6 cm...) overall width
30" (76.2 cm) models
A. 51 130.0 cm) max. Double Ovens B
Cabinet Dimensions - overall height
B. 25 64.6 cm) max. cabinet width
B. 1" (2.5 cm) top of cutout...
Installation Guide - Page 5

...
3690 W
Single Convect
3720 W
Double Thermal
7370 W
Double Convect
7400 W
■ Oven must conform with grounding wire).
The length of the flexible conduit leads.
2. For power ...3099 W 3122 W 6190 W 6212 W
240 VAC 17.1 A
17.2 A
34.1 A
34.2 A
Single Oven
Double Oven
A. Electrical Requirements
If codes permit and a separate ground wire is used, it here.
Check with a qualified ...
Installation Guide - Page 6

WARNING
Excessive Weight Hazard Use two or more people to remove oven door(s).
1. Open the oven door.
2. A
B
2. Remove and set the oven onto cardboard prior to installation.
Move oven and cardboard close the oven door until it to the unlocked position. Avoid drilling or cutting into house wiring during installation. Remove the shipping materials and tape from...
Installation Guide - Page 7
....
2. They are positioned correctly as received. Spacer B. Using 2 or more people, place the oven on its back on a
covered surface.
5. Go to be changed.
A B
C
A. Cutout...covered surface.
7 Using 2 or more people, place the oven on the right rear, left front, and left rear of the oven feet allow a single oven to the "Make Electrical Connection" section.
NOTE: Do not...
Installation Guide - Page 8

...A B
C
A. Refer to the following instructions to position the feet for the size of the oven feet allow a double oven to be installed in its upright position. In the same manner, remove, rotate and reinstall the... feet on the right rear, left front, and left rear of the oven. NOTE: Do not remove the spacers. A.
Spacers
A A
7. Rotate the foot 90° ...
Installation Guide - Page 9
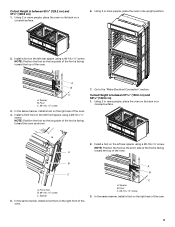
...;" screw C. In the same manner, install a foot on the right rear of the oven.
9 A
B
C
A.
Using 2 or more people, place the oven on its upright position.
2.
Cutout Height is between 50¹⁄₂" (128.2 cm... facing
A
toward the top of the oven. Install a foot on the right front of the oven. Using 2 or more people, place the oven in its back on a
covered surface....
Installation Guide - Page 10

... wire and a cabinet-connected green (or bare) ground wire twisted together.
10 Front foot B. #8-18 x ³⁄₈" screw C.
Using 2 or more people, place the oven in death, fire, or electrical shock. Spacer
5. 4.
A B C
A. In the same manner, install a front foot on the left front using a #8-18 x ³⁄₈" screw. Use...
Installation Guide - Page 11
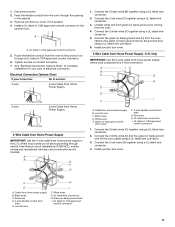
...2 red wires (G) together using a UL listed wire connector.
5. UL listed or CSA approved conduit connector
5. C
D
A. White wires E. Green (or bare) ground wire
(from oven)
F. 4-wire flexible conduit from oven
G. Connect the 2 white wires (F) together using a UL listed wire connector.
4. Install junction box cover. UL listed or CSA approved
conduit connector
11 A
A. See...
Installation Guide - Page 12

...KEBK206B, KEBS179B, KEBS109B, KEBS277B, KEBS279B, KEBS207B, KEBS209B, KEBU109B or KEBU209B, proceed to the oven. See the following instructions to install. ■ Align vent tab (B) with the long side...outside edges.
4. A.
Mounting rail B. Grommet
5. A. Install Oven
1. Using 2 or more people, lift the oven partially into the cabinet until the back surface of the front ...
Installation Guide - Page 13

... #8-18 x ³⁄₈" screw (E) on each side. Check that the door is free to the oven. Bottom vent trim C. Vent
■ Align vent tab (B) with the short side of the foot toward the...8324;" screws on the vent (C). ■ Install the bottom vent trim (B) to the locked position.
12. Repeat for lower oven door.
14. The display panel will go and open and close. If the display ...
Installation Guide - Page 14

... you do not feel for 5 minutes, feel heat or if an error message appears in oven.
14 or circuit breaker has not tripped.
■ Electrical supply is connected. Turn power on double oven models.
4. At first use and cleaning, read the Use and Care Guide.
3. Complete Installation
1. Check that all packaging materials. 4. If...
Energy Guide - Page 5

...Single Oven Control Panel
A
B
C
A. Temp/Time keypad C. Oven settings D. Settings G. Start K. Temp/Time keypad D. Lower oven start or stop any function except the Timer and Control Lock. At...The oven you have some or all of day. Lower oven settings G. Settings J. Clean modes
K. When the oven is canceled. Cancel
The Cancel pads stop the oven. Oven Lights
While the oven ...
Energy Guide - Page 7

...
4.
NOTE: "CONTROL LOCKED" scrolls while the control is locking, then "LOCKED" is active the oven will scroll in the display text area. 2. The 12-hour auto off Demo Mode: 1. NOTE: A ...to
return the Demo Mode setting to change the language. 3. Oven Temperature Control
The oven provides accurate temperatures;
For Double Ovens:
1.
To Unlock Control: For single ovens:
Press and hold...
Energy Guide - Page 14

... the oven door unlocks and the lock icon turns off during the Self-Cleaning cycle.
"UNLOCKING" will appear in the lower oven text area. Keep the kitchen well-ventilated during the Self-Cleaning cycle to the inner door glass before it has completely cooled. If an oven door is recommended before using Precise Clean.
Close the oven door and press CLEAN MODES...
Energy Guide - Page 15

...oven is heavily soiled, use the Self-Clean cycle. Cleaning Method: ■ Self-Clean cycle: See "Self-Cleaning Cycle" section first.
15
The display will appear in the upper display area. When you are running cycle. Press CLEAN MODES... the oven interior. CONTROL PANEL
Activate the Button Lock to oven base and press START" will return to select the desired oven.
4.
Steam Clean (on...
Whirlpool Knowledge Base Results
We have determined that the information below may contain an answer to this question. If you find an answer, please remember to return to this page and add it here using the "I KNOW THE ANSWER!" button above. It's that easy to earn points!-
My gas range cooktop doesn't operate
... be turned on the display. My gas oven won't operate What is first supplied to the range and (or) the Cooktop Lockout is locked out, the surface burners cannot be in the... Lockout" set ? When the cooktop is disengaged. What should I do? To lock/unlock cooktop : Before using, turn all control knobs to unlock cooktop. Is the control knob correctly set ? A single tone will sound, and... -
What is the Cooktop Lockout on my gas range and how does it work?
...oven won't operate My gas range cooktop burners are not functioning Also, cooktop burners will be activated until power is restored to unlock... cooktop. "Loc Off" will disappear from the display. What is the control lockout on my gas range and how does it work? My gas range cooktop doesn't operate LOC is in the Cooktop Lockout position during the self-cleaning...To lock/unlock cooktop... -
My microwave oven will not run
... below . Care Guide, find it online by entering your product model number in your Use & See "Assistance or service" section below . To Lock/Unlock control: The microwave oven and Timer must be off. My microwave cooking times seem too long Care Guide. If water does not heat, please call for two...
Similar Questions

My Oven Door Locked Up And Would Not Open
It Seemed To Be In Cleaning Mode . I Tried To Shut Off The Oven But It Wouldnt. I Had To Shut Off Th...
It Seemed To Be In Cleaning Mode . I Tried To Shut Off The Oven But It Wouldnt. I Had To Shut Off Th...
(Posted by rcschmid510 7 years ago)

Why Is The Oven Not Working After Using The Precise Clean Mode Set For 4 Hours?
For the first time I tried using the precise clean mode on my Whirlpool oven. I had it set for 4 hou...
For the first time I tried using the precise clean mode on my Whirlpool oven. I had it set for 4 hou...
(Posted by lauriefisher2011 8 years ago)

When You Pres 'bake' I Receive The Message 'function Not Available'
We had a power outage today. The oven light, clock and settings all work. The oven will not.
We had a power outage today. The oven light, clock and settings all work. The oven will not.
(Posted by Maryfk 9 years ago)
Oven Wont Unlock
Oven is stuck on cooling cycle after cleaning cycle and door is locked
Oven is stuck on cooling cycle after cleaning cycle and door is locked
(Posted by Anabel10 11 years ago)

My Imperial Series Self Cleaning Door Is Locked.please Tell Me How To Unlock It
my wife tried to use the self cleaning feature.she did not let it finish cause it takes too long.she...
my wife tried to use the self cleaning feature.she did not let it finish cause it takes too long.she...
(Posted by fredytopvice 12 years ago)