Whirlpool WOD51EC0AS Support Question
Whirlpool WOD51EC0AS Support Question
Find answers below for this question about Whirlpool WOD51EC0AS.Need a Whirlpool WOD51EC0AS manual? We have 4 online manuals for this item!
Question posted by crbeese70 on May 14th, 2017
Junction Box
Where does the junction box need to be located for installation? It is currently on the floor
Current Answers
Answer #1: Posted by BusterDoogen on May 14th, 2017 3:24 PM
BusterDoogen

Member since:
October 30th, 2011 Points: 28,565,437

Member since:
October 30th, 2011 Points: 28,565,437
If seen them mounted in a cabinet above the unit & on the wall. You should check with your local building codes dept. for the proper install location.
I hope this is helpful to you!
Please respond to my effort to provide you with the best possible solution by using the "Acceptable Solution" and/or the "Helpful" buttons when the answer has proven to be helpful. Please feel free to submit further info for your question, if a solution was not provided. I appreciate the opportunity to serve you!
Related Whirlpool WOD51EC0AS Manual Pages
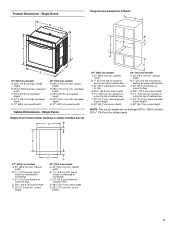
Dimension Guide - Page 1

...;₄" (59.1 cm) max. 27" (68.6 CM) AND 30" (76.2 CM) ELECTRIC SINGLE AND DOUBLE BUILT-IN OVEN
PRODUCT MODEL SERIES
PRODUCT DIMENSIONS
WOD51EC0A WOD51EC7A WOD93EC0A
WOD93EC7A WOS51EC0A WOS51EC7A
WOS92EC0A WOS92EC7A
Electrical:
To properly install your oven, you must be provided. See the following table. q Fuse both sides of the flexible conduit leads. 2. q A UL...
Dimension Guide - Page 2

....8 cm) cutout width D. 28¹⁄₂" (72.4 cm) cutout width
E. 28" (71.2 cm) min.
cutout height
Double Ovens Installed in Cabinet A
E
D
C
A. 27" (68.6 cm) min. W10351242 2/15/12 top of cutout to floor
D. 25¹⁄₂" (64.8 cm) cutout width E. 1¹⁄₂" (3.8 cm) min. bottom of
cutout to top of...
Installation Guide - Page 1

... and the safety of Contents/Table des matières
BUILT-IN OVEN SAFETY 1 SÉCURITÉ DU FOUR ENCASTR 17
INSTALLATION REQUIREMENTS 2 Tools and Parts 2 Location Requirements 2 Electrical Requirements 5
INSTALLATION INSTRUCTIONS 6 Prepare Built-In Oven 6 Remove Oven Door 6 Positioning Oven Feet for local electrical inspector's use. IMPORTANT :
À conserver pour consultation...
Installation Guide - Page 2

...; 1" (2.5 cm) drill bit (for 30" models (76.2 cm).
■ Floor must be located 3" (7.6 cm) maximum below the support surface when the oven is required. bottom vent ■ Four #8-18 x ¹⁄₄" screws - double oven
■ Two front feet - It is recommended that are installing the junction box on the top of 194°F (90°C). IMPORTANT...
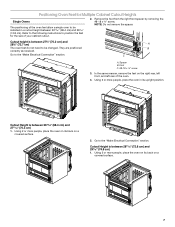
Installation Guide - Page 3
...cutout height
3 overall height
B. 25 64.6 cm) max. cabinet width
B. 1¹⁄₂" (3.8 cm) min. Single Ovens B
Single Ovens Installed in Cabinet A
B
D
C
F
A
G
E
D E
27" (68.6 cm) models
A. 28¾" (72... of cutout to bottom of upper cabinet door
C. 32" (81.3 cm) bottom of cutout to floor
D. 25¹⁄₂" (64.8 cm) cutout width E. 1¹⁄₂" (3.8 cm)...
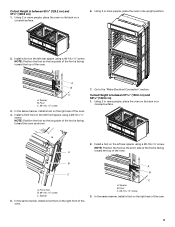
Installation Guide - Page 4

...floor is acceptable. overall height
B. 25 64.6 cm) max. D. 25¹⁄₂" (64.8 cm) cutout width
E. 1¹⁄₂" (3.8 cm) min. Product Dimensions - D. 28¹⁄₂" (72.4 cm) cutout width
E. 1¹⁄₂" (3.8 cm) min. Double Ovens Double Ovens Installed...cm) models
A. 30" (76.2 cm) min. Double Ovens B
Cabinet Dimensions - recessed width
C. 48 124.0 cm...
Installation Guide - Page 5

The length of electrical connection you will be connected directly to the junction box.
208 VAC 14.9 A
15.0 A
29.8 A
29.9 A
For power requirements for joining copper to the following table. Electrical Connection
To properly install your oven, you are not sure the oven is properly grounded. Voltage
Single
Single
Thermal Convect
Double Double Thermal Convect
240...
Installation Guide - Page 6

...installation. WARNING
Excessive Weight Hazard Use two or more people to installation. To avoid floor damage, set aside racks and other injury. Do not use handle or any portion of the oven...oven and cardboard close the oven door until it to the oven's final location.
6 Failure to remove oven door(s).
1. Foam strip
7. INSTALLATION INSTRUCTIONS
Prepare Built-In Oven
1. Locate the oven...
Installation Guide - Page 7
....
2. A B
C
A.
Go to the "Make Electrical Connection" section. Cutout height is between 27⁵⁄₈" (70.2 cm) and 28⁵⁄₈" (72.7 cm) The oven feet do not need to be installed in its back on a
covered surface.
5. Foot C. #8-18 x ³⁄₈" screw
3. Using 2 or more people, place the...
Installation Guide - Page 8

Refer to the following instructions to be installed. The oven is between 48⁷⁄₈" (124.1 cm) and 50 128.1 cm) The oven feet do not need to the "Make Electrical Connection" section. 8 NOTE: Do not remove the spacers. Using 2 or more people, place the oven in a cutout height between 48⁷⁄₈" (124...
Installation Guide - Page 9
... its back on the right front of the oven. Install a foot on the right rear of the oven.
9 In the same manner, install a foot on the left rear spacer using a #8-18 x ³⁄₈" screw. Install a front foot on the right rear of the oven. 4. NOTE: Position the foot so the short side of the foot...
Installation Guide - Page 10

...;⁄₈" screw. Go to follow these instructions can result in its upright position.
Failure to the "Make Electrical Connection" section. 4. Electrically ground oven. Use 8 gauge solid copper wire. Install a front foot on the right front of the foot is manufactured with a neutral (white) power supply wire and a cabinet-connected green (or...
Installation Guide - Page 11
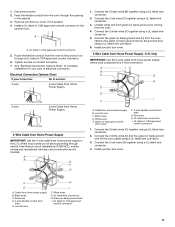
... conduit connector
1. Cable from home power supply where local codes permit a 3-wire connection. Junction box
H
I . UL listed or CSA approved
conduit connector
11 1. Feed the flexible conduit from the oven to complete installation for your home has:
Go to the
junction box. Remove junction box cover, if it is present. 4.
Tighten screws on conduit connector.
7. where local codes...
Installation Guide - Page 12

...;⁄₈" screws
12 Make sure the grommet stays in the grommet. Shipping foot
3. Insert the screws through hole in position. Install Oven
1.
Push oven completely into the cabinet and center the oven into the grommet and turn ¹⁄₄ turn counterclockwise. Do not overtighten screws.
6.
Vent tab C.
See the following instructions to...
Installation Guide - Page 13

... as far as shown. ■ Using one #8-18 x ¹⁄₄" screw is used on each side of the oven, the bottom vent trim must also be installed. A
B
E
D
C
A. A
B
8. You should appear in the oven frame.
10. If it is free to the vent (C) using two #8-18 x ¹⁄₄" screws on each side...
Installation Guide - Page 14

... and tight; NOTE: Press UPPER BROIL or LOWER BROIL on single oven models. Check that you do not feel for 5 minutes, feel heat or if an error message appears in the display, turn off the oven and contact a qualified technician.
7. Complete Installation
1. If there is an extra part, go back through the steps...
Energy Guide - Page 2

... 36
DÉPANNAGE 37
ASSISTANCE OU SERVICE 38 Accessoires 38 Au Canada 38
GARANTIE 39
OVEN SAFETY
Your safety and the safety of injury, and tell you what can be killed ... provided many important safety messages in this manual and on some models 15 General Cleaning 15 Oven Light 16 Oven Door 16
TROUBLESHOOTING 17
ASSISTANCE OR SERVICE 18 In the U.S.A 18 Accessories 18 In Canada ...
Energy Guide - Page 3

... for Warming or Heating the Room.
■ Do Not Leave Children Alone -
They should be moved while oven is in desired location while oven is properly installed and grounded by a qualified technician.
■ Never Use the Oven for a good seal. Do not let potholder touch hot heating elements.
Remove broiler pan and other reproductive harm...
Energy Guide - Page 4

... have some or all of your model.
Hidden bake element
I
E
H
G
A. Electronic oven control B. Convection element and fan J. Oven door lock latch and oven light switch
F
Parts and Features not shown Oven racks
4 The locations and appearances of the features shown here may have purchased may not match those of the items listed. PARTS AND FEATURES...
Energy Guide - Page 5

...manual covers different models. Oven settings D. Oven light M. When the oven is open.
"Press TIMER" will come on the display. Lower oven settings G. Start time
I . Electronic display C.
Press TIMER SET/OFF to enter the desired Timer. Lower oven start the timer. To Set: 1. Clean modes
I J
K
L
MN
F. Settings J. The locations and appearances of the items...
Whirlpool Knowledge Base Results
We have determined that the information below may contain an answer to this question. If you find an answer, please remember to return to this page and add it here using the "I KNOW THE ANSWER!" button above. It's that easy to earn points!-
My oven is not hot enough
... down to the element will have either a bake element visible on the floor of heat. Not thoroughly preheating the oven can cause excessive top heat to the element. Shiny pans reflect heat. When...the Choice Bake feature which allows you the option of heat. Your oven may require additional time and/or need information about the coil elements and burner bowls on my electric range... -
Damp loads or long drying times - Dryer
...this a new installation? Closet doors must have too many turns. Heavy rigid metal vent material and boxed or louvered exhaust... vent with lint and restricting air movement? Is the dryer located in an area where the air temperature is heating, check ... vent material. Dryer Dryer does not heat - Box or louvered hoods are damp; Dryers need good air movement to dry. A clogged exhaust ... -
My jetted sink pump/motor won't operate
... jetted sink pump/motor won't turn on the GFCI tripped? Is the timer control box plugged into the timer control box outlet? Is the clear air-line hose connected to both the bottom of the timer control box and the bottom of the on/off button? Is there power at the plug? ...
Similar Questions

My Oven Will Not Shut Off. I Get An 'e2 - F3 - Message. What Does This Mean? How
my oven will not shut off. I get an "E2-F3-" message. What does this mean? How can I fix this? How c...
my oven will not shut off. I get an "E2-F3-" message. What does this mean? How can I fix this? How c...
(Posted by rcschmid510 7 years ago)

Rbd245pds14 Kw?
I Need To Replace My Whirpool Oven Rbd245pds14, For Electric Connection I Need To Know If It Has 7.3...
I Need To Replace My Whirpool Oven Rbd245pds14, For Electric Connection I Need To Know If It Has 7.3...
(Posted by snabavian 9 years ago)

Oven & Broil Elements Not Heating
Whirlpool oven rps305pds16 has power but neither element will heat up. Control panel seems to work f...
Whirlpool oven rps305pds16 has power but neither element will heat up. Control panel seems to work f...
(Posted by wynne22 11 years ago)

Oven Thermo Problems Mod# Rf387lxhq1
the oven turns on and works fine but the oven works only wide open in all settings
the oven turns on and works fine but the oven works only wide open in all settings
(Posted by creativmancreature 12 years ago)
I Have A Whirlpool Gold Double Oven Model #gbd307pds10 Quits Working After 1 Use
Oven works once then quits turn breakers off wait a week and it will work one time again. Repairman ...
Oven works once then quits turn breakers off wait a week and it will work one time again. Repairman ...
(Posted by rmart42153 12 years ago)