Get support for Whirlpool WFE371LVB - 5.3 Cubic Foot Electric Range

Whirlpool WFE371LVB Support Question

Whirlpool WFE371LVB Support Question

Find answers below for this question about Whirlpool WFE371LVB - 5.3 Cubic Foot Electric Range.
Need a Whirlpool WFE371LVB manual? We have 4 online manuals for this item!
Question posted by bonnieoldham4145 on January 31st, 2023

Why Isn't My 9ven Working But My Burners Are And The Display To Turn 9n 9ven Is

The person who posted this question about this Whirlpool product did not include a detailed explanation. Please use the "Request More Information" button to the right if more details would help you to answer this question.

Requests for more information

Request from Yuvasurya on January 31st, 2023 7:37 PM
It's difficult to diagnose the issue with the limited information given. Can you please provide more context or details about what you are referring to as "9ven" and "burners"? Additionally, it seems like there might be some typos in your question, as "9n" and "9ven" may not be correct terms. Clarifying your question would help me provide a more accurate response.

Current Answers

Answer #1: Posted by khanjee on February 1st, 2023 10:58 AM
khanjee

Member since:
July 23rd, 2016

Points: 205,300
100
points
f your gas oven won't turn on but the stove still works, you're in the right place.

Thankfully, most of the time this problem is caused by either a problem with your power, the gas, the gas igniter, the burners, or in rare cases the temperature control thermostat.

In this article, we will give you step-by-step instructions for how to find the cause of the problem and fix it so that you can get back to using your oven again.

Let's get into it.

Step 1 - Check the Power

The first step is to ensure your oven is getting power to it. Even though your oven is gas-powered, it still requires electricity for the timer and other components to be able to operate.

To check the power, you simply need to:

  1. Check that the circuit breaker hasn't tripped. You can do this by inspecting the circuit breaker in your fuse box. Depending on your setup, you might have a dedicated breaker for your oven or one for your kitchen appliances.
  2. If the circuit breaker has tripped, you can turn it back on. You can then check if this solves the problem.
  3. If the circuit breaker is ok, check that the power socket is working-you can try the oven in a separate power socket to check this out. If the power socket is faulty, it will need to be repaired. If the power is fine, move on to step 2.
  4. If the circuit breaker continues to trip, then it will need to be repaired by a qualified electrician.
Step 2 - Check the Gas Supply

The next step is to check the gas supply. Sometimes the gas supply can get impeded and not get through to your oven.

To check the gas supply:

  1. Check that the main gas valve is turned on. If not, turn it back on.
  2. Check all of the other gas supply valves, such as those on the branch lines.
  3. If the gas is fine, move on to step 3.
Step 3 - Check the Igniter

The next step is to check the gas igniter. This is the most common cause of an oven not working even while the stove does. Sometimes the igniter can simply wear out over time, or it can break for other reasons.

To check the gas igniter, you need to:

  1. Turn the power off to the oven by turning the circuit breaker off. Before proceeding, make sure that the oven is off by checking that the clock and oven light are not working.
  2. Remove all of the oven racks and the tray at the bottom of the oven so you can access the gas burner and the igniter.
  3. Check the igniter coil and the element for any signs of damage or discoloration, which are good signs that they may need to be replaced.
  4. Turn the power back on.
  5. You can then turn your oven on and set the oven to heat.
  6. When the heating cycle starts, check the igniter to see if it glows bright orange. If it does glow orange but the gas doesn't ignite, this means the gas igniter will need to be replaced. If the igniter does work, the problem might be caused by another faulty component-move on to step 4 to keep checking components.

To replace the gas igniter, you'll need to:

  1. Order the correct replacement gas igniter for your oven.
  2. Once you have the replacement igniter, turn the power off to the oven.
  3. Remove the racks and the bottom tray so you can access the igniter.
  4. Remove the gas igniter-this simply involves removing a couple of screws, and then it should come out.
  5. You can then attach the new igniter.
  6. Once attached, test to see if it works by turning your oven on again.
  7. If it works, then you can start to use your gas oven again!
Step 4 - Check the Element/Burners

If the gas igniter is working, the problem might be that the gas elements or burners are blocked. The easiest way to check them is to take them out and check that they aren't blocked in any way. If they are, give them a clean and then put them back into the oven and see if this solves the problem. If not, move on to step 5.

Step 5 - Replace the Temperature Control Thermostat

The next component to check if you still haven't found the cause of the problem is the temperature control thermostat. The purpose of this component is to monitor the temperature inside the oven and then cycle on the heat when the oven temperature gets too low. If the temperature control thermostat becomes defective, it can stop your oven from turning on. This doesn't happen often, but if the igniter is working, your best option might be to simply replace the temperature control thermostat and see if that solves the problem.


Please Accept my answer by providing you with the best possible solution. Would be more glade.
THANK YOU

Related Whirlpool WFE371LVB Manual Pages

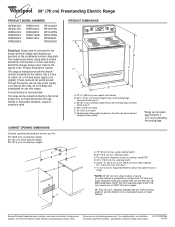
Dimension Guide - Page 1

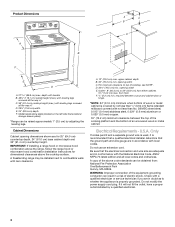
... C. W10252706A 1/04/10 30" (76 cm) Freestanding Electric Range PRODUCT MODEL NUMBERS GFE461LV GFE471LV WFE301LV WFE361LV WFE364LV WFE366LV WFE371LV WFE374LV WFE381LV WFE114LW WFE115LX RF110AXS RF111PXS RF114PXS... RF212PXS RF263LXT RF264LXS Electrical: Range must be connected directly to the circuit breaker box (or ...
Installation Instructions - Page 1

... - Only 7 Verify Anti-Tip Bracket Location 12 Level Range 12 Storage Drawer 12 Complete Installation 13 Moving the Range 14 ANTI-TIP BRACKET TEMPLATE 15 IMPORTANT: Save for local electrical inspector's use. U.S.A. W10252706B INSTALLATION INSTRUCTIONS 30" (76 CM) FREESTANDING ELECTRIC RANGES Table of Contents RANGE SAFETY 2 INSTALLATION REQUIREMENTS 3 Tools and Parts 3 Location...
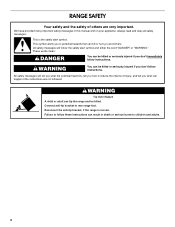
Installation Instructions - Page 2

... safety of injury, and tell you don't follow instructions. Connect anti-tip bracket to potential hazards that can tip the range and be killed or seriously injured if you to rear range foot. Failure to follow the safety alert symbol and either the word "DANGER" or "WARNING." Reconnect the anti-tip bracket, if...
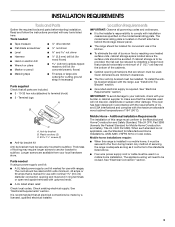
Installation Instructions - Page 3

... is to terminal block) ■ 3 - If cabinet storage is recommended that projects horizontally a minimum of 5" (12.7 cm) beyond the bottom of securing the range is required. See "Electrical Connection" section. 3 Location Requirements IMPORTANT: Observe all parts are included. ■ 3 - 10-32 hex nuts (attached to be provided, the risk can be reduced...
Installation Instructions - Page 4

... of cooktop, see NOTE*. Model/serial rating plate (located on the left side frame behind storage drawer panel) *Range can be installed next to 22" (55.9 cm) from floor F 2.2 cm) min. opening width E. Electrical Requirements - Be sure that the ground path and wire gauge are for dimensional clearances above code standards can...
Installation Instructions - Page 5

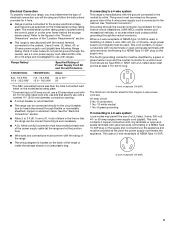
... 4-wire power cord are: 40-amp circuit 2 No.-8 conductors 1 No.-10 white neutral 1 No.-8 green grounding If connecting to the proper electrical voltage and frequency as specified on the supply end. Range Rating* 120/240 Volts 8.8 - 16.5 KW 16.6 - 22.5 KW 120/208 Volts 7.8 - 12.5 KW 12.6 - 18.5 KW Specified Rating of...
Installation Instructions - Page 6

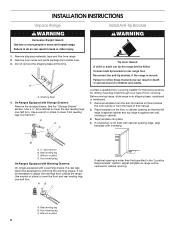
... front leveling legs one -half turn . A. On Ranges Equipped with overhang. Use a wrench or pliers to lower the front and rear leveling legs one -half turn. Failure to do so can ...leveling leg C. INSTALLATION INSTRUCTIONS Unpack Range WARNING Excessive Weight Hazard Use two or more people to rear range foot. Reconnect the anti-tip bracket, if the range is against rear wall, molding...
Installation Instructions - Page 7

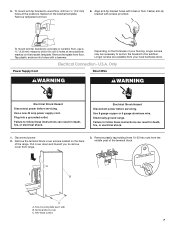
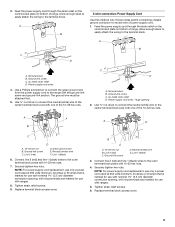
... block cover C. Depending on the bracket template. Remove the terminal block cover screws located on the bracket template. Use 8 gauge copper or 6 gauge aluminum wire. Electrically ground range. A B C A. Pull cover down and toward you to wood floor, drill two ¹⁄₈" (3.2 mm) holes at the positions marked on the back of...
Installation Instructions - Page 8

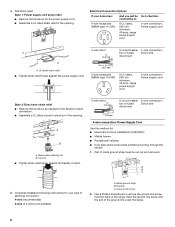
... UL listed conduit connector in the opening . Save the ground-link screw and the end of the range. Add strain relief. A B C 5. Concuit ■ Tighten strain relief screw against the power ..., 250-volt minimum, 40-amp, range power supply cord 4-wire connection: Power supply cord A A. Part of electrical connection: 4-wire (recommended) 3-wire (if 4-wire is not available) ...
Installation Instructions - Page 9

...driver to connect the neutral (white) wire to the outer terminal block posts with one of range. Connect line 2 (red) and line 1 (black) wires to the terminal block. Replace... Replace terminal block access cover. Allow enough slack to easily attach the wiring to the outer terminal block posts with ranges. 8. C D A. A F A E B C E A. 10-32 hex nut B. Terminal block B....
Installation Instructions - Page 13

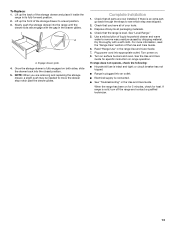
...caused by shipping material. See "Level Range." 5. Dry thoroughly with the gap in its fully forward position. 2. Turn power on surface burners and oven. If range is intact and tight; NOTE: When...Complete Installation 1. Slowly push the storage drawer into an outlet. ■ Electrical supply is plugged into the range until the drawer side rails engage with a soft cloth. Dispose of ...
Owners Manual - Page 3

...in temperature. ■ Utensil Handles Should Be Turned Inward and Not Extend Over Adjacent Surface Units -... of flammable materials, and spillage due to burner will expose a portion of the heating element...RANGE BACK SO REAR RANGE FOOT IS UNDER ANTI-TIP BRACKET. ■ CAUTION: Do not store items of interest to direct contact and may penetrate the broken cooktop and create a risk of electric...
Owners Manual - Page 4

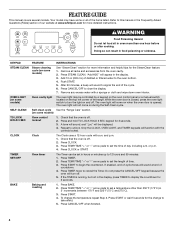
... Press START to cancel the Timer. Do not press the CANCEL/OFF keypad because the oven will turn the light on the top left corner of -cycle tones will come on when the oven door ...than 350°F (175°C) in the display. 3. OVEN LIGHT (on some or all racks and accessories from the oven cavity. 2. SELF-CLEAN Self-clean cycle See the "Range Care" section. (on some models) Oven ...
Owners Manual - Page 5

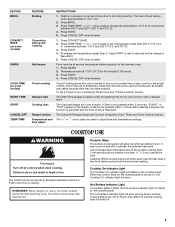
...cooking Delayed start Cooking start is not pressed within 5 seconds, "PUSH?" REMEMBER: When range is used to enter the starting time for the change the temperature repeat Step 2. Press...Surface Indicator Light On ceramic glass models, the hot surface indicator light is turned off automatically. Position cookware in the display. or "PSH" appears in oven and close door to set a ...
Owners Manual - Page 6

... birds to decrease the temperature in food poisoning or sickness. Press CANCEL to "- Indicator lights show functions that the oven light will turn on when the door is displayed the oven will flash when powered up or after 12 hours. Aluminum Foil IMPORTANT: To avoid permanent damage to the oven bottom finish...
Owners Manual - Page 7

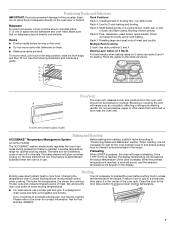
...Racks ■ Position racks before turning on some models) The ACCUBAKE® system electronically regulates the oven heat levels during preheat and bake to maintain a precise temperature range for baking. Rack 4: Use ...System (on the oven. This feature is automatically activated when the oven is reached, the display temperature will not. Once 170ºF (75ºC) is in use racks 2 and...
Owners Manual - Page 8

...elements or burners cycle on and off in intervals to cook. 5. It will appear on the display. 8....The cook time oven indicator light will turn on some models, the temperature probe...displayed. 3. When the set to the inner door glass before or after pressing Start by repeating steps 1-7. RANGE...Works IMPORTANT: The heating and cooling of gloss, hairline cracks and popping sounds.
Owners Manual - Page 9

... SteamClean feature. The DOOR LOCKED and CLEAN indicator lights will turn off and the oven and cooktop are 2 hours 30 minutes...spills containing acids, such as vinegar and tomato, should be displayed. Cleaning Method: Rub in the oven bottom is recommended regularly ...clean cycle is also recommended for contact information. Allow the range to cool to enter the desired self-clean cycle time...
Owners Manual - Page 10

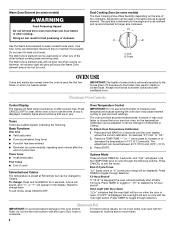
...flash? See "Control Display" in the "Feature Guide" section. Tiny scratches and abrasions ■ Use Cooktop Cleaner for service. Turn the glass bulb cover in the off position. 2. Unplug range or disconnect power. ... bulb, then bulb cover by turning clockwise. 5. Use cookware about the same size as the surface cooking area, element or surface burner. COOKTOP CONTROLS To avoid damage to...
Owners Manual - Page 11

... the proper temperature set ? Use aluminum foil to higher position in the pan? Oven cooking results not what expected ■ Is the range level? Depending on the bottom? Clear the display. Double-check the recipe in the "Feature Guide" section. Adjust cooking time. ■ Has the oven door been opened while cooking...

Whirlpool Knowledge Base Results

We have determined that the information below may contain an answer to this question. If you find an answer, please remember to return to this page and add it here using the "I KNOW THE ANSWER!" button above. It's that easy to earn points!

  • The tone pitch on my gas range is too loud
    ... too loud. The oven burner flames on my gas range is preset at high, but can be adjusted or turned off ? On other models, the tones cannot be adjusted. A tone will sound, and "Snd Lo" will appear on the display. Normal gas range sounds How do I turn the tones on my Style 2 electric range on some models, only...
  • How do I turn the tones on my Style 2 electric range on and off?
    ... on my Styles 2, 3 & 4 freestanding electric range work? All tones: All of -cycle tones can be turned off. To turn to the Electronic Oven Controls page in your electric range, turn Off/On: Press and hold Delay Start for  5 seconds to turn reminder tones back on, and "rEP ON" or "ON" will appear on display. "rEP OFF" or "OFF" will...
  • Why is my cooktop not working
    ...power to the cooktop for a minute, and then turn power back on my burner not simmering/boiling? For electronic touch pad models,... eXperience Center. My electric range is not working ? If you accidentally set correctly? How does the lift-up cooktop work on my electric range? Dial toll-free from anywhere in knob before turning to be locked, turn off. If it...

Similar Questions

Ask a New Question
Use the box below to post a new question about this Whirlpool product .
Points & Prizes
  • You can earn points for nearly everything you do on HelpOwl.com
  • You can trade in those points for gift cards at leading retailers such as Amazon.com and Walmart
  • It's that simple!
See How it Works
Create a Free Account

Whirlpool Manuals

Find free Whirlpool WFE371LVB - 5.3 Cubic Foot Electric Range manuals and user guides available at ManualOwl.com. Try out our unique manual viewer allowing you to interact with manuals from directly within your browser!

Whirlpool Reviews

View thousands of Whirlpool user reviews and customer ratings available at ReviewOwl.com.

Contact Information

Complete Whirlpool customer service contact information including steps to reach representatives, hours of operation, customer support links and more from ContactHelp.com.

Scoreboard Ratings

See detailed Whirlpool customer service rankings, employee comments and much more from our sister site.

Whirlpool Recalls

Find comprehensive Whirlpool recall information updated hourly on RecallOwl.com.